length KIA PICANTO 2012 Owners Manual
[x] Cancel search | Manufacturer: KIA, Model Year: 2012, Model line: PICANTO, Model: KIA PICANTO 2012Pages: 840, PDF Size: 41.16 MB
Page 30 of 840
Safety features of your vehicle
18
3
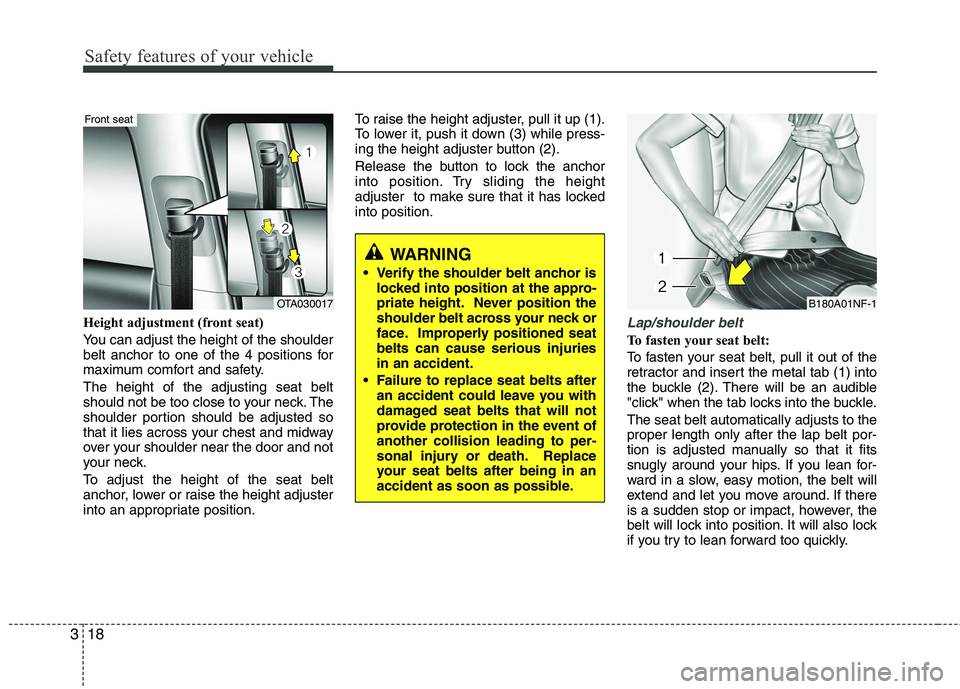
Height adjustment (front seat)
You can adjust the height of the shoulder
belt anchor to one of the 4 positions for
maximum comfort and safety. The height of the adjusting seat belt
should not be too close to your neck. The
shoulder portion should be adjusted so
that it lies across your chest and midway
over your shoulder near the door and not
your neck.
To adjust the height of the seat belt
anchor, lower or raise the height adjuster
into an appropriate position. To raise the height adjuster, pull it up (1).
To lower it, push it down (3) while press-
ing the height adjuster button (2).
Release the button to lock the anchor
into position. Try sliding the height
adjuster to make sure that it has lockedinto position.Lap/shoulder belt
To fasten your seat belt:
To fasten your seat belt, pull it out of the
retractor and insert the metal tab (1) into
the buckle (2). There will be an audible
"click" when the tab locks into the buckle. The seat belt automatically adjusts to the proper length only after the lap belt por-
tion is adjusted manually so that it fits
snugly around your hips. If you lean for-
ward in a slow, easy motion, the belt will
extend and let you move around. If there
is a sudden stop or impact, however, the
belt will lock into position. It will also lock
if you try to lean forward too quickly.
OTA030017
Front seat
WARNING
Verify the shoulder belt anchor is locked into position at the appro-
priate height. Never position the
shoulder belt across your neck or
face. Improperly positioned seatbelts can cause serious injuriesin an accident.
Failure to replace seat belts after an accident could leave you with
damaged seat belts that will not
provide protection in the event ofanother collision leading to per-
sonal injury or death. Replace
your seat belts after being in an
accident as soon as possible.
B180A01NF-1
Page 32 of 840
Safety features of your vehicle
20
3
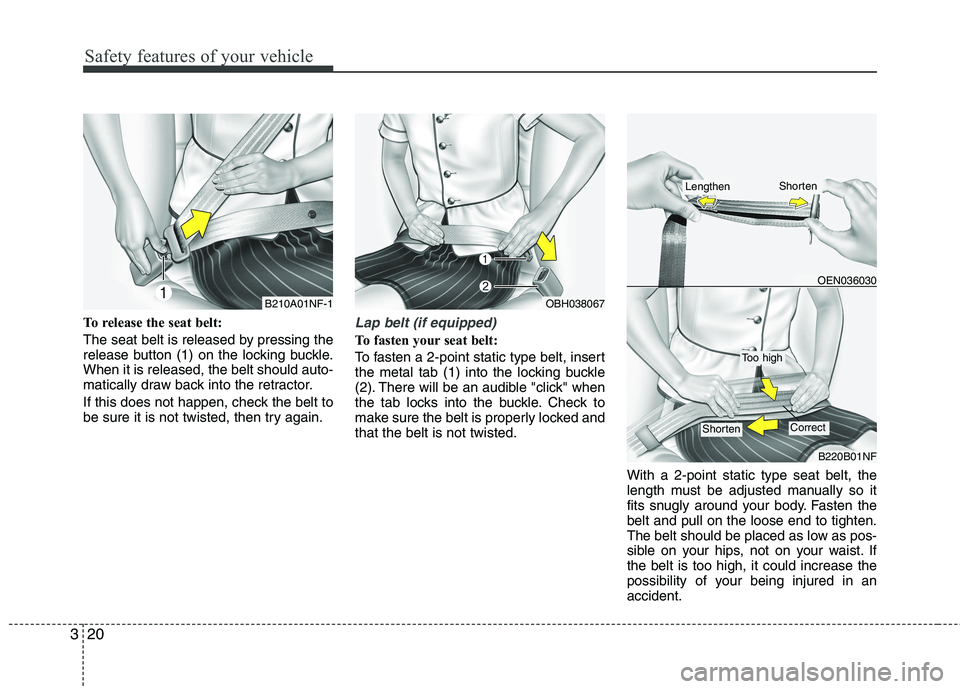
To release the seat belt:
The seat belt is released by pressing the
release button (1) on the locking buckle.When it is released, the belt should auto-
matically draw back into the retractor.
If this does not happen, check the belt to
be sure it is not twisted, then try again.Lap belt (if equipped)
To fasten your seat belt:
To fasten a 2-point static type belt, insert
the metal tab (1) into the locking buckle
(2). There will be an audible "click" when
the tab locks into the buckle. Check to
make sure the belt is properly locked andthat the belt is not twisted.
With a 2-point static type seat belt, the
length must be adjusted manually so it
fits snugly around your body. Fasten thebelt and pull on the loose end to tighten.
The belt should be placed as low as pos-
sible on your hips, not on your waist. Ifthe belt is too high, it could increase the
possibility of your being injured in anaccident.
B210A01NF-1
OEN036030
B220B01NF
Too high
ShortenCorrect
OBH038067
ShortenLengthen
Page 241 of 840
Features of your vehicle
168
4
✽✽
NOTICE
- The system can recognize single digits from zero to nine. Numbers that are
ten or greater cannot be recognized.
- You can enter each digit individually or group digits together in preferred
string lengths.
- To speed up input, it is a good idea to
group all digits into a continuous
string.
- Recommend to enter the numbers con- stituted an grouping within all digit
numbers to dial 995 / 734 / 0000
- The display corresponding to each
operation appears on the screen as fol-
lows:
Input operation example: 1. Say: “Nine, nine, five”
➟ Display: “995”
2. And say: “Seven, three, four”
➟ Display: “995734”
1. Press button.
2. Say “Phonebook”.
3. Say “Add Entry” after prompt.
4. Say “By Phone” to proceed.
5. Say “Yes” to confirm.
6. Your phone will start to transfer phone/contact list to the audio system.
This process may take over 10 minutes depending on the phone model and
number of entries
7. Wait till the audio displays “Transfer Complete” message.
Changing Name
The registered names can be modified.
1. Press button.
2. Say “Phonebook”.
3. Say “Change Name” after prompt.
4. Say the name of the entry (voice tag).
5. Say “Yes” to confirm.
6. Say new desired name.
Deleting Name
The registered names can be deleted.
1. Press button.
2. Say “Phonebook”.
3. Say “Delete Name” after prompt.
4. Say the name of the entry (voice tag).
5. Say “Yes” to confirm.
■ Making a Phone Call
A phone call can be made by speaking names registered in the audio system.
1. Press button.
2. Say “Call”.
3. Say “Name” when prompted.
4. Say desired name (voice tag).
5. Say desired location (phone number type). Only stored locations can be selected.
6. Say “Yes” to confirm and make a call.
✽✽ Tip
A shortcut to each of the following func-
tions is available:
1. Say “Call Name”
2. Say “Call
3. Say “Call
Page 266 of 840
Driving your vehicle
22
5
LPG safety precaution
Refill LPG only 80% of the tank.
Do not remove the valve to over refill. If
you refill more than you are permitted,
the fuel tank may explode.
Turn the engine off while refilling.
Avoid heat and direct sunlight the fuel tank may pressure up.
Avoid underground parking lots or closed places when you need to park
your vehicle for a very long time.
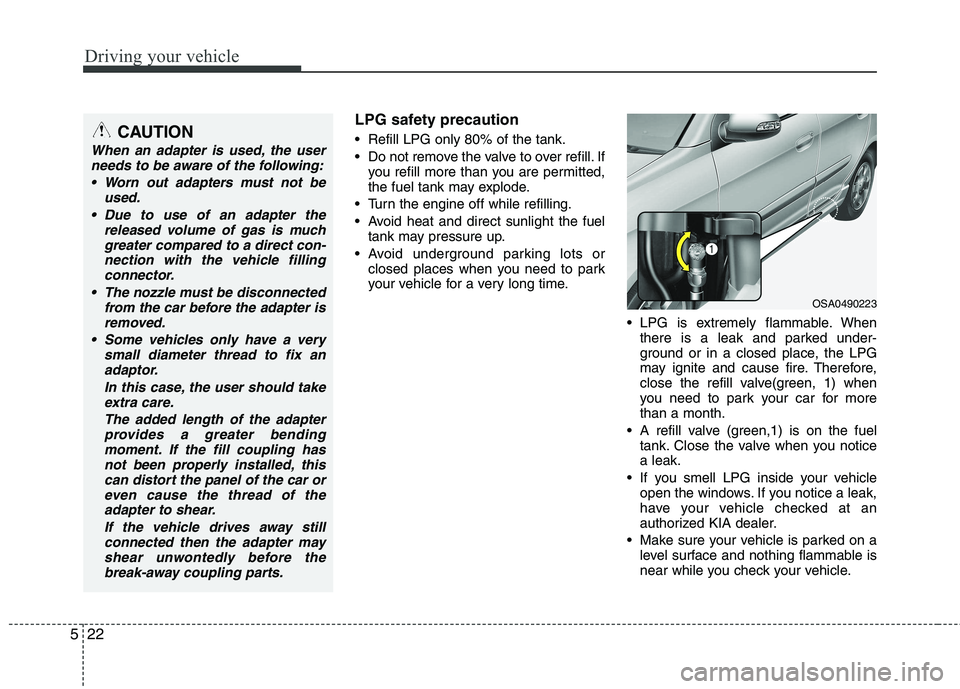
LPG is extremely flammable. Whenthere is a leak and parked under-
ground or in a closed place, the LPG
may ignite and cause fire. Therefore,
close the refill valve(green, 1) when
you need to park your car for morethan a month.
A refill valve (green,1) is on the fuel tank. Close the valve when you noticea leak.
If you smell LPG inside your vehicle open the windows. If you notice a leak,
have your vehicle checked at an
authorized KIA dealer.
Make sure your vehicle is parked on a level surface and nothing flammable is
near while you check your vehicle.CAUTION
When an adapter is used, the user
needs to be aware of the following:
Worn out adapters must not be used.
Due to use of an adapter the released volume of gas is muchgreater compared to a direct con-
nection with the vehicle fillingconnector.
The nozzle must be disconnected from the car before the adapter isremoved.
Some vehicles only have a very small diameter thread to fix anadaptor.
In this case, the user should takeextra care.
The added length of the adapterprovides a greater bending moment. If the fill coupling hasnot been properly installed, thiscan distort the panel of the car or
even cause the thread of theadapter to shear.
If the vehicle drives away stillconnected then the adapter mayshear unwontedly before the
break-away coupling parts.
OSA0490223
Page 302 of 840
Driving your vehicle
58
5
Following distance
Stay at least twice as far behind the vehi-
cle ahead as you would when driving
your vehicle without a trailer. This can
help you avoid situations that require
heavy braking and sudden turns.
Passing
You’ll need more passing distance up
ahead when you’re towing a trailer. And,
because of the increased vehicle length,
you’ll need to go much farther beyond the
passed vehicle before you can return to
your lane.
Backing up
Hold the bottom of the steering wheel
with one hand. Then, to move the trailer
to the left, just move your hand to the left.
To move the trailer to the right, move your
hand to the right. Always back up slowly
and, if possible, have someone guide
you.
Making turns
When you’re turning with a trailer, make
wider turns than normal. Do this so your
trailer won’t strike soft shoulders, curbs,
road signs, trees, or other objects. Avoid
jerky or sudden maneuvers. Signal well
in advance.
Turn signals when towing a trailer
When you tow a trailer, your vehicle has
to have a different turn signal flasher and
extra wiring. The green arrows on your
instrument panel will flash whenever you
signal a turn or lane change. Properly
connected, the trailer lights will also flash
to alert other drivers you’re about to turn,
change lanes, or stop.
When towing a trailer, the green arrows
on your instrument panel will flash for
turns even if the bulbs on the trailer are
burned out. Thus, you may think drivers
behind you are seeing your signals
when, in fact, they are not. It’s important
to check occasionally to be sure the trail-
er bulbs are still working. You must also
check the lights every time you discon-
nect and then reconnect the wires.
Do not connect a trailer lighting system
directly to your vehicle’s lighting system.
Use only an approved trailer wiring har-
ness.
An authorized KIA dealer can assist you
in installing the wiring harness.
Driving on grades
Reduce the speed and shift to a lower
gear before you start down a long or
steep downgrade. If you don’t shift down,
you might have to use your brakes so
much that they would get hot and no
longer operate efficiently.
On a long uphill grade, shift down and
reduce your speed to around 45 mph (70km/h) to reduce the possibility of engine
and transaxle overheating.
If your trailer weighs more than the max-
imum trailer weight without trailer brakes
and you have an automatic transaxle,
you should drive in D (Drive) when tow-
ing a trailer.
Operating your vehicle in D (Drive) when
towing a trailer will minimize heat build up
and extend the life of your transaxle.
WARNING
Failure to use an approved trailer wiring harness could result in dam-
age to the vehicle electrical system
and/or personal injury.
Page 412 of 840
![KIA PICANTO 2012 Owners Manual Specifications & Consumer information
2
8
ENGINE BULB WATTAGE
DIMENSIONS Item
Gasoline 1.0/
LPG 1.0 Gasoline 1.25
Displacement [cc(cu.in)] 998 (60.9) 1,248 (76.2)
Bore x Stroke [mm(in)] 71 x 84
(2.8 KIA PICANTO 2012 Owners Manual Specifications & Consumer information
2
8
ENGINE BULB WATTAGE
DIMENSIONS Item
Gasoline 1.0/
LPG 1.0 Gasoline 1.25
Displacement [cc(cu.in)] 998 (60.9) 1,248 (76.2)
Bore x Stroke [mm(in)] 71 x 84
(2.8](/img/2/57971/w960_57971-411.png)
Specifications & Consumer information
2
8
ENGINE BULB WATTAGE
DIMENSIONS Item
Gasoline 1.0/
LPG 1.0 Gasoline 1.25
Displacement [cc(cu.in)] 998 (60.9) 1,248 (76.2)
Bore x Stroke [mm(in)] 71 x 84
(2.80 x 3.31) 71 x 78.8
(2.80 x 3.10)
Firing order 1-2-3 1-3-4-2
No. of cylinders 3, In-line 4, In-line
Item mm (in)
Overall length 3595 (141.5)
Overall width 1595 (62.8)
Overall heightFor Europe 1480 (58.3)
Except Europe 1490 (58.7)
Front tread
155/70R13 1421 (55.9)
165/60R14 1415 (55.7)
175/50R15 1409 (55.5)
Rear tread
155/70R13 1424 (56.1)
165/60R14 1418 (55.8)
175/50R15 1412 (55.6)
Wheelbase 2385 (93.9)
Light Bulb Wattage Bulb type
Headlights (Low/High) 55/60 H4 L/L
Headlights (Low/High)* 55 H7 L/L
Front turn signal lights* 21 PY21W
FRT Position lights (Bulb type)* 5 W5W
FRT Position lights (LED type)*LEDLED
Side repeater lights* 5 WY5W
Side repeater lights (LED type)* LED LED
Front fog lights* 27 GE881
D.R.L (Bulb type)21P21W
D.R.L (LED type)*LEDLED
Stop and tail light* 21/5 P21/5W
Stop and tail light (LED type)* LED LED
Rear turn signal lights 21 P21W
Back-up lights 16 W16W
Rear fog lights*21P21W
High mounted stop light* 5 W5W High mounted stop light (LED type)* LED LED
License plate lights 5 W5W
Map lamps 10 W10W
Room lamp 8 FESTOON 8W
Luggage lamp* 5 FESTOON 5W
* : If equipped
Page 456 of 840
Safety features of your vehicle
18
3
Height adjustment (front seat)
You can adjust the height of the shoulder
belt anchor to one of the 4 positions for
maximum comfort and safety. The height of the adjusting seat belt
should not be too close to your neck. The
shoulder portion should be adjusted so
that it lies across your chest and midway
over your shoulder near the door and not
your neck.
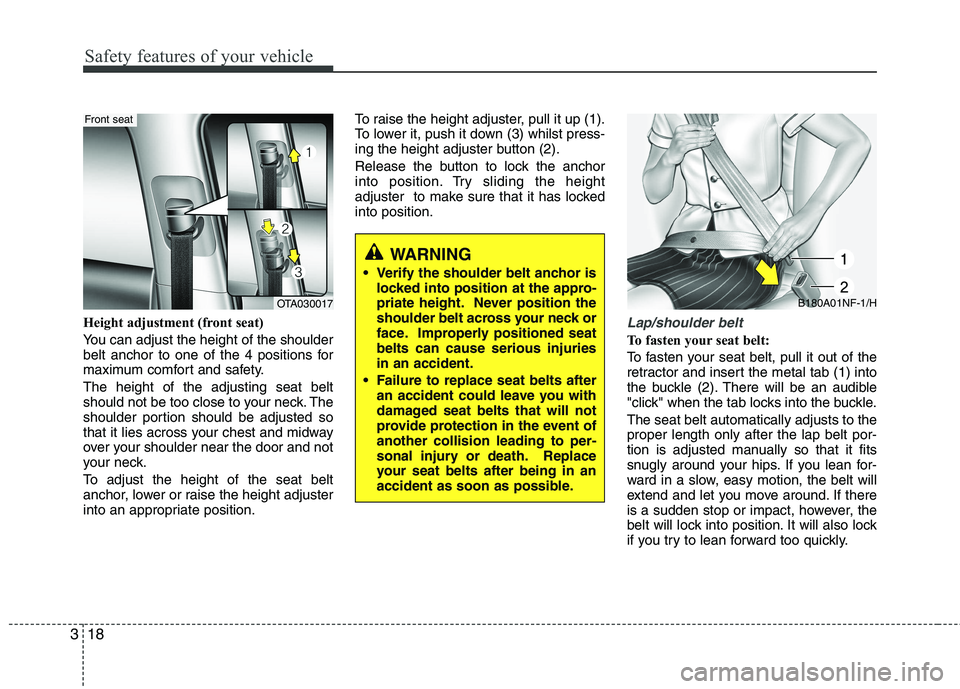
To adjust the height of the seat belt
anchor, lower or raise the height adjuster
into an appropriate position. To raise the height adjuster, pull it up (1).
To lower it, push it down (3) whilst press-
ing the height adjuster button (2).
Release the button to lock the anchor
into position. Try sliding the height
adjuster to make sure that it has lockedinto position.Lap/shoulder belt
To fasten your seat belt:
To fasten your seat belt, pull it out of the
retractor and insert the metal tab (1) into
the buckle (2). There will be an audible
"click" when the tab locks into the buckle. The seat belt automatically adjusts to the proper length only after the lap belt por-
tion is adjusted manually so that it fits
snugly around your hips. If you lean for-
ward in a slow, easy motion, the belt will
extend and let you move around. If there
is a sudden stop or impact, however, the
belt will lock into position. It will also lock
if you try to lean forward too quickly.
OTA030017
Front seat
WARNING
Verify the shoulder belt anchor is locked into position at the appro-
priate height. Never position the
shoulder belt across your neck or
face. Improperly positioned seatbelts can cause serious injuriesin an accident.
Failure to replace seat belts after an accident could leave you with
damaged seat belts that will not
provide protection in the event ofanother collision leading to per-
sonal injury or death. Replace
your seat belts after being in an
accident as soon as possible.
B180A01NF-1/H
Page 458 of 840
Safety features of your vehicle
20
3
To release the seat belt:
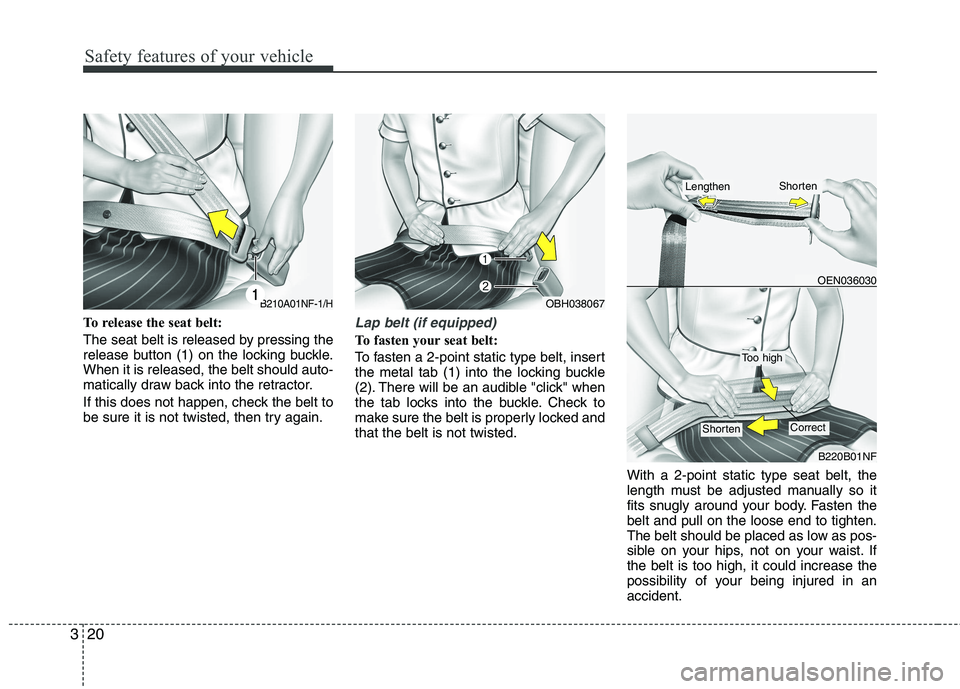
The seat belt is released by pressing the
release button (1) on the locking buckle.When it is released, the belt should auto-
matically draw back into the retractor.
If this does not happen, check the belt to
be sure it is not twisted, then try again.Lap belt (if equipped)
To fasten your seat belt:
To fasten a 2-point static type belt, insert
the metal tab (1) into the locking buckle
(2). There will be an audible "click" when
the tab locks into the buckle. Check to
make sure the belt is properly locked andthat the belt is not twisted.
With a 2-point static type seat belt, the
length must be adjusted manually so it
fits snugly around your body. Fasten thebelt and pull on the loose end to tighten.
The belt should be placed as low as pos-
sible on your hips, not on your waist. Ifthe belt is too high, it could increase the
possibility of your being injured in anaccident.
OEN036030
B220B01NF
Too high
ShortenCorrect
OBH038067
ShortenLengthen
B210A01NF-1/H
Page 664 of 840
4165
Features of your vehicle
✽✽NOTICE
- The system can recognize single digits from zero to nine. Numbers that are
ten or greater cannot be recognized.
- You can enter each digit individually or group digits together in preferred
string lengths.
- To speed up input, it is a good idea to
group all digits into a continuous
string.
- Recommend to enter the numbers con- stituted an grouping within all digit
numbers to dial 995 / 734 / 0000
- The display corresponding to each
operation appears on the screen as fol-
lows:
Input operation example: 1. Say: “Nine, nine, five”
➟ Display: “995”
2. And say: “Seven, three, four”
➟ Display: “995734”
1. Press button.
2. Say “Phonebook”.
3. Say “Add Entry” after prompt.
4. Say “By Phone” to proceed.
5. Say “Yes” to confirm.
6. Your phone will start to transfer phone/contact list to the audio system.
This process may take over 10 minutes depending on the phone model and
number of entries
7. Wait till the audio displays “Transfer Complete” message.
Changing Name
The registered names can be modified.
1. Press button.
2. Say “Phonebook”.
3. Say “Change Name” after prompt.
4. Say the name of the entry (voice tag).
5. Say “Yes” to confirm.
6. Say new desired name.
Deleting Name
The registered names can be deleted.
1. Press button.
2. Say “Phonebook”.
3. Say “Delete Name” after prompt.
4. Say the name of the entry (voice tag).
5. Say “Yes” to confirm.
■ Making a Phone Call
A phone call can be made by speaking names registered in the audio system.
1. Press button.
2. Say “Call”.
3. Say “Name” when prompted.
4. Say desired name (voice tag).
5. Say desired location (phone number type). Only stored locations can be selected.
6. Say “Yes” to confirm and make a call.
✽✽ Tip
A shortcut to each of the following func-
tions is available:
1. Say “Call Name”
2. Say “Call
3. Say “Call
Page 717 of 840
Driving your vehicle
50
5
Following distance
Stay at least twice as far behind the vehi-
cle ahead as you would when driving
your vehicle without a trailer. This can
help you avoid situations that require
heavy braking and sudden turns.
Passing
You’ll need more passing distance up
ahead when you’re towing a trailer. And,
because of the increased vehicle length,
you’ll need to go much farther beyond the
passed vehicle before you can return to
your lane.
Backing up
Hold the bottom of the steering wheel
with one hand. Then, to move the trailer
to the left, just move your hand to the left.
To move the trailer to the right, move your
hand to the right. Always back up slowly
and, if possible, have someone guide
you.
Making turns
When you’re turning with a trailer, make
wider turns than normal. Do this so your
trailer won’t strike soft shoulders, kerbs,
road signs, trees, or other objects. Avoid
jerky or sudden manoeuvres. Signal well
in advance.
Turn signals when towing a trailer
When you tow a trailer, your vehicle has
to have a different turn signal flasher and
extra wiring. The green arrows on your
instrument panel will flash whenever you
signal a turn or lane change. Properly
connected, the trailer lights will also flash
to alert other drivers you’re about to turn,
change lanes, or stop.
When towing a trailer, the green arrows
on your instrument panel will flash for
turns even if the bulbs on the trailer are
burned out. Thus, you may think drivers
behind you are seeing your signals
when, in fact, they are not. It’s important
to check occasionally to be sure the trail-
er bulbs are still working. You must also
check the lights every time you discon-
nect and then reconnect the wires.
Do not connect a trailer lighting system
directly to your vehicle’s lighting system.
Use only an approved trailer wiring har-
ness.
An authorised KIA dealer can assist you
in installing the wiring harness.
Driving on grades
Reduce the speed and shift to a lower
gear before you start down a long or
steep downgrade. If you don’t shift down,
you might have to use your brakes so
much that they would get hot and no
longer operate efficiently.
On a long uphill grade, shift down and
reduce your speed to around 45 mph (70km/h) to reduce the possibility of engine
and transaxle overheating.
If your trailer weighs more than the max-
imum trailer weight without trailer brakes
and you have an automatic transaxle,
you should drive in D (Drive) when tow-
ing a trailer.
Operating your vehicle in D (Drive) when
towing a trailer will minimise heat build up
and extend the life of your transaxle.
WARNING
Failure to use an approved trailer wiring harness could result in dam-
age to the vehicle electrical system
and/or personal injury.