set clock KIA PICANTO 2015 Owner's Manual
[x] Cancel search | Manufacturer: KIA, Model Year: 2015, Model line: PICANTO, Model: KIA PICANTO 2015Pages: 846, PDF Size: 49.67 MB
Page 642 of 846
4143
Features of your vehicle
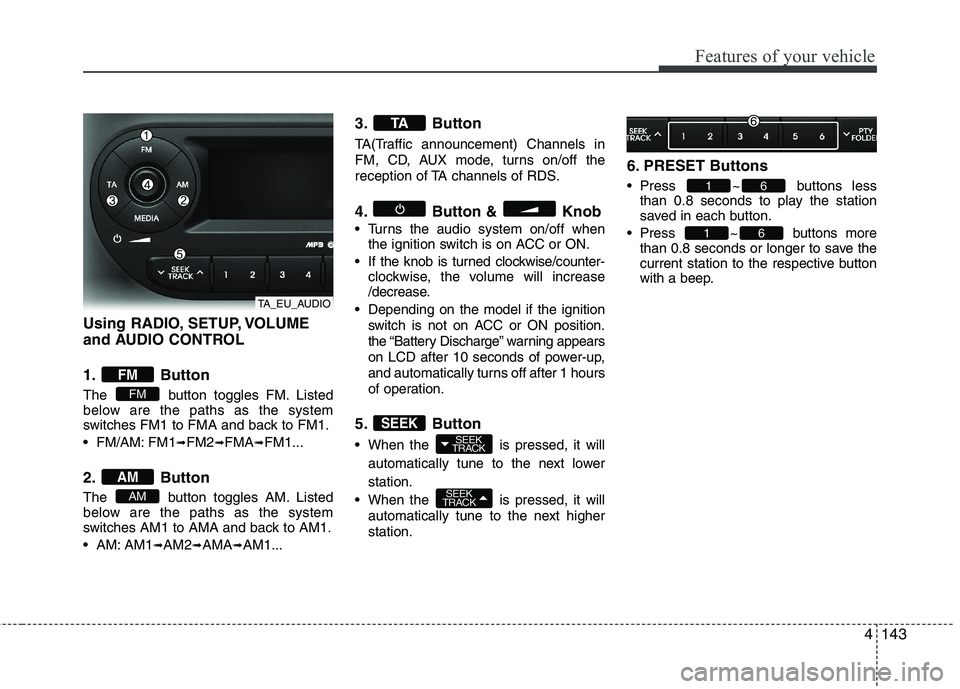
Using RADIO, SETUP, VOLUME
and AUDIO CONTROL
1. Button
The button toggles FM. Listed
below are the paths as the system
switches FM1 to FMA and back to FM1.
FM/AM: FM1➟FM2 ➟FMA ➟FM1...
2. Button
The button toggles AM. Listed
below are the paths as the system
switches AM1 to AMA and back to AM1.
AM: AM1 ➟AM2 ➟AMA ➟AM1... 3. Button
TA(Traffic announcement) Channels in
FM, CD, AUX mode, turns on/off the
reception of TA channels of RDS.
4. Button & Knob
Turns the audio system on/off when
the ignition switch is on ACC or ON.
If the knob is turned clockwise/counter- clockwise, the volume will increase
/decrease.
Depending on the model if the ignition switch is not on ACC or ON position.
the “Battery Discharge” warning appears
on LCD after 10 seconds of power-up,
and automatically turns off after 1 hours
of operation.
5. Button
When the is pressed, it will automatically tune to the next lower station.
When the is pressed, it will automatically tune to the next higher station. 6. PRESET Buttons
Press ~ buttons
less
than 0.8 seconds to play the station
saved in each button.
Press ~ buttons more than 0.8 seconds or longer to save the
current station to the respective button
with a beep.
61
61
SEEK
TRACK
SEEK
TRACKSEEK
TA
AM
AM
FM
FM
TA_EU_AUDIO
Page 645 of 846
Features of your vehicle
146
4
MENU indication is
possible with RDS MENU)
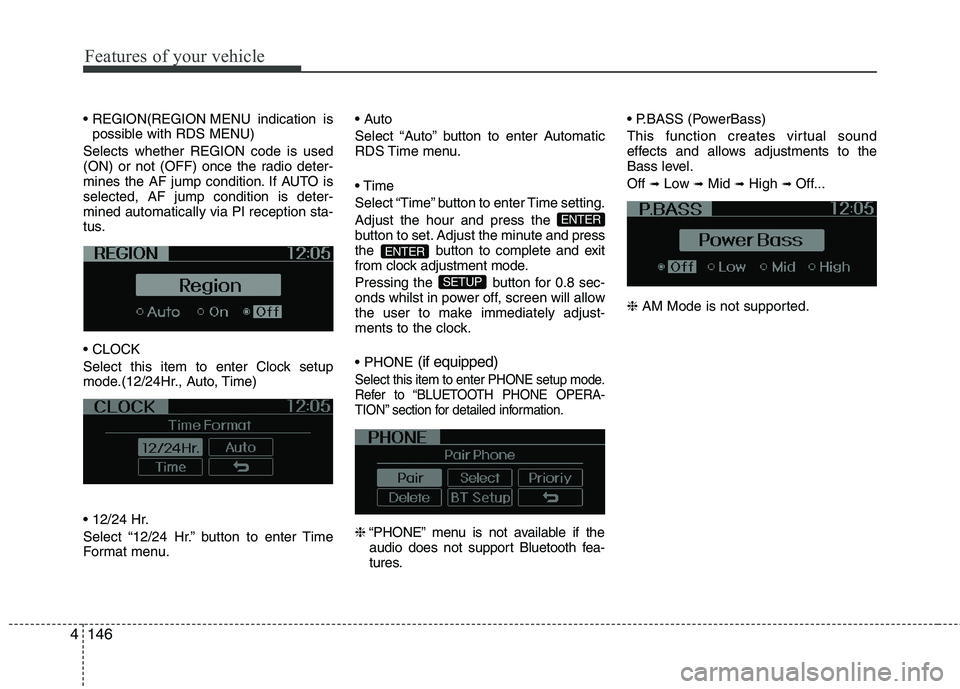
Selects whether REGION code is used
(ON) or not (OFF) once the radio deter-
mines the AF jump condition. If AUTO isselected, AF jump condition is deter-mined automatically via PI reception sta-
tus.
Select this item to enter Clock setup
mode.(12/24Hr., Auto, Time)
Select “12/24 Hr.” button to enter Time
Format menu.
Select “Auto” button to enter Automatic
RDS Time menu.
Select “Time” button to enter Time setting.Adjust the hour and press the
button to set. Adjust the minute
and press
the button to complete and exit
from clock adjustment mode.
Pressing the button for 0.8 sec-
onds whilst in power off, screen will allow
the user to make immediately adjust-
ments to the clock. (if equipped)
Select this item to enter PHONE setup mode.
Refer to “BLUETOOTH PHONE OPERA-
TION” section for detailed information.
❈
“PHONE” menu is not available if the
audio does not support Bluetooth fea-
tures. (PowerBass)
This function creates virtual sound
effects and allows adjustments to the
Bass level. Off
➟Low ➟Mid ➟High ➟ Off...
❈ AM Mode is not supported.
SETUP
ENTER
ENTER
Page 732 of 846
What to do in an emergency
10
6
WARNING - Jack location
To reduce the possibility of
injury, be sure to use only the
jack provided with the vehicle
and in the correct jack position;
never use any other part of the
vehicle for jack support.
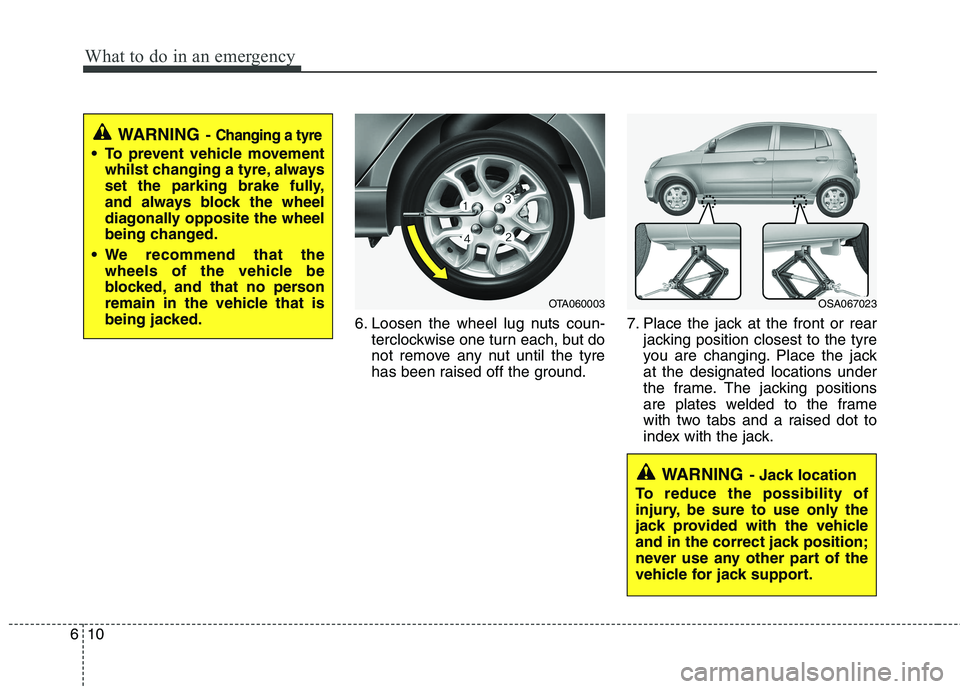
6. Loosen the wheel lug nuts coun- terclockwise one turn each, but do
not remove any nut until the tyre
has been raised off the ground. 7. Place the jack at the front or rear
jacking position closest to the tyre
you are changing. Place the jackat the designated locations under
the frame. The jacking positions
are plates welded to the frame
with two tabs and a raised dot to
index with the jack.
WARNING - Changing a tyre
To prevent vehicle movement
whilst changing a tyre, always
set the parking brake fully,
and always block the wheel
diagonally opposite the wheel
being changed.
We recommend that the wheels of the vehicle be
blocked, and that no person
remain in the vehicle that is
being jacked.
OTA060003OSA067023
Page 750 of 846

When towing your vehicle in an emer- gency without wheel dollies :
1. Set the ignition switch in the ACC posi-tion.
2. Place the shift lever in N (Neutral).
3. Release the parking brake.
Removable towing hook
(front, if equipped)
1. Open the trunk, and remove the tow-ing hook from the tool case.
2. Remove the hole cover pressing the lower part of the cover on the front
bumper.
3. Install the towing hook by turning it clockwise into the hole until it is fullysecured.
4. Remove the towing hook and install the cover after use. Emergency towing
If towing is necessary, we recommend
you to have it done by an authorised
Kia dealer or a commercial tow truck
service.
628
What to do in an emergency
CAUTION
Failure to place the shift lever in N
(Neutral) may cause internal dam- age to the transaxle.
OTA060010
OTA060012
Front
RearOTA060011
Page 792 of 846
739
Maintenance
Reset items
Items should be reset after the battery
has been discharged or the battery hasbeen disconnected.
Auto up/down window (See section 4)
Sunroof (See section 4)
Trip computer (See section 4)
Climate control system (See section 4)
Clock (See section 4)
Audio (See section 4)
WARNING
Before performing maintenance or recharging the battery, turn off all accessories and stop the
engine.
The negative battery cable must be removed first and installed
last when the battery is discon-nected.
Operation related to the battery should be done in an authorised
Kia dealer.
CAUTION
Keep the battery away from water
or any liquid.
For your safety, use the authentic- ity by approved authorised Kiadealer, when you replace the bat-tery.
WARNING - Recharging
battery
When recharging the battery,
observe the following precautions:
The battery must be removed from the vehicle and placed in an area with good ventilation.
Do not allow cigarettes, sparks, or flame near the battery.
Watch the battery during charg- ing, and stop or reduce the charg-
ing rate if the battery cells begin
gassing (boiling) violently or if
the temperature of the electrolyte
of any cell exceeds 49°C (120°F).
Wear eye protection when check- ing the battery during charging.
Disconnect the battery charger in the following order.
1. Turn off the battery charger main switch.
2. Unhook the negative clamp from the negative battery terminal.
3. Unhook the positive clamp from the positive battery terminal.
Page 805 of 846
Maintenance
52
7
If you do not have a spare, use a fuse of
the same rating from a circuit you maynot need for operating the vehicle, suchas the cigarette lighter fuse.
If the headlights or other electrical com-
ponents do not work and the fuses are
OK, check the fuse panel in the engine
compartment. If a fuse is blown, it mustbe replaced.
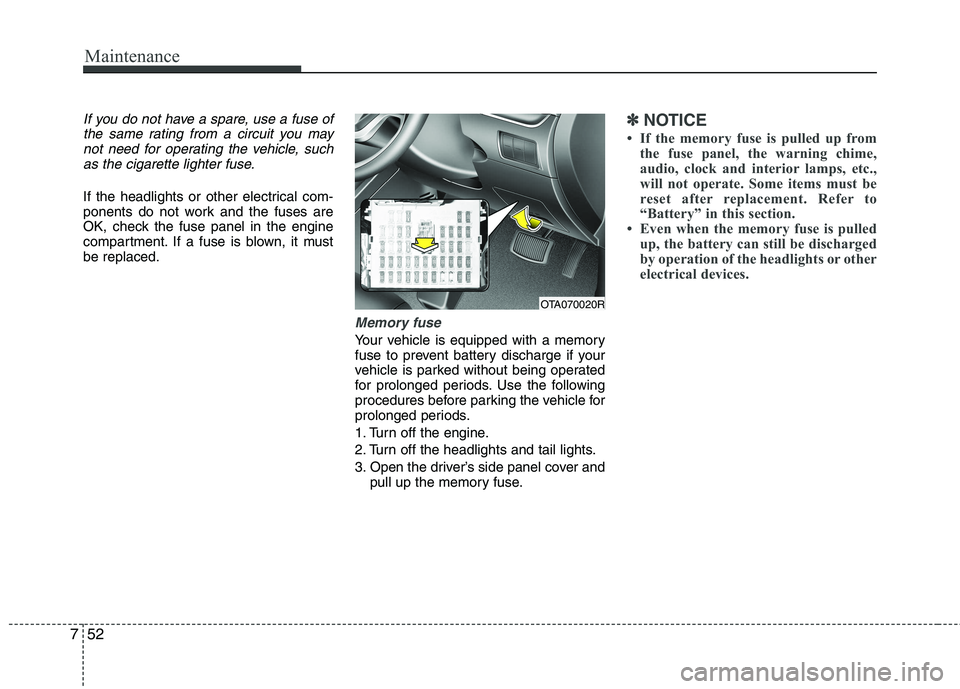
Memory fuse
Your vehicle is equipped with a memory
fuse to prevent battery discharge if your
vehicle is parked without being operated
for prolonged periods. Use the following
procedures before parking the vehicle for
prolonged periods.
1. Turn off the engine.
2. Turn off the headlights and tail lights.
3. Open the driver’s side panel cover and pull up the memory fuse.
✽✽ NOTICE
If the memory fuse is pulled up from the fuse panel, the warning chime,
audio, clock and interior lamps, etc.,
will not operate. Some items must be
reset after replacement. Refer to
“Battery” in this section.
Even when the memory fuse is pulled
up, the battery can still be discharged
by operation of the headlights or other
electrical devices.
OTA070020R