door lock KIA QUORIS 2013 Owners Manual
[x] Cancel search | Manufacturer: KIA, Model Year: 2013, Model line: QUORIS, Model: KIA QUORIS 2013Pages: 485, PDF Size: 31.55 MB
Page 12 of 485
Your vehicle at a glance
4
2
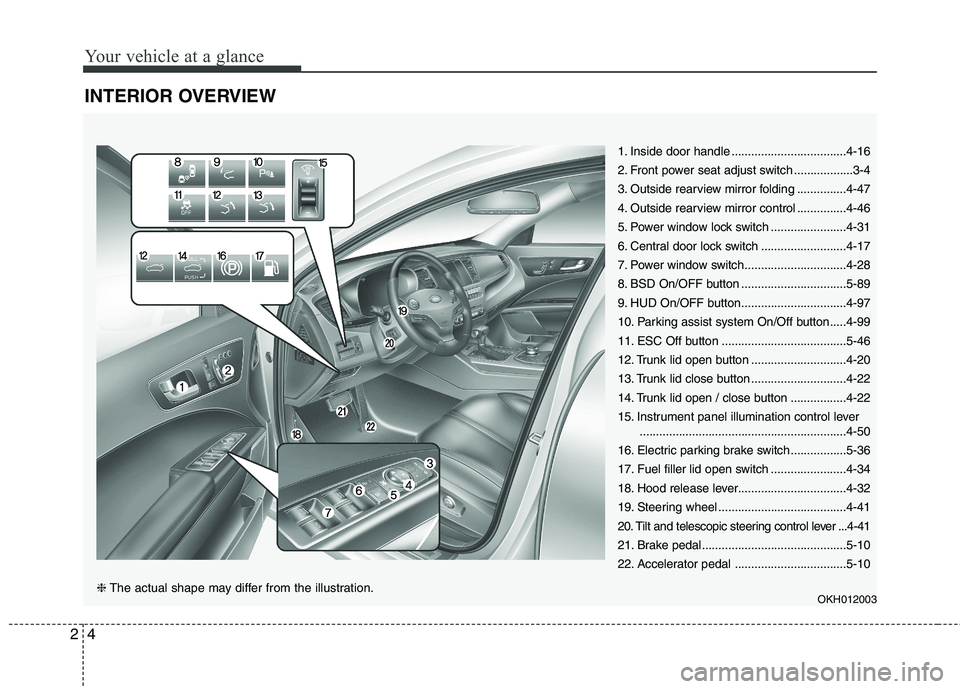
INTERIOR OVERVIEW
1. Inside door handle ...................................4-16
2. Front power seat adjust switch ..................3-4
3. Outside rearview mirror folding ...............4-47
4. Outside rearview mirror control ...............4-46
5. Power window lock switch .......................4-31
6. Central door lock switch ..........................4-17
7. Power window switch...............................4-28
8. BSD On/OFF button ................................5-89
9. HUD On/OFF button................................4-97
10. Parking assist system On/Off button.....4-99
11. ESC Off button ......................................5-46
12. Trunk lid open button .............................4-20
13. Trunk lid close button .............................4-22
14. Trunk lid open / close button .................4-22
15. Instrument panel illumination control lever
...............................................................4-50
16. Electric parking brake switch .................5-36
17. Fuel filler lid open switch .......................4-34
18. Hood release lever.................................4-32
19. Steering wheel .......................................4-41
20. Tilt and telescopic steering control lever ...4-41
21. Brake pedal............................................5-10
22. Accelerator pedal ..................................5-10
OKH012003
❈The actual shape may differ from the illustration.
Page 19 of 485
Safety features of your vehicle
4
3
Front seat adjustment
The front seat can be adjusted by
using the control switch located on
the doors. Before driving, adjust theseat to the proper position so as to
easily control the steering wheel,
pedals and switches on the instru-ment panel.
WARNING
The power seat is operable with
the engine start/stop button in
OFF.
Therefore, children should
never be left unattended in the
vehicle.
WARNING
Do not adjust the seat while wearing seat belts. Moving the
seat cushion forward may
cause strong pressure on theabdomen.
Use extreme caution so that hands or other objects are not
caught in the seat mechanisms
while the seat is moving.
Do not put a cigarette lighter on the floor or seat. When you
operate the seat, gas maygush out of the lighter and
cause fire.(Continued)
Do not allow anything to inter-fere with the normal position of
the seatback. Storing items
against a seatback or in any
other way interfering with prop-
er locking of a seatback could
result in serious or fatal injury
in a sudden stop or collision.
your seatback upright and the
lap portion of the seat belt
snug and low across the hips.This is the best position to
protect you in case of an acci-dent.
In order to avoid unnecessary and perhaps severe air bag
injuries, always sit as far back
as possible from the steeringwheel while maintaining com-
fortable control of the vehicle.
We recommend that your
chest be at least 250 mm (10
inches) away from the steer-ing wheel.
Page 37 of 485
Safety features of your vehicle
22
3
✽✽
NOTICE
If you are not able to pull out the
seat belt from the retractor, firmly
pull the belt out and release it. Then
you will be able to pull the belt out
smoothly.
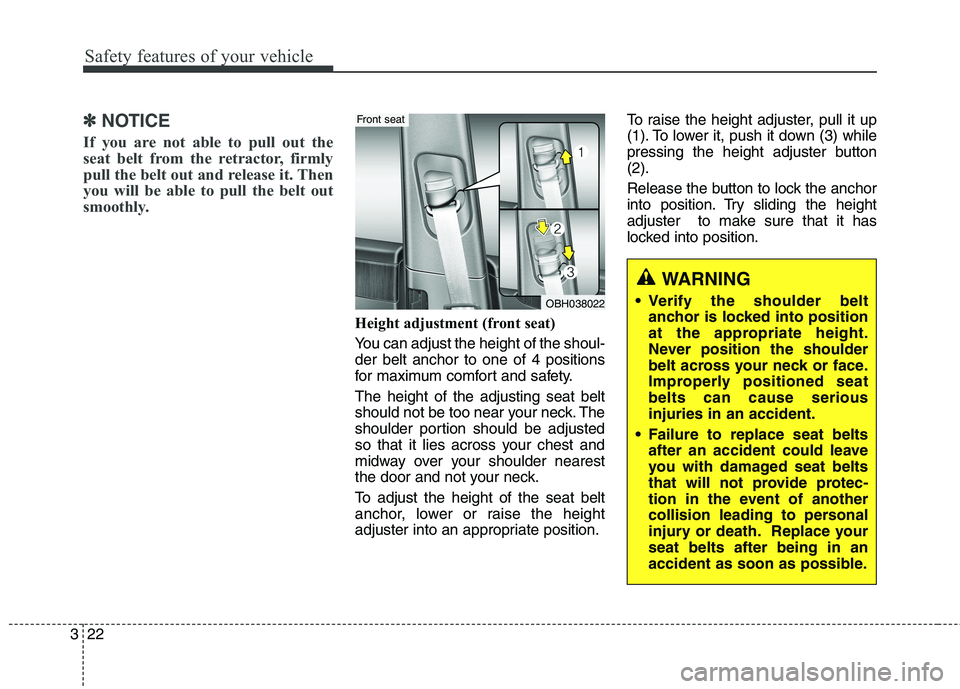
Height adjustment (front seat)
You can adjust the height of the shoul- der belt anchor to one of 4 positions
for maximum comfort and safety. The height of the adjusting seat belt
should not be too near your neck. The
shoulder portion should be adjusted
so that it lies across your chest and
midway over your shoulder nearest
the door and not your neck.
To adjust the height of the seat belt
anchor, lower or raise the height
adjuster into an appropriate position. To raise the height adjuster, pull it up
(1). To lower it, push it down (3) while
pressing the height adjuster button(2).
Release the button to lock the anchor
into position. Try sliding the height
adjuster to make sure that it has
locked into position.
WARNING
Verify the shoulder belt anchor is locked into position
at the appropriate height.
Never position the shoulder
belt across your neck or face.
Improperly positioned seatbelts can cause seriousinjuries in an accident.
Failure to replace seat belts after an accident could leave
you with damaged seat belts
that will not provide protec-
tion in the event of another
collision leading to personal
injury or death. Replace yourseat belts after being in an
accident as soon as possible.
OBH038022
Front seat
Page 38 of 485
323
Safety features of your vehicle
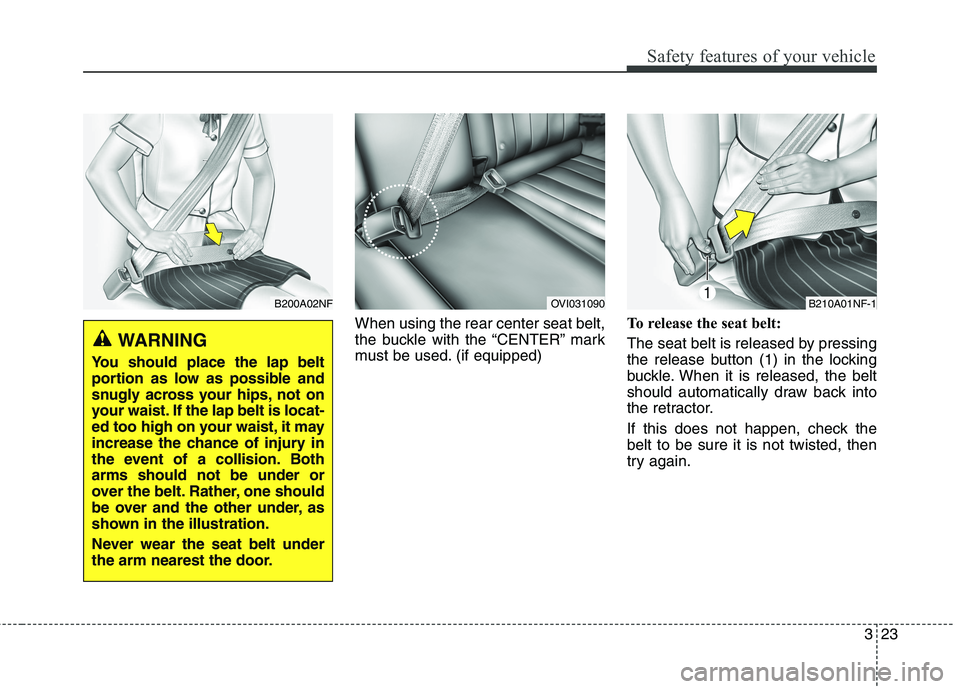
When using the rear center seat belt,
the buckle with the “CENTER” mark
must be used. (if equipped)To release the seat belt:
The seat belt is released by pressing
the release button (1) in the locking
buckle. When it is released, the belt
should automatically draw back into
the retractor.
If this does not happen, check the belt to be sure it is not twisted, then
try again.
B200A02NF
WARNING
You should place the lap belt
portion as low as possible and
snugly across your hips, not on
your waist. If the lap belt is locat-
ed too high on your waist, it may
increase the chance of injury in
the event of a collision. Botharms should not be under or
over the belt. Rather, one should
be over and the other under, as
shown in the illustration.
Never wear the seat belt under
the arm nearest the door.
B210A01NF-1OVI031090
Page 61 of 485
Safety features of your vehicle
46
3
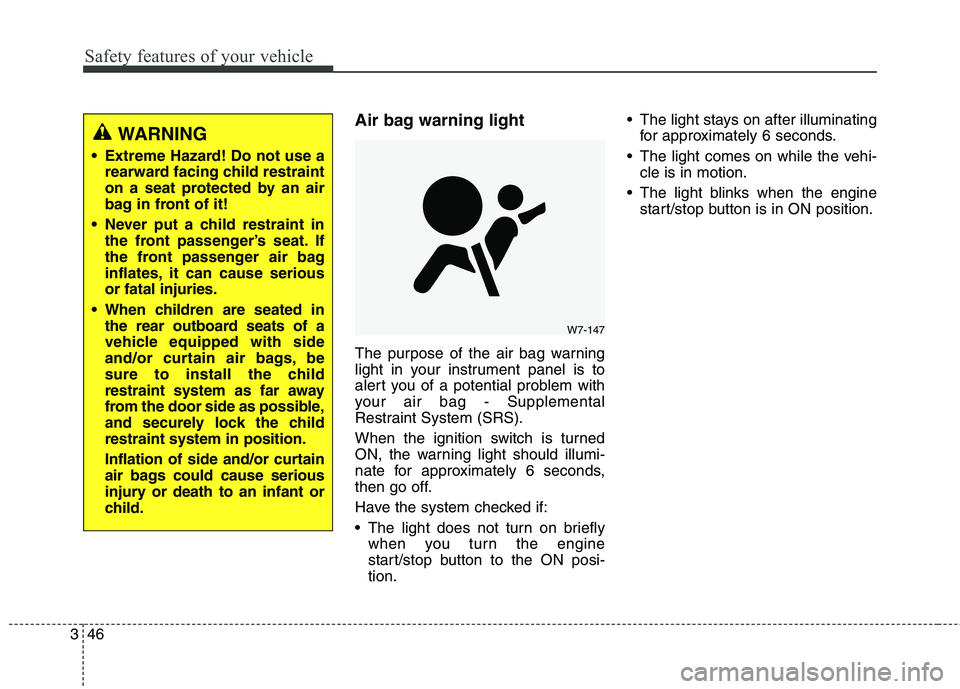
Air bag warning light
The purpose of the air bag warning
light in your instrument panel is to
alert you of a potential problem with
your air bag - Supplemental
Restraint System (SRS).
When the ignition switch is turned
ON, the warning light should illumi-
nate for approximately 6 seconds,
then go off.
Have the system checked if:
The light does not turn on briefly
when you turn the engine
start/stop button to the ON posi-tion. The light stays on after illuminating
for approximately 6 seconds.
The light comes on while the vehi- cle is in motion.
The light blinks when the engine start/stop button is in ON position.WARNING
Extreme Hazard! Do not use a rearward facing child restraint
on a seat protected by an air
bag in front of it!
Never put a child restraint in the front passenger’s seat. If
the front passenger air bag
inflates, it can cause serious
or fatal injuries.
When children are seated in the rear outboard seats of a
vehicle equipped with side
and/or curtain air bags, be
sure to install the child
restraint system as far away
from the door side as possible,
and securely lock the childrestraint system in position.
Inflation of side and/or curtain
air bags could cause serious
injury or death to an infant or
child.
W7-147
Page 71 of 485
Safety features of your vehicle
56
3
WARNING
In order for side and curtain air bags to provide the best
protection, front seat occu-
pants and outboard rear occu-pants should sit in an uprightposition with the seat belts
properly fastened.
Importantly, children should
sit in a proper child restraintsystem in the rear seat.
When children are seated in the rear outboard seats, they
must be seated in the proper
child restraint system. Make
sure to position the child
restraint system as far away
from the door side as possi-
ble, and secure the child
restraint system in a lockedposition.
(Continued)(Continued)
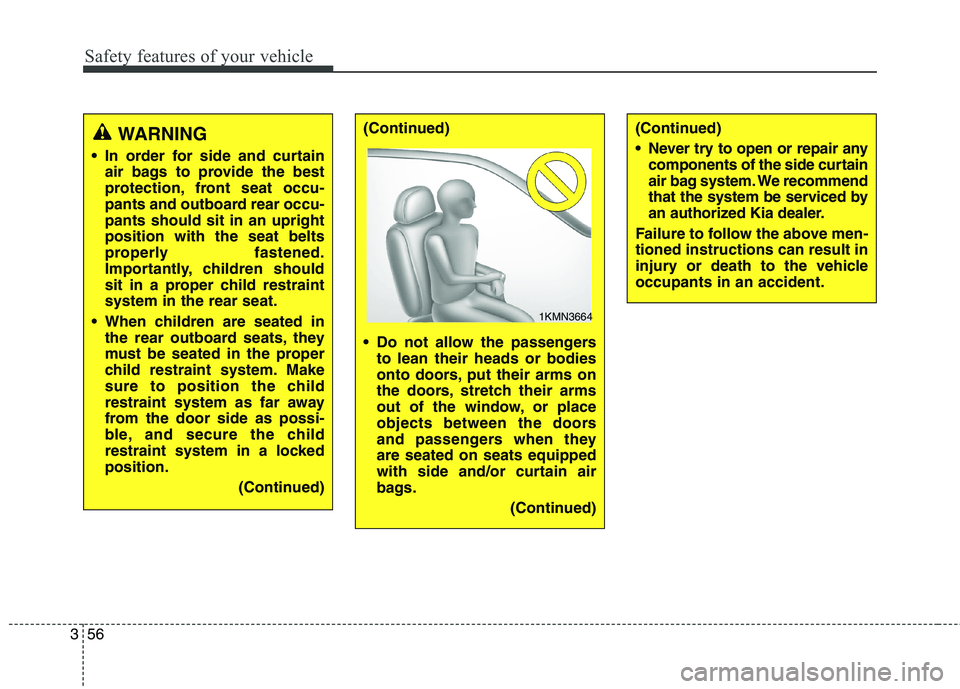
Do not allow the passengersto lean their heads or bodies
onto doors, put their arms on
the doors, stretch their arms
out of the window, or place
objects between the doors
and passengers when theyare seated on seats equipped
with side and/or curtain air
bags.
(Continued)(Continued)
Never try to open or repair anycomponents of the side curtain
air bag system. We recommend
that the system be serviced by
an authorized Kia dealer.
Failure to follow the above men-tioned instructions can result in
injury or death to the vehicleoccupants in an accident.
1KMN3664
Page 80 of 485
Features of your vehicle
Smart key . . . . . . . . . . . . . . . . . . . . . . . . . . . . . . . . . 4-4• Record your key number . . . . . . . . . . . . . . . . . . . . . . . 4-4
. . . . . . . . . . . . . . . . . . . . . . . . . . . . 4-4
. . . . . . . . . . . . . . . . . . . . . . . 4-6
. . . . . . . . . . . . . . . . . . . . . . . . . 4-8
. . . . . . . . . . . . . . . . . . . . . . . . . . . . 4-9
. . . . . . . . . . . . . . . . . . . . . . . . . . 4-10
Theft-alarm system . . . . . . . . . . . . . . . . . . . . . . . . 4-12 . . . . . . . . . . . . . . . . . . . . . . . . . . . . . . . . . 4-12
. . . . . . . . . . . . . . . . . . . . . . . . . . . . 4-13
Door locks . . . . . . . . . . . . . . . . . . . . . . . . . . . . . . . . 4-15 . . . . . . . . . . . . . . . . . . . . . . . . . . . . . . . . 4-15
. . . . . . . . . . . . . . . . . . . . . . . . . . . . . 4-16
. . . . . . . . . . . . . . . . . . . . . . . . . . . . . . . . . 4-16
. . . . . . . . . . . . . . . . . 4-19
Trunk . . . . . . . . . . . . . . . . . . . . . . . . . . . . . . . . . . . . 4-20 . . . . . . . . . . . . . . . . . . . . . . . . . . . 4-20
. . . . . . . . . . . . . . . . . . . . . . . . . . . . . . . . . 4-22
. . . . . . . . . . . . . . . . . 4-27
Windows . . . . . . . . . . . . . . . . . . . . . . . . . . . . . . . . . 4-28 . . . . . . . . . . . . . . . . . . . . . . . . . . . . . . 4-29
Hood. . . . . . . . . . . . . . . . . . . . . . . . . . . . . . . . . . . . . 4-32 . . . . . . . . . . . . . . . . . . . . . . . . . . . . 4-32
. . . . . . . . . . . . . . . . . . . . . . . . . . . . . 4-32 Fuel filler lid . . . . . . . . . . . . . . . . . . . . . . . . . . . . . . 4-34
. . . . . . . . . . . . . . . . . . . . . . 4-34
. . . . . . . . . . . . . . . . . . . . . . . 4-34
Sunroof . . . . . . . . . . . . . . . . . . . . . . . . . . . . . . . . . . 4-37 . . . . . . . . . . . . . . . . . . . . . . . . . . . 4-38
. . . . . . . . . . . . . . . . . . . . . . . . . . . . 4-38
. . . . . . . . . . . . . . . . . . . . . . . . . . . . . . . . . . . 4-39
. . . . . . . . . . . . . . . . . . . . . . . . . 4-43
Steering wheel . . . . . . . . . . . . . . . . . . . . . . . . . . . . . 4-41 . . . . . 4-41
. . . . . . . . . . . . . . . . . . . . . . . . . . . . . . . . . 4-41
. . . . . . . . . . . . . . . . . . . . . . . . . 4-42
. . . . . . . . . . . . . . . . . . . . . . . . . . . . . . . . . . . . . . . 4-43
Mirrors . . . . . . . . . . . . . . . . . . . . . . . . . . . . . . . . . . 4-44 . . . . . . . . . . . . . . . . . . . . . . . . 4-44
. . . . . . . . . . . . . . . . . . . . . . . 4-45
Instrument cluster . . . . . . . . . . . . . . . . . . . . . . . . . 4-49 . . . . . . . . . . . . . . . . . . . . 4-50
. . . . . . . . . . . . . . . . . . . . . . . . . 4-51
. . . . . . . . . . . . . . . . . . . . . . . . . . . . . . . . . . . . . 4-52
LCD display . . . . . . . . . . . . . . . . . . . . . . . . . . . 4-56, 61
Trip computer . . . . . . . . . . . . . . . . . . . . . . . . . . . . . 4-75
. . . . . . . . . . . . . . . . . . . . . . . . . . . . . . . . . . . 4-76
. . . . . . . . . . . . . . . . . . . . . . . . . 4-76
4
Page 83 of 485
Features of your vehicle
4
4
Record your key number
The key code number is stamped on the barcode tag attached to
the key set. Should
you lose your keys, we recommend
that you contact an authorized Kia
dealer. Remove the bar code tag and
store it in a safe place. Also, record
the code number and keep it in a
safe and handy place, but not in the
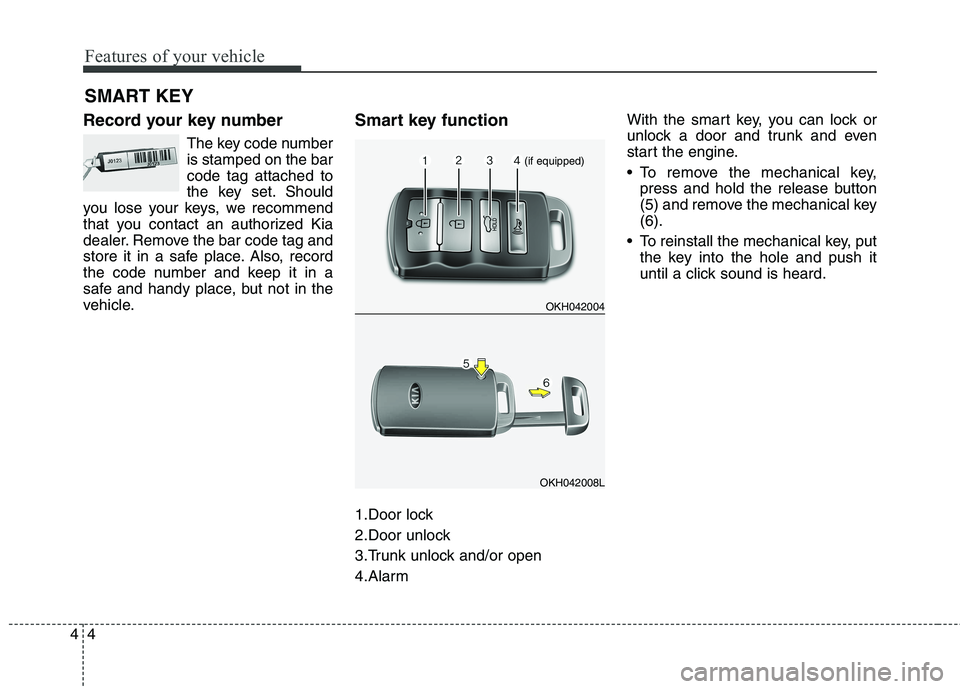
vehicle. Smart key function
1.Door lock
2.Door unlock
3.Trunk unlock and/or open
4.AlarmWith the smart key, you can lock or
unlock a door and trunk and even
start the engine.
• To remove the mechanical key,
press and hold the release button
(5) and remove the mechanical key(6).
To reinstall the mechanical key, put the key into the hole and push it
until a click sound is heard.
SMART KEY
OKH042004
OKH042008L
(if equipped)
Page 84 of 485
45
Features of your vehicle
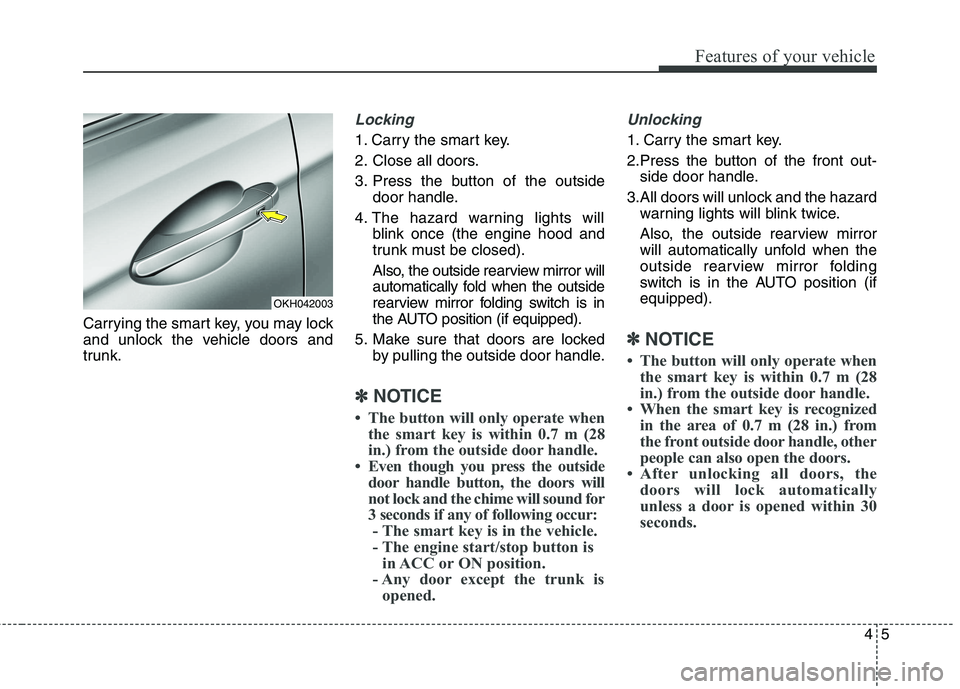
Carrying the smart key, you may lock
and unlock the vehicle doors and
trunk.
Locking
1. Carry the smart key.
2. Close all doors.
3. Press the button of the outsidedoor handle.
4. The hazard warning lights will blink once (the engine hood and
trunk must be closed).
Also, the outside rearview mirror will
automatically fold when the outside
rearview mirror folding switch is in
the AUTO position (if equipped).
5. Make sure that doors are locked by pulling the outside door handle.
✽✽ NOTICE
The button will only operate when the smart key is within 0.7 m (28
in.) from the outside door handle.
Even though you press the outside door handle button, the doors will
not lock and the chime will sound for
3 seconds if any of following occur:- The smart key is in the vehicle.
- The engine start/stop button is in ACC or ON position.
- Any door except the trunk is opened.
Unlocking
1. Carry the smart key.
2.Press the button of the front out- side door handle.
3.All doors will unlock and the hazard warning lights will blink twice.
Also, the outside rearview mirror
will automatically unfold when the
outside rearview mirror folding
switch is in the AUTO position (ifequipped).
✽✽ NOTICE
The button will only operate when the smart key is within 0.7 m (28
in.) from the outside door handle.
When the smart key is recognized in the area of 0.7 m (28 in.) from
the front outside door handle, other
people can also open the doors.
After unlocking all doors, the doors will lock automatically
unless a door is opened within 30
seconds.
OKH042003
Page 85 of 485
Features of your vehicle
6
4
Trunk unlocking
Power trunk
1. Carry the smart key.
2. Press the trunk handle switch.
3. The trunk will unlock and open.
Non-powered trunk
1. Carry the smart key.
2. Press the trunk handle switch.
3. The trunk will unlock.
✽✽
NOTICE
Once the trunk is opened and then closed, the trunk will lock auto-
matically.
The button will only operate when the smart key is within 0.7 m (28
in.) from the trunk handle.
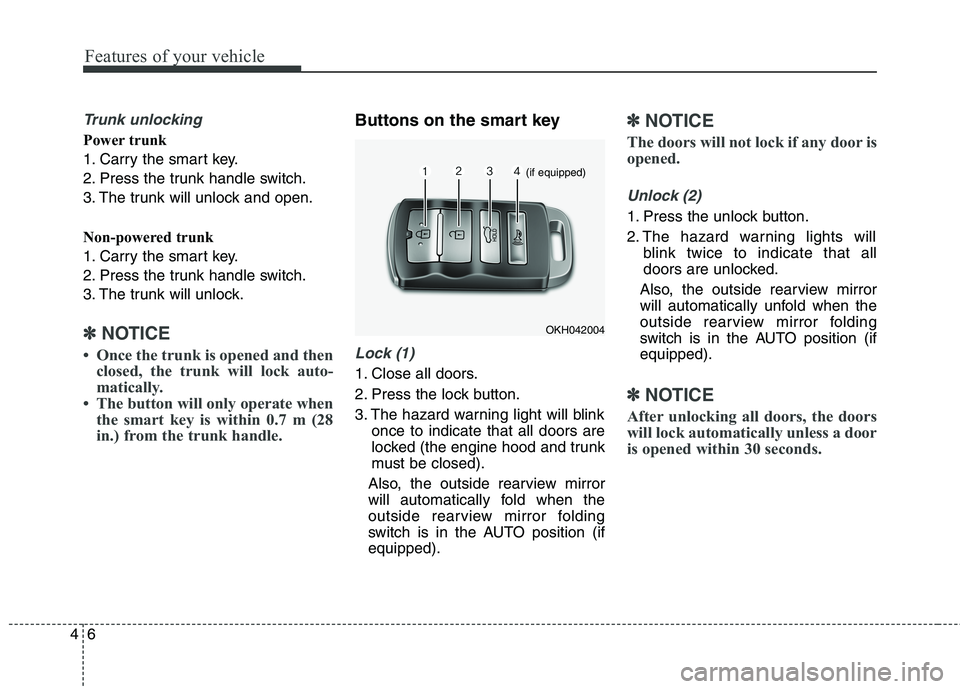
Buttons on the smart key
Lock (1)
1. Close all doors.
2. Press the lock button.
3. The hazard warning light will blink once to indicate that all doors are
locked (the engine hood and trunk
must be closed).
Also, the outside rearview mirror
will automatically fold when the
outside rearview mirror folding
switch is in the AUTO position (ifequipped).
✽✽ NOTICE
The doors will not lock if any door is
opened.
Unlock (2)
1. Press the unlock button.
2. The hazard warning lights will blink twice to indicate that all
doors are unlocked.
Also, the outside rearview mirror
will automatically unfold when the
outside rearview mirror folding
switch is in the AUTO position (ifequipped).
✽✽ NOTICE
After unlocking all doors, the doors
will lock automatically unless a door
is opened within 30 seconds.
OKH042004
(if equipped)