check engine KIA Rio 2005 2.G Owner's Guide
[x] Cancel search | Manufacturer: KIA, Model Year: 2005, Model line: Rio, Model: KIA Rio 2005 2.GPages: 238, PDF Size: 2.6 MB
Page 156 of 238
Electrical Circuit ProtectionFusesA vehicle’s electrical system is protected from
electrical overload damage by fuses.
This vehicle has two fuse panels, one located in the
driver’s side kick panel, the other in the engine
compartment near the battery. A fuse panel chart is
provided later in this section.
If any of your vehicle’s lights, accessories, or controls
do not work, check the appropriate circuit fuse. If a
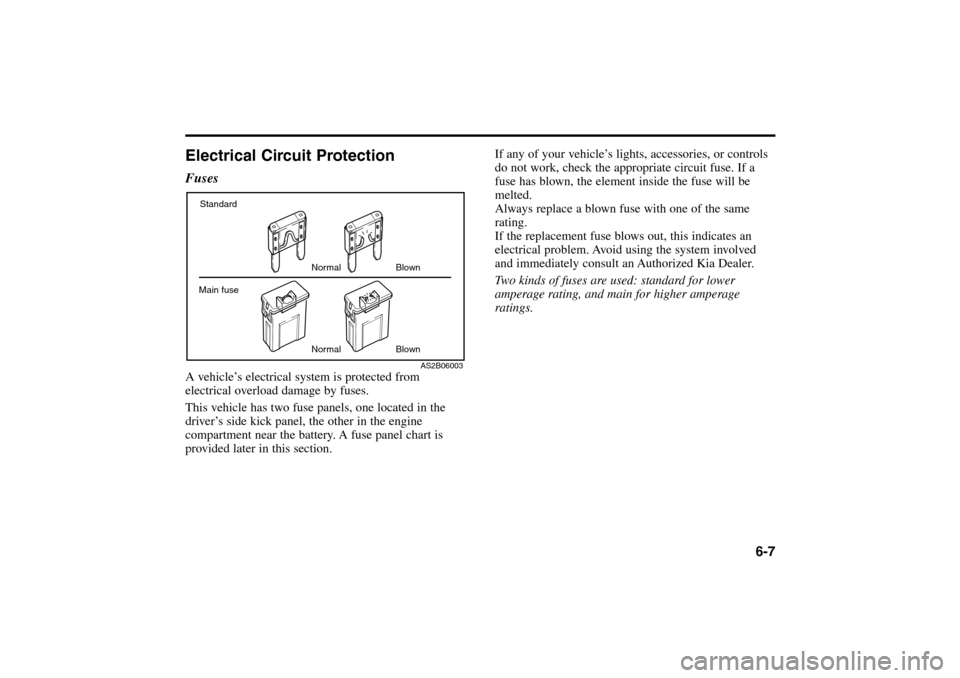
fuse has blown, the element inside the fuse will be
melted.
Always replace a blown fuse with one of the same
rating.
If the replacement fuse blows out, this indicates an
electrical problem. Avoid using the system involved
and immediately consult an Authorized Kia Dealer.
Two kinds of fuses are used: standard for lower
amperage rating, and main for higher amperage
ratings.
6-7
Standard
Normal
NormalBlown
Blown Main fuse
AS2B06003
RIO ENG CNA 6.qxd 7/29/05 5:15 PM Page 7
Page 157 of 238
Fuse Replacement
If the electrical system does not work, first check the
driver’s side fuse panel.
1. Turn the ignition switch and all other switches off.
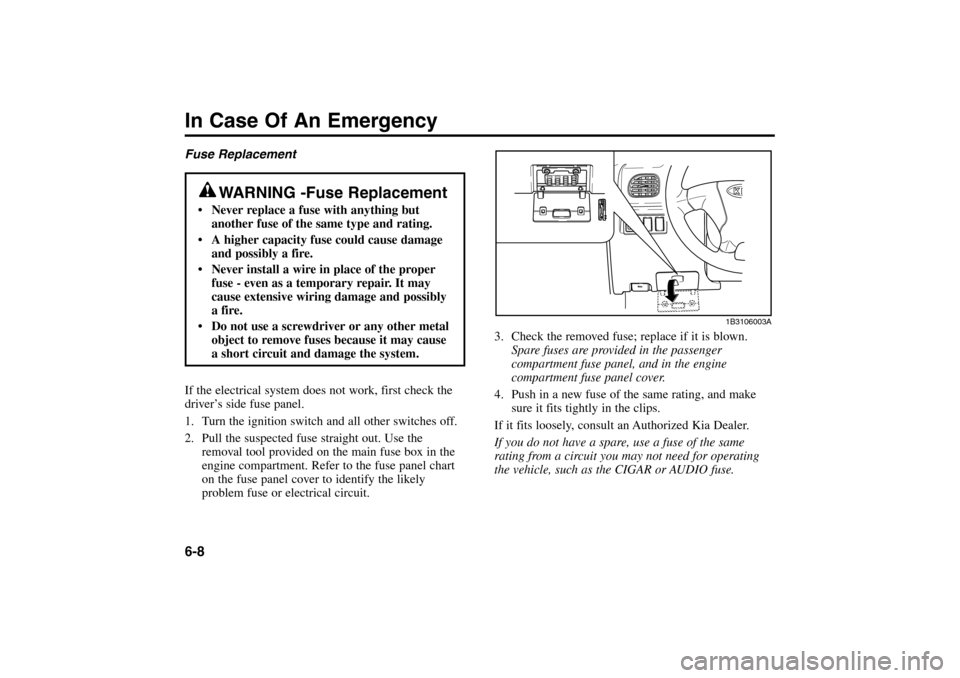
2. Pull the suspected fuse straight out. Use the
removal tool provided on the main fuse box in the
engine compartment. Refer to the fuse panel chart
on the fuse panel cover to identify the likely
problem fuse or electrical circuit.3. Check the removed fuse; replace if it is blown.
Spare fuses are provided in the passenger
compartment fuse panel, and in the engine
compartment fuse panel cover.
4. Push in a new fuse of the same rating, and make
sure it fits tightly in the clips.
If it fits loosely, consult an Authorized Kia Dealer.
If you do not have a spare, use a fuse of the same
rating from a circuit you may not need for operating
the vehicle, such as the CIGAR or AUDIO fuse.In Case Of An Emergency6-8
WARNING -Fuse Replacement
Never replace a fuse with anything but
another fuse of the same type and rating.
A higher capacity fuse could cause damage
and possibly a fire.
Never install a wire in place of the proper
fuse - even as a temporary repair. It may
cause extensive wiring damage and possibly
a fire.
Do not use a screwdriver or any other metal
object to remove fuses because it may cause
a short circuit and damage the system.
1B3106003A
RIO ENG CNA 6.qxd 7/29/05 5:15 PM Page 8
Page 158 of 238
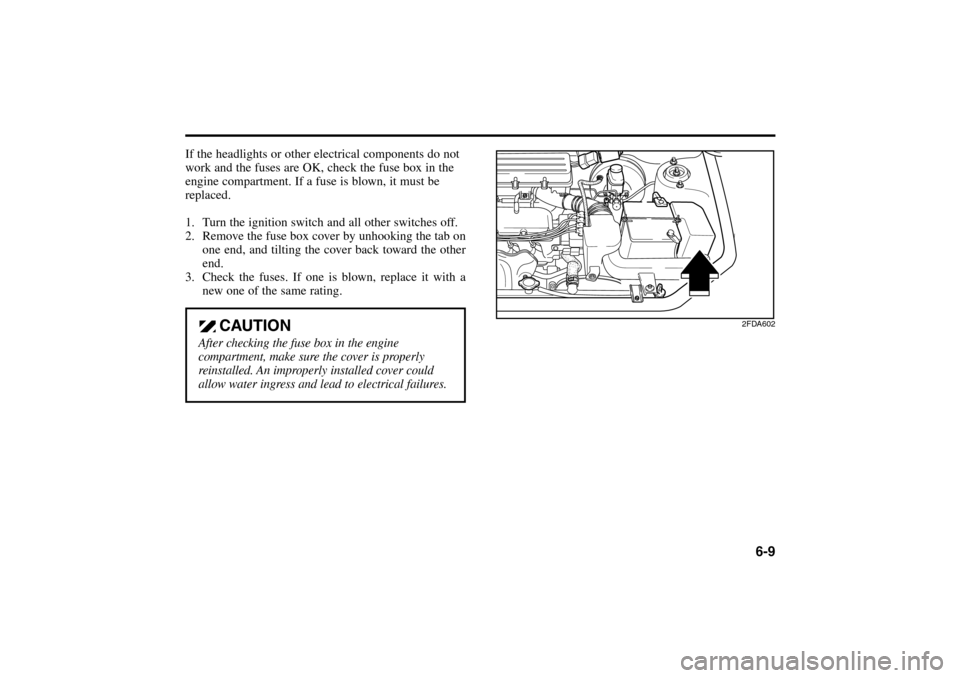
If the headlights or other electrical components do not
work and the fuses are OK, check the fuse box in the
engine compartment. If a fuse is blown, it must be
replaced.
1. Turn the ignition switch and all other switches off.
2. Remove the fuse box cover by unhooking the tab on
one end, and tilting the cover back toward the other
end.
3. Check the fuses. If one is blown, replace it with a
new one of the same rating.
6-9
CAUTION
After checking the fuse box in the engine
compartment, make sure the cover is properly
reinstalled. An improperly installed cover could
allow water ingress and lead to electrical failures.
2FDA602
RIO ENG CNA 6.qxd 7/29/05 5:15 PM Page 9
Page 177 of 238
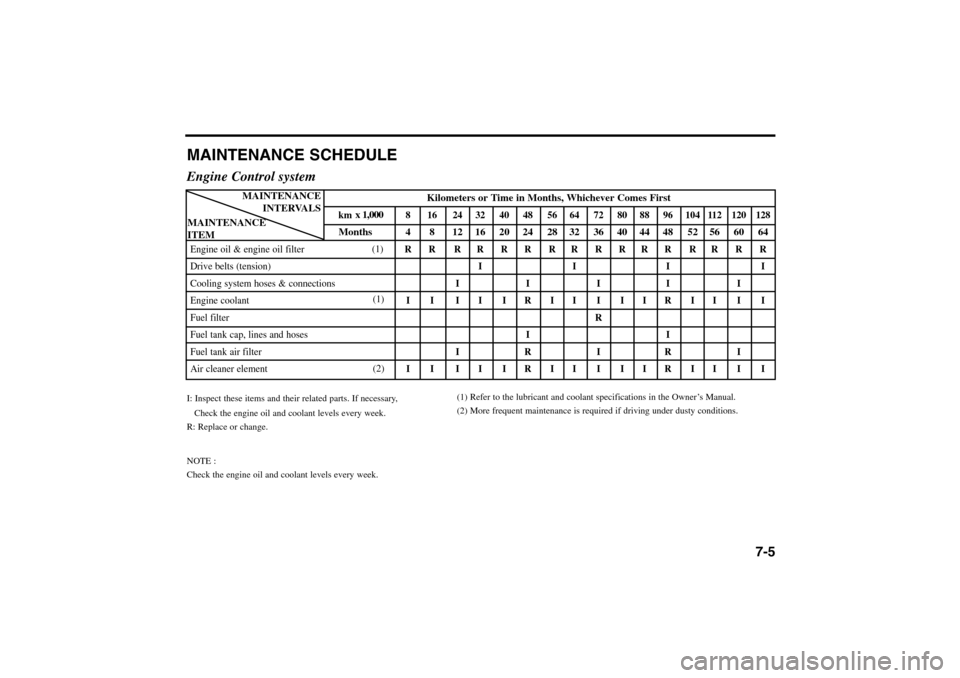
MAINTENANCE SCHEDULEEngine Control systemI: Inspect these items and their related parts. If necessary,
Check the engine oil and coolant levels every week.
R: Replace or change.
NOTE :
Check the engine oil and coolant levels every week.
7-5
(1) Refer to the lubricant and coolant specifications in the Owner’s Manual.
(2) More frequent maintenance is required if driving under dusty conditions.
Kilometers or Time in Months, Whichever Comes First
km 8 16 24 32 40 48 56 64 72 80 88 96 104 112 120 128Months 4 8 12 16 20 24 28 32 36 40 44 48 52 56 60 64
Engine oil & engine oil filter RR RRRRRRRRRR RRRR
Drive belts (tension)III I
Cooling system hoses & connectionsIIII I
Engine coolant II IIIRIIIIIRIIII
Fuel filterR
Fuel tank cap, lines and hosesII
Fuel tank air filterIRIR I
Air cleaner element II IIIRIIIIIRIIII
MAINTENANCE
INTERVALS
MAINTENANCE
ITEM
x 1,000
(1)
(1)
(2)
RIO ENG CNA 7-1.qxd 7/29/05 5:16 PM Page 5
Page 178 of 238

Maintenance7-6Engine Control System (cont.)I: Inspect these items and their related parts. If necessary,
Check the engine oil and coolant levels every week.
R: Replace or change.
Kilometers or Time in Months, Whichever Comes First
km 8 16 24 32 40 48 56 64 72 80 88 96 104 112 120 128
Months 4 8 12 16 20 24 28 32 36 40 44 48 52 56 60 64
Ignition wiresII
Spark plugsRR
Idle speedIIIII
Engine timing beltR
MAINTENANCE
INTERVALS
MAINTENANCE
ITEM
x 1,000
RIO ENG CNA 7-1.qxd 7/29/05 5:16 PM Page 6
Page 179 of 238
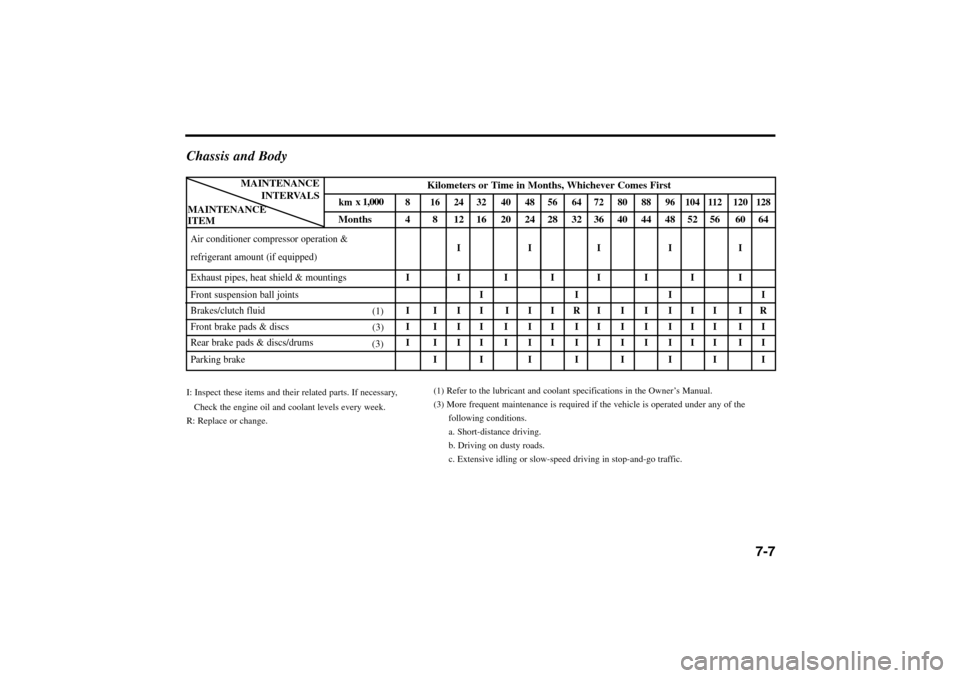
Chassis and BodyI: Inspect these items and their related parts. If necessary,
Check the engine oil and coolant levels every week.
R: Replace or change.
7-7
(1) Refer to the lubricant and coolant specifications in the Owner’s Manual.
(3) More frequent maintenance is required if the vehicle is operated under any of the
following conditions.
a. Short-distance driving.
b. Driving on dusty roads.
c. Extensive idling or slow-speed driving in stop-and-go traffic.Kilometers or Time in Months, Whichever Comes First
km 8 16 24 32 40 48 56 64 72 80 88 96 104 112 120 128Months 4 8 12 16 20 24 28 32 36 40 44 48 52 56 60 64
Air conditioner compressor operation &
IIIII
refrigerant amount (if equipped)
Exhaust pipes, heat shield & mountingsIIII IIII
Front suspension ball jointsIIII
Brakes/clutch fluidIIIIIIIRIIIIIIIR
Front brake pads & discsIIIIIIIIIIIIIIII
Rear brake pads & discs/drumsIIIIIIIIIIIIIIII
Parking brakeII III II I
MAINTENANCE
INTERVALS
MAINTENANCE
ITEM
x 1,000
(1)
(3)
(3)
RIO ENG CNA 7-1.qxd 7/29/05 5:16 PM Page 7
Page 180 of 238
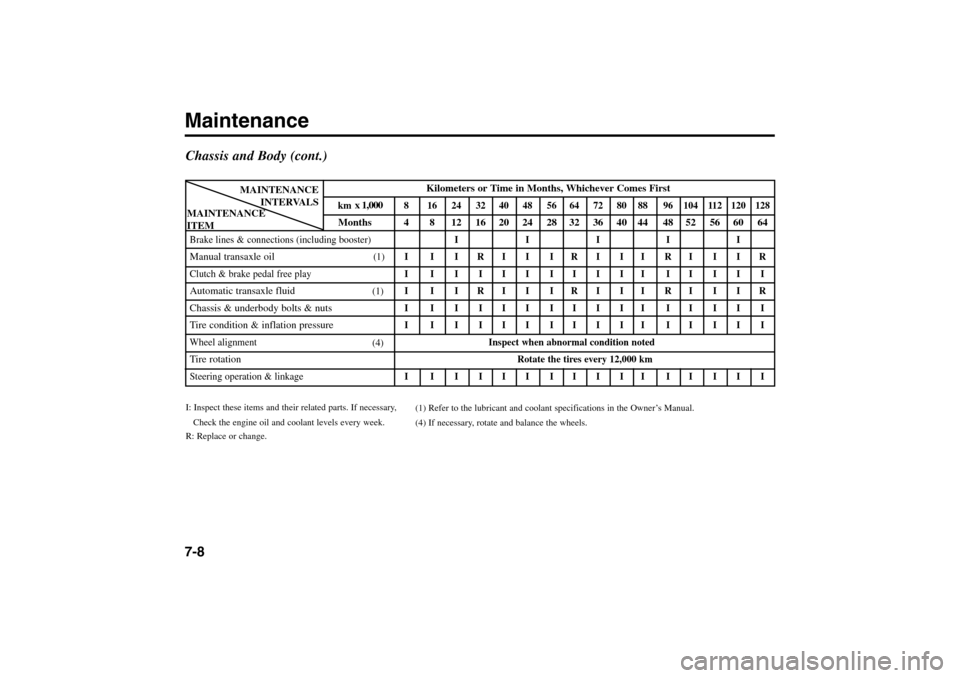
Maintenance7-8Chassis and Body (cont.)I: Inspect these items and their related parts. If necessary,
Check the engine oil and coolant levels every week.
R: Replace or change.
Kilometers or Time in Months, Whichever Comes First
km 8 16 24 32 40 48 56 64 72 80 88 96 104 112 120 128Months 4 8 12 16 20 24 28 32 36 40 44 48 52 56 60 64
Brake lines & connections (including booster)IIIIIManual transaxle oil
IIIRIIIRIIIRIIIR
Clutch & brake pedal free playI IIIIIIIIII IIIII
Automatic transaxle fluid
IIIRIIIRIIIRIIIR
Chassis & underbody bolts & nuts
I IIIIIIIIII IIIII
Tire condition & inflation pressure
I IIIIIIIIII IIIII
Wheel alignmentInspect when abnormal condition noted
Tire rotationSteering operation & linkageI IIIIIIIIII IIIII
MAINTENANCE
INTERVALS
MAINTENANCE
ITEM
x 1,000
Rotate the tires every 12,000 km (1)
(1)
(4)
(1) Refer to the lubricant and coolant specifications in the Owner’s Manual.
(4) If necessary, rotate and balance the wheels.
RIO ENG CNA 7-1.qxd 7/29/05 5:16 PM Page 8
Page 181 of 238
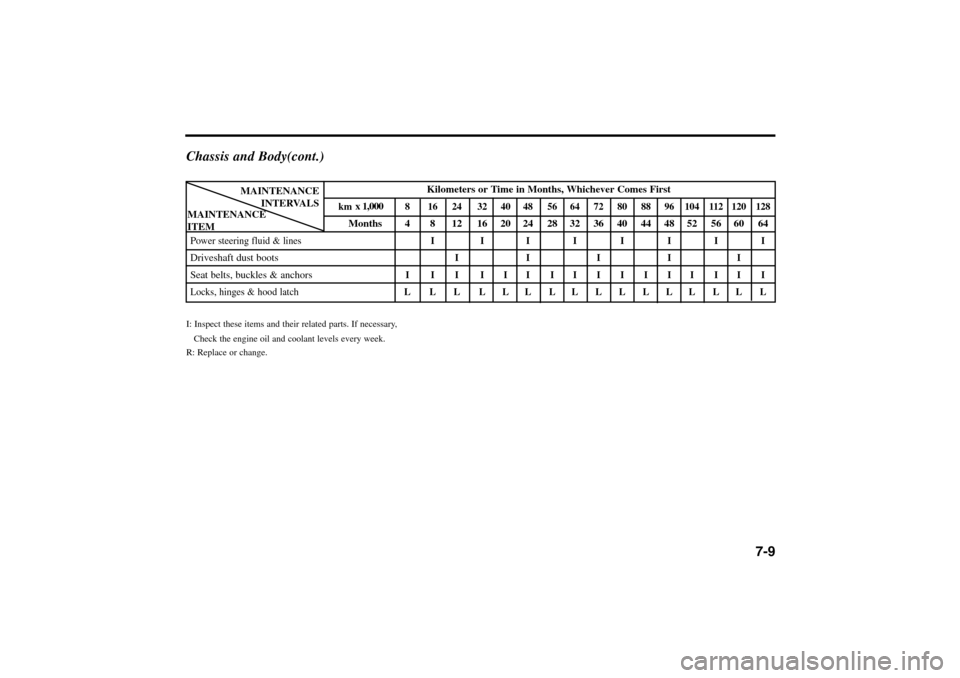
7-9 Chassis and Body(cont.)
I: Inspect these items and their related parts. If necessary,
Check the engine oil and coolant levels every week.
R: Replace or change.
Kilometers or Time in Months, Whichever Comes First
km 8 16 24 32 40 48 56 64 72 80 88 96 104 112 120 128Months 4 8 12 16 20 24 28 32 36 40 44 48 52 56 60 64
P
ower steering fluid & linesIIIIIIIIDriveshaft dust boots
IIIII
Seat belts, buckles & anchors
IIIIIIIIIIIIIIII
Locks, hinges & hood latchLLLLLLLLLLLLLLLL
MAINTENANCE
INTERVALS
MAINTENANCE
ITEM
x 1,000
RIO ENG CNA 7-1.qxd 7/29/05 5:16 PM Page 9
Page 182 of 238
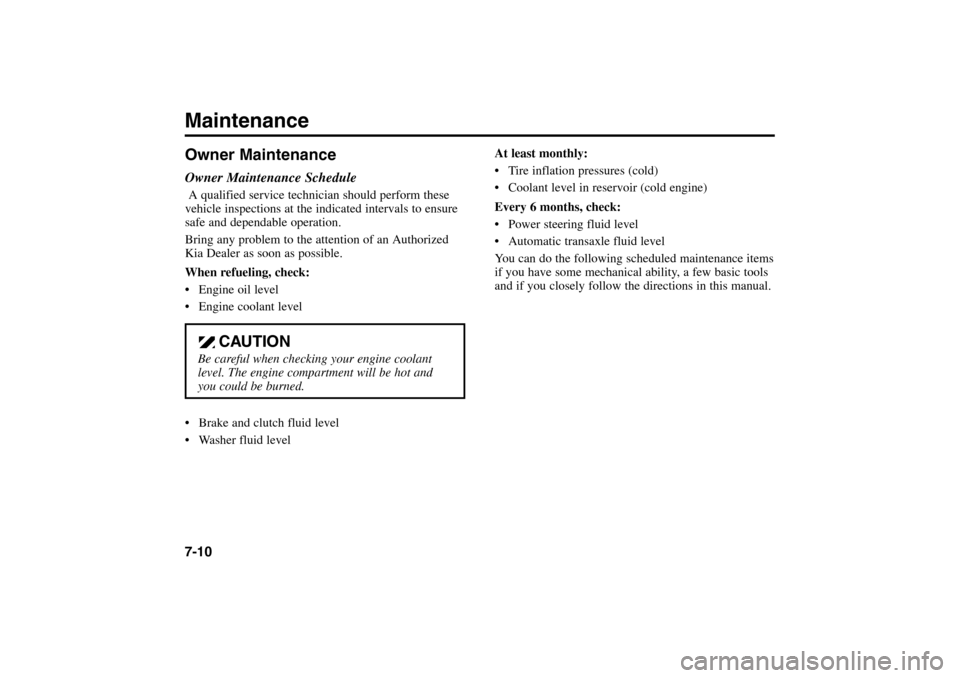
Maintenance7-10Owner MaintenanceOwner Maintenance ScheduleA qualified service technician should perform these
vehicle inspections at the indicated intervals to ensure
safe and dependable operation.
Bring any problem to the attention of an Authorized
Kia Dealer as soon as possible.
When refueling, check:
Engine oil level
Engine coolant level
Brake and clutch fluid level
Washer fluid level
CAUTION
Be careful when checking your engine coolant
level. The engine compartment will be hot and
you could be burned.
At least monthly:
Tire inflation pressures (cold)
Coolant level in reservoir (cold engine)
Every 6 months, check:
Power steering fluid level
Automatic transaxle fluid level
You can do the following scheduled maintenance items
if you have some mechanical ability, a few basic tools
and if you closely follow the directions in this manual.
RIO ENG CNA 7-1.qxd 7/29/05 5:16 PM Page 10
Page 186 of 238
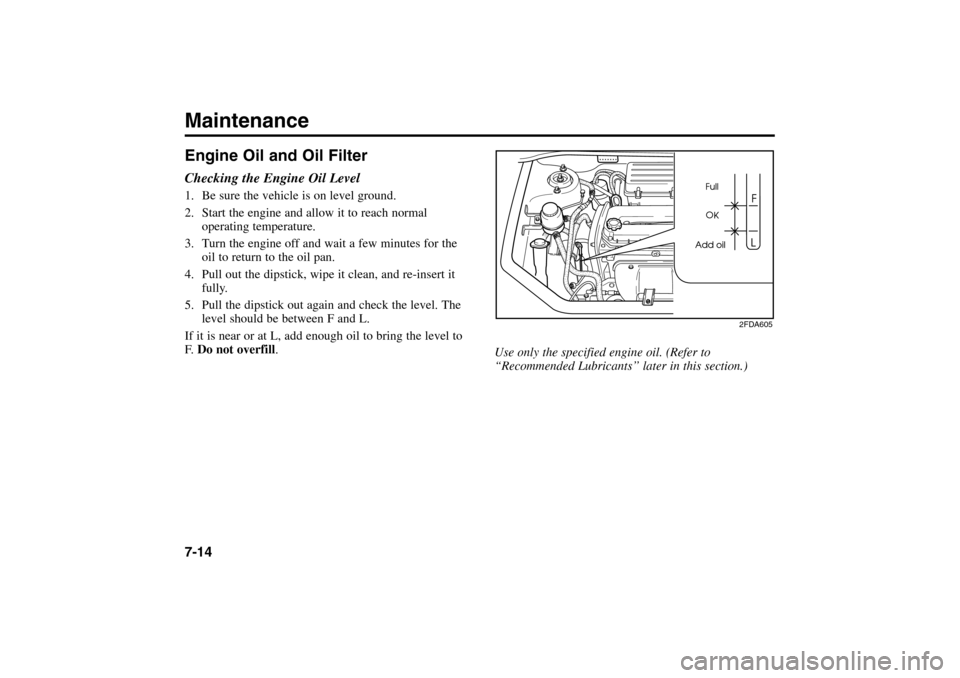
Engine Oil and Oil FilterChecking the Engine Oil Level1. Be sure the vehicle is on level ground.
2. Start the engine and allow it to reach normal
operating temperature.
3. Turn the engine off and wait a few minutes for the
oil to return to the oil pan.
4. Pull out the dipstick, wipe it clean, and re-insert it
fully.
5. Pull the dipstick out again and check the level. The
level should be between F and L.
If it is near or at L, add enough oil to bring the level to
F. Do not overfill.Maintenance7-14
Use only the specified engine oil. (Refer to
“Recommended Lubricants’’ later in this section.)
2FDA605
RIO ENG CNA 7-1.qxd 7/29/05 5:16 PM Page 14