audio KIA Rio 2011 2.G Owner's Manual
[x] Cancel search | Manufacturer: KIA, Model Year: 2011, Model line: Rio, Model: KIA Rio 2011 2.GPages: 240, PDF Size: 4.68 MB
Page 8 of 240
23
Your vehicle at a glance
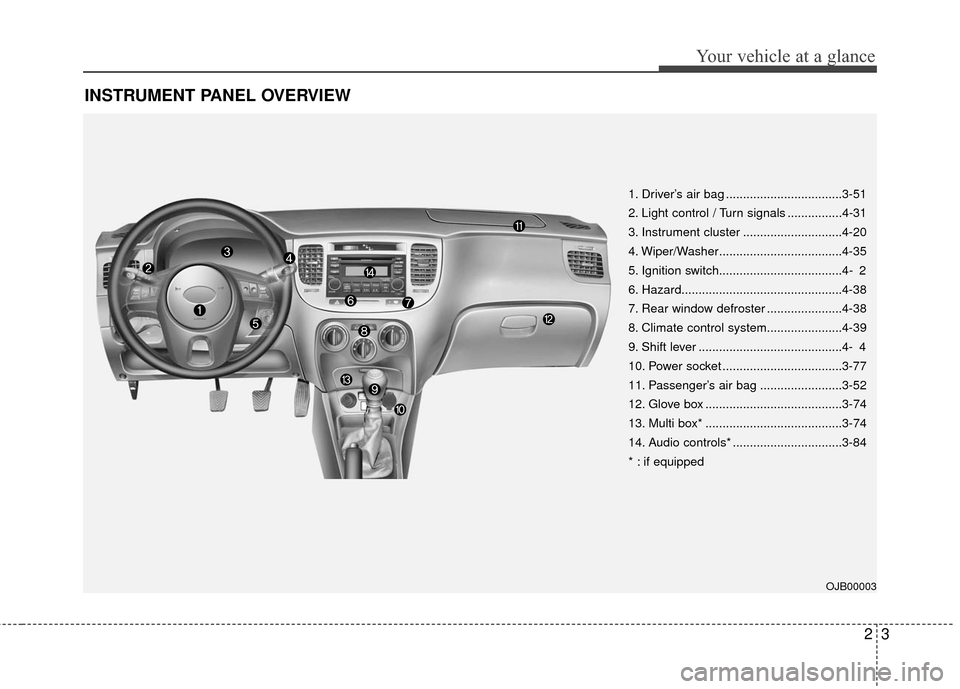
INSTRUMENT PANEL OVERVIEW
1. Driver’s air bag ..................................3-51
2. Light control / Turn signals ................4-31
3. Instrument cluster .............................4-20
4. Wiper/Washer....................................4-35
5. Ignition switch....................................4- 2
6. Hazard...............................................4-38
7. Rear window defroster ......................4-38
8. Climate control system......................4-39
9. Shift lever ..........................................4- 4
10. Power socket ...................................3-77
11. Passenger’s air bag ........................3-52
12. Glove box ........................................3-74
13. Multi box* ........................................3-74
14. Audio controls* ................................3-84
* : if equipped
OJB00003
Page 10 of 240
3
Keys / 3-2
Remote keyless entry / 3-3
Theft-alarm system / 3-5
Immobilizer system / 3-7
Door locks / 3-9
Windows / 3-14
Seat / 3-17
Safety belts / 3-28
Air bags-supplemental restraint system / 3-49
Trunk / 3-64
Hood / 3-66
Fuel filler lid / 3-67
Mirrors / 3-70
Interior lights / 3-73
Storage compartment / 3-74
Interior features / 3-76
Sunroof / 3-79
Luggage net / 3-81
Floor mat anchor/ 3-81
Antenna / 3-82
Audio remote control / 3-83
Audio system / 3-84
Knowing your vehicle
Page 86 of 240
377
Knowing your vehicle
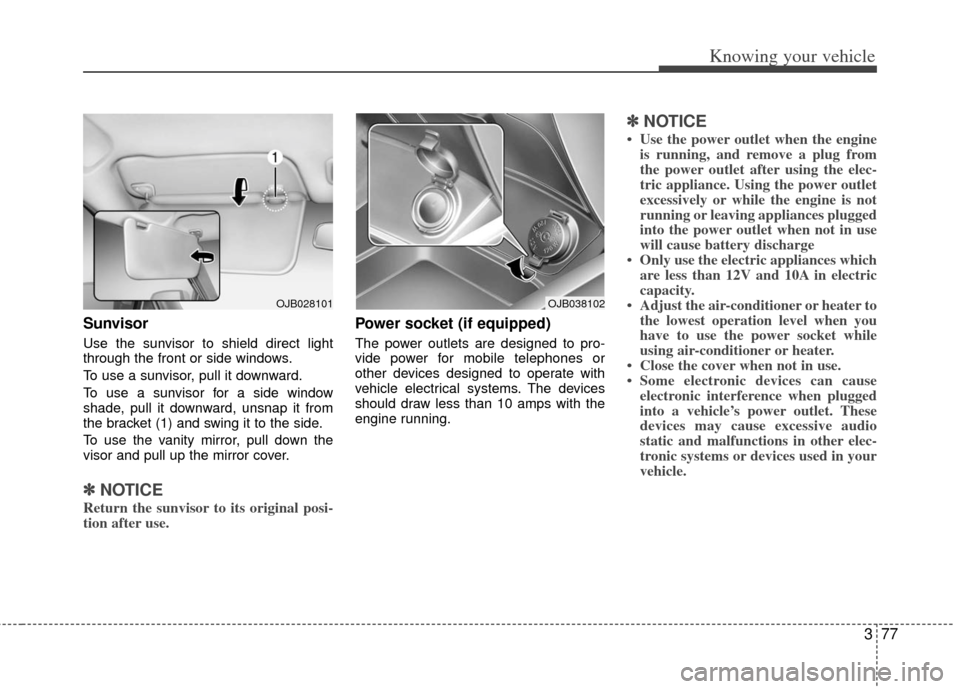
Sunvisor
Use the sunvisor to shield direct light
through the front or side windows.
To use a sunvisor, pull it downward.
To use a sunvisor for a side window
shade, pull it downward, unsnap it from
the bracket (1) and swing it to the side.
To use the vanity mirror, pull down the
visor and pull up the mirror cover.
✽ ✽NOTICE
Return the sunvisor to its original posi-
tion after use.
Power socket (if equipped)
The power outlets are designed to pro-
vide power for mobile telephones or
other devices designed to operate with
vehicle electrical systems. The devices
should draw less than 10 amps with the
engine running.
✽ ✽NOTICE
• Use the power outlet when the engine
is running, and remove a plug from
the power outlet after using the elec-
tric appliance. Using the power outlet
excessively or while the engine is not
running or leaving appliances plugged
into the power outlet when not in use
will cause battery discharge
• Only use the electric appliances which are less than 12V and 10A in electric
capacity.
• Adjust the air-conditioner or heater to the lowest operation level when you
have to use the power socket while
using air-conditioner or heater.
• Close the cover when not in use.
• Some electronic devices can cause electronic interference when plugged
into a vehicle’s power outlet. These
devices may cause excessive audio
static and malfunctions in other elec-
tronic systems or devices used in your
vehicle.
OJB038102OJB028101
Page 91 of 240
Knowing your vehicle
82
3
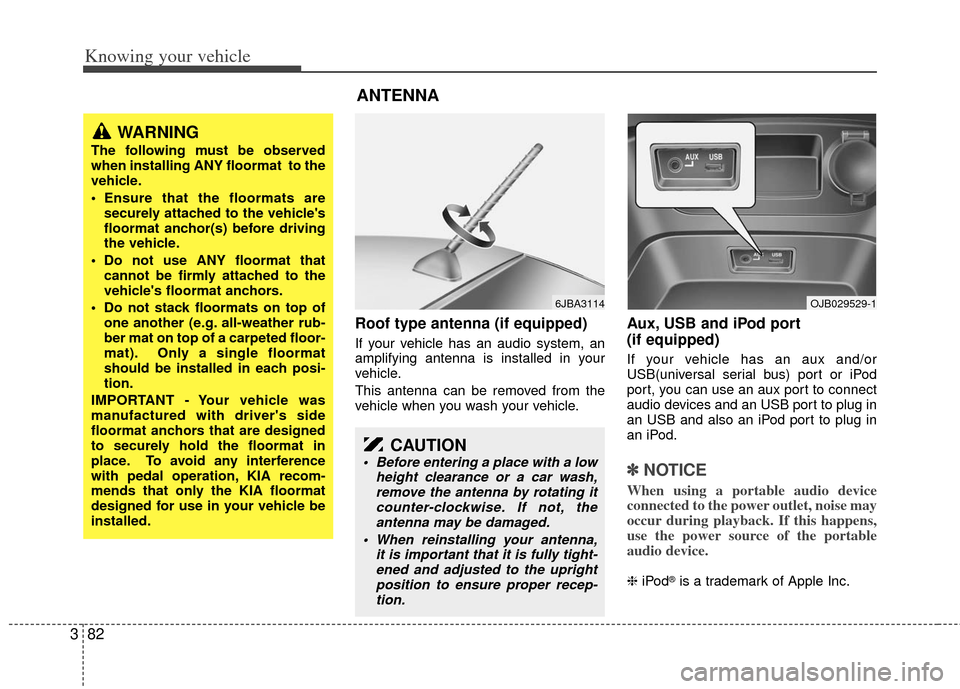
Roof type antenna (if equipped)
If your vehicle has an audio system, an
amplifying antenna is installed in your
vehicle.
This antenna can be removed from the
vehicle when you wash your vehicle.
Aux, USB and iPod port
(if equipped)
If your vehicle has an aux and/or
USB(universal serial bus) port or iPod
port, you can use an aux port to connect
audio devices and an USB port to plug in
an USB and also an iPod port to plug in
an iPod.
✽ ✽
NOTICE
When using a portable audio device
connected to the power outlet, noise may
occur during playback. If this happens,
use the power source of the portable
audio device.
❈ iPod®is a trademark of Apple Inc.
6JBA3114OJB029529-1
WARNING
The following must be observed
when installing ANY floormat to the
vehicle.
Ensure that the floormats are
securely attached to the vehicle's
floormat anchor(s) before driving
the vehicle.
Do not use ANY floormat that cannot be firmly attached to the
vehicle's floormat anchors.
Do not stack floormats on top of one another (e.g. all-weather rub-
ber mat on top of a carpeted floor-
mat). Only a single floormat
should be installed in each posi-
tion.
IMPORTANT - Your vehicle was
manufactured with driver's side
floormat anchors that are designed
to securely hold the floormat in
place. To avoid any interference
with pedal operation, KIA recom-
mends that only the KIA floormat
designed for use in your vehicle be
installed.
CAUTION
Before entering a place with a low height clearance or a car wash,remove the antenna by rotating itcounter-clockwise. If not, the antenna may be damaged.
it is important that it is fully tight-ened and adjusted to the uprightposition to ensure proper recep-tion.
ANTENNA
Page 92 of 240
383
Knowing your vehicle
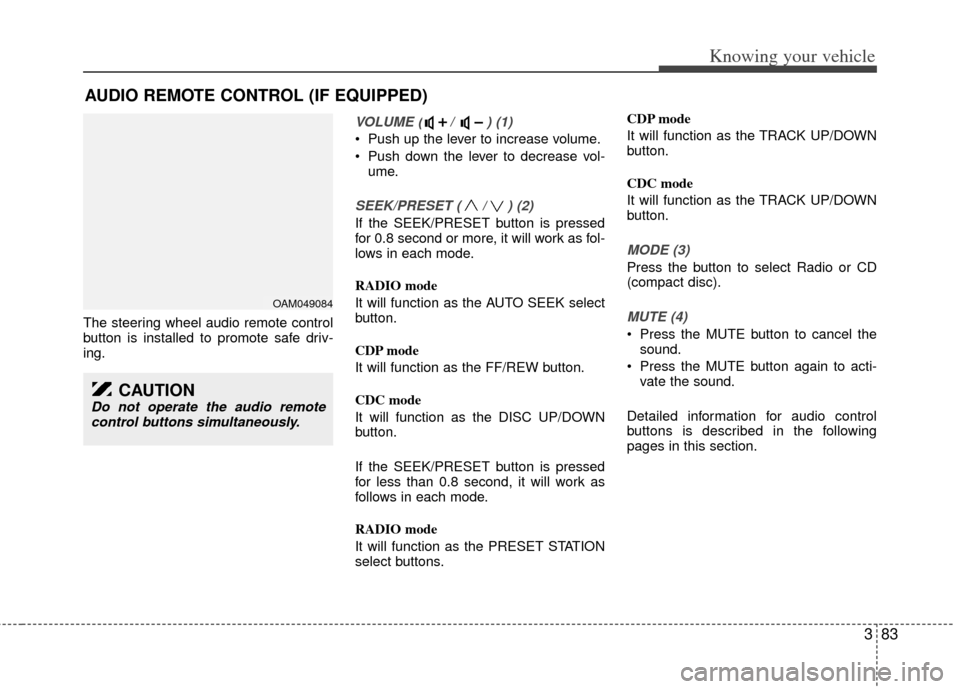
The steering wheel audio remote control
button is installed to promote safe driv-
ing.
VOLUME ( / ) (1)
Push up the lever to increase volume.
Push down the lever to decrease vol-ume.
SEEK/PRESET ( / ) (2)
If the SEEK/PRESET button is pressed
for 0.8 second or more, it will work as fol-
lows in each mode.
RADIO mode
It will function as the AUTO SEEK select
button.
CDP mode
It will function as the FF/REW button.
CDC mode
It will function as the DISC UP/DOWN
button.
If the SEEK/PRESET button is pressed
for less than 0.8 second, it will work as
follows in each mode.
RADIO mode
It will function as the PRESET STATION
select buttons. CDP mode
It will function as the TRACK UP/DOWN
button.
CDC mode
It will function as the TRACK UP/DOWN
button.
MODE (3)
Press the button to select Radio or CD
(compact disc).
MUTE (4)
Press the MUTE button to cancel the
sound.
Press the MUTE button again to acti- vate the sound.
Detailed information for audio control
buttons is described in the following
pages in this section.
AUDIO REMOTE CONTROL (IF EQUIPPED)
OAM049084
CAUTION
Do not operate the audio remote control buttons simultaneously.
Page 93 of 240
Knowing your vehicle
84
3
✽
✽
NOTICE
If you install an aftermarket HID head
lamp, your vehicle’s audio and electron-
ic device may malfunction.
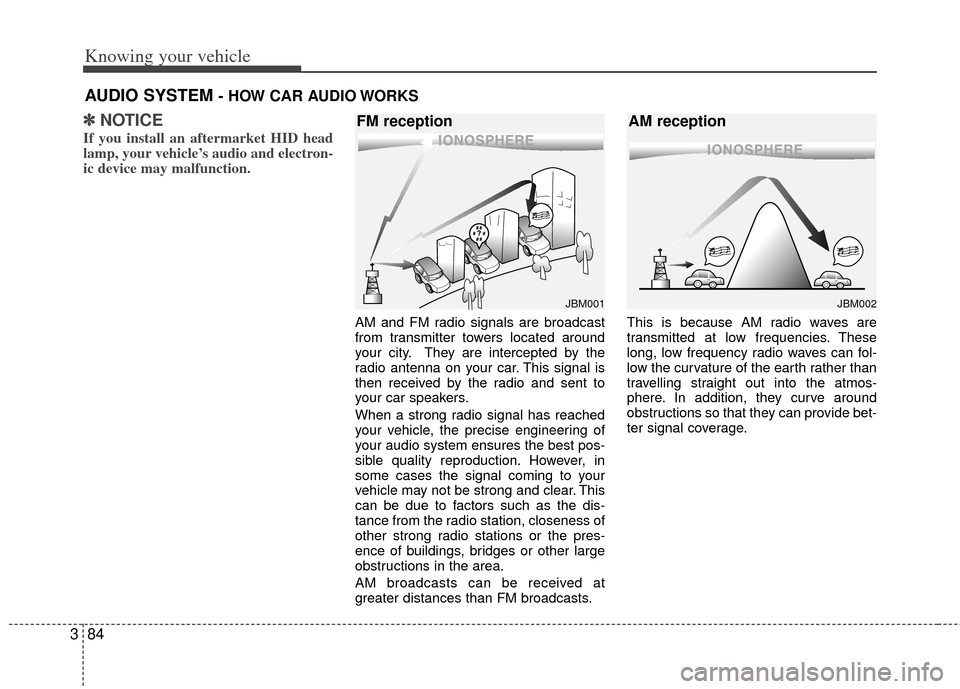
AM and FM radio signals are broadcast
from transmitter towers located around
your city. They are intercepted by the
radio antenna on your car. This signal is
then received by the radio and sent to
your car speakers.
When a strong radio signal has reached
your vehicle, the precise engineering of
your audio system ensures the best pos-
sible quality reproduction. However, in
some cases the signal coming to your
vehicle may not be strong and clear. This
can be due to factors such as the dis-
tance from the radio station, closeness of
other strong radio stations or the pres-
ence of buildings, bridges or other large
obstructions in the area.
AM broadcasts can be received at
greater distances than FM broadcasts. This is because AM radio waves are
transmitted at low frequencies. These
long, low frequency radio waves can fol-
low the curvature of the earth rather than
travelling straight out into the atmos-
phere. In addition, they curve around
obstructions so that they can provide bet-
ter signal coverage.
AUDIO SYSTEM - HOW CAR AUDIO WORKS
JBM001JBM002
FM reception
AM reception
Page 95 of 240
Knowing your vehicle
86
3
Satellite radio reception
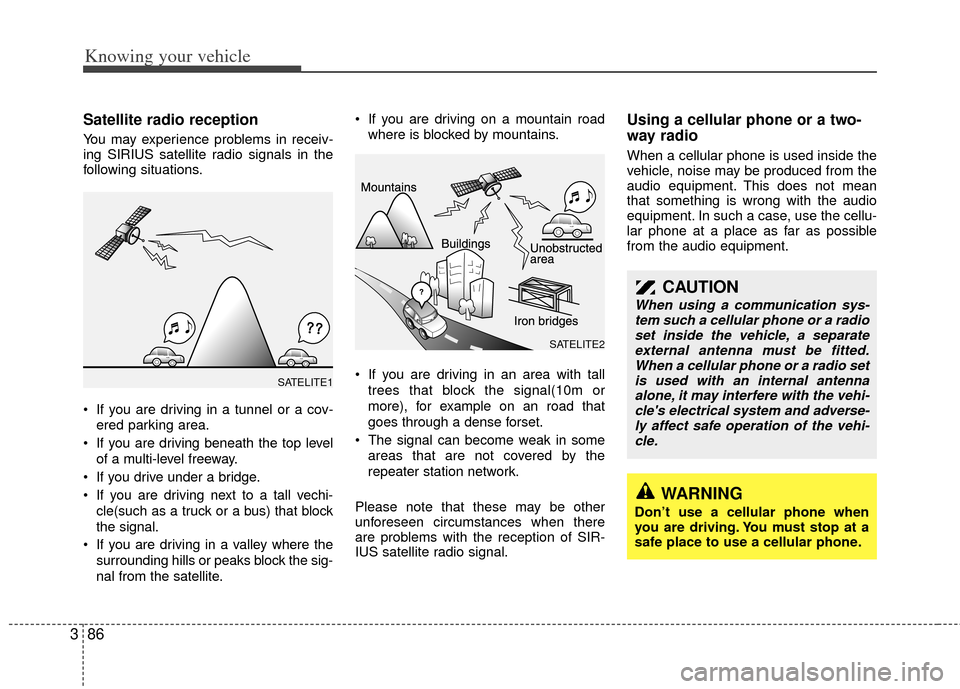
You may experience problems in receiv-
ing SIRIUS satellite radio signals in the
following situations.
If you are driving in a tunnel or a cov-
ered parking area.
If you are driving beneath the top level of a multi-level freeway.
If you drive under a bridge.
If you are driving next to a tall vechi- cle(such as a truck or a bus) that block
the signal.
If you are driving in a valley where the surrounding hills or peaks block the sig-
nal from the satellite. If you are driving on a mountain road
where is blocked by mountains.
If you are driving in an area with tall trees that block the signal(10m or
more), for example on an road that
goes through a dense forset.
The signal can become weak in some areas that are not covered by the
repeater station network.
Please note that these may be other
unforeseen circumstances when there
are problems with the reception of SIR-
IUS satellite radio signal.
Using a cellular phone or a two-
way radio
When a cellular phone is used inside the
vehicle, noise may be produced from the
audio equipment. This does not mean
that something is wrong with the audio
equipment. In such a case, use the cellu-
lar phone at a place as far as possible
from the audio equipment.
CAUTION
When using a communication sys- tem such a cellular phone or a radioset inside the vehicle, a separateexternal antenna must be fitted. When a cellular phone or a radio setis used with an internal antennaalone, it may interfere with the vehi- cle's electrical system and adverse-ly affect safe operation of the vehi- cle.
WARNING
Don’t use a cellular phone when
you are driving. You must stop at a
safe place to use a cellular phone.
SATELITE2
SATELITE1
Page 96 of 240
387
Knowing your vehicle
Care of disc (if equipped)
If the temperature inside the car is toohigh, open the car windows for ventila-
tion before using your car audio.
It is illegal to copy and use MP3/WMA/AAC/WAVE files without
permission. Use CDs that are created
only by lawful means.
Do not apply volatile agents such as benzene and thinner, normal cleaners
and magnetic sprays made for ana-
logue disc onto CDs.
To prevent the disc surface from get- ting damaged. Hold and carry CDs by
the edges or the edges of the center
hole only.
Clean the disc surface with a piece of soft cloth before playback (wipe it from
the center to the outside edge.)
Do not damage the disc surface or attach pieces of sticky tape or paper
onto it.
Make sure on undesirable matter other than CDs are inserted into the CD
player (Do not insert more than one
CD at a time). Keep CDs in their cases after use to
protect them from scratches or dirt.
Depending on the type of CD-R/CD- RW CDs, certain CDs may not operate
normally according to manufacturing
companies or making and recording
methods. In such circumstances, if you
still continue to use those CDs, they
may cause the malfunction of your car
audio system.
✽ ✽ NOTICE- Playing an
Incompatible Copy-Protected
Audio CD
Some copy-protected CDs, which do not
comply with the international audio CD
standards(Red Book), may not play on
your car audio. Please note that if you
try to play copy protected CDs and the
CD player of your car audio is not per-
forming to your expectation, this may be
caused by those CDs and not a defect in
the device itself. Please replace those
CDs.
Page 98 of 240
389
Knowing your vehicle
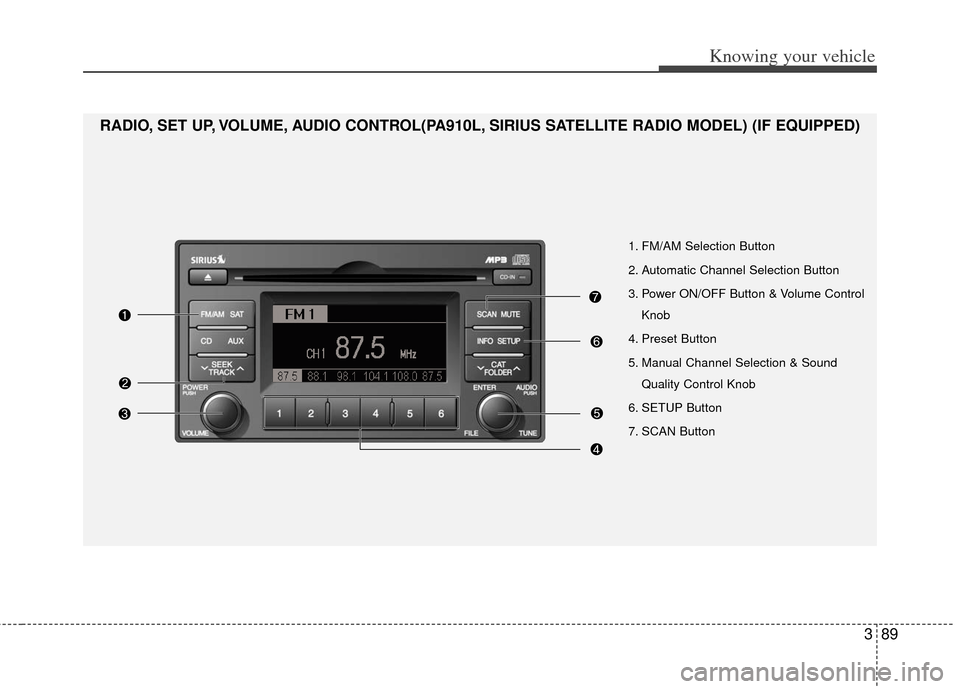
1. FM/AM Selection Button
2. Automatic Channel Selection Button
3. Power ON/OFF Button & Volume ControlKnob
4. Preset Button
5. Manual Channel Selection & Sound Quality Control Knob
6. SETUP Button
7. SCAN Button
RADIO, SET UP, VOLUME, AUDIO CONTROL(PA910L, SIRIUS SATELLITE RADIO MODEL) (IF EQUIPPED)
Page 99 of 240
Knowing your vehicle
90
3
1. FM/AM Selection Button
Turns to FM or AM mode, and toggles in
the order of FM1
➟ FM2 ➟ AM ➟ FM1...
when the button is pressed each time.
2. Automatic Channel Selection Button
When the [SEEK ] button is pressed,
it increases the band frequency to auto-
matically select a channel. Stops at the
previous frequency if no channel is
found.
When the [TRACK ] button is press- ed, it reduces the band frequency to
automatically select a channel. Stops
at the previous frequency if no channel
is found.
3. Power ON/OFF Button & Volume Control Knob
Turns the set on/off when the IGNITION
SWITH is on ACC or ON. If the button is
turned to the right, it increases the vol-
ume and left,decreases the volume.
4. Preset Button
Push [1]~[6] buttons less than 0.8 sec-
ond to play the channel saved in each
button. Push [Preset] button for 0.8 sec-
ond or longer to save current channel to
the respective button with a beep.
5. Manual Channel Selection &Sound Quality Control Knob
Turn this control while listening to a radio
channel to manually adjust frequency.
Turn clockwise to increase frequency and
counterclockwise to reduce frequency.
Pressing the button changes the BASS,
MIDDLE, TREBLE, FADER and BAL-
ANCE TUNE mode. The mode selected
is shown on the display. After selecting
each mode, rotate the Audio control knob
clockwise or counterclockwise.
BASS Control
To increase the BASS, rotate the knob
clockwise, while to decrease the BASS,
rotate the knob counterclockwise.
MIDDLE Control
To increase the Midrange, rotate the
knob clockwise, while to decrease the
Midrange, rotate the knob counterclock-
wise. TREBLE Control
To increase the TREBLE, rotate the knob
clockwise, while to decrease the
TREBLE, rotate the knob counterclock-
wise.
FADER Control
Turn the control knob clockwise to
emphasize rear speaker sound(front
speaker sound will be attenuated). When
the control knob is turned counterclock-
wise, front speaker sound will be empha-
sized(rear speaker sound will be attenu-
ated).
BALANCE Control
Rotate the knob clockwise to emphasize
right speaker sound(left speaker sound
will be attenuated). When the control
knob is turned counter clockwise, left
speaker sound will be emphasized(right
speaker sound will be attenuated).