clutch KIA Rio 2011 2.G Owner's Manual
[x] Cancel search | Manufacturer: KIA, Model Year: 2011, Model line: Rio, Model: KIA Rio 2011 2.GPages: 240, PDF Size: 4.68 MB
Page 115 of 240
43
Driving your vehicle
1. Make sure the parking brake isapplied.
2. Manual Transaxle - Depress the
clutch pedal fully and shift the
transaxle into Neutral. Keep the clutch
pedal depressed while turning the
ignition switch to the start position.
The starter will not operate if the
clutch pedal is not fully depressed.
Automatic Transaxle - Place the
transaxle shift lever in P (Park).
Depress the brake pedal fully.
You can also start the engine when the shift lever is in the N (Neutral)position.
3. Turn the ignition switch to START and hold it there until the engine starts (a
maximum of 10 seconds), then
release the key.
4. In extremely cold weather (below -18°C / 0°F) or after the vehicle has
not been operated for several days, let
the engine warm up without depress-
ing the accelerator.
Whether the engine is cold or warm, it
should be started without depressing the accelerator.
✽ ✽ NOTICE
Do not engage the starter for more than
10 seconds. If the engine stalls or fails to
start, wait 5 to 10 seconds before re-
engaging the starter. Excessive or
improper use of the starter may damage
it.
The starter will not operate if:
Manual Transaxle - the clutch pedal is
not fully depressed.
Automatic Transaxle - the shift lever
is NOT in the P (Park) or N (Neutral)
position.
WARNING - Ignition key
• Never turn the ignition switch to LOCK or ACC while the vehicle is
moving. This would result in loss
of directional control and braking
function, which could cause an
accident or collision.
Before leaving the driver’s seat, always make sure the shift lever
is engaged in 1
stgear for manual
transaxle or P (Park) for automat-
ic transaxle. Then, set the parking
brake fully and shut the engine
off. Unexpected and sudden vehi-
cle movement may occur if these
precautions are not taken.
Never reach for the ignition switch, or any other controls
through the steering wheel while
the vehicle is in motion. The pres-
ence of your hand or arm in this
area could cause a loss of vehicle
control, an accident and serious
bodily injury or death.
Do not place any movable objects around the driver’s seat as they
may move while driving, interfere
with the driver and lead to an
accident.
CAUTION - Stall
If the engine stalls while you are inmotion, do not attempt to move theshift lever to the P (Park) position. If traffic and road conditions permit,you may put the shift lever in the N (Neutral) position while the vehicleis still moving and turn the ignition switch to the START position in anattempt to restart the engine.
STARTING THE ENGINE
CAUTION
Always wear appropriate shoes whenoperating your vehicle. Unsuitable shoes (high heels, ski boots,etc.) mayinterfere with your ability to use the brake and accelerator pedal, and theclutch (if equipped).
Page 116 of 240
Driving your vehicle
44
Manual transaxle operation
The manual transaxle has five forward
gears.
Press the clutch pedal down fully while
shifting, then release it slowly.
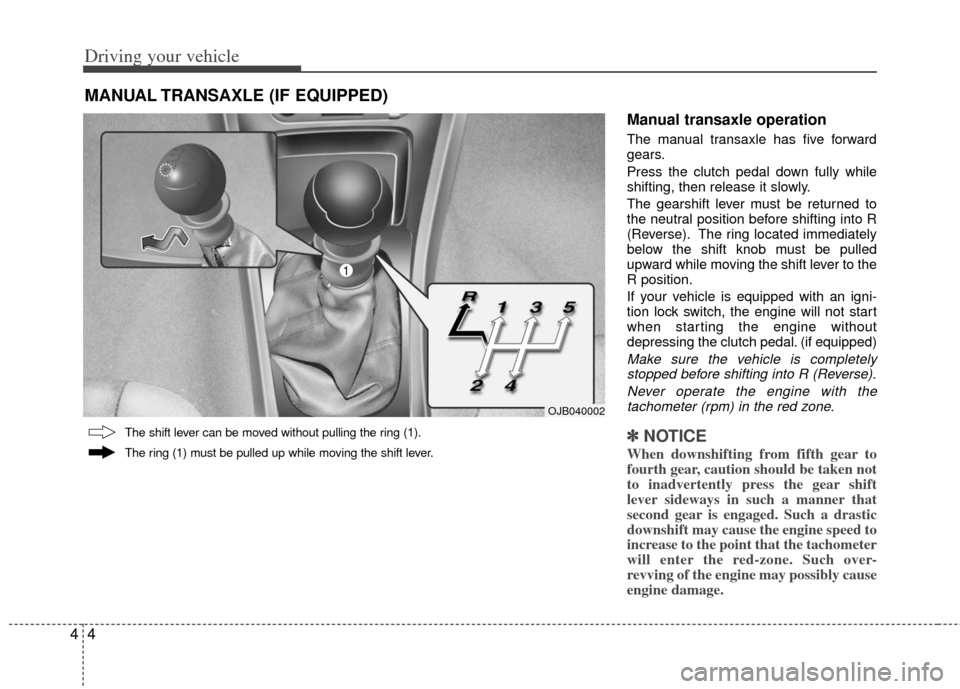
The gearshift lever must be returned to
the neutral position before shifting into R
(Reverse). The ring located immediately
below the shift knob must be pulled
upward while moving the shift lever to the
R position.
If your vehicle is equipped with an igni-
tion lock switch, the engine will not start
when starting the engine without
depressing the clutch pedal. (if equipped)
Make sure the vehicle is completelystopped before shifting into R (Reverse).
Never operate the engine with thetachometer (rpm) in the red zone.
✽ ✽ NOTICE
When downshifting from fifth gear to
fourth gear, caution should be taken not
to inadvertently press the gear shift
lever sideways in such a manner that
second gear is engaged. Such a drastic
downshift may cause the engine speed to
increase to the point that the tachometer
will enter the red-zone. Such over-
revving of the engine may possibly cause
engine damage.
MANUAL TRANSAXLE (IF EQUIPPED)
The ring (1) must be pulled up while moving the shift lever.
OJB040002
The shift lever can be moved without pulling the ring (1).
1
Page 117 of 240
45
Driving your vehicle
✽
✽NOTICE
To avoid premature clutch wear and
damage, do not drive with your foot
resting on the clutch pedal. Also, don’t
use the clutch to hold the vehicle
stopped on an uphill grade, while wait-
ing for a traffic light, etc..
Downshifting
When you must slow down in heavy traf-
fic or while driving up steep hills, down-
shift before the engine starts to labor.
Downshifting reduces the chance of
stalling and gives better acceleration
when you again need to increase your
speed. When the vehicle is traveling
down steep hills, downshifting helps
maintain safe speed and prolongs brake
life.
WARNING- Manual
transaxle
Before leaving the driver’s seat,
always set the parking brake fully
and shut the engine off. Then make
sure the transaxle is shifted into 1
st
gear when the vehicle is parked on
a level or uphill grade, and shifted
into R (Reverse) on a downhill
grade. Unexpected and sudden
vehicle movement can occur if
these precautions are not followed
in the order identified.
Page 126 of 240
Driving your vehicle
14
4
The cruise control system allows you to
program the vehicle to maintain a con-
stant speed without resting your foot on
the accelerator pedal.
This system is designed to function
above approximately 40 km/h (25 mph).
✽ ✽
NOTICE
During normal cruise control operation,
when the SET- switch is activated or
reactivated after applying the brakes,
the cruise control will energize after
approximately 3 seconds. This delay is
normal.
To set cruise control speed:
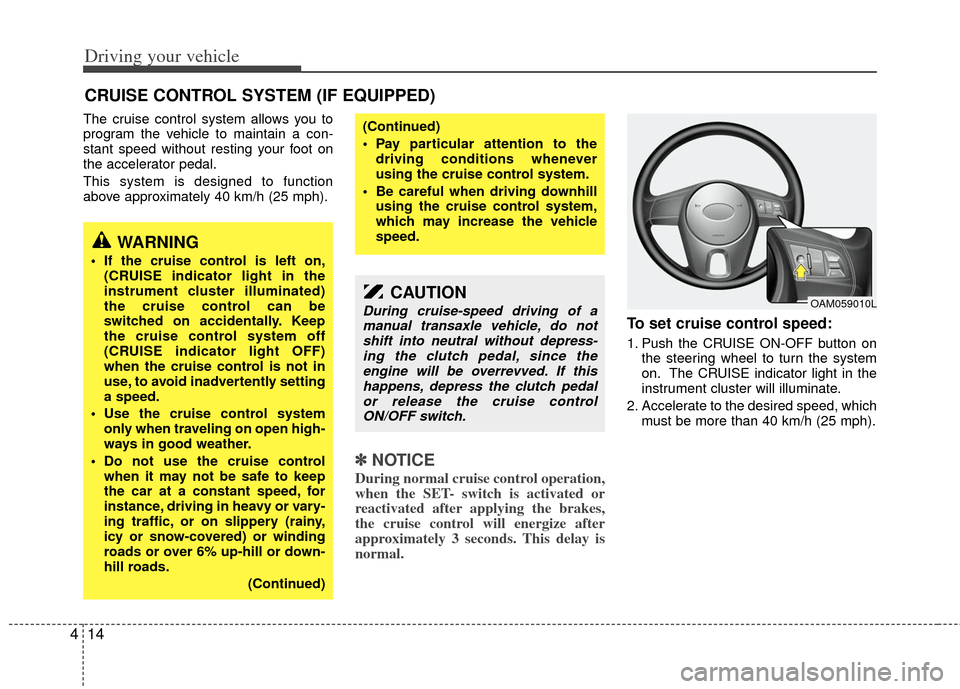
1. Push the CRUISE ON-OFF button on
the steering wheel to turn the system
on. The CRUISE indicator light in the
instrument cluster will illuminate.
2. Accelerate to the desired speed, which must be more than 40 km/h (25 mph).
CRUISE CONTROL SYSTEM (IF EQUIPPED)
WARNING
If the cruise control is left on,(CRUISE indicator light in the
instrument cluster illuminated)
the cruise control can be
switched on accidentally. Keep
the cruise control system off
(CRUISE indicator light OFF)
when the cruise control is not in
use, to avoid inadvertently setting
a speed.
Use the cruise control system only when traveling on open high-
ways in good weather.
Do not use the cruise control when it may not be safe to keep
the car at a constant speed, for
instance, driving in heavy or vary-
ing traffic, or on slippery (rainy,
icy or snow-covered) or winding
roads or over 6% up-hill or down-
hill roads.
(Continued)
(Continued)
Pay particular attention to thedriving conditions whenever
using the cruise control system.
Be careful when driving downhill using the cruise control system,
which may increase the vehicle
speed.
CAUTION
During cruise-speed driving of amanual transaxle vehicle, do notshift into neutral without depress- ing the clutch pedal, since theengine will be overrevved. If this happens, depress the clutch pedalor release the cruise control ON/OFF switch.OAM059010L
Page 128 of 240
Driving your vehicle
16
4
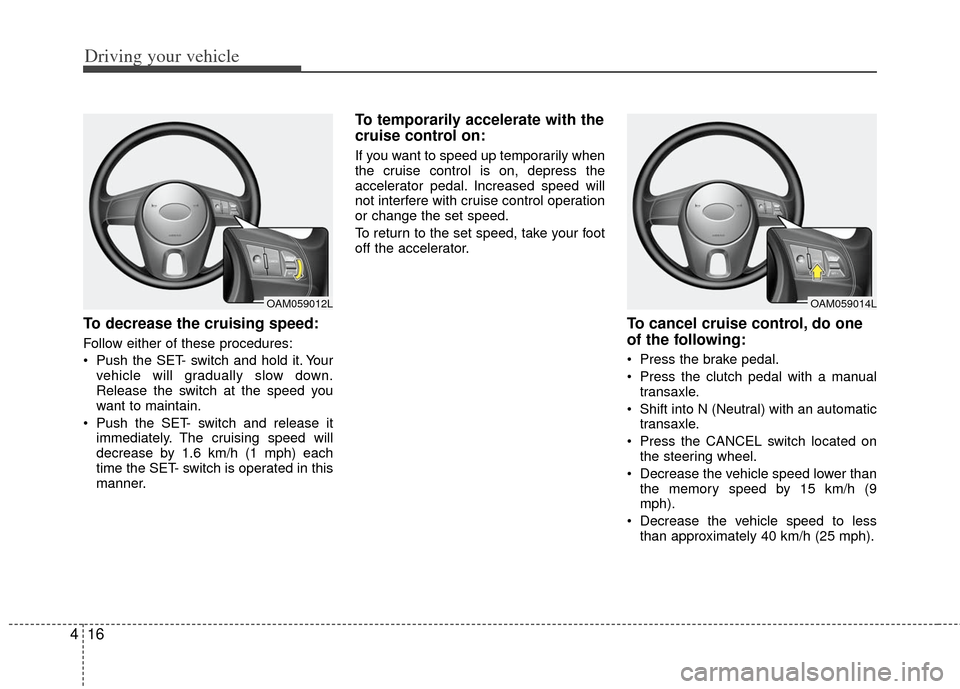
To decrease the cruising speed:
Follow either of these procedures:
Push the SET- switch and hold it. Your
vehicle will gradually slow down.
Release the switch at the speed you
want to maintain.
Push the SET- switch and release it immediately. The cruising speed will
decrease by 1.6 km/h (1 mph) each
time the SET- switch is operated in this
manner.
To temporarily accelerate with the
cruise control on:
If you want to speed up temporarily when
the cruise control is on, depress the
accelerator pedal. Increased speed will
not interfere with cruise control operation
or change the set speed.
To return to the set speed, take your foot
off the accelerator.
To cancel cruise control, do one
of the following:
Press the brake pedal.
Press the clutch pedal with a manualtransaxle.
Shift into N (Neutral) with an automatic transaxle.
Press the CANCEL switch located on the steering wheel.
Decrease the vehicle speed lower than the memory speed by 15 km/h (9
mph).
Decrease the vehicle speed to less than approximately 40 km/h (25 mph).
OAM059012LOAM059014L
Page 195 of 240
Maintenance
47
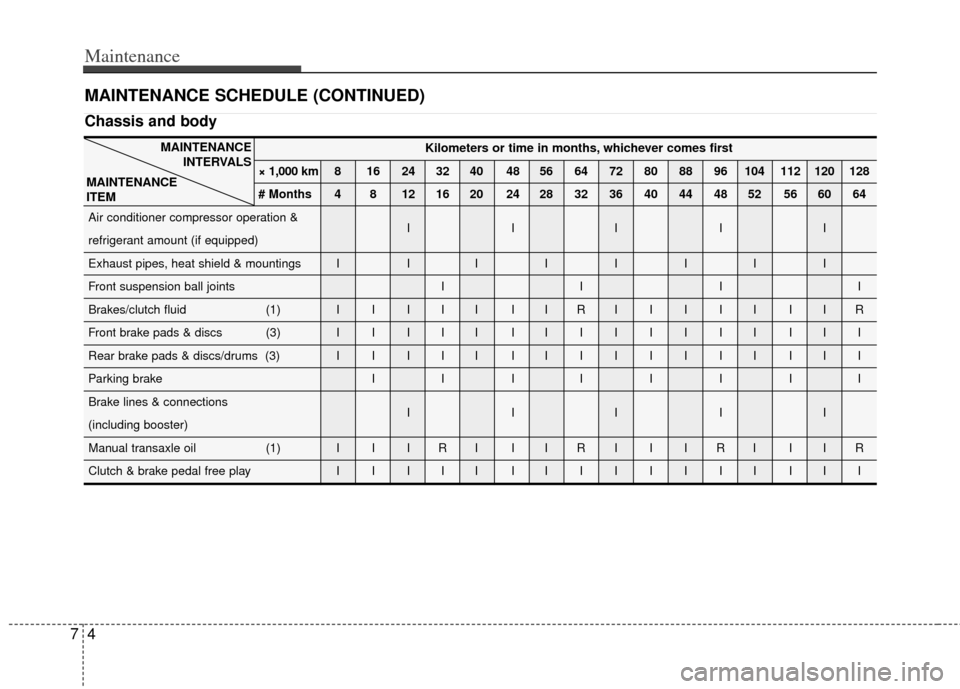
MAINTENANCE SCHEDULE (CONTINUED)
Chassis and body
Kilometers or time in months, whichever comes first
× 1,000 km 8 16 24 32 40 48 56 64 72 80 88 96 104 112 120 128
# Months 4 8 12 16 20 24 28 32 36 40 44 48 52 56 60 64
Air conditioner compressor operation & IIIII
refrigerant amount (if equipped)
Exhaust pipes, heat shield & mountings I I IIIIII
Front suspension ball joints I I I I
Brakes/clutch fluid (1) I I I I I I I R IIIII IIR
Front brake pads & discs (3) I I I I I I IIIIIII III
Rear brake pads & discs/drums (3) I I I I I I IIIIIII III
Parking brake I I I IIIII
Brake lines & connections IIIII
(including booster)
Manual transaxle oil (1) I I I R I I I R I I I R I I I R
Clutch & brake pedal free play I I I I I I IIIIIII III
MAINTENANCE
INTERVALS
MAINTENANCE
ITEM
Page 205 of 240
Maintenance
14
7
BRAKE FLUID (IF EQUIPPED)
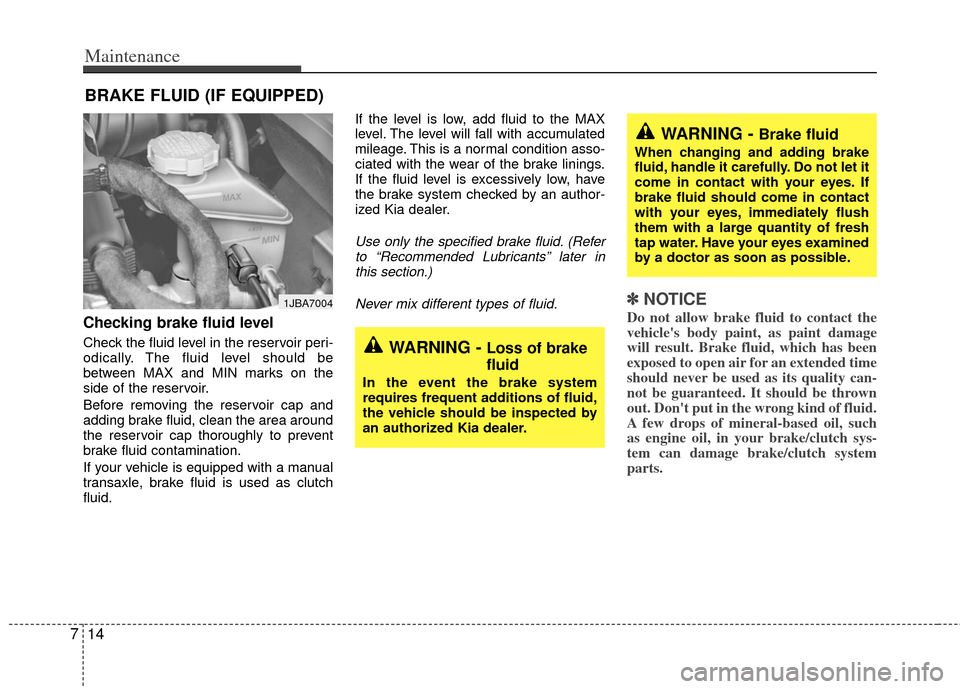
Checking brake fluid level
Check the fluid level in the reservoir peri-
odically. The fluid level should be
between MAX and MIN marks on the
side of the reservoir.
Before removing the reservoir cap and
adding brake fluid, clean the area around
the reservoir cap thoroughly to prevent
brake fluid contamination.
If your vehicle is equipped with a manual
transaxle, brake fluid is used as clutch
fluid. If the level is low, add fluid to the MAX
level. The level will fall with accumulated
mileage. This is a normal condition asso-
ciated with the wear of the brake linings.
If the fluid level is excessively low, have
the brake system checked by an author-
ized Kia dealer.
Use only the specified brake fluid. (Refer
to “Recommended Lubricants” later in this section.)
Never mix different types of fluid.
✽ ✽ NOTICE
Do not allow brake fluid to contact the
vehicle's body paint, as paint damage
will result. Brake fluid, which has been
exposed to open air for an extended time
should never be used as its quality can-
not be guaranteed. It should be thrown
out. Don't put in the wrong kind of fluid.
A few drops of mineral-based oil, such
as engine oil, in your brake/clutch sys-
tem can damage brake/clutch system
parts.
WARNING - Brake fluid
When changing and adding brake
fluid, handle it carefully. Do not let it
come in contact with your eyes. If
brake fluid should come in contact
with your eyes, immediately flush
them with a large quantity of fresh
tap water. Have your eyes examined
by a doctor as soon as possible.
WARNING - Loss of brake
fluid
In the event the brake system
requires frequent additions of fluid,
the vehicle should be inspected by
an authorized Kia dealer.
1JBA7004
Page 224 of 240
733
Maintenance
LUBRICANT SPECIFICATIONS
Recommended lubricants
To help achieve proper engine and powertrain performance and
durability, use only lubricants of the proper quality. The correct
lubricants also help promote engine efficiency that results in
improved fuel economy.
Engine oils labeled Energy Conserving Oil are now available.
Along with other additional benefits, they contribute to fuel
economy by reducing the amount of fuel necessary to over-
come engine friction. Often, these improvements are difficult to
measure in everyday driving, but in a year’s time, they can offer
significant cost and energy savings.
Recommended SAE viscosity number
✽ ✽NOTICE
Always be sure to clean the area around any filler plug, drain
plug, or dipstick before checking or draining any lubricant.
This is especially important in dusty or sandy areas and when
the vehicle is used on unpaved roads. Cleaning the plug and
dipstick areas will prevent dirt and grit from entering the
engine and other mechanisms that could be damaged.
Engine oil viscosity (thickness) has an effect on fuel economy
and cold weather operating (starting and oil flow). Lower vis-
cosity engine oils can provide better fuel economy and cold
weather performance, however, higher viscosity engine oils are
required for satisfactory lubrication in hot weather. Using oils of
any viscosity other than those recommended could result in
engine damage.
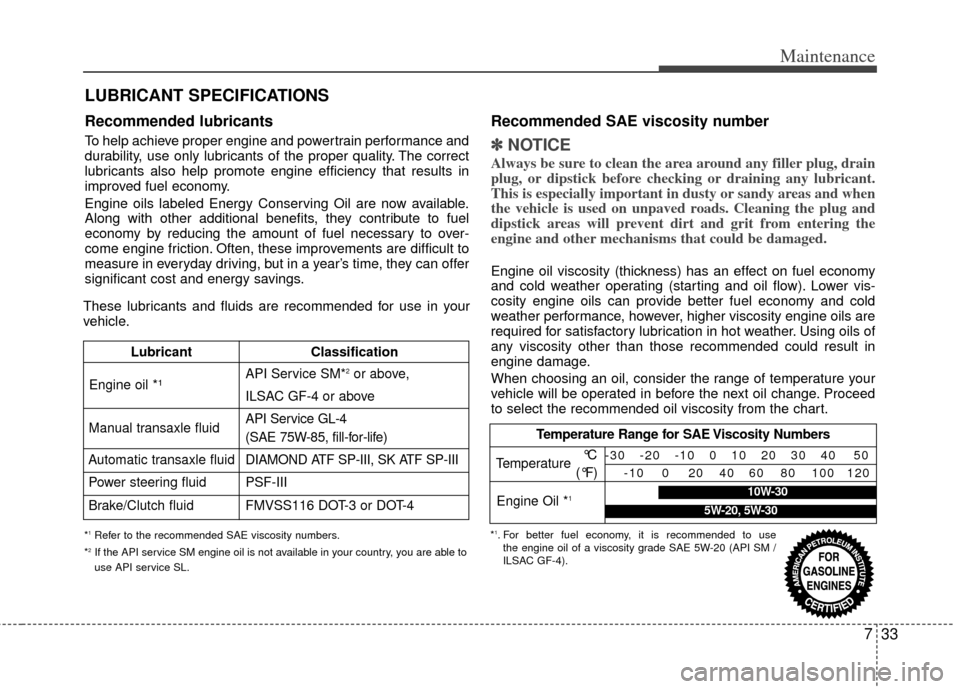
When choosing an oil, consider the range of temperature your
vehicle will be operated in before the next oil change. Proceed
to select the recommended oil viscosity from the chart.
*1Refer to the recommended SAE viscosity numbers.
*2If the API service SM engine oil is not available in your country, you are able to
use API service SL.
These lubricants and fluids are recommended for use in your
vehicle.
Lubricant Classification
API Service SM*
2or above,
ILSAC GF-4 or above
Manual transaxle fluid API Service GL-4
(SAE 75W-85, fill-for-life)
DIAMOND ATF SP-III, SK ATF SP-III
Power steering fluid PSF-III
Brake/Clutch fluid FMVSS116 DOT-3 or DOT-4Engine oil *¹
Automatic transaxle fluid
Temperature Range for SAE Viscosity Numbers
Temperature
Engine Oil *
1
°C
(°F)-30 -20 -10 0 10 20 30 40 50
-10 0 20 40 60 80 100 120
*1. For better fuel economy, it is recommended to use the engine oil of a viscosity grade SAE 5W-20 (API SM /
ILSAC GF-4).
10W-30
5W-20, 5W-30