KIA Rio 2016 3.G Owners Manual
Manufacturer: KIA, Model Year: 2016, Model line: Rio, Model: KIA Rio 2016 3.GPages: 449, PDF Size: 14.93 MB
Page 91 of 449
Features of your vehicle
20
4
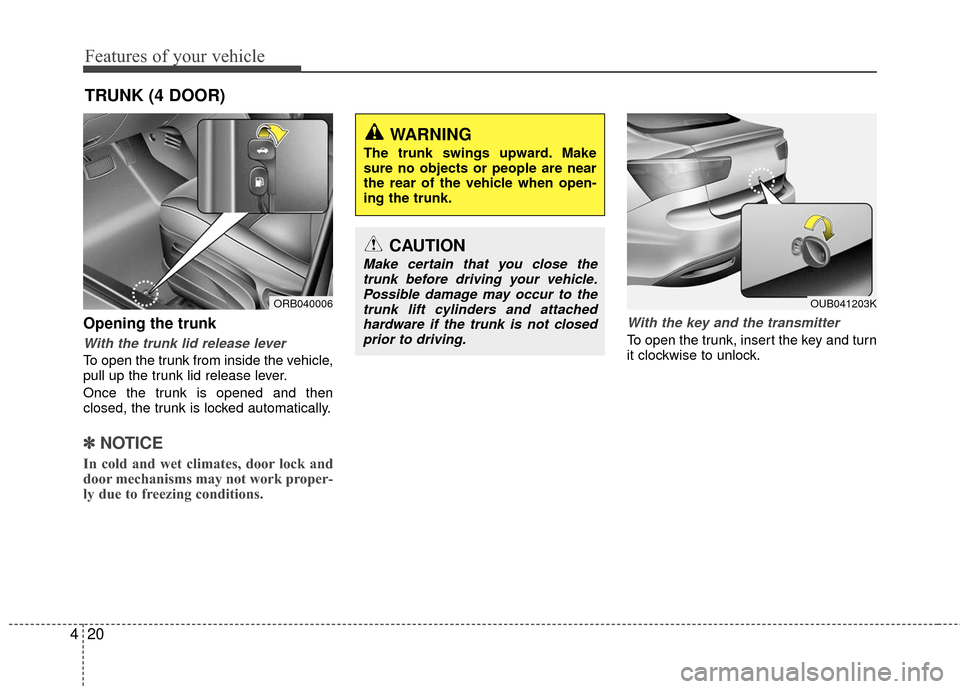
Opening the trunk
With the trunk lid release lever
To open the trunk from inside the vehicle,
pull up the trunk lid release lever.
Once the trunk is opened and then
closed, the trunk is locked automatically.
✽ ✽
NOTICE
In cold and wet climates, door lock and
door mechanisms may not work proper-
ly due to freezing conditions.
With the key and the transmitter
To open the trunk, insert the key and turn
it clockwise to unlock.
TRUNK (4 DOOR)
ORB040006
CAUTION
Make certain that you close the
trunk before driving your vehicle.Possible damage may occur to the trunk lift cylinders and attachedhardware if the trunk is not closed prior to driving.
WARNING
The trunk swings upward. Make
sure no objects or people are near
the rear of the vehicle when open-
ing the trunk.
OUB041203K
Page 92 of 449
421
Features of your vehicle
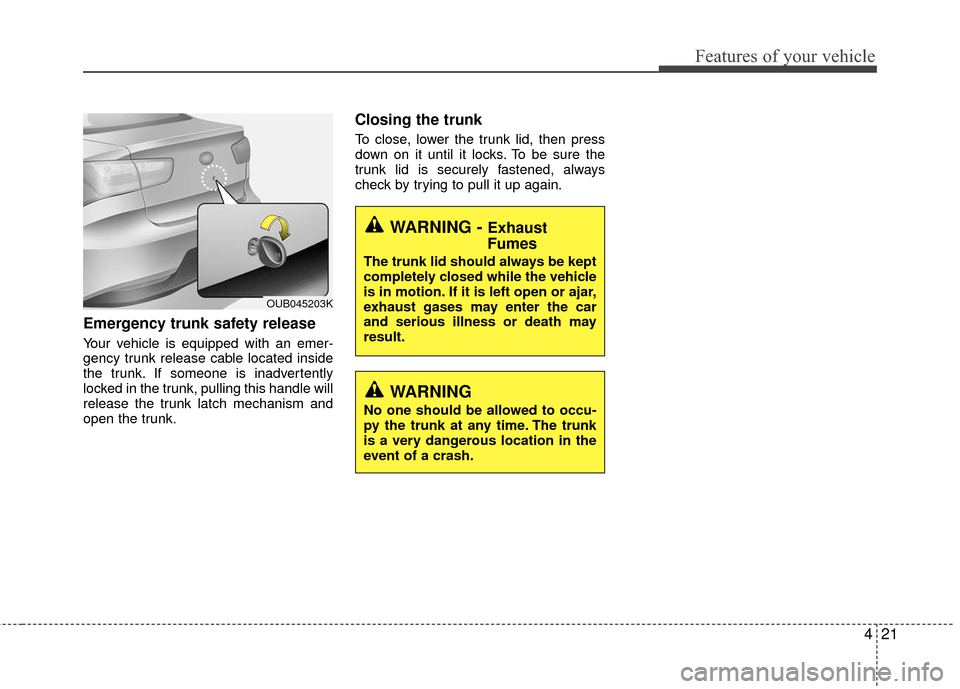
Emergency trunk safety release
Your vehicle is equipped with an emer-
gency trunk release cable located inside
the trunk. If someone is inadvertently
locked in the trunk, pulling this handle will
release the trunk latch mechanism and
open the trunk.
Closing the trunk
To close, lower the trunk lid, then press
down on it until it locks. To be sure the
trunk lid is securely fastened, always
check by trying to pull it up again.
WARNING - Exhaust
Fumes
The trunk lid should always be kept
completely closed while the vehicle
is in motion. If it is left open or ajar,
exhaust gases may enter the car
and serious illness or death may
result.
WARNING
No one should be allowed to occu-
py the trunk at any time. The trunk
is a very dangerous location in the
event of a crash.
OUB045203K
Page 93 of 449
Features of your vehicle
22
4
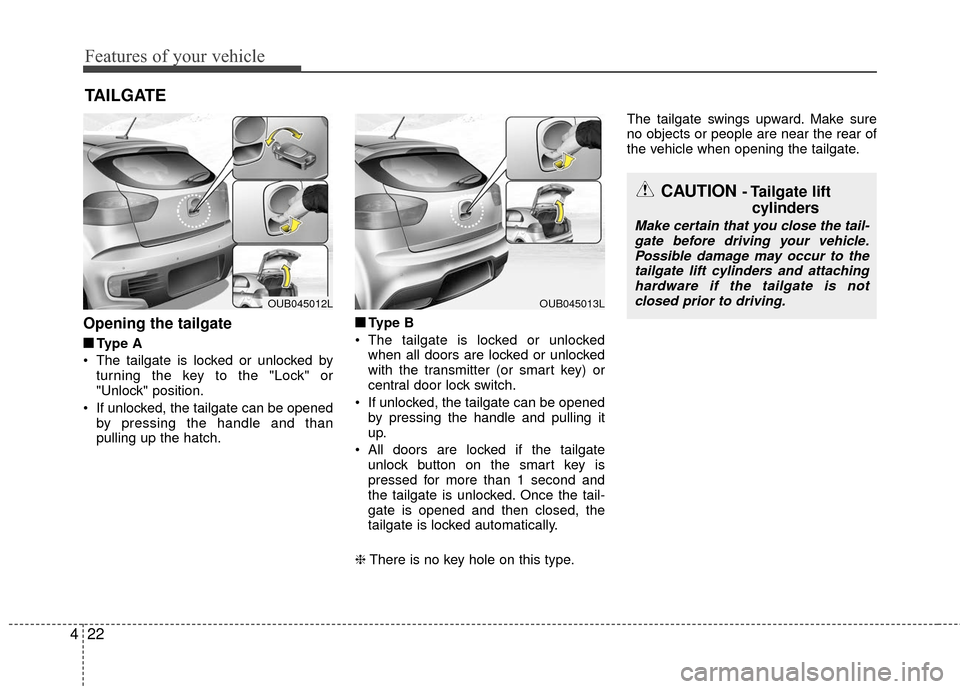
Opening the tailgate
■
■
Type A
The tailgate is locked or unlocked by turning the key to the "Lock" or
"Unlock" position.
If unlocked, the tailgate can be opened by pressing the handle and than
pulling up the hatch. ■ ■
Type B
The tailgate is locked or unlocked when all doors are locked or unlocked
with the transmitter (or smart key) or
central door lock switch.
If unlocked, the tailgate can be opened by pressing the handle and pulling it
up.
All doors are locked if the tailgate unlock button on the smart key is
pressed for more than 1 second and
the tailgate is unlocked. Once the tail-
gate is opened and then closed, the
tailgate is locked automatically.
❈ There is no key hole on this type. The tailgate swings upward. Make sure
no objects or people are near the rear of
the vehicle when opening the tailgate.
TAILGATE
CAUTION - Tailgate lift
cylinders
Make certain that you close the tail-
gate before driving your vehicle. Possible damage may occur to thetailgate lift cylinders and attachinghardware if the tailgate is not closed prior to driving.
OUB045013LOUB045012L
Page 94 of 449
423
Features of your vehicle
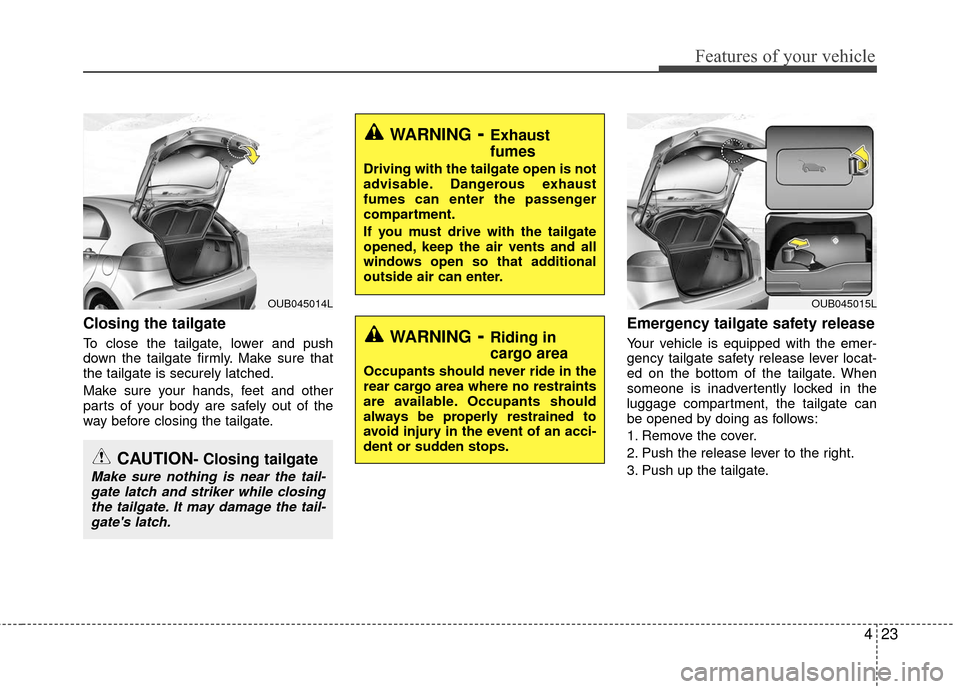
Closing the tailgate
To close the tailgate, lower and push
down the tailgate firmly. Make sure that
the tailgate is securely latched.
Make sure your hands, feet and other
parts of your body are safely out of the
way before closing the tailgate.
Emergency tailgate safety release
Your vehicle is equipped with the emer-
gency tailgate safety release lever locat-
ed on the bottom of the tailgate. When
someone is inadvertently locked in the
luggage compartment, the tailgate can
be opened by doing as follows:
1. Remove the cover.
2. Push the release lever to the right.
3. Push up the tailgate.
CAUTION- Closing tailgate
Make sure nothing is near the tail-gate latch and striker while closingthe tailgate. It may damage the tail-gate's latch.
OUB045014L
WARNING- Exhaust
fumes
Driving with the tailgate open is not
advisable. Dangerous exhaust
fumes can enter the passenger
compartment.
If you must drive with the tailgate
opened, keep the air vents and all
windows open so that additional
outside air can enter.
WARNING- Riding in
cargo area
Occupants should never ride in the
rear cargo area where no restraints
are available. Occupants should
always be properly restrained to
avoid injury in the event of an acci-
dent or sudden stops.
OUB045015L
Page 95 of 449
Features of your vehicle
24
4
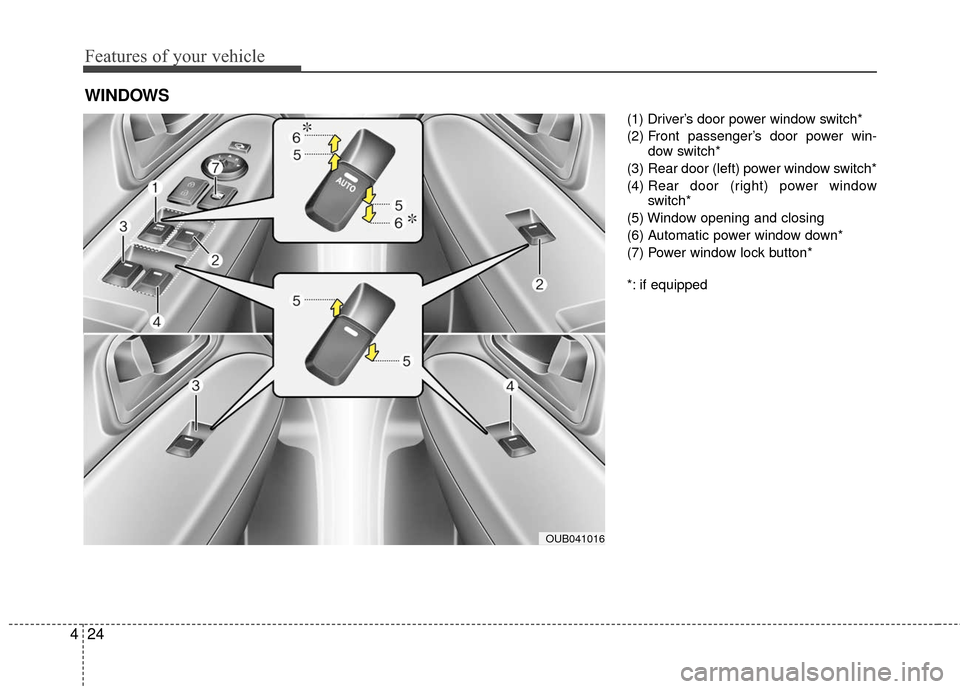
(1) Driver’s door power window switch*
(2) Front passenger’s door power win-
dow switch*
(3) Rear door (left) power window switch*
(4) Rear door (right) power window
switch*
(5) Window opening and closing
(6) Automatic power window down*
(7) Power window lock button*
*: if equipped
WINDOWS
OUB041016
Page 96 of 449
425
Features of your vehicle
Power windows
The ignition switch must be in the ON
position for power windows to operate.
Each door has a power window switch
that controls the door’s window. The driv-
er has a power window lock switch which
can block the operation of passenger
windows.
The power windows can be operated for
approximately 30 seconds after the igni-
tion key is removed or turned to the ACC
or LOCK position. However, if the front
doors are opened, the power windows
cannot be operated even within the 30
second period.
In cold and wet climates, power windows
may not work properly due to freezing
conditions.
✽ ✽NOTICE
While driving with the rear windows
down or with the sunroof (if equipped)
in an open (or partially open) position,
your vehicle may demonstrate a wind
buffeting or pulsation noise. This noise
is a normal occurrence and can be
reduced or eliminated by taking the fol-
lowing actions. If the noise occurs with
one or both of the rear windows down,
partially lower both front windows
approximately one inch. If you experi-
ence the noise with the sunroof open,
slightly reduce the size of the sunroof
opening.
Window opening and closing
(if equipped)
The driver’s door has a master power
window switch that controls all the win-
dows in the vehicle.
To open or close a window, press down
or pull up the front portion of the corre-
sponding switch to the first detent posi-
tion (5).
Auto down window (if equipped) (Driver’s window)
Pressing the power window switch
momentarily to the second detent posi-
tion (6) completely lowers the driver’s
window even when the switch is
released. To stop the window at the
desired position while the window is in
operation, momentarily pull up the switch
to the opposite direction of the window
movement.
Page 97 of 449
Features of your vehicle
26
4
Auto up/down window (if equipped)
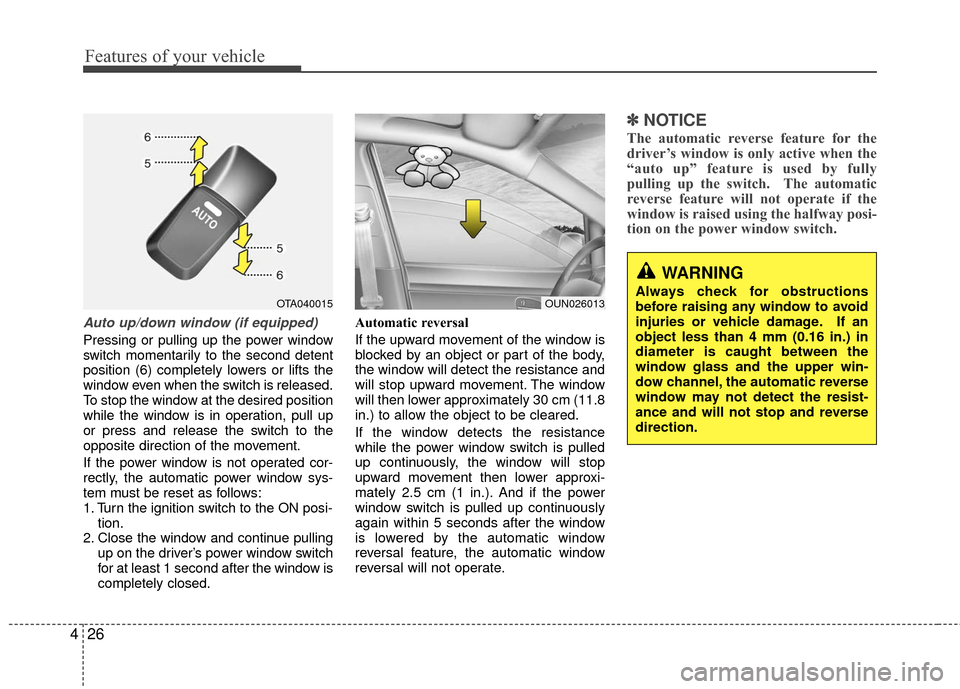
Pressing or pulling up the power window
switch momentarily to the second detent
position (6) completely lowers or lifts the
window even when the switch is released.
To stop the window at the desired position
while the window is in operation, pull up
or press and release the switch to the
opposite direction of the movement.
If the power window is not operated cor-
rectly, the automatic power window sys-
tem must be reset as follows:
1. Turn the ignition switch to the ON posi-
tion.
2. Close the window and continue pulling up on the driver’s power window switch
for at least 1 second after the window is
completely closed. Automatic reversal
If the upward movement of the window is
blocked by an object or part of the body,
the window will detect the resistance and
will stop upward movement. The window
will then lower approximately 30 cm (11.8
in.) to allow the object to be cleared.
If the window detects the resistance
while the power window switch is pulled
up continuously, the window will stop
upward movement then lower approxi-
mately 2.5 cm (1 in.). And if the power
window switch is pulled up continuously
again within 5 seconds after the window
is lowered by the automatic window
reversal feature, the automatic window
reversal will not operate.
✽ ✽
NOTICE
The automatic reverse feature for the
driver’s window is only active when the
“auto up” feature is used by fully
pulling up the switch. The automatic
reverse feature will not operate if the
window is raised using the halfway posi-
tion on the power window switch.
OTA040015
WARNING
Always check for obstructions
before raising any window to avoid
injuries or vehicle damage. If an
object less than 4 mm (0.16 in.) in
diameter is caught between the
window glass and the upper win-
dow channel, the automatic reverse
window may not detect the resist-
ance and will not stop and reverse
direction.OUN026013
Page 98 of 449
427
Features of your vehicle
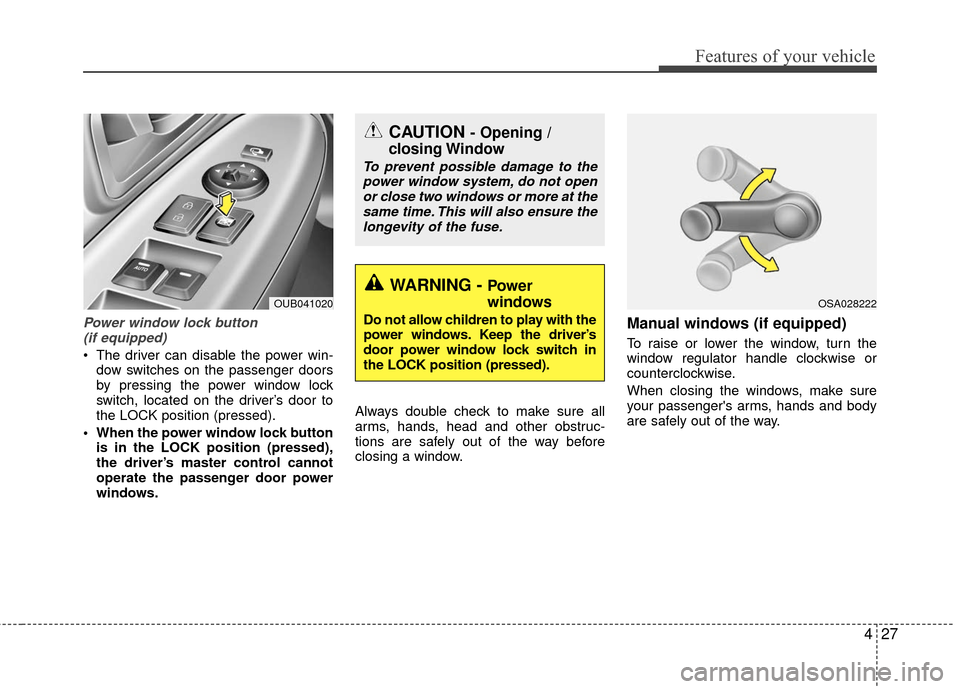
Power window lock button (if equipped)
The driver can disable the power win- dow switches on the passenger doors
by pressing the power window lock
switch, located on the driver’s door to
the LOCK position (pressed).
When the power window lock button is in the LOCK position (pressed),
the driver’s master control cannot
operate the passenger door power
windows. Always double check to make sure all
arms, hands, head and other obstruc-
tions are safely out of the way before
closing a window.
Manual windows (if equipped)
To raise or lower the window, turn the
window regulator handle clockwise or
counterclockwise.
When closing the windows, make sure
your passenger's arms, hands and body
are safely out of the way.
CAUTION - Opening /
closing Window
To prevent possible damage to the
power window system, do not openor close two windows or more at thesame time. This will also ensure thelongevity of the fuse.
WARNING - Power
windows
Do not allow children to play with the
power windows. Keep the driver’s
door power window lock switch in
the LOCK position (pressed).
OUB041020OSA028222
Page 99 of 449
Features of your vehicle
28
4
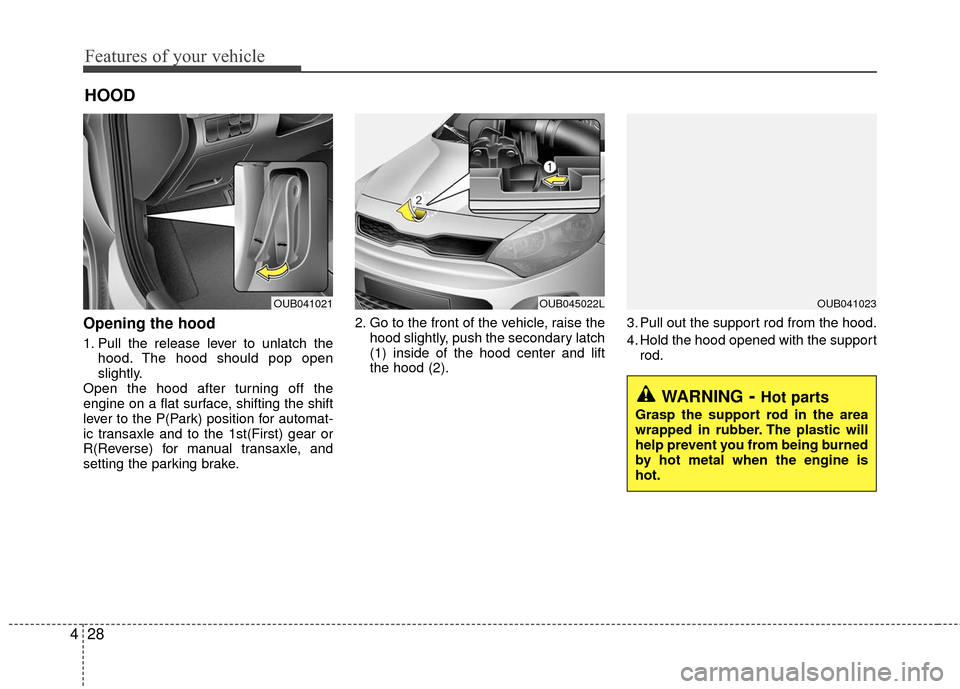
Opening the hood
1. Pull the release lever to unlatch the
hood. The hood should pop open
slightly.
Open the hood after turning off the
engine on a flat surface, shifting the shift
lever to the P(Park) position for automat-
ic transaxle and to the 1st(First) gear or
R(Reverse) for manual transaxle, and
setting the parking brake. 2. Go to the front of the vehicle, raise the
hood slightly, push the secondary latch
(1) inside of the hood center and lift
the hood (2). 3. Pull out the support rod from the hood.
4. Hold the hood opened with the support
rod.
HOOD
WARNING- Hot parts
Grasp the support rod in the area
wrapped in rubber. The plastic will
help prevent you from being burned
by hot metal when the engine is
hot.
OUB041021OUB045022LOUB041023
Page 100 of 449
429
Features of your vehicle
Closing the hood
1. Before closing the hood, check the fol-lowing:
ment must be correctly installed.
bustible material must be removed
from the engine compartment.
2. Return the support rod to its clip to prevent it from rattling.
3. Lower the hood until it is about 30 cm (1 ft.) above the closed position and let
it drop. Make sure that it locks into
place. The support rod must be inserted com-
pletely into the hole whenever you
inspect the engine compartment. This will
prevent the hood from falling and possi-
bly injuring you.
WARNING - Fire risk
Do not leave gloves, rags or any
other combustible material in the
engine compartment. Doing so may
cause a heat-induced fire.
WARNING - Unsecured
engine hood
Always double check to be sure
that the hood is firmly latched
before driving away. If it is not
latched, the hood could fly open
while the vehicle is being driven,
causing a total loss of visibility,
which might result in an accident.