KIA RIO 2020 Owners Manual
Manufacturer: KIA, Model Year: 2020, Model line: RIO, Model: KIA RIO 2020Pages: 516, PDF Size: 10.49 MB
Page 171 of 516
491
Features of your vehicle
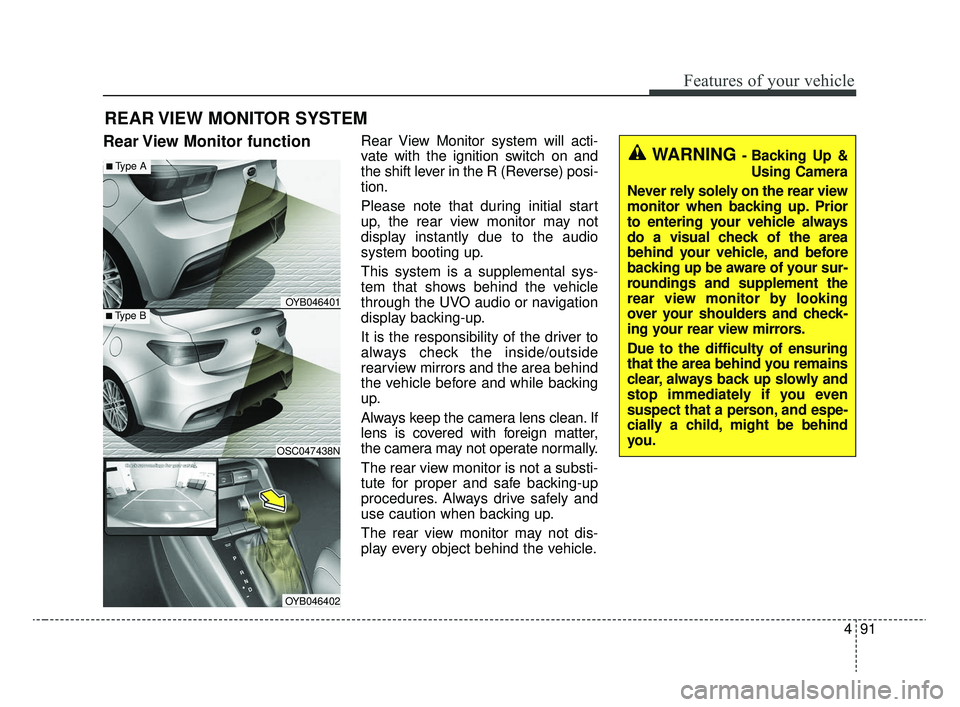
Rear View Monitor functionRear View Monitor system will acti-
vate with the ignition switch on and
the shift lever in the R (Reverse) posi-
tion.
Please note that during initial start
up, the rear view monitor may not
display instantly due to the audio
system booting up.
This system is a supplemental sys-
tem that shows behind the vehicle
through the UVO audio or navigation
display backing-up.
It is the responsibility of the driver to
always check the inside/outside
rearview mirrors and the area behind
the vehicle before and while backing
up.
Always keep the camera lens clean. If
lens is covered with foreign matter,
the camera may not operate normally.
The rear view monitor is not a substi-
tute for proper and safe backing-up
procedures. Always drive safely and
use caution when backing up.
The rear view monitor may not dis-
play every object behind the vehicle.
REAR VIEW MONITOR SYSTEM
WARNING - Backing Up &Using Camera
Never rely solely on the rear view
monitor when backing up. Prior
to entering your vehicle always
do a visual check of the area
behind your vehicle, and before
backing up be aware of your sur-
roundings and supplement the
rear view monitor by looking
over your shoulders and check-
ing your rear view mirrors.
Due to the difficulty of ensuring
that the area behind you remains
clear, always back up slowly and
stop immediately if you even
suspect that a person, and espe-
cially a child, might be behind
you.
■Type B
■Type A
OSC047438N
OYB046401
OYB046402
SC CAN (ENG) 4.QXP 12/12/2019 5:12 PM Page 91
Page 172 of 516
Features of your vehicle
92
4
Battery saver function
The purpose of this feature is to
prevent the battery from being dis-
charged. The system automatically
turns off the parking lights when
the driver removes the ignition key
and opens the driver-side door.
With this feature, the parking lights will turn off automatically if the driv-
er parks on the side of the road at
night.
If necessary, to keep the lights on
when the ignition key is removed,
perform the following:
1) Open the driver-side door.
2) Turn the parking lights OFF and ON again using the light switch
on the steering column.
Headlight escort function
(if equipped)
The headlights (and/or taillights) will
remain on for approximately 5 min-
utes after the ignition key is removed
or turned to the ACC or LOCK posi-
tion. However, if the driver’s door is
opened and closed, the headlights
are turned off after 15 seconds.
The headlights can be turned off by
pressing the lock button on the trans-
mitter (or smart key) twice or turning
off the light switch from the headlight
or Auto light position.
If the driver gets out of the vehicle
through other doors (except driver's
door), the battery saver function
does not operate and the headlight
escort function does not turn off
automatically. Therefore, It causes
the battery to be discharged. In this
case, make sure to turn off the lamp
before getting out of the vehicle.
If the headlights are not working
properly have your vehicle inspected
by an authorized Kia dealer.
Don't attempt to inspect or replace
the wiring yourself to prevent mal-
function.
Headlight welcome function
(if equipped)
When the headlight switch is in the
ON or AUTO position and all doors
(and liftgate) are closed and locked,
if you press the door unlock button
on the transmitter (or smart key), the
headlights will come on for about 15
seconds.
If the headlight switch is in the AUTO
position, the function can only oper-
ate at night.
At this time, if you press the door
unlock button again or door lock but-
ton on the transmitter (or smart key),
the headlights will turn off immedi-
ately.
LIGHTING
SC CAN (ENG) 4.QXP 12/12/2019 5:12 PM Page 92
Page 173 of 516
493
Features of your vehicle
Daytime running light
The Daytime Running Lights (DRL)
can make it easier for others to see
the front of your vehicle during the
day. DRL can be helpful in many dif-
ferent driving conditions, and it is
especially helpful after dawn and
before sunset.
The DRL system turns OFF when:
1. The headlight switch is ON.
2. The engine is OFF.
3. The front fog light is on.
4. The parking brake is engaged.
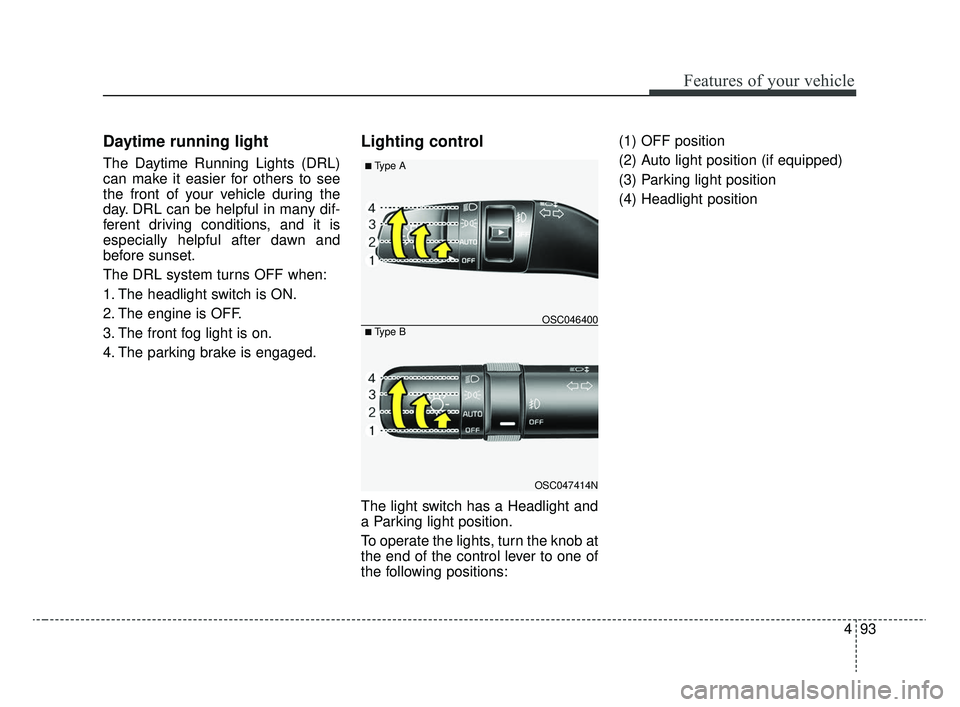
Lighting control
The light switch has a Headlight and
a Parking light position.
To operate the lights, turn the knob at
the end of the control lever to one of
the following positions:(1) OFF position
(2) Auto light position (if equipped)
(3) Parking light position
(4) Headlight position
OSC047414N
OSC046400
■ Type A
■ Type B
SC CAN (ENG) 4.QXP 12/12/2019 5:12 PM Page 93
Page 174 of 516
Features of your vehicle
94
4
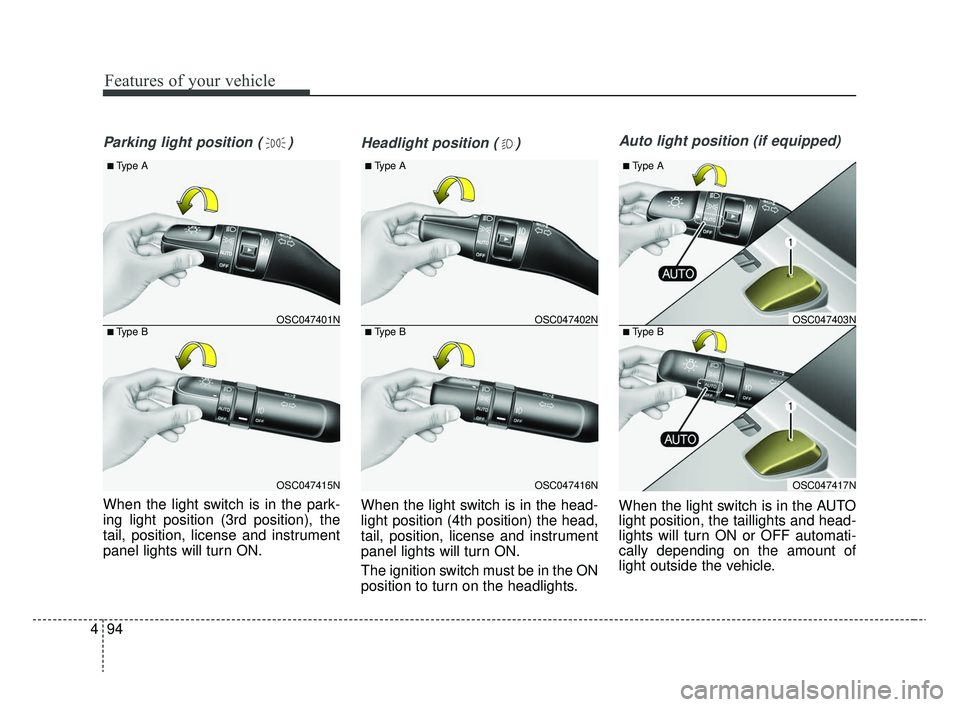
Parking light position ( )
When the light switch is in the park-
ing light position (3rd position), the
tail, position, license and instrument
panel lights will turn ON.
Headlight position ( )
When the light switch is in the head-
light position (4th position) the head,
tail, position, license and instrument
panel lights will turn ON.
The ignition switch must be in the ON
position to turn on the headlights.
Auto light position (if equipped)
When the light switch is in the AUTO
light position, the taillights and head-
lights will turn ON or OFF automati-
cally depending on the amount of
light outside the vehicle.
OSC047416N
OSC047402N
■ Type A
■ Type B
OSC047417N
OSC047403N
■ Type A
■ Type B
OSC047415N
OSC047401N
■ Type A
■ Type B
SC CAN (ENG) 4.QXP 12/12/2019 5:12 PM Page 94
Page 175 of 516

495
Features of your vehicle
High beam operation
To turn on the high beam headlights,
push the lever away from you. Pull it
back for normal (low beam) position.
The high beam indicator light will illu-
minate when the headlight high
beams are switched on.To prevent the battery from being
discharged, do not leave the lights
on for a prolonged time while the
engine is not running.
WARNING - High beams
Do not use high beam when
there are other vehicles. Using
high beam could obstruct the
other driver's vision.
OSC047418N
OSC047404N
■ Type A
■ Type B
CAUTION
Never place anything over the sensor (1) located on the instru-ment panel. This will ensure bet-ter auto-light system control.
Do not clean the sensor using awindow cleaner, the cleaner mayleave a light film which couldinterfere with sensor operation.
If your vehicle has window tintor other types of metallic coat-ing on the front windshield, theAuto light system may not workproperly.
SC CAN (ENG) 4.QXP 12/12/2019 5:12 PM Page 95
Page 176 of 516
Features of your vehicle
96
4
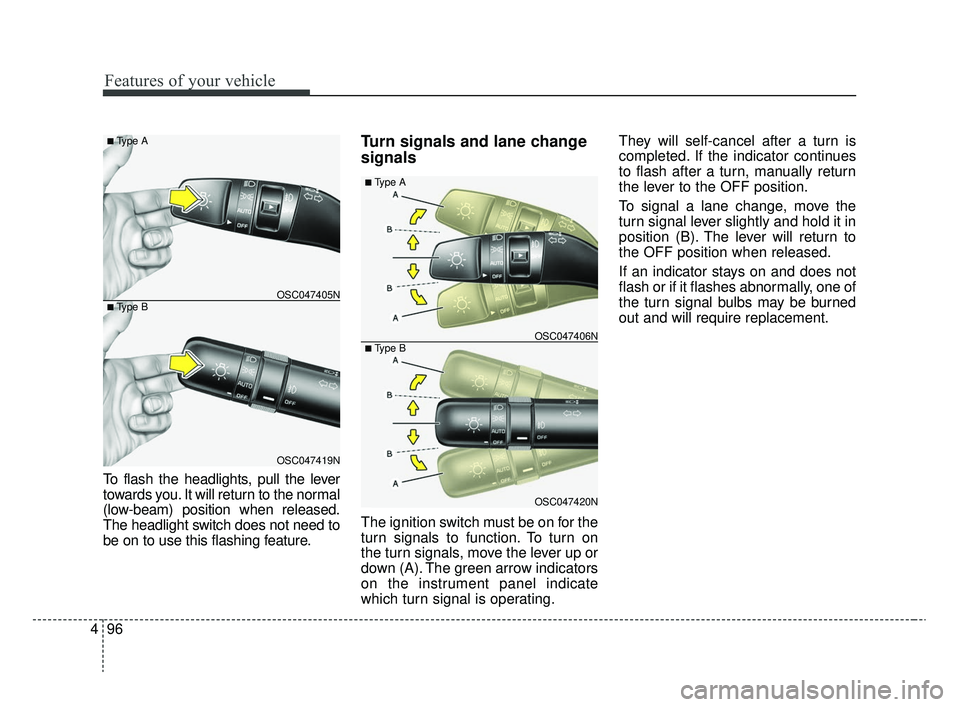
To flash the headlights, pull the lever
towards you. It will return to the normal
(low-beam) position when released.
The headlight switch does not need to
be on to use this flashing feature.
Turn signals and lane change
signals
The ignition switch must be on for the
turn signals to function. To turn on
the turn signals, move the lever up or
down (A). The green arrow indicators
on the instrument panel indicate
which turn signal is operating. They will self-cancel after a turn is
completed. If the indicator continues
to flash after a turn, manually return
the lever to the OFF position.
To signal a lane change, move the
turn signal lever slightly and hold it in
position (B). The lever will return to
the OFF position when released.
If an indicator stays on and does not
flash or if it flashes abnormally, one of
the turn signal bulbs may be burned
out and will require replacement.
OSC047420N
OSC047406N
■ Type A
■ Type B
OSC047419N
OSC047405N
■ Type A
■ Type B
SC CAN (ENG) 4.QXP 12/12/2019 5:12 PM Page 96
Page 177 of 516
497
Features of your vehicle
One-touch lane change function
To activate a one-touch lane change
function, move the turn signal lever
slightly and then release it. The lane
change signals will blink 3, 5 or 7
times.
You can choose one-touch lane
change blinking function in “One
touch turn signal” of “User setting”.
Refer to “User setting” in chapter 4.
(if equipped)
✽ ✽NOTICE
If an indicator flash is abnormally
quick or slow, the bulb may be
burned out or have a poor electrical
connection in the circuit.
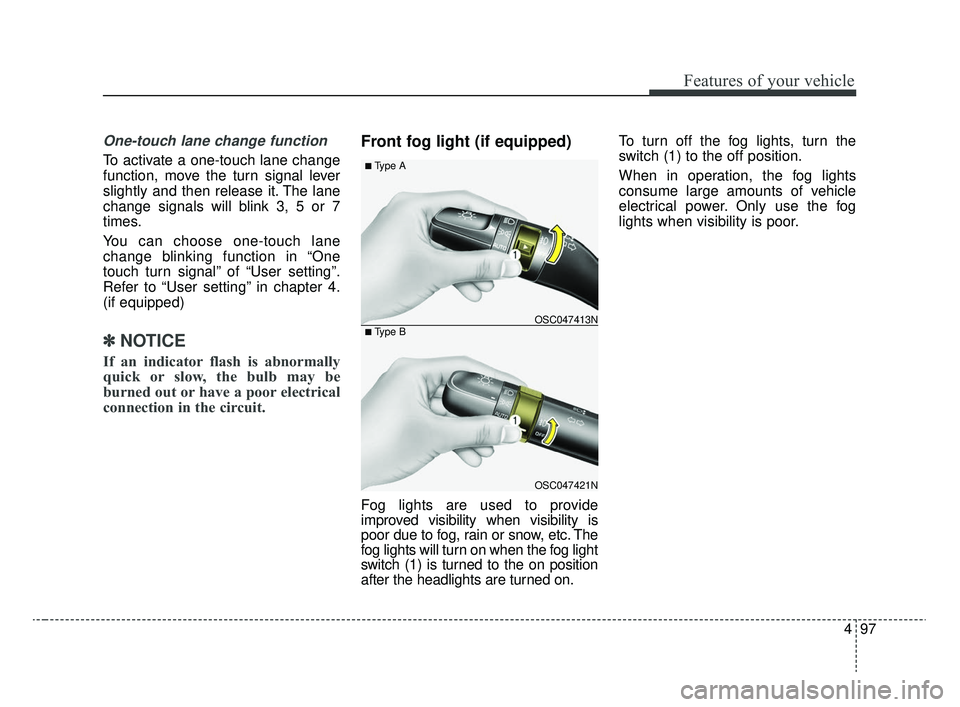
Front fog light (if equipped)
Fog lights are used to provide
improved visibility when visibility is
poor due to fog, rain or snow, etc. The
fog lights will turn on when the fog light
switch (1) is turned to the on position
after the headlights are turned on. To turn off the fog lights, turn the
switch (1) to the off position.
When in operation, the fog lights
consume large amounts of vehicle
electrical power. Only use the fog
lights when visibility is poor.
OSC047421N
OSC047413N
■ Type A
■ Type B
SC CAN (ENG) 4.QXP 12/12/2019 5:12 PM Page 97
Page 178 of 516
Features of your vehicle
98
4
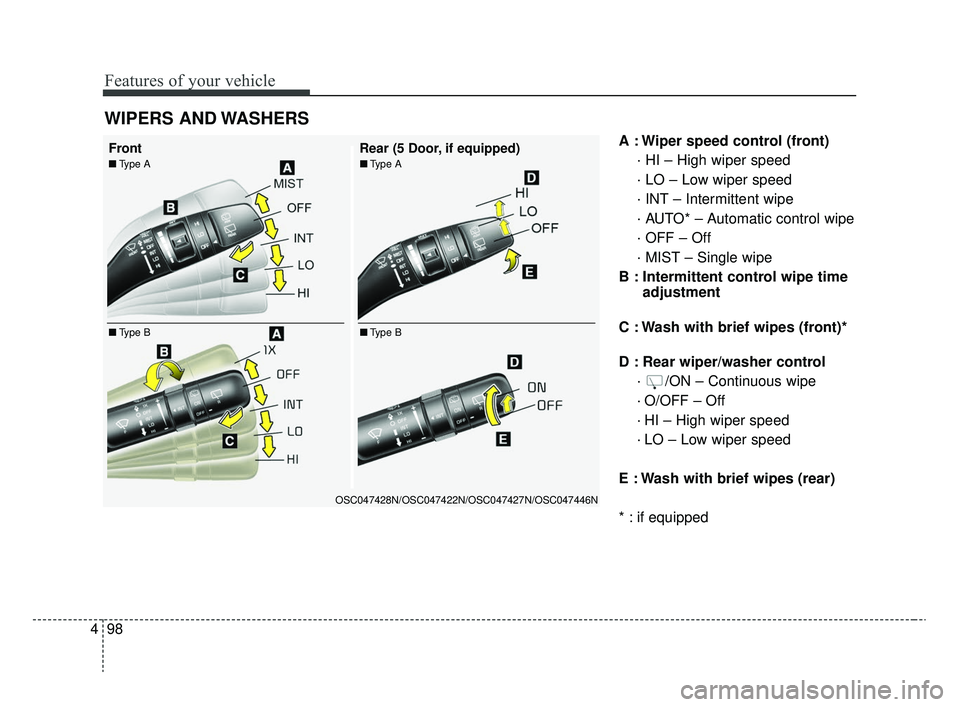
A : Wiper speed control (front)
· HI – High wiper speed
· LO – Low wiper speed
· INT – Intermittent wipe
· AUTO* – Automatic control wipe
· OFF – Off
· MIST – Single wipe
B : Intermittent control wipe time adjustment
C : Wash with brief wipes (front)*
D : Rear wiper/washer control · /ON – Continuous wipe
· O/OFF – Off
· HI – High wiper speed
· LO – Low wiper speed
E : Wash with brief wipes (rear)
* : if equipped
WIPERS AND WASHERS
OSC047428N/OSC047422N/OSC047427N/OSC047446N
Front Rear (5 Door, if equipped)
■Type A
■ Type B■Type A
■ Type B
SC CAN (ENG) 4.QXP 12/12/2019 5:12 PM Page 98
Page 179 of 516

499
Features of your vehicle
Windshield wipers
Operates as follows when the igni-
tion switch is turned ON.
MIST : For a single wiping cycle,
push the lever upward and
release it. The wipers will
operate continuously if the
lever is held in this position.
OFF : Wiper is not in operation
INT : Wiper operates intermittently at the same wiping intervals. Use
this mode in a light rain or mist.
To vary the speed setting, turn
the speed control knob.
LO : Normal wiper speed
HI : Fast wiper speed
✽ ✽ NOTICE
If there is heavy accumulation of
snow or ice on the windshield,
defrost the windshield for about 10
minutes, or until the snow and/or ice
is removed, before using the wind-
shield wipers in order to ensure
proper operation.
If you do not remove the snow
and/or ice before using the wiper
and washer, the wiper and washer
system may be damaged.
AUTO (Automatic) control
(if equipped)
The rain sensor located on the upper
end of the windshield glass senses
the amount of rainfall and controls
the wiping cycle for the proper inter-
val. The more it rains, the faster the
wiper operates. When the rain stops,
the wiper stops.
OSC047411N
SC CAN (ENG) 4.QXP 12/12/2019 5:12 PM Page 99
Page 180 of 516

Features of your vehicle
100
4
To vary the speed setting, turn the
speed control knob (1).
If the wiper switch is set in AUTO
mode when the ignition switch is ON,
the wiper will operate once to per-
form a self-check of the system. Set
the wiper to off position when the
wiper is not in use.Windshield washers (front)
In the OFF position, pull the lever
gently toward you to spray washer
fluid on the windshield and to run the
wipers 1-3 cycles.
Use this function when the wind-
shield is dirty.
CAUTION
When washing the vehicle, set
the wiper switch in the off posi-tion to stop the auto wiper oper-ation.
The wiper may operate and bedamaged if the switch is set inthe AUTO mode while washingthe vehicle.
Do not remove the sensor coverlocated on the upper end of thepassenger side windshieldglass. Damage to system partscould occur and may not becovered by your vehicle warran-ty.
When starting the vehicle inwinter, set the wiper switch inthe off position. Otherwise,wipers may operate and ice maydamage the windshield wiperblades. Always remove all snowand ice and defrost the wind-shield properly prior to operat-ing the windshield wipers.
OSC047424N
OSC047429N
■ Type A
■ Type B
CAUTION
When the ignition switch is ONand the windshield wiper switchis placed in the AUTO mode, usecaution in the following situa-tions to avoid any injury to thehands or other parts of thebody:
Do not touch the upper end of the windshield glass facingthe rain sensor.
Do not wipe the upper end of the windshield glass with adamp or wet cloth.
Do not put pressure on the windshield glass.
SC CAN (ENG) 4.QXP 12/12/2019 5:13 PM Page 100