trunk KIA RIO 2022 Features and Functions Guide
[x] Cancel search | Manufacturer: KIA, Model Year: 2022, Model line: RIO, Model: KIA RIO 2022Pages: 46, PDF Size: 4.15 MB
Page 4 of 46
2*IF EQUIPPEDRIO FEATURES & FUNCTIONS GUIDE
TABLE OF CONTENTS
VIDEOS & QR CODES . . . . . . . . .Inside Cover
INSTRUMENT CLUSTER
Instrument Cluster Overview . . . . . . . . . . . . . . . . . . 03
Indicators & Warning Lights . . . . . . . . . . . . . . . . . . . 04
Tire Pressure Monitoring System (TPMS) . . . . . . . 05
Fuel Economy . . . . . . . . . . . . . . . . . . . . . . . . . . . . . . . . 05
Instant Fuel Consumption Mode . . . . . . . . . . . . . . . 05
VEHICLE SETTINGS
Trip Mode/Trip Computer . . . . . . . . . . . . . . . . . . . . . 06
LCD Instrument Cluster Modes . . . . . . . . . . . . . . . . 06
User Settings (Type B) . . . . . . . . . . . . . . . . . . . . . . . . . 07
Service Interval Mode (Type A) . . . . . . . . . . . . . . . . 07
ADVANCED DRIVER ASSISTANCE
SYSTEMS (ADAS)
Lane Keeping Assist (LK A)* . . . . . . . . . . . . . . . . . . . .08
Forward Collision-Avoidance Assist (FCA)* . . . . . 10
Driver Attention Warning (DAW)* . . . . . . . . . . . . . . 11
Lane Following Assist (LFA)* . . . . . . . . . . . . . . . . . . . 12
Cruise Control* . . . . . . . . . . . . . . . . . . . . . . . . . . . . . . . 13
Rear View Monitor (RVM)* . . . . . . . . . . . . . . . . . . . . . 13
Rear Occupant Alert (ROA)
with Door Monitoring* . . . . . . . . . . . . . . . . . . . . . . . 14
DRIVER’S PANEL
Instrument Cluster Control . . . . . . . . . . . . . . . . . . . . 15
Electronic Stability Control (ESC) . . . . . . . . . . . . . . . 15
Hill-Start Assist Control (HAC) . . . . . . . . . . . . . . . . . . 15
Power Windows, Window Lock
& Central Door Lock . . . . . . . . . . . . . . . . . . . . . . . . . 16
Auto Door Lock/Unlock . . . . . . . . . . . . . . . . . . . . . . . . 16
Power/Heated Outside Mirrors . . . . . . . . . . . . . . . . . 16
Engine Start/Stop Button . . . . . . . . . . . . . . . . . . . . . . 16
STEERING WHEEL CONTROLS
Headlights & High Beams . . . . . . . . . . . . . . . . . . . . . . 17
Turn Signals . . . . . . . . . . . . . . . . . . . . . . . . . . . . . . . . . . . 17
Windshield Wipers & Washers . . . . . . . . . . . . . . . . . . 18
Rear Wiper & Washer (5-Door Only)* . . . . . . . . . . . 18
Tilt Steering Wheel . . . . . . . . . . . . . . . . . . . . . . . . . . . . 19
AUDIO CONTROLS
Bluetooth® Wireless Technology . . . . . . . . . . . . . . . .20
Audio Controls . . . . . . . . . . . . . . . . . . . . . . . . . . . . . . . . 2 1
Android Auto™ / Apple CarPlay® Setup . . . . . . . . . . 22
UVO link Activation* / UVO Assistance* . . . . . . . . . 23
Standard Audio System* . . . . . . . . . . . . . . . . . . . . . . . 24
Kia Access with UVO link App Download . . . . . . . 25
Kia Access with UVO link App Features Guide . . 25
Standard Audio System - Value with UVO link* . . 26
CENTER PANEL
Multimedia USB Port, Power Outlets*
& USB Charger Port* . . . . . . . . . . . . . . . . . . . . . . . 27
Digital Clock . . . . . . . . . . . . . . . . . . . . . . . . . . . . . . . . . . 27
Automatic Climate Control* . . . . . . . . . . . . . . . . . . . . 28
Manual Climate Control* . . . . . . . . . . . . . . . . . . . . . . . 29
Automatic Gear Shift with Manual Mode . . . . . . . 30
SEATING
6-Way Adjustable Driver ’s Seat . . . . . . . . . . . . . . . . . 31
Front Seat Headrest Adjustment . . . . . . . . . . . . . . . 31
Folding Rear Seatback . . . . . . . . . . . . . . . . . . . . . . . . . 32
OTHER KEY FEATURES
Smart Key* . . . . . . . . . . . . . . . . . . . . . . . . . . . . . . . . . . . . 33
Remote Keyless Entry (Folding Key)* . . . . . . . . . . . 34
Door Locks / Double-Turn Unlock All . . . . . . . . . . . 34
Fuel Cap / Malfunction Indicator . . . . . . . . . . . . . . . 34
Fuel Door Release Lever . . . . . . . . . . . . . . . . . . . . . . . 34
Hood Release Lever and Latch . . . . . . . . . . . . . . . . . 35
Trunk Release Lever (4-Door)* . . . . . . . . . . . . . . . . . 35
Liftgate Release Button (5-Door)* . . . . . . . . . . . . . . 35
Smart Power Trunk* . . . . . . . . . . . . . . . . . . . . . . . . . . . .36
Map/Room Lamps . . . . . . . . . . . . . . . . . . . . . . . . . . . . 37
Child-Protector Rear Door Locks . . . . . . . . . . . . . . . 38
Sunvisor . . . . . . . . . . . . . . . . . . . . . . . . . . . . . . . . . . . . . . 38
SAFETY FEATURES
Occupant Detection System (ODS) /
Passenger Airbag Off Indicator . . . . . . . . . . . . . . 39
Seat Belts . . . . . . . . . . . . . . . . . . . . . . . . . . . . . . . . . . . . . 39
MAINTENANCE SCHEDULE . . . . .Back Cover
LEGAL DISCLAIMERS . . Inside Back Cover
Page 6 of 46
INSTRUMENT CLUSTER
4*IF EQUIPPEDRIO FEATURES & FUNCTIONS GUIDE
INSTRUMENTCLUSTER
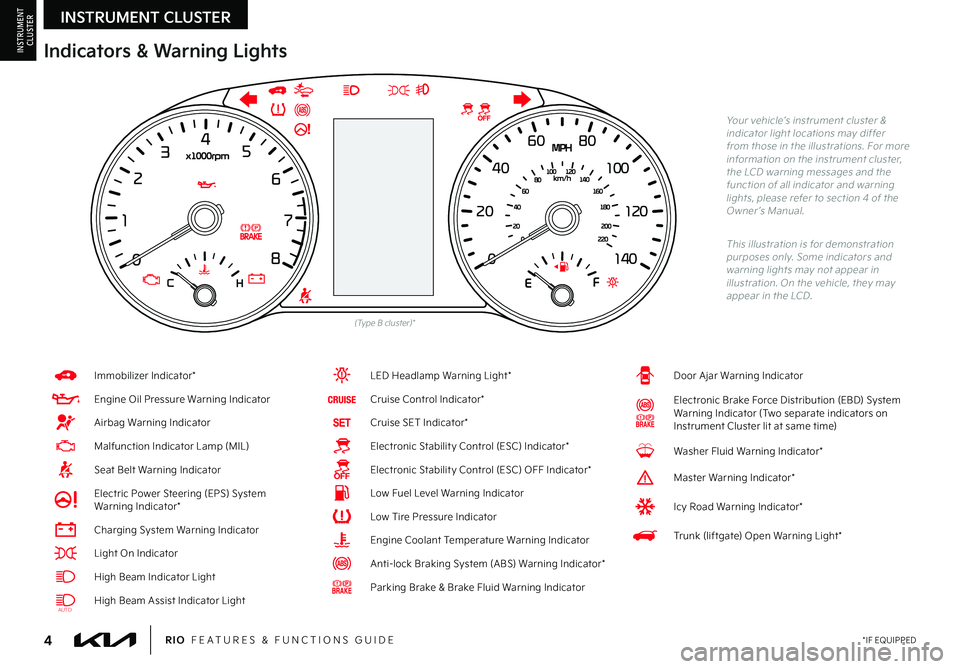
Door Ajar Warning Indicator
Electronic Brake Force Distribution (EBD) System Warning Indicator (Two separate indicators on Instrument Cluster lit at same time)
Washer Fluid Warning Indicator*
Master Warning Indicator*
Icy Road Warning Indicator*
Trunk (liftgate) Open Warning Light*
Immobilizer Indicator*
Engine Oil Pressure Warning Indicator
Airbag Warning Indicator
Malfunction Indicator Lamp (MIL)
Seat Belt Warning Indicator
Electric Power Steering (EPS) System Warning Indicator*
Charging System Warning Indicator
Light On Indicator
High Beam Indicator Light
High Beam Assist Indicator Light
LED Headlamp Warning Light*
Cruise Control Indicator*
Cruise SET Indicator*
Electronic Stabilit y Control (ESC) Indicator*
Electronic Stabilit y Control (ESC) OFF Indicator*
Low Fuel Level Warning Indicator
Low Tire Pressure Indicator
Engine Coolant Temperature Warning Indicator
Anti-lock Braking System (ABS) Warning Indicator*
Parking Brake & Brake Fluid Warning Indicator
(Type B cluster)*
Your vehicle’s instrument cluster & indicator light locations may differ from those in the illustrations . For more information on the instrument cluster, the LCD warning messages and the function of all indicator and warning lights, please refer to section 4 of the Owner ’s Manual .
This illustration is for demonstration purposes only . Some indicators and warning lights may not appear in illustration . On the vehicle, they may appear in the LCD .
Indicators & Warning Lights
AUTO
Page 9 of 46
7*IF EQUIPPEDALWAYS CHECK THE OWNER ’S MANUAL FOR COMPLETE OPER ATING INFORMATION AND SAFET Y WARNINGS .
VEHICLESETTINGS
VEHICLE SETTINGS
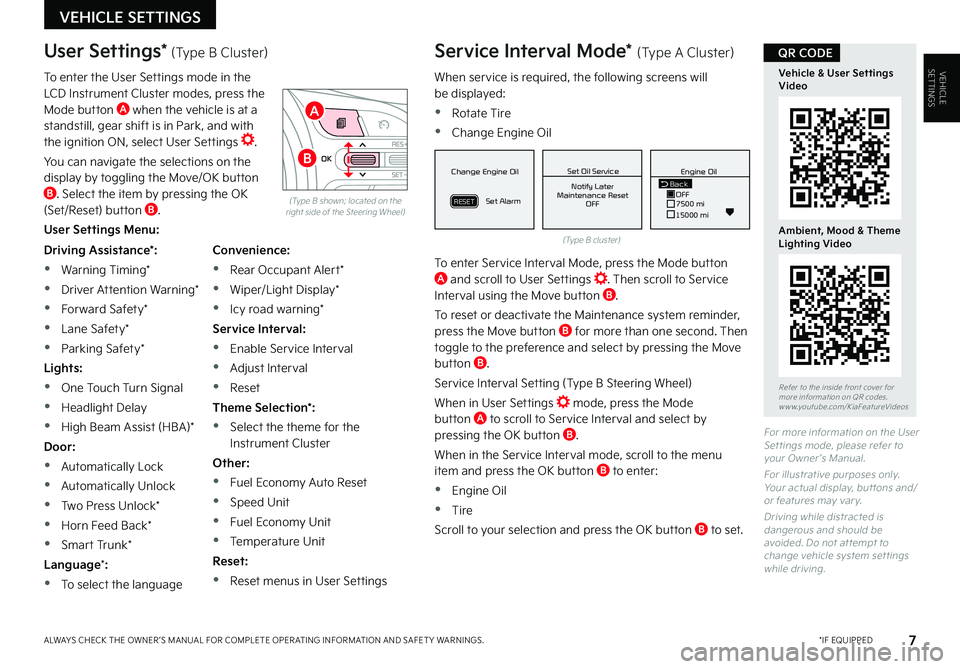
When service is required, the following screens will be displayed:
•Rotate Tire
•Change Engine Oil
To enter Service Interval Mode, press the Mode button A and scroll to User Settings . Then scroll to Service Interval using the Move button B .
To reset or deactivate the Maintenance system reminder, press the Move button B for more than one second . Then toggle to the preference and select by pressing the Move button B .
Service Interval Setting (Type B Steering Wheel)
When in User Settings mode, press the Mode button A to scroll to Service Interval and select by pressing the OK button B .
When in the Service Interval mode, scroll to the menu item and press the OK button B to enter:
•Engine Oil
•Tire
Scroll to your selection and press the OK button B to set .
(Type B cluster)
(Type B shown; located on the right side of the Steering Wheel)
For more information on the User Set tings mode, please refer to your Owner ’s Manual .
For illustrative purposes only . Your actual display, but tons and/or features may var y .
Driving while distracted is dangerous and should be avoided . Do not at tempt to change vehicle system set tings while driving .
Driving Assistance*:
•Warning Timing*
•Driver Attention Warning*
•Forward Safety*
•Lane Safety*
•Parking Safety*
Lights:
•One Touch Turn Signal
•Headlight Delay
•High Beam Assist (HBA)*
Door:
•Automatically Lock
•Automatically Unlock
•Two Press Unlock*
•Horn Feed Back*
•Smart Trunk*
Language*:
•To select the language
Convenience:
•Rear Occupant Alert*
•Wiper/Light Display*
•Icy road warning*
Service Interval:
•Enable Service Interval
•Adjust Interval
•Reset
Theme Selection*:
•Select the theme for the Instrument Cluster
Other:
•Fuel Economy Auto Reset
•Speed Unit
•Fuel Economy Unit
•Temperature Unit
Reset:
•Reset menus in User Settings
User Settings* (Type B Cluster)
To enter the User Settings mode in the LCD Instrument Cluster modes, press the Mode button A when the vehicle is at a standstill, gear shift is in Park, and with the ignition ON, select User Settings .
You can navigate the selections on the display by toggling the Move/OK button B . Select the item by pressing the OK (Set/Reset) button B .
User Settings Menu:
Service Interval Mode* (Type A Cluster)
MPG030
60
INSTFuel
Economy
MPG0 30
60
INSTFuel
Economy
MPG0 30
60
INSTFuel
Economy
BackTire Rotation
OFF9000 km
10000 kmBack OFF7500 mi
15000 mi Engine Oil
Set Tire Service Set Oil Service
Notify Later
Maintenance Reset OFF Notify Later
Maintenance Reset OFF
Rotate Tire
Change Engine Oil
Set Alarm
Set Alarm
RESETRESET
Change Engine Oil
Set Alarm
RESET
Set Oil ServiceNotify Later
Maintenance Reset OFF
Back
OFF7500 mi
15000 mi Engine Oil
MPG0
30
60
INSTFuel
Economy
MPG0 30
60
INSTFuel
Economy
MPG0 30
60
INSTFuel
Economy
BackTire Rotation
OFF9000 km
10000 kmBack OFF7500 mi
15000 mi Engine Oil
Set Tire Service Set Oil Service
Notify Later
Maintenance Reset OFF Notify Later
Maintenance Reset OFF
Rotate Tire
Change Engine Oil
Set Alarm
Set Alarm
RESETRESET
Change Engine Oil
Set Alarm
RESET
Set Oil ServiceNotify Later
Maintenance Reset OFF
BackOFF
7500 mi
15000 mi
Engine OilOKRES+
SET-
CANCEL
A
B
Refer to the inside front cover for more information on QR codes .www .youtube .com/KiaFeatureVideos
Vehicle & User Settings Video
Ambient, Mood & Theme Lighting Video
QR CODE
Page 15 of 46
13†LEGAL DISCL AIMERS ON BACK INSIDE COVER | *IF EQUIPPEDALWAYS CHECK THE OWNER ’S MANUAL FOR COMPLETE OPER ATING INFORMATION AND SAFET Y WARNINGS .
ADVANCED DRIVER ASSISTANCE SYSTEMS (ADAS)
ADAS
Refer to section 5 in the Owner ’s Manual for more information .
Your vehicle’s steering wheel but tons may differ from those in the illustrations .
When engaged, Cruise Control is a supplemental system and is not a substitute for safe driving . The driver remains responsible for maintaining a proper and safe speed for the vehicle .
A
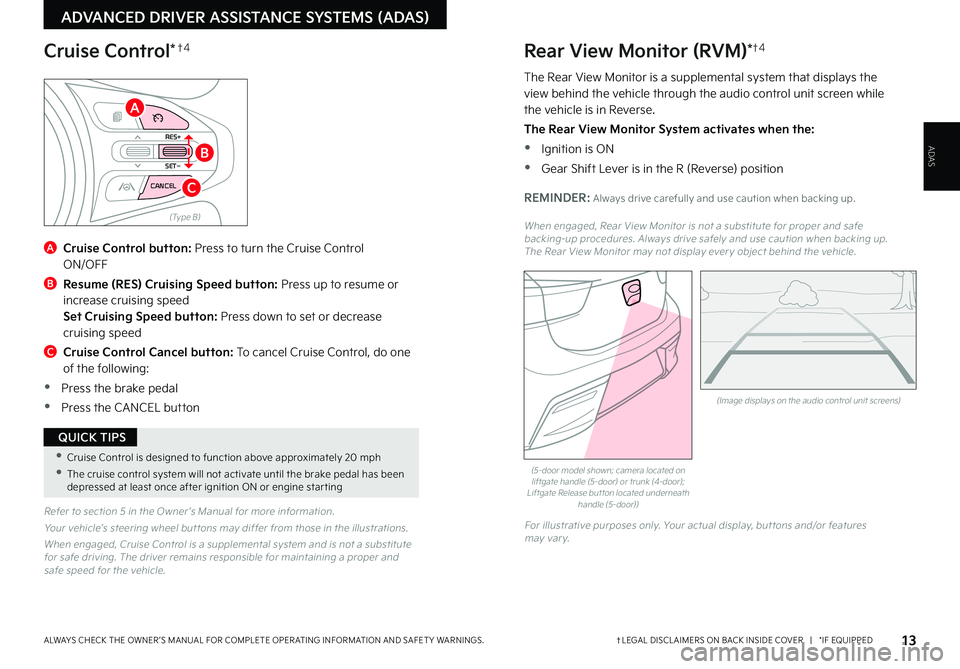
Cruise Control button: Press to turn the Cruise Control ON/OFF
B
Resume (RES) Cruising Speed button: Press up to resume or increase cruising speed Set Cruising Speed button: Press down to set or decrease cruising speed
C Cruise Control Cancel button: To cancel Cruise Control, do one of the following:
•Press the brake pedal
•Press the CANCEL button
(Type B)
RES+
SET
-
CANCEL
Cruise Control*†4
A
B
C
•Cruise Control is designed to function above approximately 20 mph
•The cruise control system will not activate until the brake pedal has been depressed at least once after ignition ON or engine star ting
QUICK TIPS
(Image displays on the audio control unit screens)
Rear View Monitor (RVM)*†4
The Rear View Monitor is a supplemental system that displays the view behind the vehicle through the audio control unit screen while the vehicle is in Reverse .
The Rear View Monitor System activates when the:
•Ignition is ON
•
Gear Shift Lever is in the R (Reverse) position
REMINDER: Always drive carefully and use caution when backing up .
When engaged, Rear View Monitor is not a substitute for proper and safe backing-up procedures . Always drive safely and use caution when backing up . The Rear View Monitor may not display ever y object behind the vehicle .
(5-door model shown; camera located on liftgate handle (5-door) or trunk (4-door); Liftgate Release but ton located underneath handle (5-door))
For illustrative purposes only . Your actual display, but tons and/or features may var y .
Page 27 of 46
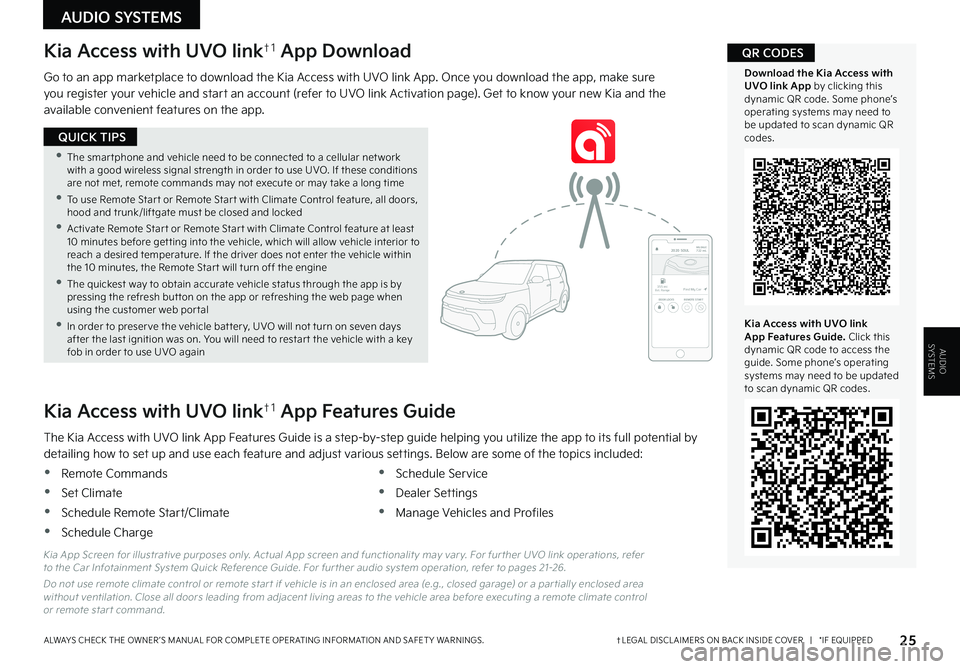
Kia Access with UVO link†1 App Download
Go to an app marketplace to download the Kia Access with UVO link App . Once you download the app, make sure you register your vehicle and start an account (refer to UVO link Activation page) . Get to know your new Kia and the available convenient features on the app .
The Kia Access with UVO link App Features Guide is a step-by-step guide helping you utilize the app to its full potential by detailing how to set up and use each feature and adjust various settings . Below are some of the topics included:
•Remote Commands
•Set Climate
•Schedule Remote Start/Climate
•Schedule Charge
•Schedule Service
•Dealer Settings
•Manage Vehicles and Profiles
Kia Access with UVO link†1 App Features Guide
Kia App Screen for illustrative purposes only . Actual App screen and functionalit y may var y . For fur ther UVO link operations, refer to the Car Infotainment System Quick Reference Guide . For fur ther audio system operation, refer to pages 21-26 .
Do not use remote climate control or remote star t if vehicle is in an enclosed area (e .g ., closed garage) or a par tially enclosed area without ventilation . Close all doors leading from adjacent living areas to the vehicle area before executing a remote climate control or remote star t command .
2020 SOULMILEAGE722 mi.
355 miEst. RangeDOOR LOCKSREMOTE STARTFind My Car
25†LEGAL DISCL AIMERS ON BACK INSIDE COVER | *IF EQUIPPEDALWAYS CHECK THE OWNER ’S MANUAL FOR COMPLETE OPER ATING INFORMATION AND SAFET Y WARNINGS .
•The smar tphone and vehicle need to be connected to a cellular net work with a good wireless signal strength in order to use UVO . If these conditions are not met, remote commands may not execute or may take a long time
•To use Remote Star t or Remote Star t with Climate Control feature, all doors, hood and trunk/liftgate must be closed and locked
•Activate Remote Star t or Remote Star t with Climate Control feature at least 10 minutes before get ting into the vehicle, which will allow vehicle interior to reach a desired temperature . If the driver does not enter the vehicle within the 10 minutes, the Remote Star t will turn off the engine
•The quickest way to obtain accurate vehicle status through the app is by pressing the refresh but ton on the app or refreshing the web page when using the customer web por tal
•In order to preser ve the vehicle bat ter y, UVO will not turn on seven days after the last ignition was on . You will need to restar t the vehicle with a key fob in order to use UVO again
QUICK TIPS
Kia Access with UVO link App Features Guide. Click this dynamic QR code to access the guide . Some phone’s operating systems may need to be updated to scan dynamic QR codes .
Download the Kia Access with UVO link App by clicking this dynamic QR code . Some phone’s operating systems may need to be updated to scan dynamic QR codes .
QR CODES
AUDIO SYSTEMS
AUDIOSYSTEMS
Page 35 of 46
33†LEGAL DISCL AIMERS ON BACK INSIDE COVER | *IF EQUIPPEDALWAYS CHECK THE OWNER ’S MANUAL FOR COMPLETE OPER ATING INFORMATION AND SAFET Y WARNINGS .
OTHER KEY FEATURES
OTHER KEY FEATURES
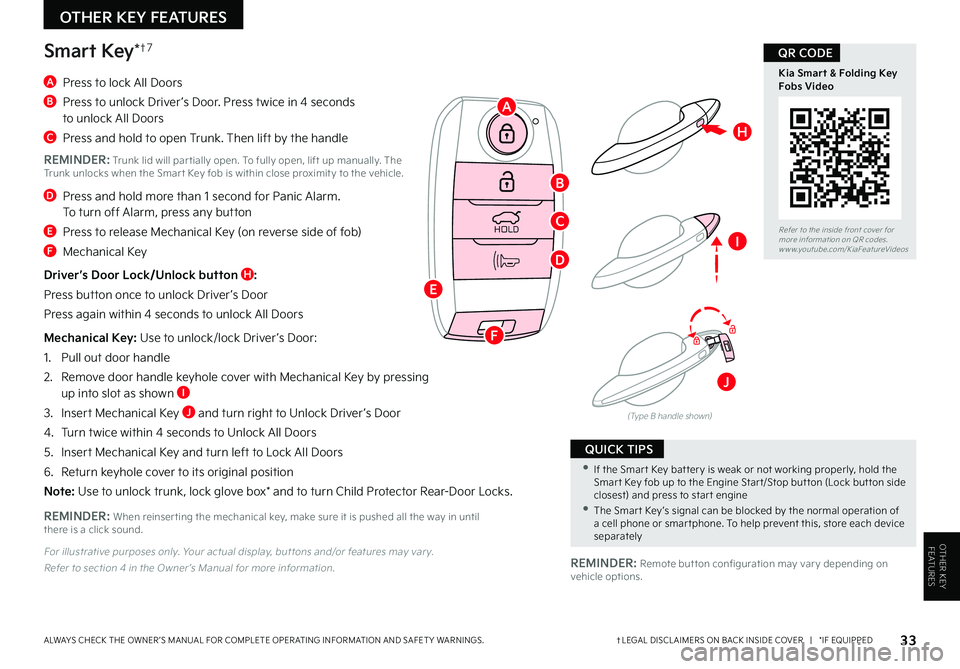
A Press to lock All Doors
B Press to unlock Driver ’s Door . Press twice in 4 seconds to unlock All Doors
C Press and hold to open Trunk . Then lift by the handle
REMINDER: Trunk lid will par tially open . To fully open, lift up manually . The Trunk unlocks when the Smar t Key fob is within close proximit y to the vehicle .
D Press and hold more than 1 second for Panic Alarm . To turn off Alarm, press any button
E Press to release Mechanical Key (on reverse side of fob)
F Mechanical Key
Driver’s Door Lock/Unlock button H:
Press button once to unlock Driver ’s Door
Press again within 4 seconds to unlock All Doors
Mechanical Key: Use to unlock/lock Driver ’s Door:
1 . Pull out door handle
2 .
Remove door handle keyhole cover with Mechanical Key by pressing up into slot as shown I
3 .
Insert Mechanical Key J and turn right to Unlock Driver ’s Door
4 . Turn twice within 4 seconds to Unlock All Doors
5 . Insert Mechanical Key and turn left to Lock All Doors
6 . Return keyhole cover to its original position
Note: Use to unlock trunk, lock glove box* and to turn Child Protector Rear-Door Locks .
(Type B handle shown)
Smart Key*†7
REMINDER: Remote but ton configuration may var y depending on vehicle options .
REMINDER: When reinser ting the mechanical key, make sure it is pushed all the way in until there is a click sound .
For illustrative purposes only . Your actual display, but tons and/or features may var y .
Refer to section 4 in the Owner ’s Manual for more information .
HOLDRefer to the inside front cover for more information on QR codes .www .youtube .com/KiaFeatureVideos
Kia Smart & Folding Key Fobs Video
QR CODE
A
B
C
I
J
H
F
D
E
•If the Smar t Key bat ter y is weak or not working properly, hold the Smar t Key fob up to the Engine Star t/Stop but ton (Lock but ton side closest) and press to star t engine •The Smar t Key ’s signal can be blocked by the normal operation of a cell phone or smar tphone . To help prevent this, store each device separately
QUICK TIPS
Page 36 of 46
34*IF EQUIPPEDRIO FEATURES & FUNCTIONS GUIDE
OTHER KEY FEATURES
OTHER KEY FEATURES
LockUnlock
(With folding key shown)
(Type A)
HOLD
Remote Keyless Entry (Folding Key)*Fuel Cap / Malfunction Indicator
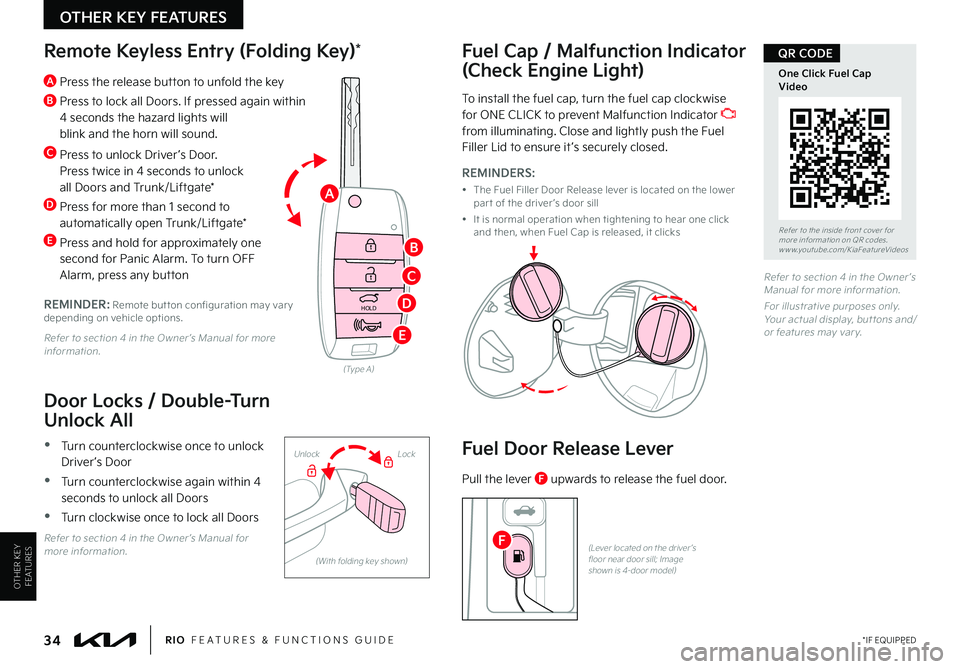
(Check Engine Light)A Press the release button to unfold the key
B Press to lock all Doors . If pressed again within 4 seconds the hazard lights will blink and the horn will sound .
C Press to unlock Driver ’s Door . Press twice in 4 seconds to unlock all Doors and Trunk/Liftgate*
D Press for more than 1 second to automatically open Trunk/Liftgate*
E Press and hold for approximately one second for Panic Alarm . To turn OFF Alarm, press any button REMINDER: Remote but ton configuration may var y depending on vehicle options .
Refer to section 4 in the Owner ’s Manual for more information .
Door Locks / Double-Turn
Unlock All
•Turn counterclockwise once to unlock Driver ’s Door
•Turn counterclockwise again within 4 seconds to unlock all Doors
•Turn clockwise once to lock all Doors
Refer to section 4 in the Owner ’s Manual for more information .
To install the fuel cap, turn the fuel cap clockwise for ONE CLICK to prevent Malfunction Indicator from illuminating . Close and lightly push the Fuel Filler Lid to ensure it ’s securely closed .
Refer to section 4 in the Owner ’s Manual for more information .
For illustrative purposes only . Your actual display, but tons and/or features may var y .
Refer to the inside front cover for more information on QR codes .www .youtube .com/KiaFeatureVideos
One Click Fuel Cap Video
QR CODE
REMINDERS:
• The Fuel Filler Door Release lever is located on the lower par t of the driver ’s door sill
• It is normal operation when tightening to hear one click and then, when Fuel Cap is released, it clicks
A
B
C
D
E
Fuel Door Release Lever
Pull the lever F upwards to release the fuel door .
(Lever located on the driver ’s floor near door sill; Image shown is 4-door model)
F
Page 37 of 46
35†LEGAL DISCL AIMERS ON BACK INSIDE COVER | *IF EQUIPPEDALWAYS CHECK THE OWNER ’S MANUAL FOR COMPLETE OPER ATING INFORMATION AND SAFET Y WARNINGS .
OTHER KEY FEATURES
OTHER KEY FEATURES
(Lever located on the driver ’s floor near door sill; Image shown is 4-door model)
(Lever located under Driver ’s Panel but tons)
(Latch located inside hood)
Hood Release Lever and Latch
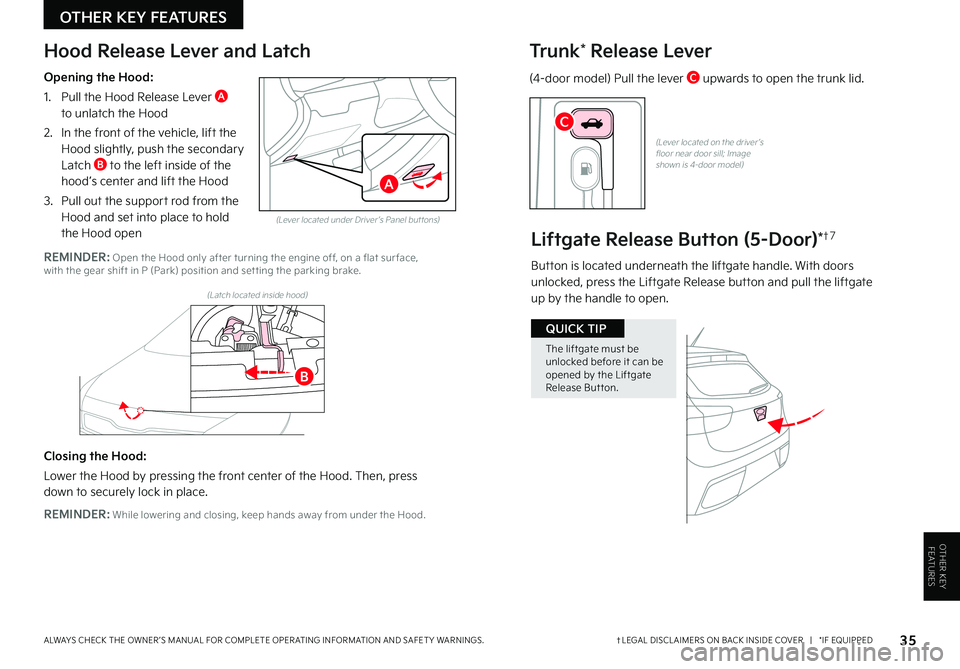
Opening the Hood:
1 . Pull the Hood Release Lever A to unlatch the Hood
2 . In the front of the vehicle, lift the Hood slightly, push the secondary Latch B to the left inside of the hood’s center and lift the Hood
3 . Pull out the support rod from the Hood and set into place to hold the Hood open
REMINDER: Open the Hood only after turning the engine off, on a flat sur face, with the gear shift in P (Park) position and set ting the parking brake .
Closing the Hood:
Lower the Hood by pressing the front center of the Hood . Then, press down to securely lock in place .
REMINDER: While lowering and closing, keep hands away from under the Hood .
Tr u n k* Release Lever
(4-door model) Pull the lever C upwards to open the trunk lid .
A
B
C
Liftgate Release Button (5-Door)*†7
Button is located underneath the liftgate handle . With doors unlocked, press the Liftgate Release button and pull the liftgate up by the handle to open .
The liftgate must be unlocked before it can be opened by the Liftgate Release But ton .
QUICK TIP
Page 38 of 46
36*IF EQUIPPEDRIO FEATURES & FUNCTIONS GUIDE
OTHER KEY FEATURES
OTHER KEY FEATURES
Smart Power Trunk*†1 2
Smart Key:
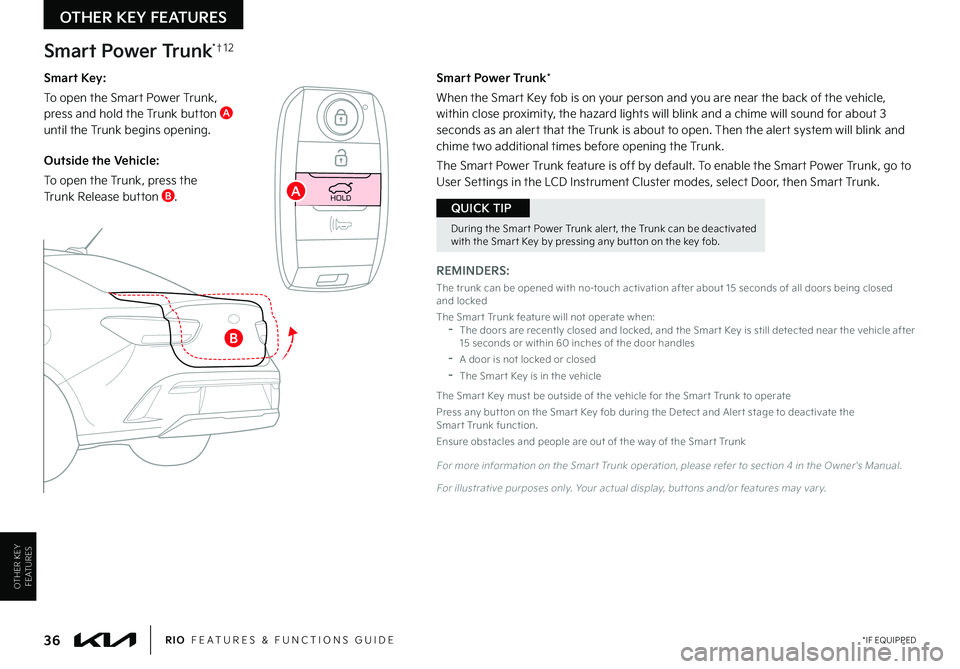
To open the Smart Power Trunk, press and hold the Trunk button A until the Trunk begins opening .
Outside the Vehicle:
To open the Trunk, press the Trunk Release button B .
Smart Power Trunk*
When the Smart Key fob is on your person and you are near the back of the vehicle, within close proximity, the hazard lights will blink and a chime will sound for about 3 seconds as an alert that the Trunk is about to open . Then the alert system will blink and chime two additional times before opening the Trunk .
The Smart Power Trunk feature is off by default . To enable the Smart Power Trunk, go to User Settings in the LCD Instrument Cluster modes, select Door, then Smart Trunk .
REMINDERS:
The trunk can be opened with no-touch activation after about 15 seconds of all doors being closed and locked
The Smar t Trunk feature will not operate when: -
The doors are recently closed and locked, and the Smar t Key is still detected near the vehicle after 15 seconds or within 60 inches of the door handles
-A door is not locked or closed
-The Smar t Key is in the vehicle
The Smar t Key must be outside of the vehicle for the Smar t Trunk to operate
Press any but ton on the Smar t Key fob during the Detect and Aler t stage to deactivate the Smar t Trunk function .
Ensure obstacles and people are out of the way of the Smar t Trunk
For more information on the Smar t Trunk operation, please refer to section 4 in the Owner's Manual .
For illustrative purposes only . Your actual display, but tons and/or features may var y .
During the Smar t Power Trunk aler t, the Trunk can be deactivated with the Smar t Key by pressing any but ton on the key fob .
QUICK TIPHOLDA
B