door lock KIA RIO 2022 Owners Manual
[x] Cancel search | Manufacturer: KIA, Model Year: 2022, Model line: RIO, Model: KIA RIO 2022Pages: 528, PDF Size: 11.8 MB
Page 13 of 528
23
Your vehicle at a glance
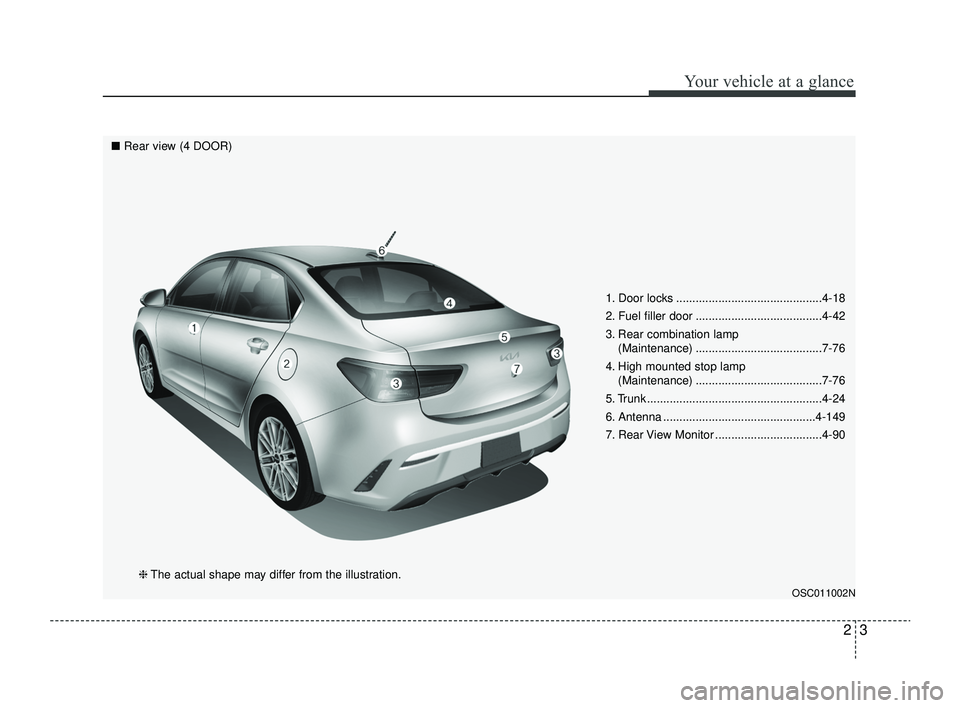
1. Door locks .............................................4-18
2. Fuel filler door .......................................4-42
3. Rear combination lamp (Maintenance) .......................................7-76
4. High mounted stop lamp (Maintenance) .......................................7-76
5. Trunk ......................................................4-24
6. Antenna ...............................................4-149
7. Rear View Monitor .................................4-90
OSC011002N
■ Rear view (4 DOOR)
❈The actual shape may differ from the illustration.
SC PE USA 2.qxp 8/23/2021 5:23 PM Page 3
Page 14 of 528
Your vehicle at a glance
42
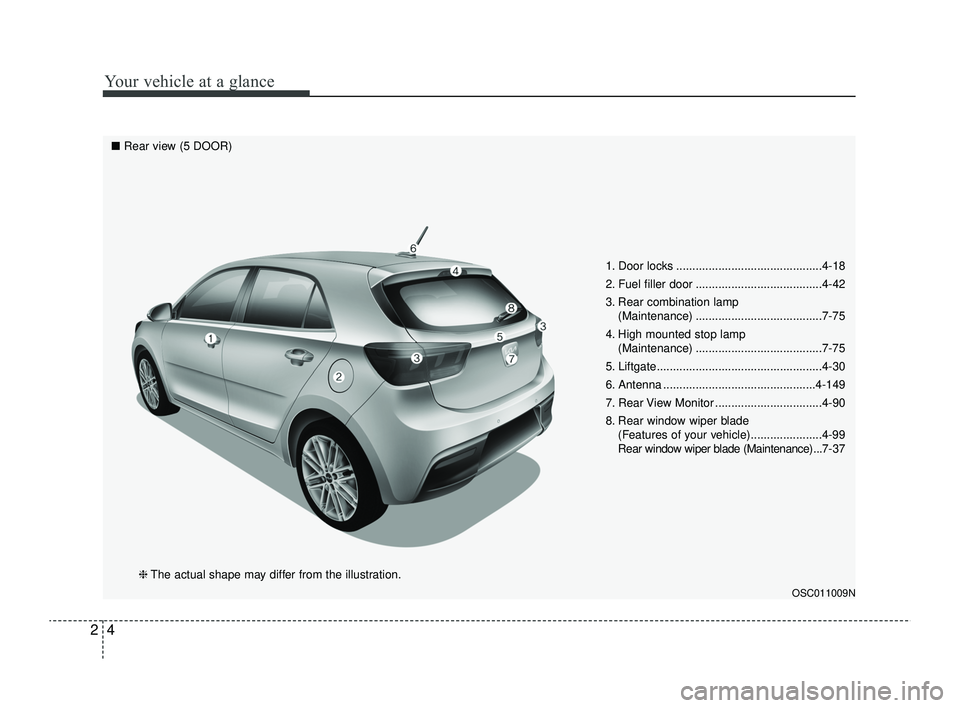
1. Door locks .............................................4-18
2. Fuel filler door .......................................4-42
3. Rear combination lamp (Maintenance) .......................................7-75
4. High mounted stop lamp (Maintenance) .......................................7-75
5. Liftgate...................................................4-30
6. Antenna ...............................................4-149
7. Rear View Monitor .................................4-90
8. Rear window wiper blade (Features of your vehicle)......................4-99
Rear window wiper blade (Maintenance) ...7-37
OSC011009N
■Rear view (5 DOOR)
❈The actual shape may differ from the illustration.
SC PE USA 2.qxp 8/23/2021 5:23 PM Page 4
Page 15 of 528
25
Your vehicle at a glance
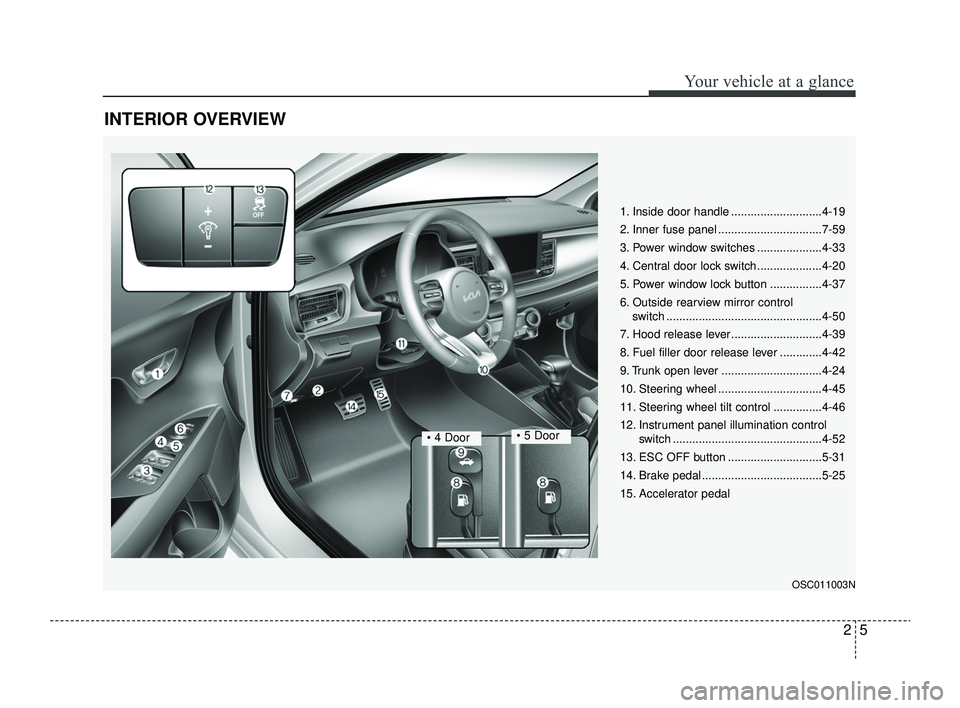
INTERIOR OVERVIEW
1. Inside door handle ............................4-19
2. Inner fuse panel ................................7-59
3. Power window switches ....................4-33
4. Central door lock switch....................4-20
5. Power window lock button ................4-37
6. Outside rearview mirror controlswitch ................................................4-50
7. Hood release lever ............................4-39
8. Fuel filler door release lever .............4-42
9. Trunk open lever ...............................4-24
10. Steering wheel ................................4-45
11. Steering wheel tilt control ...............4-46
12. Instrument panel illumination control switch ..............................................4-52
13. ESC OFF button .............................5-31
14. Brake pedal .....................................5-25
15. Accelerator pedal
OSC011003N
• 4 Door 5 Door
SC PE USA 2.qxp 8/23/2021 5:23 PM Page 5
Page 34 of 528
317
Safety features of your vehicle
Seat belt - Driver's 3-point systemwith emergency locking retractor
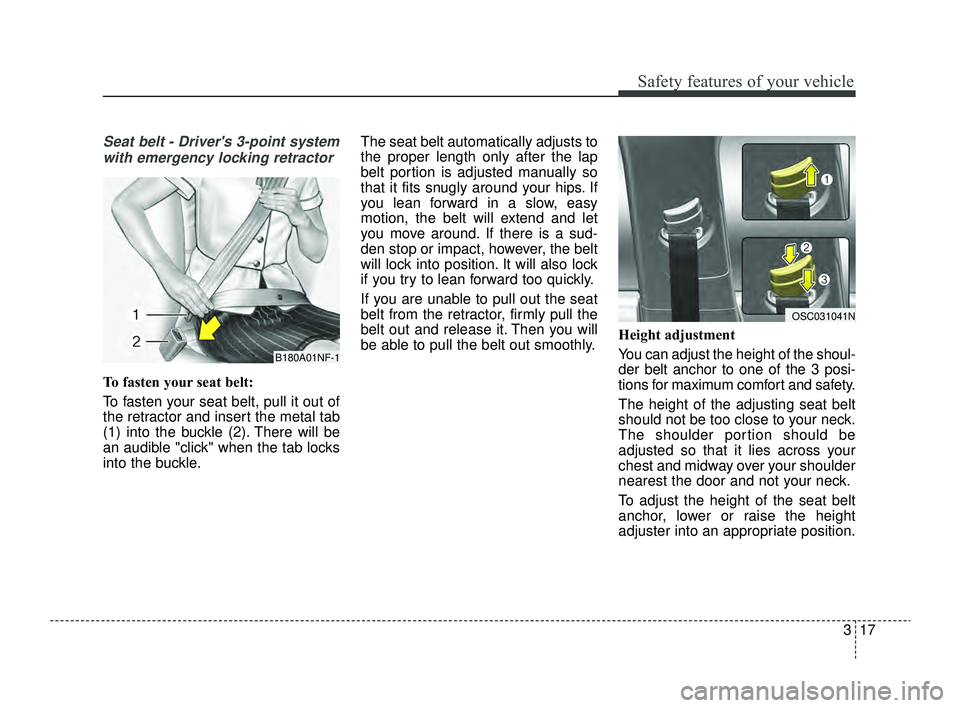
To fasten your seat belt:
To fasten your seat belt, pull it out of
the retractor and insert the metal tab
(1) into the buckle (2). There will be
an audible "click" when the tab locks
into the buckle. The seat belt automatically adjusts to
the proper length only after the lap
belt portion is adjusted manually so
that it fits snugly around your hips. If
you lean forward in a slow, easy
motion, the belt will extend and let
you move around. If there is a sud-
den stop or impact, however, the belt
will lock into position. It will also lock
if you try to lean forward too quickly.
If you are unable to pull out the seat
belt from the retractor, firmly pull the
belt out and release it. Then you will
be able to pull the belt out smoothly.
Height adjustment
You can adjust the height of the shoul-
der belt anchor to one of the 3 posi-
tions for maximum comfort and safety.
The height of the adjusting seat belt
should not be too close to your neck.
The shoulder portion should be
adjusted so that it lies across your
chest and midway over your shoulder
nearest the door and not your neck.
To adjust the height of the seat belt
anchor, lower or raise the height
adjuster into an appropriate position.
OSC031041N
B180A01NF-1
SC PE USA 3.QXP 8/23/2021 5:37 PM Page 17
Page 35 of 528
Safety features of your vehicle
18
3
To raise the height adjuster, pull it up
(1). To lower it, push it down (3) while
pressing the height adjuster button (2).
Release the button to lock the anchor
into position. Try sliding the height
adjuster to make sure that it has
locked into position. Never position the
shoulder belt across your neck or face.
Improperly positioned seat belts can
cause serious injuries in an accident.Seat belts - Front passenger and
rear seat 3-point system withcombination locking retractor
To fasten your seat belt
Combination retractor type seat belts
are installed in the rear seat posi-
tions to help accommodate the
installation of child restraint systems.
Although a combination retractor is
also installed in the front passenger
seat position, it is strongly recom-
mended that children always be
seated in the rear seat. NEVER
place an infant restraint system in
the front seat of the vehicle.
This type of seat belt combines the
features of both an emergency lock-
ing retractor seat belt and an auto-
matic locking retractor seat belt. To
fasten your seat belt, pull it out of the
retractor and insert the metal tab into
the buckle. There will be an audible
"click" when the tab locks into the
buckle. When not securing a child
restraint, the seat belt operates in the
same way as the driver's seat belt
(Emergency Locking Retractor Type).
B200A01NFWARNING- Seat belt replacement
Replace your seat belts after
being in an accident. Failure to
replace seat belts after an acci-
dent could leave you with dam-
aged seat belts that will not pro-
vide protection in the event of
another collision.
WARNING- Shoulder belt positioning
Never position the shoulder belt
across your neck or face.
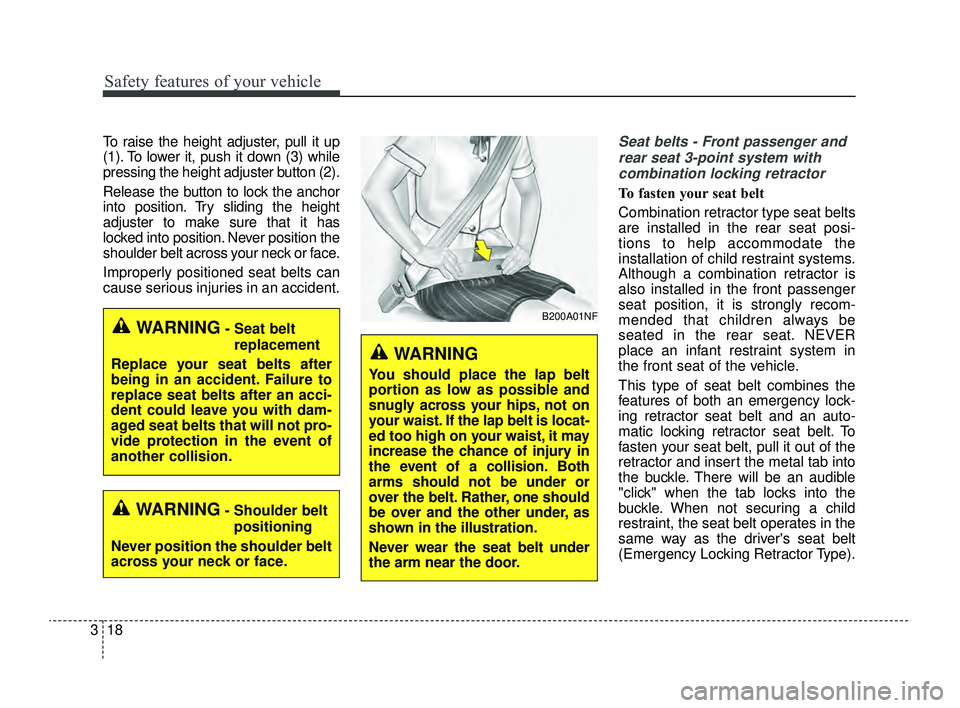
WARNING
You should place the lap belt
portion as low as possible and
snugly across your hips, not on
your waist. If the lap belt is locat-
ed too high on your waist, it may
increase the chance of injury in
the event of a collision. Both
arms should not be under or
over the belt. Rather, one should
be over and the other under, as
shown in the illustration.
Never wear the seat belt under
the arm near the door.
SC PE USA 3.QXP 8/23/2021 5:37 PM Page 18
Page 36 of 528
319
Safety features of your vehicle
It automatically adjusts to the proper
length only after the lap belt portion
of the seat belt is adjusted manually
so that it fits snugly around your hips.
When the seat belt is fully extended
from the retractor to allow the instal-
lation of a child restraint system, the
seat belt operation changes to allow
the belt to retract, but not to extend
(Automatic Locking Retractor Type).
Refer to “Using a child restraint sys-
tem” in this section.
To convert from the automatic lock-
ing feature to the emergency locking
operation mode, allow the unbuckled
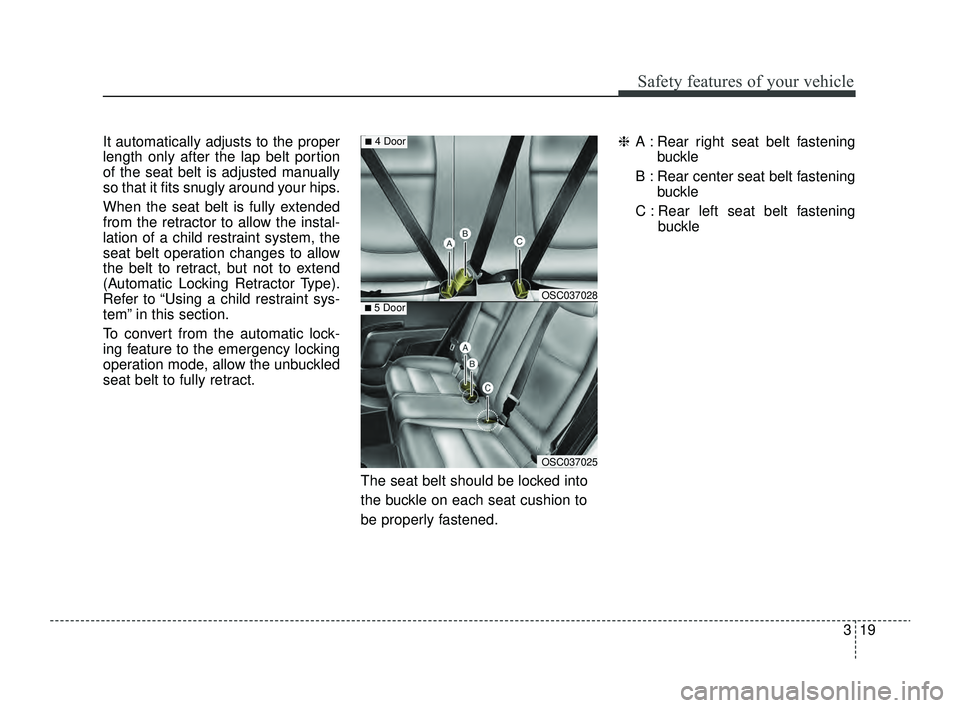
seat belt to fully retract.The seat belt should be locked into
the buckle on each seat cushion to
be properly fastened.❈
A : Rear right seat belt fastening
buckle
B : Rear center seat belt fastening buckle
C : Rear left seat belt fastening buckle
OSC037028
OSC037025
■5 Door
■4 Door
SC PE USA 3.QXP 8/23/2021 5:37 PM Page 19
Page 37 of 528
Safety features of your vehicle
20
3
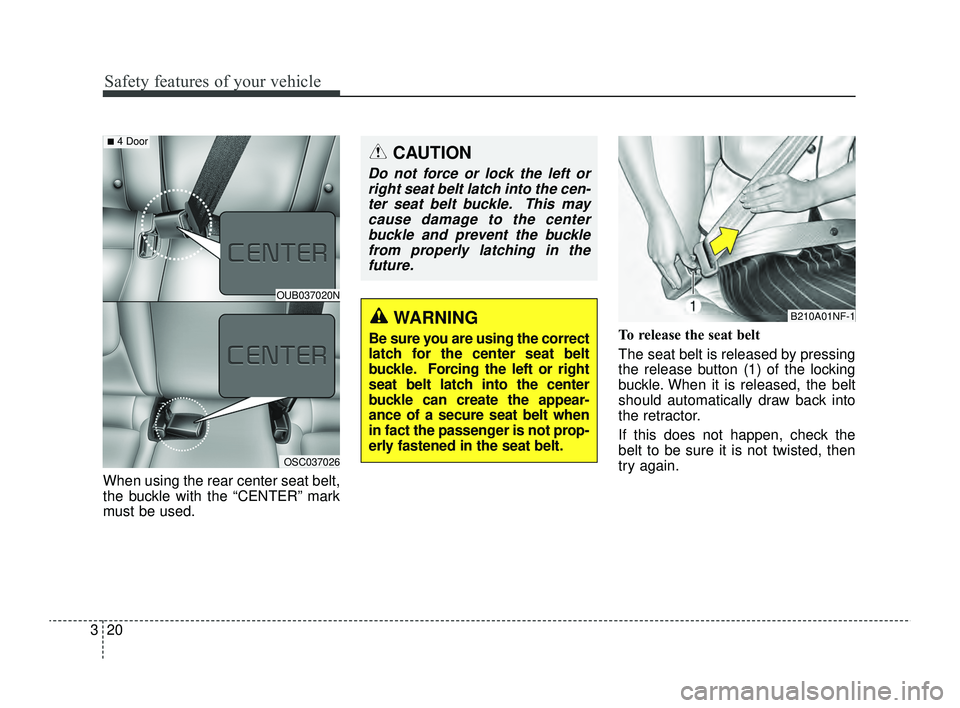
When using the rear center seat belt,
the buckle with the “CENTER” mark
must be used. To release the seat belt
The seat belt is released by pressing
the release button (1) of the locking
buckle. When it is released, the belt
should automatically draw back into
the retractor.
If this does not happen, check the
belt to be sure it is not twisted, then
try again.
B210A01NF-1
CAUTION
Do not force or lock the left or
right seat belt latch into the cen-ter seat belt buckle. This maycause damage to the centerbuckle and prevent the bucklefrom properly latching in thefuture.
WARNING
Be sure you are using the correct
latch for the center seat belt
buckle. Forcing the left or right
seat belt latch into the center
buckle can create the appear-
ance of a secure seat belt when
in fact the passenger is not prop-
erly fastened in the seat belt.
OUB037020N
OSC037026
■4 Door
SC PE USA 3.QXP 8/23/2021 5:37 PM Page 20
Page 48 of 528
331
Safety features of your vehicle
The lap/shoulder belt automatically
returns to the “emergency lock
mode” whenever the belt is allowed
to retract fully.
Therefore, the preceding seven
steps must be followed each time a
child restraint is installed.
To remove the child restraint, press
the release button on the buckle and
then pull the lap/shoulder belt out of
the restraint and allow the seat belt
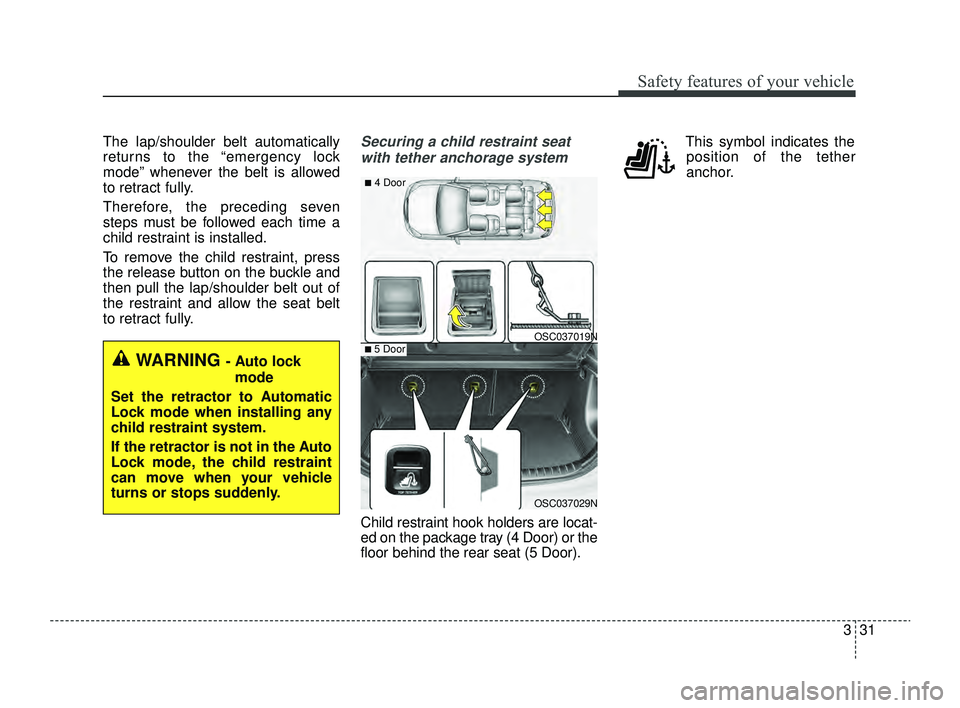
to retract fully.Securing a child restraint seatwith tether anchorage system
Child restraint hook holders are locat-
ed on the package tray (4 Door) or the
floor behind the rear seat (5 Door). This symbol indicates the
position of the tether
anchor.
WARNING - Auto lock
mode
Set the retractor to Automatic
Lock mode when installing any
child restraint system.
If the retractor is not in the Auto
Lock mode, the child restraint
can move when your vehicle
turns or stops suddenly.
OSC037019N
OSC037029N
■4 Door
■5 Door
SC PE USA 3.QXP 8/23/2021 5:38 PM Page 31
Page 58 of 528
341
Safety features of your vehicle
If an air bag deploys, there may bea loud noise followed by a fine dust
released in the vehicle. These con-
ditions are normal and are not haz-
ardous - the air bags are packed in
this fine powder. The dust generat-
ed during air bag deployment may
cause skin or eye irritation as well
as aggravate asthma for some per-
sons. Always wash all exposed
skin areas thoroughly with cold
water and a mild soap after an
accident in which the air bags were
deployed. The SRS can function only when
the ignition switch is in the ON
position. If the SRS air bag warning
light does not illuminate, or contin-
uously remains on after illuminat-
ing for about 6 seconds when the
ignition switch is turned to the ON
position, or after the engine is
started, comes on while driving,
the SRS is not working properly. If
this occurs, have your vehicle
immediately inspected by an
authorized Kia dealer.
✽ ✽ NOTICE
Before you replace a fuse or discon-
nect a battery terminal, turn the igni-
tion switch to the LOCK position
and remove the ignition key. Never
remove or replace the air bag related
fuse(s) when the ignition switch is in
the ON position. Failure to heed this
warning will cause the SRS air bag
warning light to illuminate.
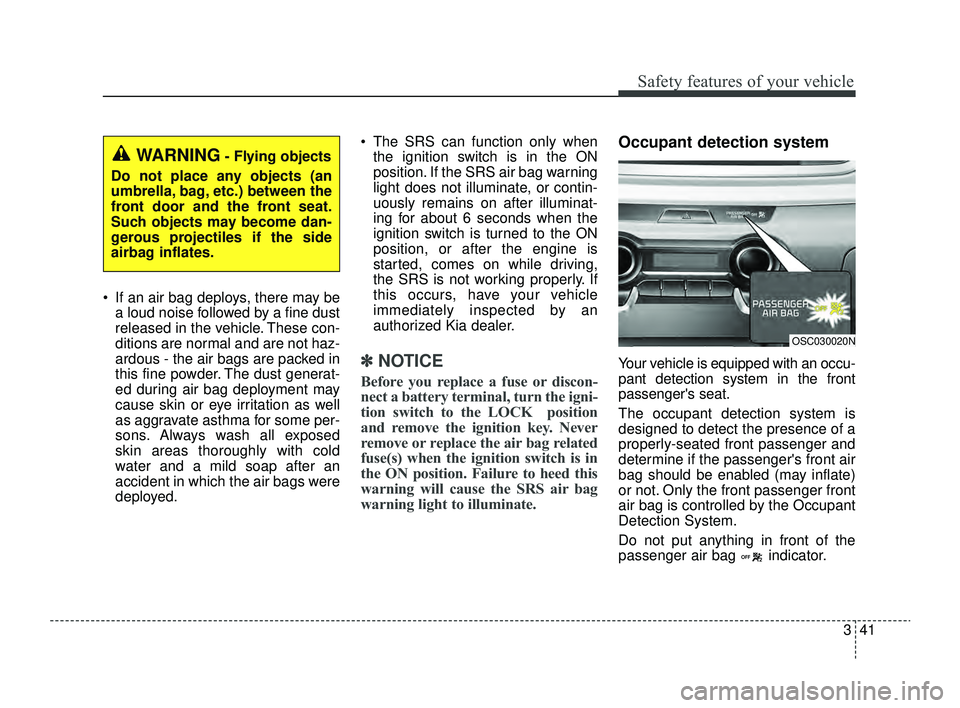
Occupant detection system
Your vehicle is equipped with an occu-
pant detection system in the front
passenger's seat.
The occupant detection system is
designed to detect the presence of a
properly-seated front passenger and
determine if the passenger's front air
bag should be enabled (may inflate)
or not. Only the front passenger front
air bag is controlled by the Occupant
Detection System.
Do not put anything in front of the
passenger air bag indicator.
WARNING- Flying objects
Do not place any objects (an
umbrella, bag, etc.) between the
front door and the front seat.
Such objects may become dan-
gerous projectiles if the side
airbag inflates.
OSC030020N
SC PE USA 3.QXP 8/23/2021 5:38 PM Page 41
Page 80 of 528
Features of your vehicle
Keys . . . . . . . . . . . . . . . . . . . . . . . . . . . . . . . . . . . . \
. . 4-4
• Record your key number . . . . . . . . . . . . . . . . . . . . . . . 4-4
• Key operations . . . . . . . . . . . . . . . . . . . . . . . . . . . . . . . . 4-4
• Remote keyless entry system operations . . . . . . . . . . . 4-5
• Transmitter precautions . . . . . . . . . . . . . . . . . . . . . . . . 4-7
• Battery replacement . . . . . . . . . . . . . . . . . . . . . . . . . . . 4-8
• Immobilizer system . . . . . . . . . . . . . . . . . . . . . . . . . . . . 4-9
Smart key . . . . . . . . . . . . . . . . . . . . . . . . . . . . . . . . 4-11
• Smart key functions. . . . . . . . . . . . . . . . . . . . . . . . . . . 4-11
• Smart key precautions . . . . . . . . . . . . . . . . . . . . . . . . 4-13
• Smart key immobilizer system . . . . . . . . . . . . . . . . . . 4-14
Theft-alarm system . . . . . . . . . . . . . . . . . . . . . . . . 4-15
• Armed stage . . . . . . . . . . . . . . . . . . . . . . . . . . . . . . . . . 4-15
• Theft-alarm stage . . . . . . . . . . . . . . . . . . . . . . . . . . . . 4-16
• Disarmed stage. . . . . . . . . . . . . . . . . . . . . . . . . . . . . . . 4-17
Door locks . . . . . . . . . . . . . . . . . . . . . . . . . . . . . . . . 4-18
• Operating door locks from outside the vehicle . . . . 4-18
• Operating door locks from inside the vehicle . . . . . . 4-19
• Impact sensing door unlock system . . . . . . . . . . . . . . 4-21
• Auto door lock/unlock feature . . . . . . . . . . . . . . . . . . 4-21
• Speed sensing door lock system . . . . . . . . . . . . . . . . 4-21
• Child-protector rear door lock. . . . . . . . . . . . . . . . . . 4-22
• Rear Occupant Alert (ROA) system . . . . . . . . . . . . . 4-22
Trunk (For 4 door) . . . . . . . . . . . . . . . . . . . . . . . . . 4-24
• Opening the trunk . . . . . . . . . . . . . . . . . . . . . . . . . . . . 4-24
• Closing the trunk . . . . . . . . . . . . . . . . . . . . . . . . . . . . . 4-24
• Emergency trunk safety release . . . . . . . . . . . . . . . . . 4-25
Smart Trunk Release (4 door). . . . . . . . . . . . . . . . 4-26
Liftgate (For 5 door) . . . . . . . . . . . . . . . . . . . . . . . 4-30
• Opening the liftgate . . . . . . . . . . . . . . . . . . . . . . . . . . . 4-30
• Closing the liftgate. . . . . . . . . . . . . . . . . . . . . . . . . . . . 4-30
• Emergency liftgate safety release. . . . . . . . . . . . . . . . 4-31
Windows . . . . . . . . . . . . . . . . . . . . . . . . . . . . . . . . . 4-33
• Power windows . . . . . . . . . . . . . . . . . . . . . . . . . . . . . . 4-34
Hood. . . . . . . . . . . . . . . . . . . . . . . . . . . . . . . . . . . . \
. 4-39
• Opening the hood . . . . . . . . . . . . . . . . . . . . . . . . . . . . 4-39
• Closing the hood . . . . . . . . . . . . . . . . . . . . . . . . . . . . . 4-40
• Hood open warning . . . . . . . . . . . . . . . . . . . . . . . . . . . 4-40
Fuel filler door . . . . . . . . . . . . . . . . . . . . . . . . . . . . 4-42
• Opening the fuel filler door . . . . . . . . . . . . . . . . . . . . 4-42
• Closing the fuel filler door . . . . . . . . . . . . . . . . . . . . . 4-43
Steering wheel . . . . . . . . . . . . . . . . . . . . . . . . . . . . . 4-45
• Electric Power Steering (EPS) . . . . . . . . . . . . . . . . . . 4-45
• Tilt steering . . . . . . . . . . . . . . . . . . . . . . . . . . . . . . . . . 4-46
• Horn . . . . . . . . . . . . . . . . . . . . . . . . . . . . . . . . . . . . \
. . . 4-47
Mirrors . . . . . . . . . . . . . . . . . . . . . . . . . . . . . . . . . . 4-48\
• Inside rearview mirror . . . . . . . . . . . . . . . . . . . . . . . . 4-48
• Outside rearview mirror. . . . . . . . . . . . . . . . . . . . . . . 4-49
4
SC PE USA 4.QXP 9/9/2021 6:01 PM Page 1