rear KIA RIO HATCHBACK 2012 Service Manual
[x] Cancel search | Manufacturer: KIA, Model Year: 2012, Model line: RIO HATCHBACK, Model: KIA RIO HATCHBACK 2012Pages: 385, PDF Size: 9.68 MB
Page 97 of 385
Features of your vehicle
22
4
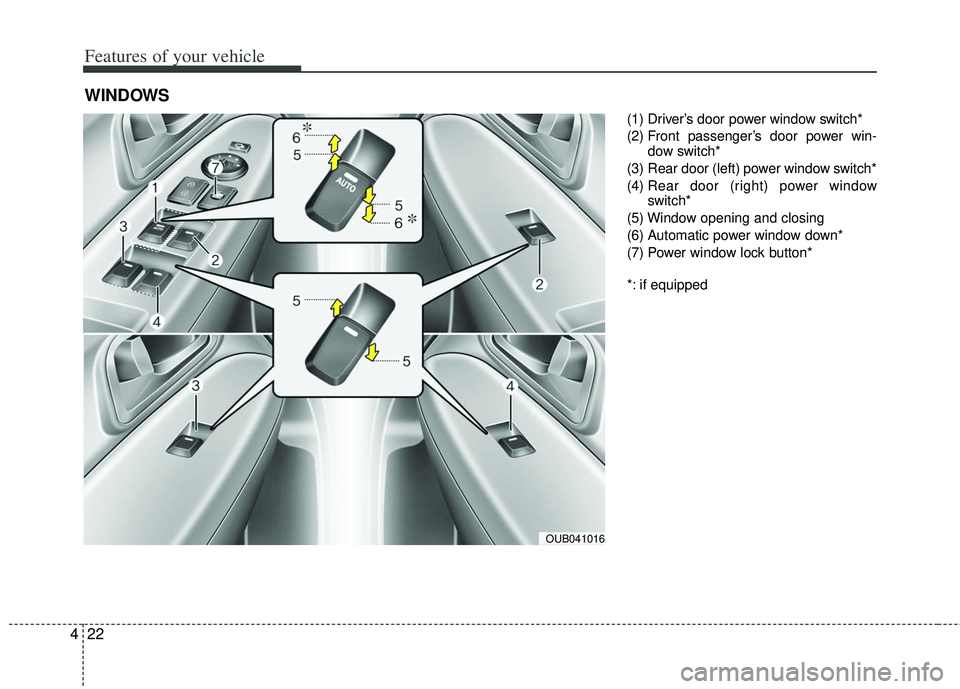
(1) Driver’s door power window switch*
(2) Front passenger’s door power win-
dow switch*
(3) Rear door (left) power window switch*
(4) Rear door (right) power window
switch*
(5) Window opening and closing
(6) Automatic power window down*
(7) Power window lock button*
*: if equipped
WINDOWS
OUB041016
Page 98 of 385
423
Features of your vehicle
Power windows
The ignition switch must be in the ON
position for power windows to operate.
Each door has a power window switch
that controls the door’s window. The driv-
er has a power window lock switch which
can block the operation of passenger
windows.
The power windows can be operated for
approximately 30 seconds after the igni-
tion key is removed or turned to the ACC
or LOCK position. However, if the front
doors are opened, the power windows
cannot be operated even within the 30
second period.
In cold and wet climates, power windows
may not work properly due to freezing
conditions.
✽ ✽NOTICE
While driving with the rear windows
down or with the sunroof (if equipped)
in an open (or partially open) position,
your vehicle may demonstrate a wind
buffeting or pulsation noise. This noise
is a normal occurrence and can be
reduced or eliminated by taking the fol-
lowing actions. If the noise occurs with
one or both of the rear windows down,
partially lower both front windows
approximately one inch. If you experi-
ence the noise with the sunroof open,
slightly reduce the size of the sunroof
opening.
Window opening and closing
(if equipped)
The driver’s door has a master power
window switch that controls all the win-
dows in the vehicle.
To open or close a window, press down
or pull up the front portion of the corre-
sponding switch to the first detent posi-
tion (5).
Auto down window (if equipped) (Driver’s window)
Pressing the power window switch
momentarily to the second detent posi-
tion (6) completely lowers the driver’s
window even when the switch is
released. To stop the window at the
desired position while the window is in
operation, momentarily pull up the switch
to the opposite direction of the window
movement.
Page 113 of 385
Features of your vehicle
38
4
Inside rearview mirror
Adjust the rearview mirror so that the
center view through the rear window is
seen. Make this adjustment before you
start driving.
Do not place objects in the rear seat
which would interfere with your vision
through the rear window.
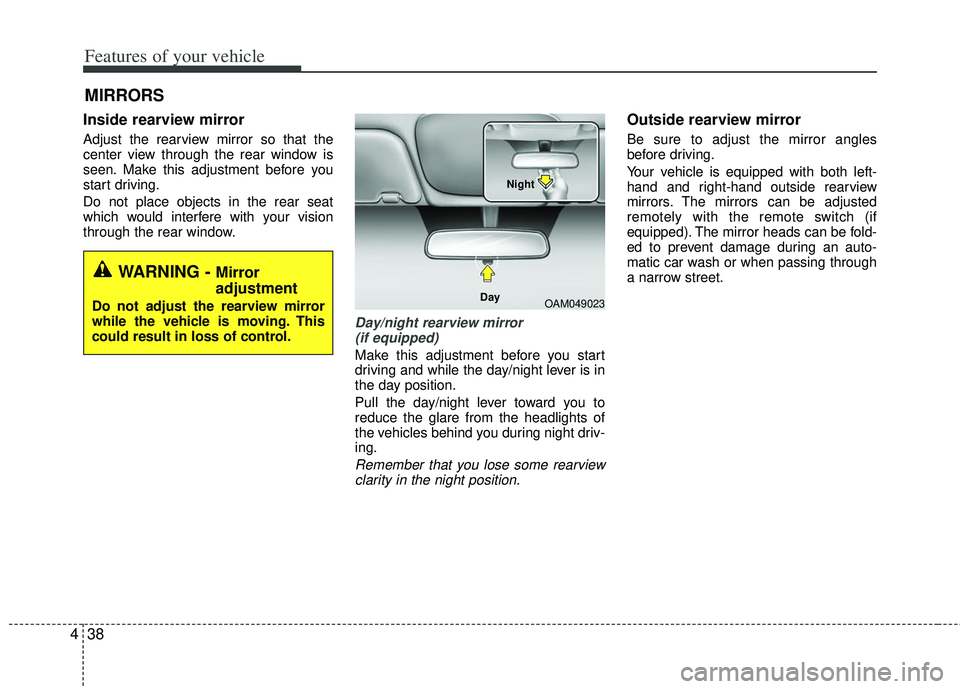
Day/night rearview mirror
(if equipped)
Make this adjustment before you start
driving and while the day/night lever is in
the day position.
Pull the day/night lever toward you to
reduce the glare from the headlights of
the vehicles behind you during night driv-
ing.
Remember that you lose some rearviewclarity in the night position.
Outside rearview mirror
Be sure to adjust the mirror angles
before driving.
Your vehicle is equipped with both left-
hand and right-hand outside rearview
mirrors. The mirrors can be adjusted
remotely with the remote switch (if
equipped). The mirror heads can be fold-
ed to prevent damage during an auto-
matic car wash or when passing through
a narrow street.
MIRRORS
WARNING - Mirror
adjustment
Do not adjust the rearview mirror
while the vehicle is moving. This
could result in loss of control.OAM049023
Day Night
Page 114 of 385
439
Features of your vehicle
The right outside rearview mirror is con-
vex. Objects seen in the mirror are closer
than they appear.
Use your interior rearview mirror or direct
observation to determine the actual dis-
tance of following vehicles when chang-
ing lanes.
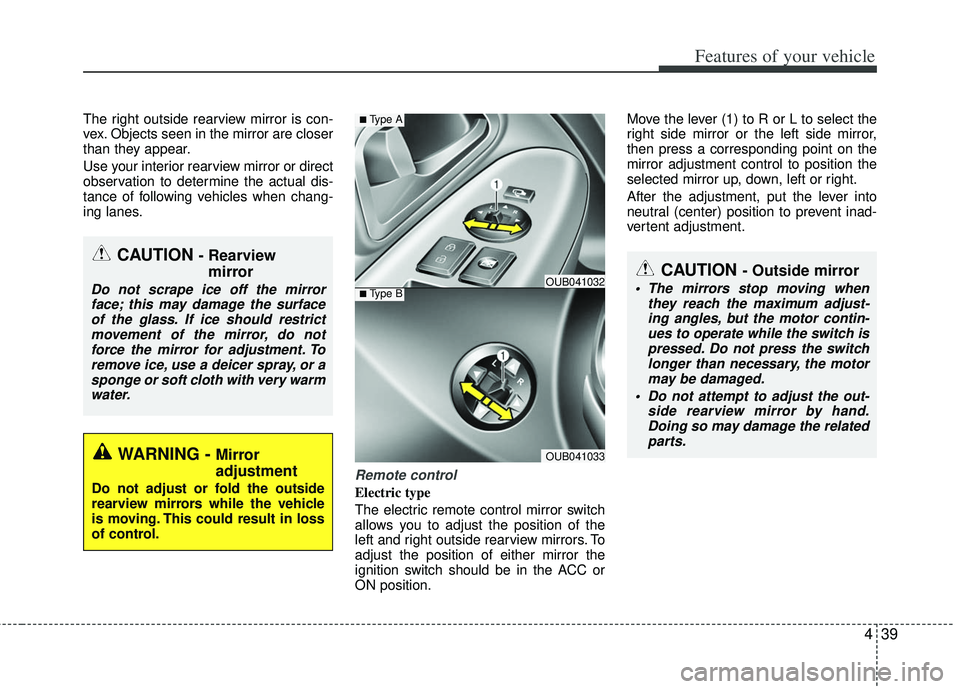
Remote control
Electric type
The electric remote control mirror switch
allows you to adjust the position of the
left and right outside rearview mirrors. To
adjust the position of either mirror the
ignition switch should be in the ACC or
ON position.Move the lever (1) to R or L to select the
right side mirror or the left side mirror,
then press a corresponding point on the
mirror adjustment control to position the
selected mirror up, down, left or right.
After the adjustment, put the lever into
neutral (center) position to prevent inad-
vertent adjustment.
CAUTION - Rearview
mirror
Do not scrape ice off the mirror
face; this may damage the surfaceof the glass. If ice should restrictmovement of the mirror, do not force the mirror for adjustment. Toremove ice, use a deicer spray, or asponge or soft cloth with very warmwater.
WARNING - Mirror
adjustment
Do not adjust or fold the outside
rearview mirrors while the vehicle
is moving. This could result in loss
of control.
■Type BOUB041032
OUB041033
■Type A
CAUTION - Outside mirror
The mirrors stop moving when they reach the maximum adjust-ing angles, but the motor contin-ues to operate while the switch is pressed. Do not press the switchlonger than necessary, the motor may be damaged.
Do not attempt to adjust the out- side rearview mirror by hand.Doing so may damage the related parts.
Page 115 of 385
Features of your vehicle
40
4
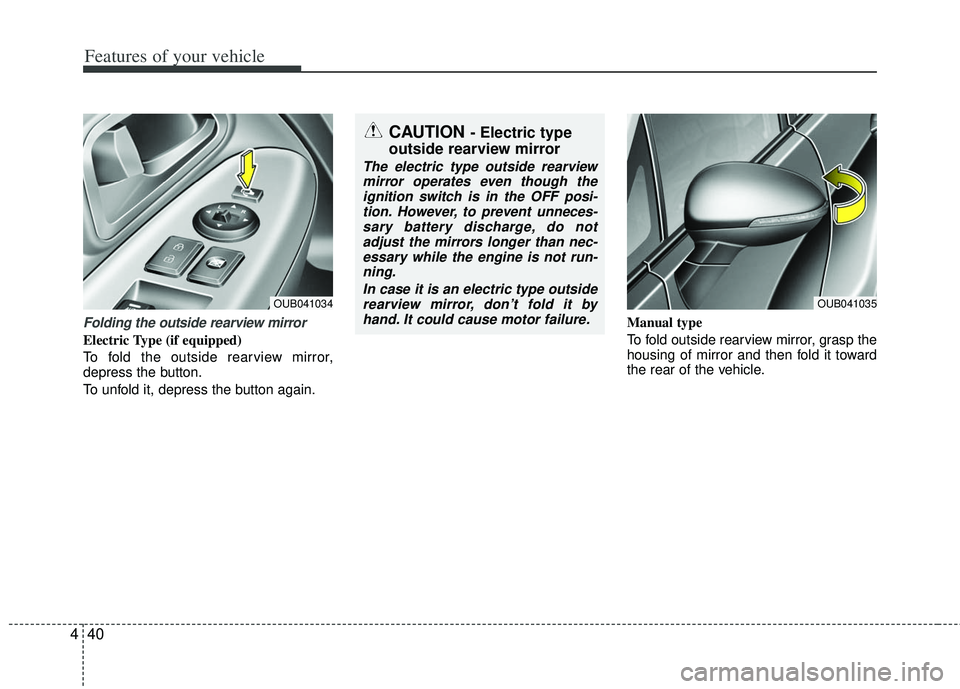
Folding the outside rearview mirror
Electric Type (if equipped)
To fold the outside rearview mirror,
depress the button.
To unfold it, depress the button again. Manual type
To fold outside rearview mirror, grasp the
housing of mirror and then fold it toward
the rear of the vehicle.
CAUTION - Electric type
outside rearview mirror
The electric type outside rearview
mirror operates even though theignition switch is in the OFF posi-tion. However, to prevent unneces-sary battery discharge, do not adjust the mirrors longer than nec-essary while the engine is not run-ning.
In case it is an electric type outsiderearview mirror, don’t fold it byhand. It could cause motor failure.
OUB041035OUB041034
Page 144 of 385
469
Features of your vehicle
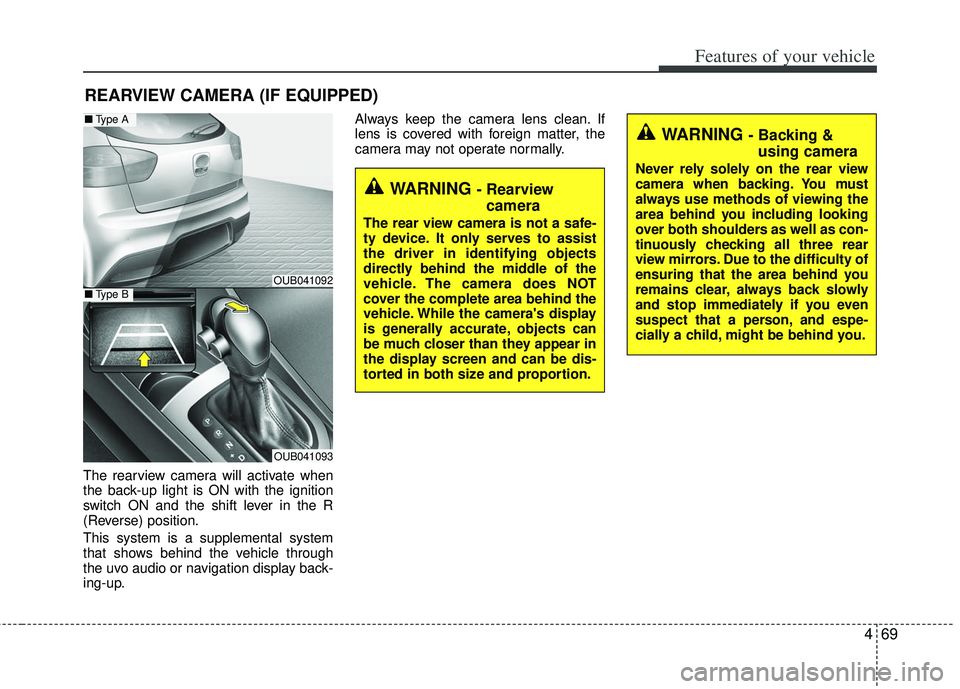
The rearview camera will activate when
the back-up light is ON with the ignition
switch ON and the shift lever in the R
(Reverse) position.
This system is a supplemental system
that shows behind the vehicle through
the uvo audio or navigation display back-
ing-up.Always keep the camera lens clean. If
lens is covered with foreign matter, the
camera may not operate normally.
REARVIEW CAMERA (IF EQUIPPED)
WARNING - Rearview
camera
The rear view camera is not a safe-
ty device. It only serves to assist
the driver in identifying objects
directly behind the middle of the
vehicle. The camera does NOT
cover the complete area behind the
vehicle. While the camera's display
is generally accurate, objects can
be much closer than they appear in
the display screen and can be dis-
torted in both size and proportion.
WARNING - Backing &using camera
Never rely solely on the rear view
camera when backing. You must
always use methods of viewing the
area behind you including looking
over both shoulders as well as con-
tinuously checking all three rear
view mirrors. Due to the difficulty of
ensuring that the area behind you
remains clear, always back slowly
and stop immediately if you even
suspect that a person, and espe-
cially a child, might be behind you.
OUB041092
OUB041093
■ Type A
■Type B
Page 149 of 385
Features of your vehicle
74
4
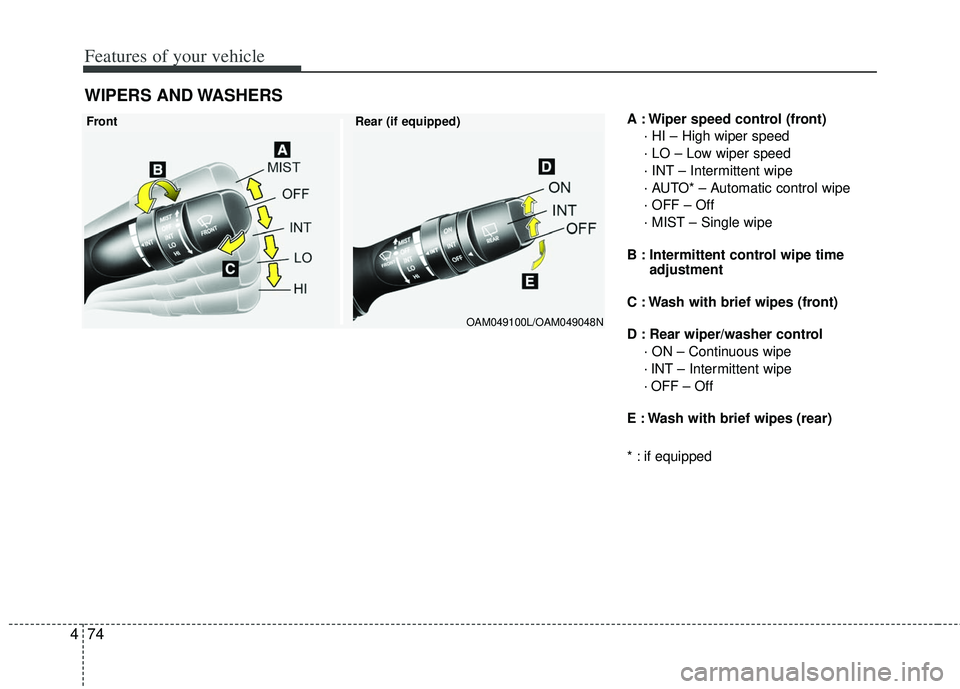
A : Wiper speed control (front)
· HI – High wiper speed
· LO – Low wiper speed
· INT – Intermittent wipe
· AUTO* – Automatic control wipe
· OFF – Off
· MIST – Single wipe
B : Intermittent control wipe time adjustment
C : Wash with brief wipes (front)
D : Rear wiper/washer control · ON – Continuous wipe
· INT – Intermittent wipe
· OFF – Off
E : Wash with brief wipes (rear)
* : if equipped
WIPERS AND WASHERS
Front Rear (if equipped)
OAM049100L/OAM049048N
Page 152 of 385
477
Features of your vehicle
Rear window wiper and washer
switch
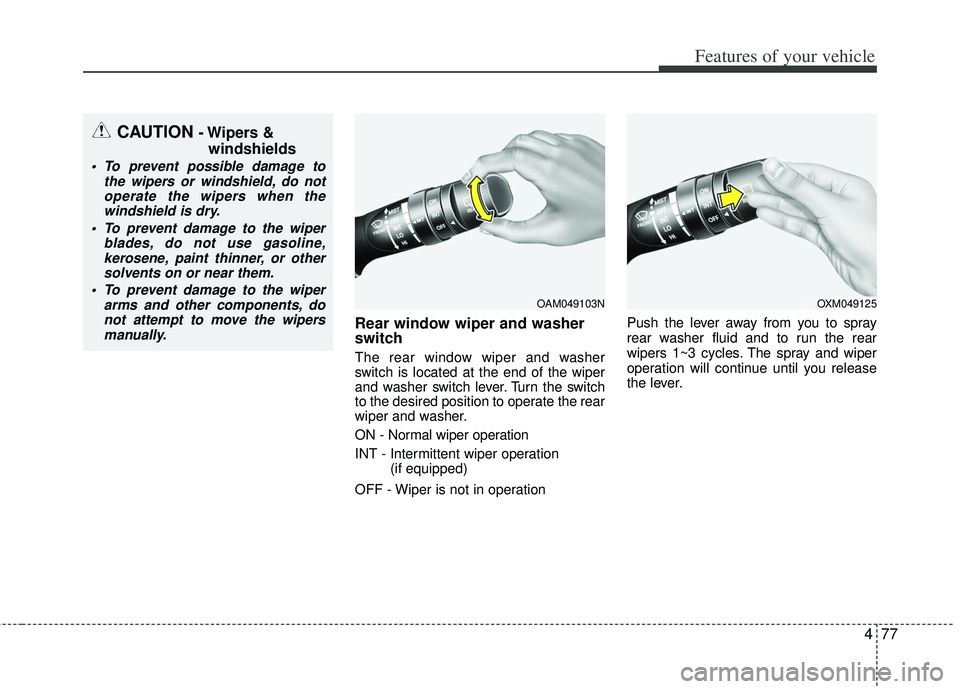
The rear window wiper and washer
switch is located at the end of the wiper
and washer switch lever. Turn the switch
to the desired position to operate the rear
wiper and washer.
ON - Normal wiper operation
INT - Intermittent wiper operation (if equipped)
OFF - Wiper is not in operation Push the lever away from you to spray
rear washer fluid and to run the rear
wipers 1~3 cycles. The spray and wiper
operation will continue until you release
the lever.
CAUTION - Wipers &
windshields
To prevent possible damage to
the wipers or windshield, do notoperate the wipers when thewindshield is dry.
To prevent damage to the wiper blades, do not use gasoline,kerosene, paint thinner, or othersolvents on or near them.
To prevent damage to the wiper arms and other components, donot attempt to move the wipersmanually.
OAM049103NOXM049125
Page 155 of 385
Features of your vehicle
80
4
If you want to defrost and defog the front
windshield, refer to “Windshield
Defrosting and Defogging” in this section.
Rear window defroster
The defroster heats the window to
remove frost, fog and thin ice from the
interior and exterior of the rear window,
while the engine is running. To activate the rear window defroster,
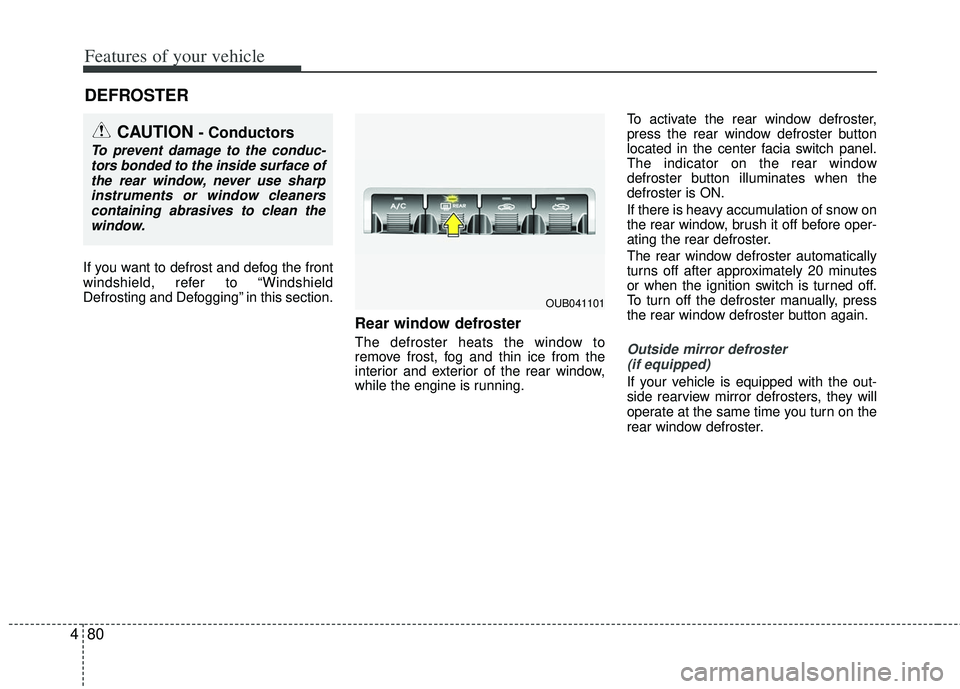
press the rear window defroster button
located in the center facia switch panel.
The indicator on the rear window
defroster button illuminates when the
defroster is ON.
If there is heavy accumulation of snow on
the rear window, brush it off before oper-
ating the rear defroster.
The rear window defroster automatically
turns off after approximately 20 minutes
or when the ignition switch is turned off.
To turn off the defroster manually, press
the rear window defroster button again.Outside mirror defroster
(if equipped)
If your vehicle is equipped with the out-
side rearview mirror defrosters, they will
operate at the same time you turn on the
rear window defroster.
DEFROSTER
CAUTION - Conductors
To prevent damage to the conduc- tors bonded to the inside surface ofthe rear window, never use sharpinstruments or window cleanerscontaining abrasives to clean the window.
OUB041101
Page 156 of 385
481
Features of your vehicle
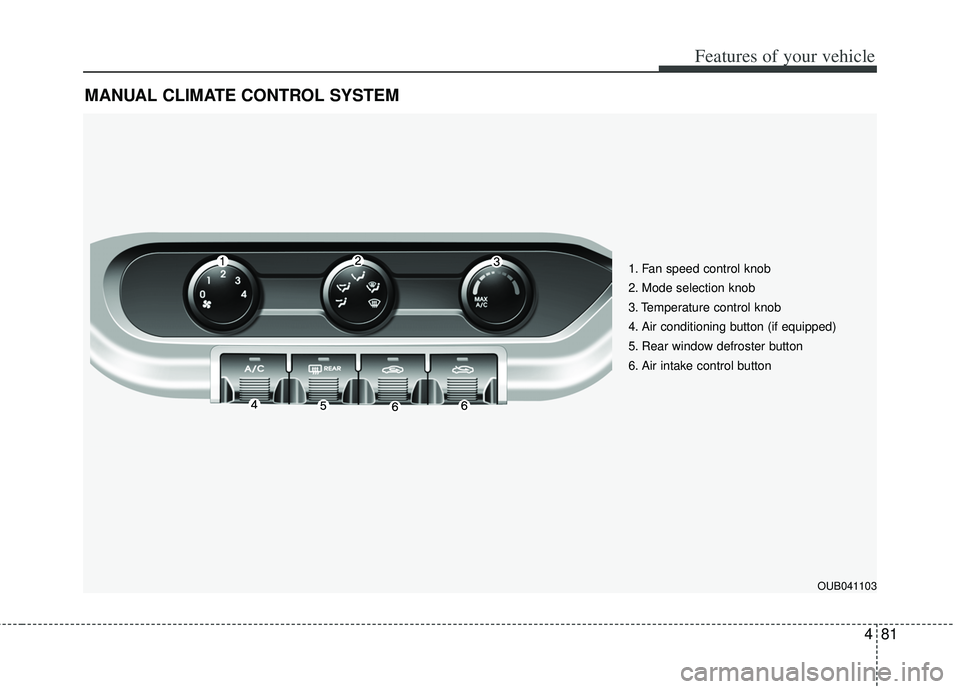
MANUAL CLIMATE CONTROL SYSTEM
1. Fan speed control knob
2. Mode selection knob
3. Temperature control knob
4. Air conditioning button (if equipped)
5. Rear window defroster button
6. Air intake control button
OUB041103