KIA RIO HATCHBACK 2013 Owners Manual
Manufacturer: KIA, Model Year: 2013, Model line: RIO HATCHBACK, Model: KIA RIO HATCHBACK 2013Pages: 385, PDF Size: 9.68 MB
Page 301 of 385
What to do in an emergency
22
6
It is possible that some tires, espe-
cially with larger punctures or dam-
age to the sidewall, cannot be sealed
completely.
Air pressure loss in the tire may
adversely affect tire performance.
For this reason, you should avoid
abrupt steering or other driving
maneuvers, especially if the vehicle
is heavily loaded or if a trailer is in
use.
The Tire Mobility Kit is not designed
or intended as a permanent tire
repair method and is to be used for
one tire only.
This instruction shows you step by
step how to temporarily seal the
puncture simply and reliably.
Read the section "Notes on the safe
use of the Tire Mobility Kit". Notes on the safe use of the Tire
Mobility Kit
Park your car at the side of the
road so that you can work with the
Tire Mobility Kit away from moving
traffic.
To be sure your vehicle will not move, even when you're on fairly
level ground, always set your park-
ing brake.
Only use the Tire Mobility Kit for sealing/inflation passenger car
tires. Only punctured areas located
within the tread region of the tire
can be sealed using the tire mobil-
ity kit.
Do not use on motorcycles, bicy- cles or any other type of tires.
When the tire and wheel are dam- aged, do not use Tire Mobility Kit
for your safety.
Use of the Tire Mobility Kit may not be effective for tire damage larger
than approximately 6 mm (0.24 in).
Please contact the nearest Kia
dealership if the tire cannot be
made roadworthy with the Tire
Mobility Kit. Do not use the Tire Mobility Kit if a
tire is severely damaged by driving
run flat or with insufficient air pres-
sure.
Do not remove any foreign objects such as nails or screws that have
penetrated the tire.
Provided the car is outdoors, leave the engine running. Otherwise
operating the compressor may
eventually drain the car battery.
Never leave the Tire Mobility Kit unattended while it is being used.
Do not leave the compressor run- ning for more than 10 min. at a time
or it may overheat.
Do not use the Tire Mobility Kit if the ambient temperature is below -
30°C (-22°F).
Page 302 of 385
623
What to do in an emergency
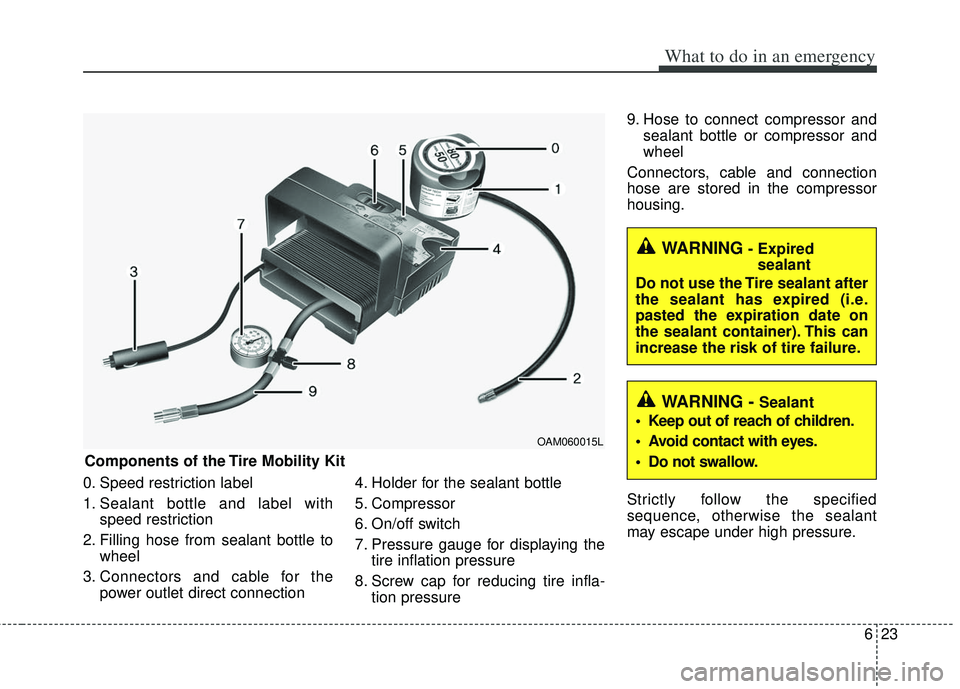
0. Speed restriction label
1. Sealant bottle and label withspeed restriction
2. Filling hose from sealant bottle to wheel
3. Connectors and cable for the power outlet direct connection 4. Holder for the sealant bottle
5. Compressor
6. On/off switch
7. Pressure gauge for displaying the
tire inflation pressure
8. Screw cap for reducing tire infla- tion pressure 9. Hose to connect compressor and
sealant bottle or compressor and
wheel
Connectors, cable and connection
hose are stored in the compressor
housing.
Strictly follow the specified
sequence, otherwise the sealant
may escape under high pressure.
Components of the Tire Mobility Kit
OAM060015L
WARNING- Expired sealant
Do not use the Tire sealant after
the sealant has expired (i.e.
pasted the expiration date on
the sealant container). This can
increase the risk of tire failure.
WARNING - Sealant
• Keep out of reach of children.
Avoid contact with eyes.
Do not swallow.
Page 303 of 385
What to do in an emergency
24
6
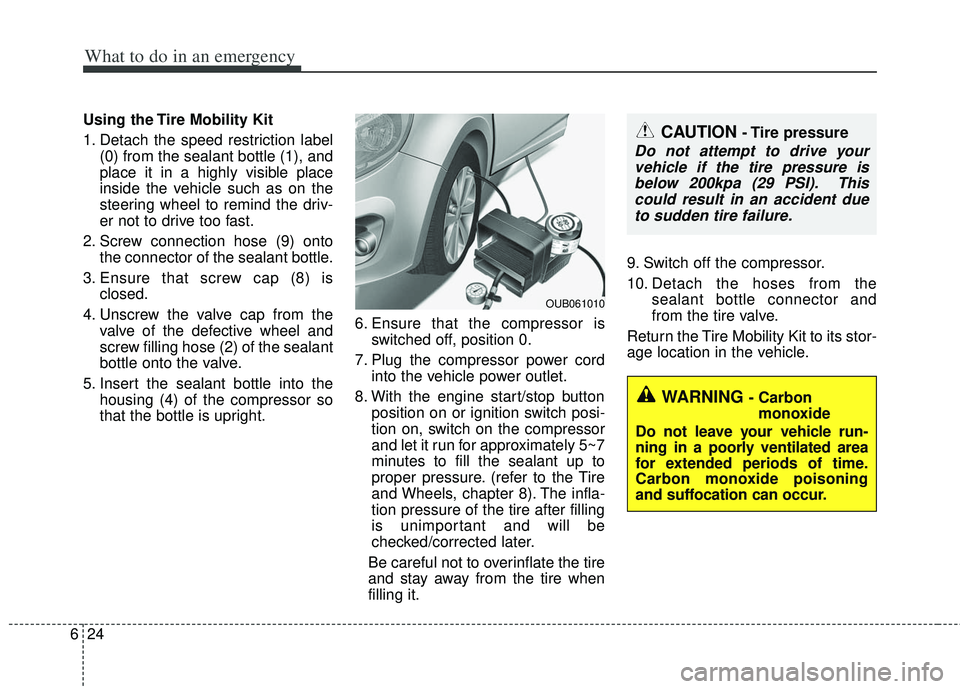
Using the Tire Mobility Kit
1. Detach the speed restriction label
(0) from the sealant bottle (1), and
place it in a highly visible place
inside the vehicle such as on the
steering wheel to remind the driv-
er not to drive too fast.
2. Screw connection hose (9) onto the connector of the sealant bottle.
3. Ensure that screw cap (8) is closed.
4. Unscrew the valve cap from the valve of the defective wheel and
screw filling hose (2) of the sealant
bottle onto the valve.
5. Insert the sealant bottle into the housing (4) of the compressor so
that the bottle is upright. 6. Ensure that the compressor is
switched off, position 0.
7. Plug the compressor power cord into the vehicle power outlet.
8. With the engine start/stop button position on or ignition switch posi-
tion on, switch on the compressor
and let it run for approximately 5~7
minutes to fill the sealant up to
proper pressure. (refer to the Tire
and Wheels, chapter 8). The infla-
tion pressure of the tire after filling
is unimportant and will be
checked/corrected later.
Be careful not to overinflate the tire
and stay away from the tire when
filling it. 9. Switch off the compressor.
10. Detach the hoses from the
sealant bottle connector and
from the tire valve.
Return the Tire Mobility Kit to its stor-
age location in the vehicle.
OUB061010
CAUTION - Tire pressure
Do not attempt to drive your vehicle if the tire pressure isbelow 200kpa (29 PSI). Thiscould result in an accident dueto sudden tire failure.
WARNING - Carbon monoxide
Do not leave your vehicle run-
ning in a poorly ventilated area
for extended periods of time.
Carbon monoxide poisoning
and suffocation can occur.
Page 304 of 385
625
What to do in an emergency
Distributing the sealant
11. Immediately drive approximately7~10km (4~6miles or, about
10min) to evenly distribute the
sealant in the tire.
Do not exceed a speed of 80 km/h
(50 mph). If possible, do not fall
below a speed of 20 km/h (12 mph).
While driving, if you experience any
unusual vibration, ride disturbance or
noise, reduce your speed and drive
with caution until you can safely pull
off of the side of the road.
Call for road side service or towing.
When you use the Tire Mobility Kit,
the tire pressure sensors and wheel
may be damaged by sealant, remove
the sealant stained with tire pressure
sensors and wheel and inspect in
authorized dealer. Checking the tire inflation pres-
sure
1.After driving approximately
7~10km (4 ~6miles or about
10min), stop at a safety location.
2.Connect connection hose (9) of the compressor directly to the tire
valve.
3.Plug the compressor power cord into the vehicle power outlet.
4.Adjust the tire inflation pressure to the recomended tire inflation.
With the ignition swithched on, pro-
ceed as follows.
- To increase the inflation pres-sure : Switch on the compressor,
position I. To check the current
inflation pressure setting, briefly
switch off the compressor.✽ ✽ NOTICE
The pressure gauge may show high-
er than actual reading when the
compressor is running. To get an
accurate tire pressure, the compres-
sor needs to be turned off.
- To reduce the inflation pres-
sure: Loosen the screw cap (8)
on the compressor hose.
Page 305 of 385
What to do in an emergency
26
6
Technical Data
System voltage: DC 12 V
Working voltage: DC 10 - 15 V
Amperage rating: max. 15 A
Suitable for use at temperatures:
-30 ~ +70°C (-22 ~ +158°F)
Max. working pressure: 6 bar (87 psi)
Size
Compressor: 170 x 150 x 60 mm (6.7 x 5.9 x 2.4 in.)
Sealant bottle: 85 x ø 77 mm (3.3 x ø 3.0 in.)
Compressor weight: 0.8 kg (1.8 lbs)
Sealant volume: 200 ml (12.2 cu. in.)CAUTION - Tire pressuresensor
When you use the Tire MobilityKit including sealant notapproved by Kia, the tire pres-sure sensors may be damagedby sealant. The sealant on thetire pressure sensor and wheelshould be removed when youreplace the tire with a new oneand inspect the tire pressuresensors in authorized dealer.
Page 306 of 385
627
What to do in an emergency
TOWING
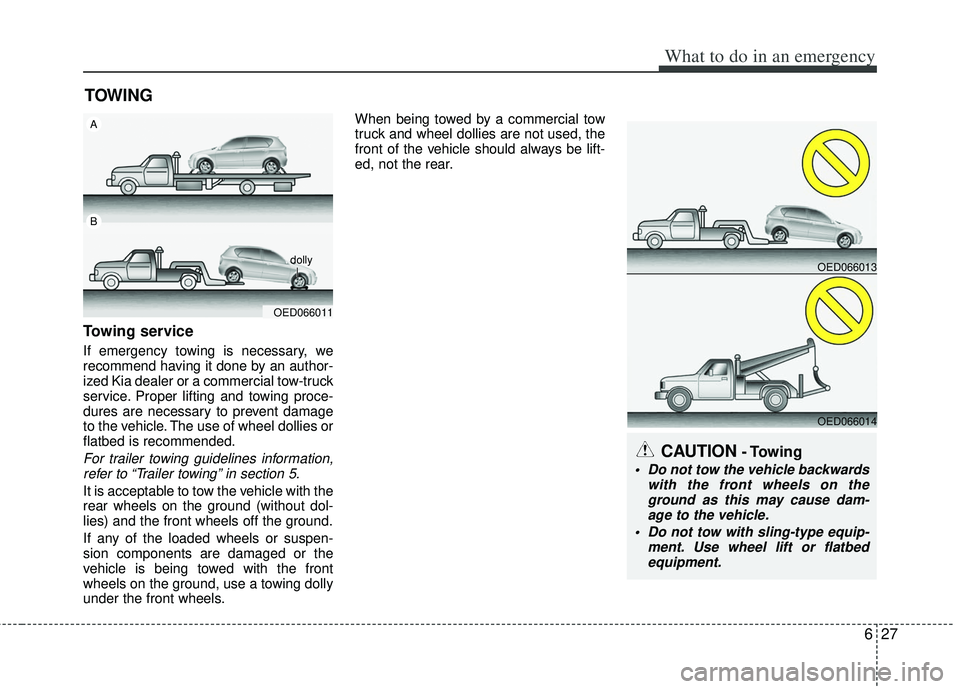
Towing service
If emergency towing is necessary, we
recommend having it done by an author-
ized Kia dealer or a commercial tow-truck
service. Proper lifting and towing proce-
dures are necessary to prevent damage
to the vehicle. The use of wheel dollies or
flatbed is recommended.
For trailer towing guidelines information,refer to “Trailer towing” in section 5.
It is acceptable to tow the vehicle with the
rear wheels on the ground (without dol-
lies) and the front wheels off the ground.
If any of the loaded wheels or suspen-
sion components are damaged or the
vehicle is being towed with the front
wheels on the ground, use a towing dolly
under the front wheels. When being towed by a commercial tow
truck and wheel dollies are not used, the
front of the vehicle should always be lift-
ed, not the rear.
CAUTION- Towing
Do not tow the vehicle backwards
with the front wheels on theground as this may cause dam- age to the vehicle.
Do not tow with sling-type equip- ment. Use wheel lift or flatbedequipment.
OED066011
A
B
dolly
OED066013
OED066014
Page 307 of 385
What to do in an emergency
28
6
When towing your vehicle in an emer-
gency without wheel dollies :
1. Set the ignition switch in the ACC posi-
tion.
2. Place the transaxle shift lever in N (Neutral).
3. Release the parking brake.
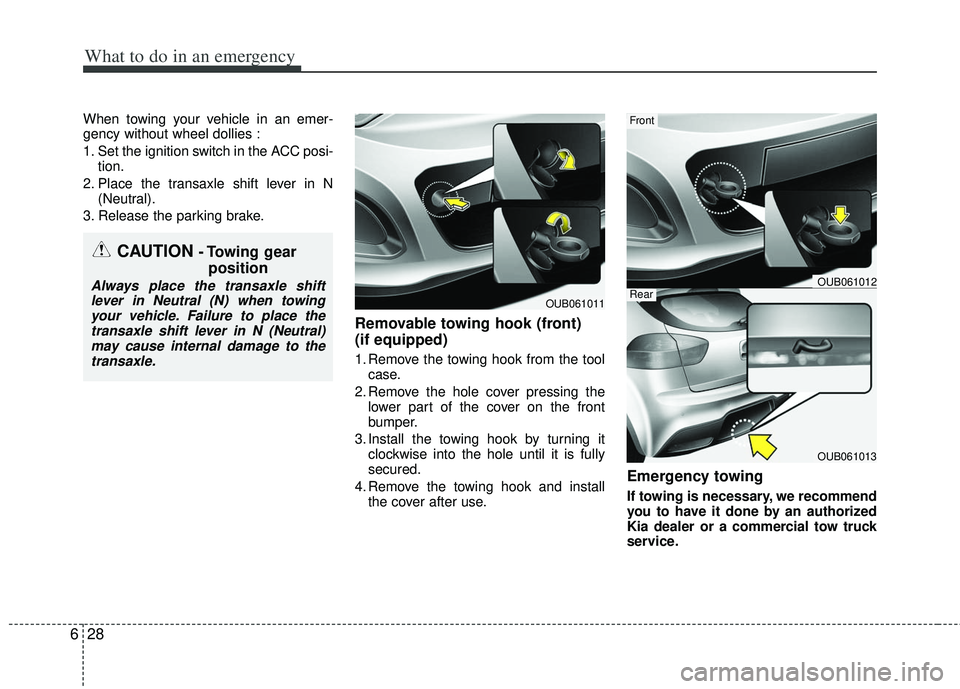
Removable towing hook (front)
(if equipped)
1. Remove the towing hook from the tool case.
2. Remove the hole cover pressing the lower part of the cover on the front
bumper.
3. Install the towing hook by turning it clockwise into the hole until it is fully
secured.
4. Remove the towing hook and install the cover after use.
Emergency towing
If towing is necessary, we recommend
you to have it done by an authorized
Kia dealer or a commercial tow truck
service.
CAUTION - Towing gear position
Always place the transaxle shift
lever in Neutral (N) when towingyour vehicle. Failure to place thetransaxle shift lever in N (Neutral)may cause internal damage to the transaxle.
OUB061011
OUB061013
Front
RearOUB061012
Page 308 of 385
629
What to do in an emergency
If towing service is not available in an
emergency, your vehicle may be tem-
porarily towed using a cable or chain
secured to the emergency towing hook
under the front (or rear) of the vehicle.
Use extreme caution when towing the
vehicle. A driver must be in the vehicle to
steer it and operate the brakes.
Towing in this manner may be done only
on hard-surfaced roads for a short dis-
tance and at low speeds. Also, the
wheels, axles, power train, steering and
brakes must all be in good condition.
Do not use the towing hooks to pull avehicle out of mud, sand or other con-
ditions from which the vehicle cannot
be driven out under its own power.
Avoid towing a vehicle heavier than the vehicle doing the towing.
The drivers of both vehicles should communicate with each other frequent-
ly. Attach a towing strap to the towing
hook.
Using a portion of the vehicle other than the tow hooks for towing may
damage the body of your vehicle.
Use only a cable or chain specifically intended for use in towing vehicles.
Securely fasten the cable or chain to
the towing hook provided.
Before emergency towing, check that the hook is not broken or damaged.
Fasten the towing cable or chain securely to the hook.
Do not jerk the hook. Apply it steadily with even force.
To avoid damaging the hook, do not pull from the side or at a vertical angle.
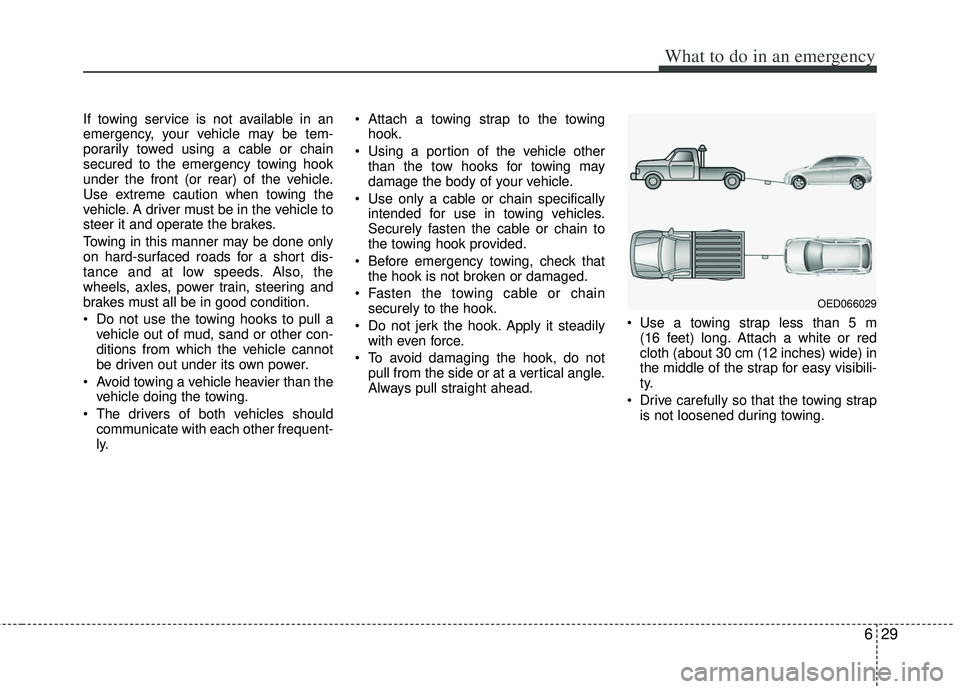
Always pull straight ahead. Use a towing strap less than 5 m
(16 feet) long. Attach a white or red
cloth (about 30 cm (12 inches) wide) in
the middle of the strap for easy visibili-
ty.
Drive carefully so that the towing strap is not loosened during towing.
OED066029
Page 309 of 385
What to do in an emergency
30
6
Emergency towing precautions
Turn the ignition switch to ACC so the
steering wheel isn’t locked.
Place the transaxle shift lever in N (Neutral).
Release the parking brake.
Press the brake pedal with more force than normal since you will have
reduced brake performance.
More steering effort will be required because the power steering system
will be disabled.
If you are driving down a long hill, the brakes may overheat and brake per-
formance will be reduced. Stop often
and let the brakes cool off. If the car is being towed with all four
wheels on the ground, it can be towed
only from the front. Be sure that the
transmission is in neutral. Be sure the
steering is unlocked by placing the igni-
tion switch in the ACC position. A driver
must be in the towed vehicle to operate
the steering and brakes.
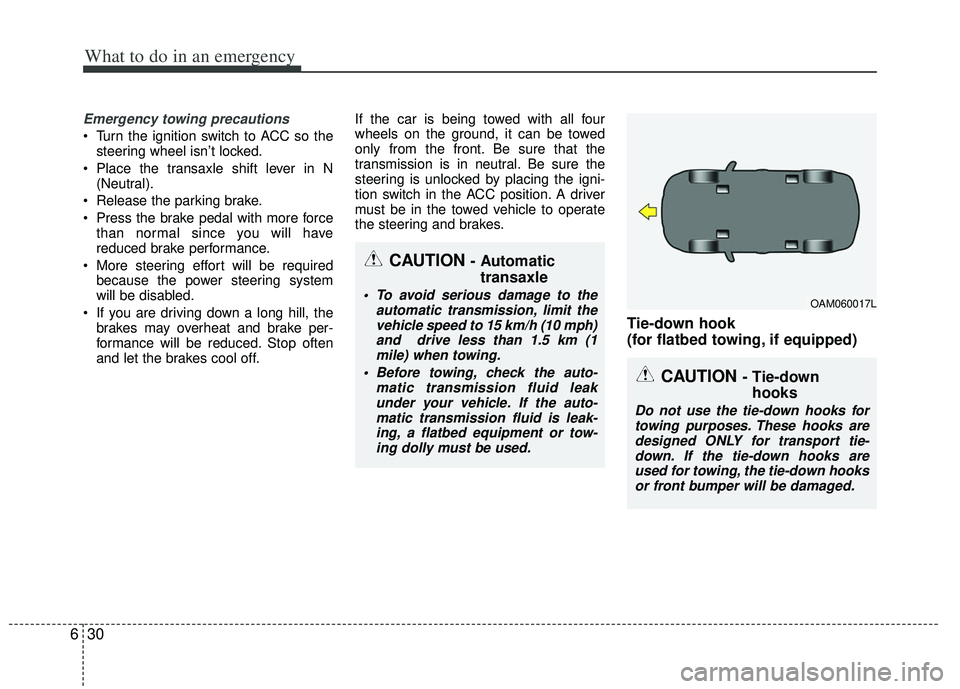
Tie-down hook
(for flatbed towing, if equipped)
CAUTION - Automatic
transaxle
To avoid serious damage to the
automatic transmission, limit thevehicle speed to 15 km/h (10 mph)and drive less than 1.5 km (1mile) when towing.
Before towing, check the auto- matic transmission fluid leakunder your vehicle. If the auto-matic transmission fluid is leak-ing, a flatbed equipment or tow-ing dolly must be used.
CAUTION - Tie-down hooks
Do not use the tie-down hooks for
towing purposes. These hooks aredesigned ONLY for transport tie- down. If the tie-down hooks areused for towing, the tie-down hooks or front bumper will be damaged.
OAM060017L
Page 310 of 385
7
Engine compartment / 7-2
Maintenance services / 7-3
Owner maintenance / 7-5
Scheduled maintenance service / 7-7
Explanation of scheduled maintenance items / 7-22
Engine oil / 7-25
Engine coolant / 7-26
Brake/clutch fluid / 7-29
Automatic transaxle fluid / 7-30
Washer fluid / 7-30
Parking brake / 7-31
Air cleaner / 7-31
Climate control air filter / 7-32
Wiper blades / 7-32
Battery / 7-34
Tires and wheels / 7-37
Fuses / 7-50
Appearance care / 7-60
Emission control system / 7-66
Maintenance