audio KIA RIO HATCHBACK 2014 Owners Manual
[x] Cancel search | Manufacturer: KIA, Model Year: 2014, Model line: RIO HATCHBACK, Model: KIA RIO HATCHBACK 2014Pages: 446, PDF Size: 12.98 MB
Page 4 of 446
ii
1
2
3
4
5
6
7
8I
IntroductionHow to use this manual / Fuel requirements / Vehicle break-in process / Vehicle data collection and event data recorders / Indicator symbols on t\
he instrument cluster
Your vehicle at a glance
Exterior overview / Interior overview / Instrument panel overview / Engi\
ne compartment
Safety features of your vehicle
Seats / Seat belts / Child restraint system / Air bag
Features of your vehicleKeys / Door locks / Trunk / Windows / Hood / Fuel filler lid / Sunroof / Steering wheel / Mirrors /
Instrument cluster / Lighting / Wipers & Washers / Climate control system / Audio system / Etc.
Driving your vehicleBefore driving / Engine start/stop button / Transaxle / Brake system / Cruise control system /
Active ECO system / Winter driving / Vehicle load limit / Etc.
What to do in an emergencyRoad warning / Emergency while driving / Emergency starting / Engine overheat / TPMS / Flat tire / Towing / Etc.
MaintenanceEngine compartment / Maintenance service / Engine oil / Engine coolant /\
Brake fluid / Washer fluid /
Parking brake / Air cleaner / Wiper blades / Battery / Tire and wheels / Fuses / Light bulbs / Etc.
Specifications, Consumer information and Reporting safety defects
Index
table of contents
Page 16 of 446
25
Your vehicle at a glance
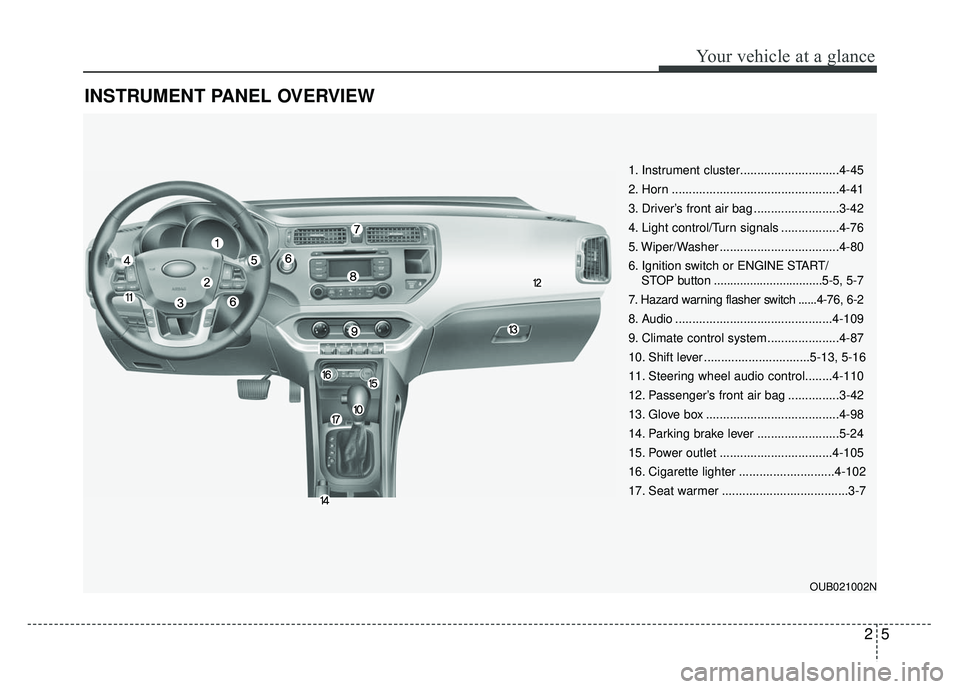
INSTRUMENT PANEL OVERVIEW
OUB021002N
1. Instrument cluster.............................4-45
2. Horn .................................................4-41
3. Driver’s front air bag .........................3-42
4. Light control/Turn signals .................4-76
5. Wiper/Washer ...................................4-80
6. Ignition switch or ENGINE START/STOP button .................................5-5, 5-7
7. Hazard warning flasher switch ......4-76, 6-2
8. Audio ..............................................4-109
9. Climate control system .....................4-87
10. Shift lever ...............................5-13, 5-16
11. Steering wheel audio control........4-110
12. Passenger’s front air bag ...............3-42
13. Glove box .......................................4-98
14. Parking brake lever ........................5-24
15. Power outlet .................................4-105
16. Cigarette lighter ............................4-102
17. Seat warmer .....................................3-7
Page 73 of 446
Lighting. . . . . . . . . . . . . . . . . . . . . . . . . . . . . . . . . . 4-76\
. . . . . . . . . . . . . . . . . . . . . 4-76
. . . . . . . . . . . . . . . . . . . . . . . . . . . . . 4-76
. . . . . . . . . . . . . . . . . . . . . . 4-78
. . . . . . . . . . 4-79
. . . . . . . . . . . . . . . . . . . . . . . . . . . 4-79
Wipers and washers . . . . . . . . . . . . . . . . . . . . . . . 4-80
Interior light . . . . . . . . . . . . . . . . . . . . . . . . . . . . . . 4-84
. . . . . . . . . . . . . . . . . . . . . . . . . . . . . . . . . . 4-84
. . . . . . . . . . . . . . . . . . . . . . . . . . . . . . . . . 4-84
. . . . . . . . . . . . . . . . . . . . . . . . . . 4-85
. . . . . . . . . . . . . . . . . . . . . . . . . . . . . 4-85
. . . . . . . . . . . . . . . . . . . . . . . . . . 4-85
Defroster . . . . . . . . . . . . . . . . . . . . . . . . . . . . . . . . . 4-86
Manual climate control system. . . . . . . . . . . . . . . 4-87
Windshield defrosting and defogging . . . . . . . . . 4-96
Storage compartments . . . . . . . . . . . . . . . . . . . . . 4-98
4-98
. . . . . . . . . . . . . . . . . . . . . . . . . . . . . . . . . . 4-98
. . . . . . . . . . . . . . . . . . . . . . . . . . . . . . . . . . . 4-99
. . . . . . . . . . . . . . . . . . . . . . . . . . 4-99
4-100
. . . . . . . . . . . . . . . . . . . . . . . . . 4-101 Interior features . . . . . . . . . . . . . . . . . . . . . . . . . . . 4-102
. . . . . . . . . . . . . . . . . . . . . . . . . . . . . 4-102
. . . . . . . . . . . . . . . . . . . . . . . . . . . . . . . . . . . . \
4-102
. . . . . . . . . . . . . . . . . . . . . . . . . . . . . . . . . 4-103
. . . . . . . . . . . . . . . . . . . . . . . . . . . . . . 4-103
. . . . . . . . . . . . . . . . . . . . . . . . . . . . . . . . 4-104
. . . . . . . . . . . . . . . . . . . . . . . . . . . . . . . . . . . 4-104
. . . . . . . . . . . . . . . . . . . . . . . . . . . . . . . . 4-105
. . . . . . . . . . . . . . . . . . . . . . . . . 4-105
. . . . . . . . . . . . . . . . . . . . 4-106
. . . . . . . . . . . . . . . . . . . . . . . . . . . . . . 4-107
. . . . . . . . . . . . . . . . . . . . . . . . . . . 4-107
. . . . . . . . . . . . . . . . . . . . . . . . . . . 4-108
Audio system . . . . . . . . . . . . . . . . . . . . . . . . . . . . . 4-109
. . . . . . . . . . . . . . . . . . . . . . . . . . . . . . . . . . . . \
4-109
. . . . . . . . . . . . . . . . . . 4-110
®wireless technology . . . . . . . . . . . . . . . . 4-110
USB and iPod®port . . . . . . . . . . . . . . . . . . . . . 4-111
4
Page 146 of 446
475
Features of your vehicle
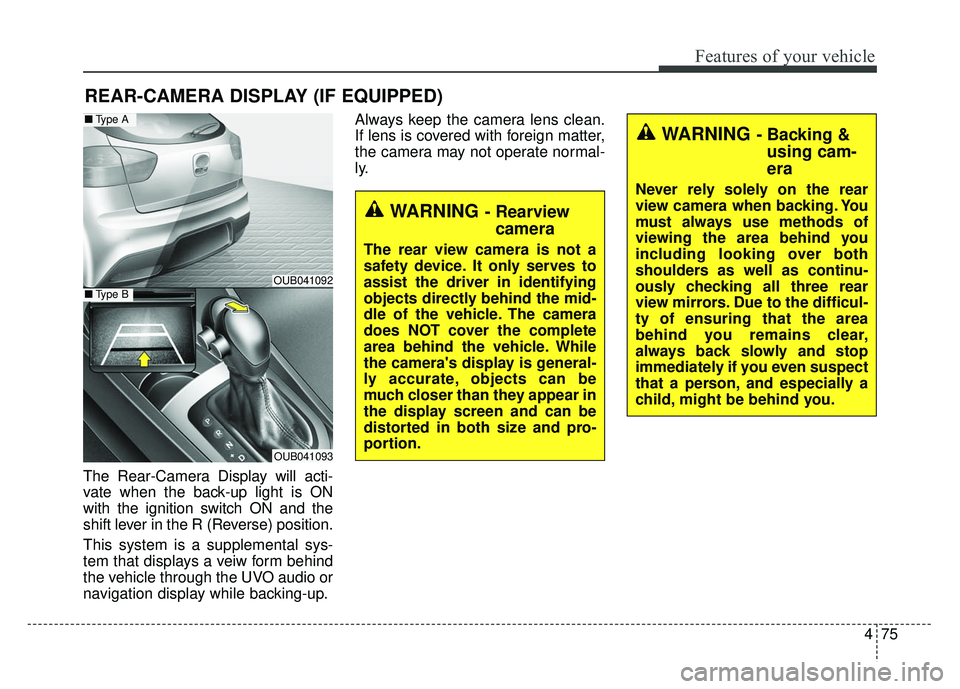
The Rear-Camera Display will acti-
vate when the back-up light is ON
with the ignition switch ON and the
shift lever in the R (Reverse) position.
This system is a supplemental sys-
tem that displays a veiw form behind
the vehicle through the UVO audio or
navigation display while backing-up.Always keep the camera lens clean.
If lens is covered with foreign matter,
the camera may not operate normal-
ly.
REAR-CAMERA DISPLAY (IF EQUIPPED)
WARNING - Rearview
camera
The rear view camera is not a
safety device. It only serves to
assist the driver in identifying
objects directly behind the mid-
dle of the vehicle. The camera
does NOT cover the complete
area behind the vehicle. While
the camera's display is general-
ly accurate, objects can be
much closer than they appear in
the display screen and can be
distorted in both size and pro-
portion.
WARNING - Backing &using cam-
era
Never rely solely on the rear
view camera when backing. You
must always use methods of
viewing the area behind you
including looking over both
shoulders as well as continu-
ously checking all three rear
view mirrors. Due to the difficul-
ty of ensuring that the area
behind you remains clear,
always back slowly and stop
immediately if you even suspect
that a person, and especially a
child, might be behind you.
OUB041092
OUB041093
■ Type A
■Type B
Page 176 of 446
4105
Features of your vehicle
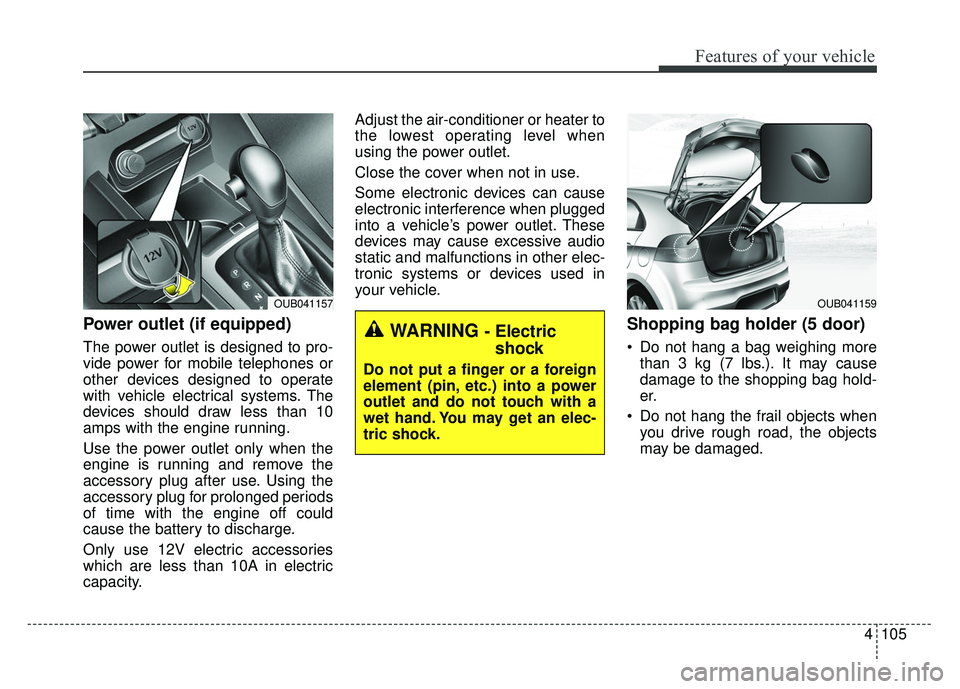
Power outlet (if equipped)
The power outlet is designed to pro-
vide power for mobile telephones or
other devices designed to operate
with vehicle electrical systems. The
devices should draw less than 10
amps with the engine running.
Use the power outlet only when the
engine is running and remove the
accessory plug after use. Using the
accessory plug for prolonged periods
of time with the engine off could
cause the battery to discharge.
Only use 12V electric accessories
which are less than 10A in electric
capacity.Adjust the air-conditioner or heater to
the lowest operating level when
using the power outlet.
Close the cover when not in use.
Some electronic devices can cause
electronic interference when plugged
into a vehicle’s power outlet. These
devices may cause excessive audio
static and malfunctions in other elec-
tronic systems or devices used in
your vehicle.
Shopping bag holder (5 door)
Do not hang a bag weighing more
than 3 kg (7 lbs.). It may cause
damage to the shopping bag hold-
er.
Do not hang the frail objects when you drive rough road, the objects
may be damaged.
OUB041157
WARNING - Electricshock
Do not put a finger or a foreign
element (pin, etc.) into a power
outlet and do not touch with a
wet hand. You may get an elec-
tric shock.
OUB041159
Page 177 of 446
Features of your vehicle
106
4
Digital clock and calendar
(if equipped)
Whenever the battery terminals or
related fuses are disconnected, you
must reset the clock and the calen-
dar.
When the ignition switch is in the
ACC or ON position, the clock but-
tons operate as follows:
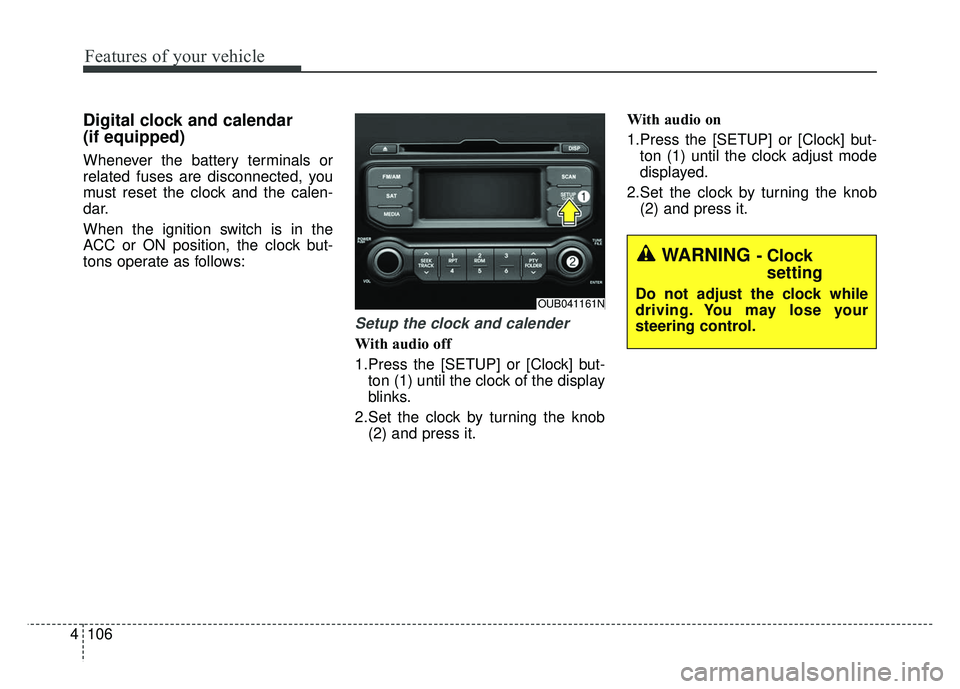
Setup the clock and calender
With audio off
1.Press the [SETUP] or [Clock] but-
ton (1) until the clock of the display
blinks.
2.Set the clock by turning the knob (2) and press it. With audio on
1.Press the [SETUP] or [Clock] but-
ton (1) until the clock adjust mode
displayed.
2.Set the clock by turning the knob (2) and press it.
OUB041161N
WARNING - Clock setting
Do not adjust the clock while
driving. You may lose your
steering control.
Page 180 of 446
4109
Features of your vehicle
If you install an aftermarket HID
head lamp, your vehicle’s audio and
electronic device may malfunction.
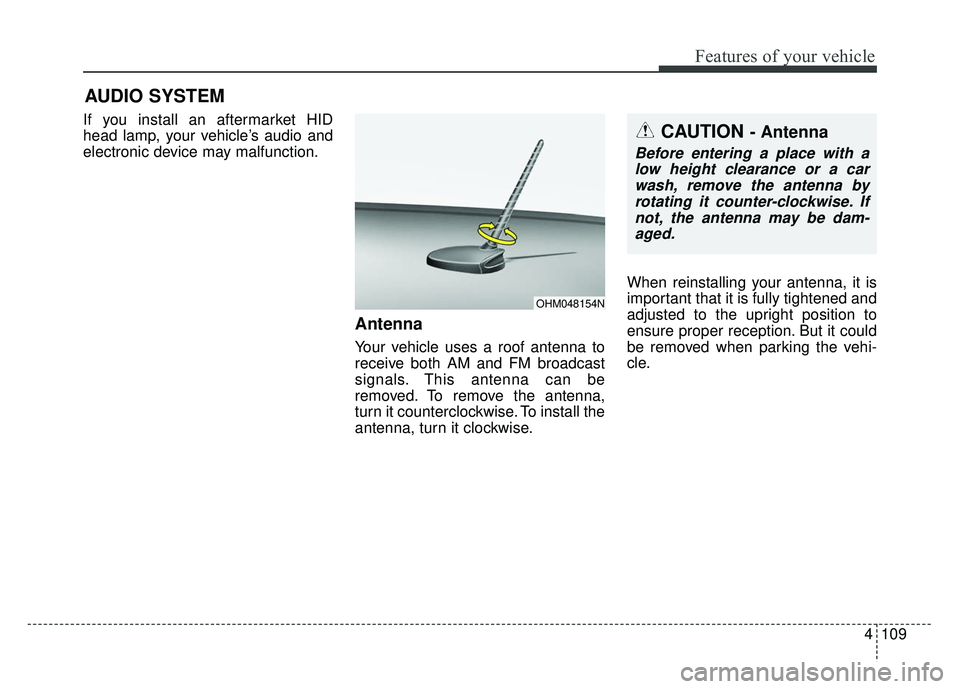
Antenna
Your vehicle uses a roof antenna to
receive both AM and FM broadcast
signals. This antenna can be
removed. To remove the antenna,
turn it counterclockwise. To install the
antenna, turn it clockwise.When reinstalling your antenna, it is
important that it is fully tightened and
adjusted to the upright position to
ensure proper reception. But it could
be removed when parking the vehi-
cle.
AUDIO SYSTEM
OHM048154N
CAUTION - Antenna
Before entering a place with a
low height clearance or a carwash, remove the antenna byrotating it counter-clockwise. Ifnot, the antenna may be dam-aged.
Page 181 of 446
Features of your vehicle
110
4
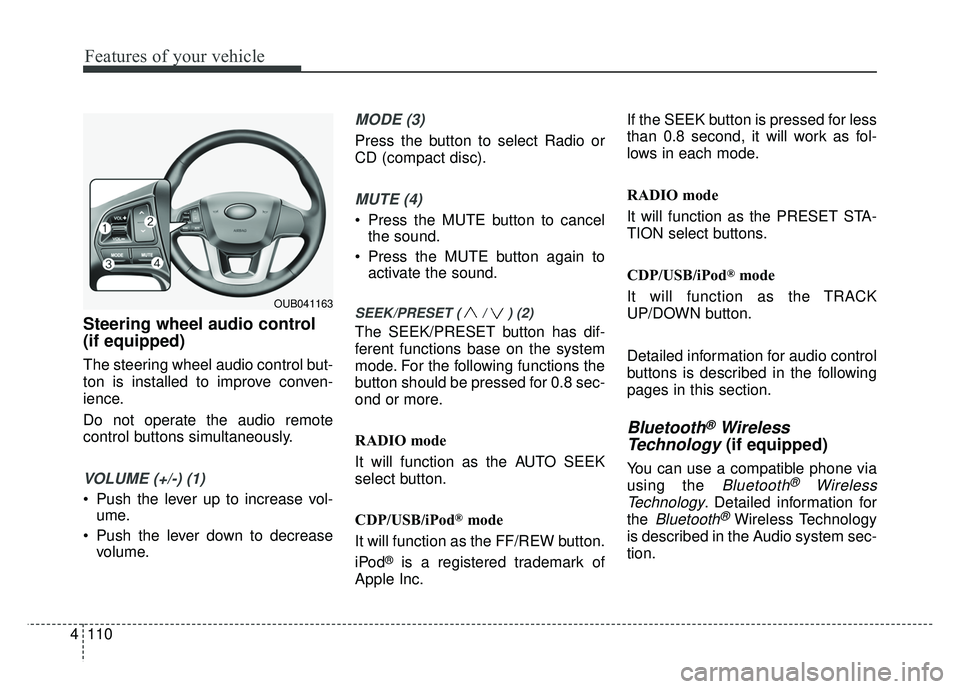
Steering wheel audio control
(if equipped)
The steering wheel audio control but-
ton is installed to improve conven-
ience.
Do not operate the audio remote
control buttons simultaneously.
VOLUME (+/-) (1)
Push the lever up to increase vol-
ume.
Push the lever down to decrease volume.
MODE (3)
Press the button to select Radio or
CD (compact disc).
MUTE (4)
Press the MUTE button to cancelthe sound.
Press the MUTE button again to activate the sound.
SEEK/PRESET ( / ) (2)
The SEEK/PRESET button has dif-
ferent functions base on the system
mode. For the following functions the
button should be pressed for 0.8 sec-
ond or more.
RADIO mode
It will function as the AUTO SEEK
select button.
CDP/USB/iPod
®mode
It will function as the FF/REW button.
iPod
®is a registered trademark of
Apple Inc. If the SEEK button is pressed for less
than 0.8 second, it will work as fol-
lows in each mode.
RADIO mode
It will function as the PRESET STA-
TION select buttons.
CDP/USB/iPod
®mode
It will function as the TRACK
UP/DOWN button.
Detailed information for audio control
buttons is described in the following
pages in this section.
Bluetooth®Wireless
Technology
(if equipped)
You can use a compatible phone via
using the
Bluetooth®Wireless
Technology
. Detailed information for
the
Bluetooth® Wireless Technology
is described in the Audio system sec-
tion.
OUB041163
Page 182 of 446
4111
Features of your vehicle
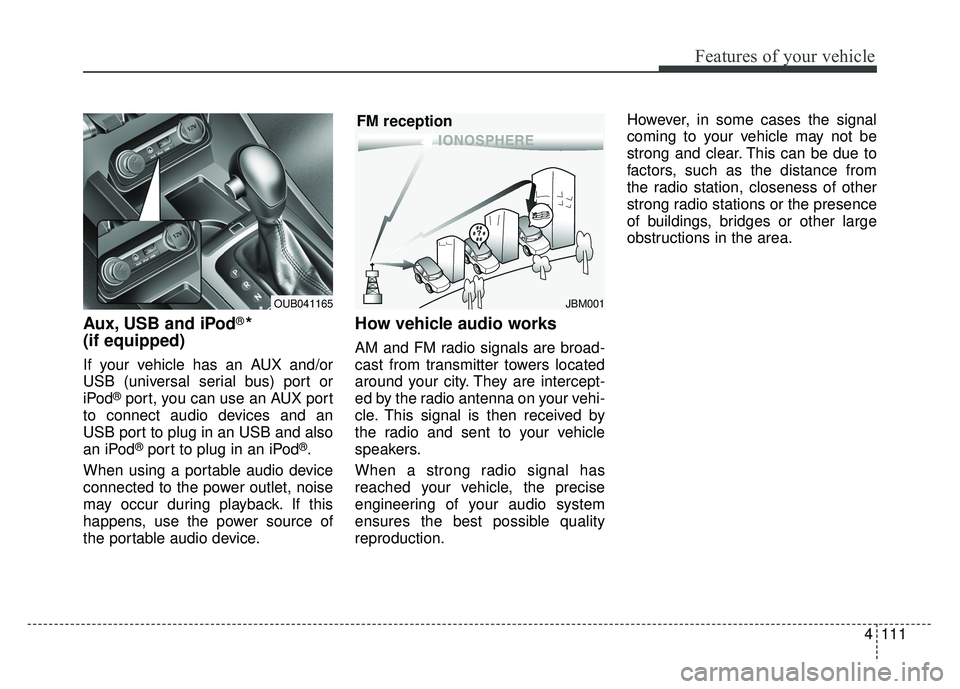
Aux, USB and iPod®*
(if equipped)
If your vehicle has an AUX and/or
USB (universal serial bus) port or
iPod
®port, you can use an AUX port
to connect audio devices and an
USB port to plug in an USB and also
an iPod
®port to plug in an iPod®.
When using a portable audio device
connected to the power outlet, noise
may occur during playback. If this
happens, use the power source of
the portable audio device.
How vehicle audio works
AM and FM radio signals are broad-
cast from transmitter towers located
around your city. They are intercept-
ed by the radio antenna on your vehi-
cle. This signal is then received by
the radio and sent to your vehicle
speakers.
When a strong radio signal has
reached your vehicle, the precise
engineering of your audio system
ensures the best possible quality
reproduction. However, in some cases the signal
coming to your vehicle may not be
strong and clear. This can be due to
factors, such as the distance from
the radio station, closeness of other
strong radio stations or the presence
of buildings, bridges or other large
obstructions in the area.
JBM001
FM reception
OUB041165
Page 185 of 446
Features of your vehicle
114
4
Using a cellular phone or a two-
way radio
When a cellular phone is used inside
the vehicle, noise may be produced
from the audio system. This does not
mean that something is wrong with
the audio equipment. In such a case,
use the cellular phone at a place as
far as possible from the audio equip-
ment.
Care of disc (if equipped)
If the temperature inside the car is too high, open the car windows for
ventilation before using your car
audio.
It is illegal to copy and use MP3/WMA/AAC/WAVE files with-
out permission. Use CDs that are
created only by lawful means.
Do not apply volatile agents such as benzene and thinner, normal
cleaners and magnetic sprays
made for analogue disc onto CDs.
To prevent the disc surface from getting damaged. Hold and carry
CDs by the edges or the edges of
the center hole only.
Clean the disc surface with a piece of soft cloth before playback (wipe
it from the center to the outside
edge).
Do not damage the disc surface or attach pieces of sticky tape or
paper onto it.
Make sure on undesirable matter other than CDs are inserted into
the CD player (Do not insert more
than one CD at a time). Keep CDs in their cases after use
to protect them from scratches or
dirt.
Depending on the type of CD- R/CD-RW CDs, certain CDs may
not operate normally according to
manufacturing companies or mak-
ing and recording methods. In such
circumstances, if you still continue
to use those CDs, they may cause
the malfunction of your car audio
system.
✽ ✽ NOTICE - Playing an
Incompatible Copy-Protected
Audio CD
Some copy protected CDs, which do
not comply with the international
audio CD standards (Red Book),
may not play on your car audio.
Please note that if you try to play
copy protected CDs and the CD
player does not perform correctly
the CDs maybe defective, not the CD
player.
WARNING - Cell phone use
Do not use a cellular phone
while driving. Stop at a safe
location to use a cellular phone.