fuse panel KIA RIO HATCHBACK 2015 Owners Manual
[x] Cancel search | Manufacturer: KIA, Model Year: 2015, Model line: RIO HATCHBACK, Model: KIA RIO HATCHBACK 2015Pages: 447, PDF Size: 9.49 MB
Page 4 of 447

ii
1
2
3
4
5
6
7
8I
IntroductionHow to use this manual / Fuel requirements / Vehicle break-in process / Vehicle data collection and event data recorders / Indicator symbols on t\
he instrument cluster
Your vehicle at a glance
Exterior overview / Interior overview / Instrument panel overview / Engi\
ne compartment
Safety features of your vehicle
Seats / Seat belts / Child restraint system / Air bag
Features of your vehicleKeys / Door locks / Trunk / Windows / Hood / Fuel filler lid / Sunroof / Steering wheel / Mirrors /
Instrument cluster / Lighting / Wipers & Washers / Climate control system / Audio system / Etc.
Driving your vehicleBefore driving / Engine start/stop button / Transaxle / Brake system / Cruise control system /
Active ECO system / Winter driving / Vehicle load limit / Etc.
What to do in an emergencyRoad warning / Emergency while driving / Emergency starting / Engine overheat / TPMS / Flat tire / Towing / Etc.
MaintenanceEngine compartment / Maintenance service / Engine oil / Engine coolant /\
Brake fluid / Washer fluid /
Parking brake / Air cleaner / Wiper blades / Battery / Tire and wheels / Fuses / Light bulbs / Etc.
Specifications, Consumer information and Reporting safety defects
Index
table of contents
Page 15 of 447

Your vehicle at a glance
42
INTERIOR OVERVIEW
OUB021001K
1. Door lock/unlock button ....................4-17
2. Central door lock switch....................4-18
3. Power window switches ....................4-25
4. Power window lock button ................4-28
5. Outside rearview mirror control switch ................................................4-42
6. Hood release lever ............................4-30
7. Fuel filler lid release lever .................4-32
8. Trunk lid release lever (4 door) .........4-21
9. Steering wheel ..................................4-39
10. Steering wheel tilt control lever.......4-40
11. Active ECO button ..........................5-45
12. Instrument panel illumination control switch ..............................................4-46
13. ESC OFF button .............................5-27
14. Heated steering wheel switch (if equipped) ....................................4-40
15. Idle Stop and Go system OFF button (if equipped) ....................................5-40
16. Fuse box .........................................7-56
17. Brake pedal .....................................5-22
18. Accelerator pedal
Page 54 of 447

337
Safety features of your vehicle
✽
✽
NOTICE
Before you replace a fuse or discon-
nect a battery terminal, turn the
ignition switch to the LOCK posi-
tion and remove the ignition key.
Never remove or replace the air bag
related fuse(s) when the ignition
switch is in the ON position. Failure
to heed this warning will cause the
SRS air bag warning light to illumi-
nate.
Occupant detection system
Your vehicle is equipped with an
occupant detection system in the
front passenger's seat.
The occupant detection system is
designed to detect the presence of a
properly-seated front passenger and
determine if the passenger's front air
bag should be enabled (may inflate)
or not. The driver's front air bag is not
affected or controlled by the occu-
pant detection system.
Main components of occupant
detection system
A detection device located within the front passenger seat track.
Electronic system to determine whether passenger air bag sys-
tems should be activated or deac-
tivated.
An indicator light located on the instrument panel which illuminates
the words PASSENGER AIR BAG
“OFF” indicating the front passen-
ger air bag system is deactivated.
The instrument panel air bag warn- ing light is interconnected with the
occupant detection system.
OUB031037N
Page 387 of 447
Maintenance
56
7
FUSES
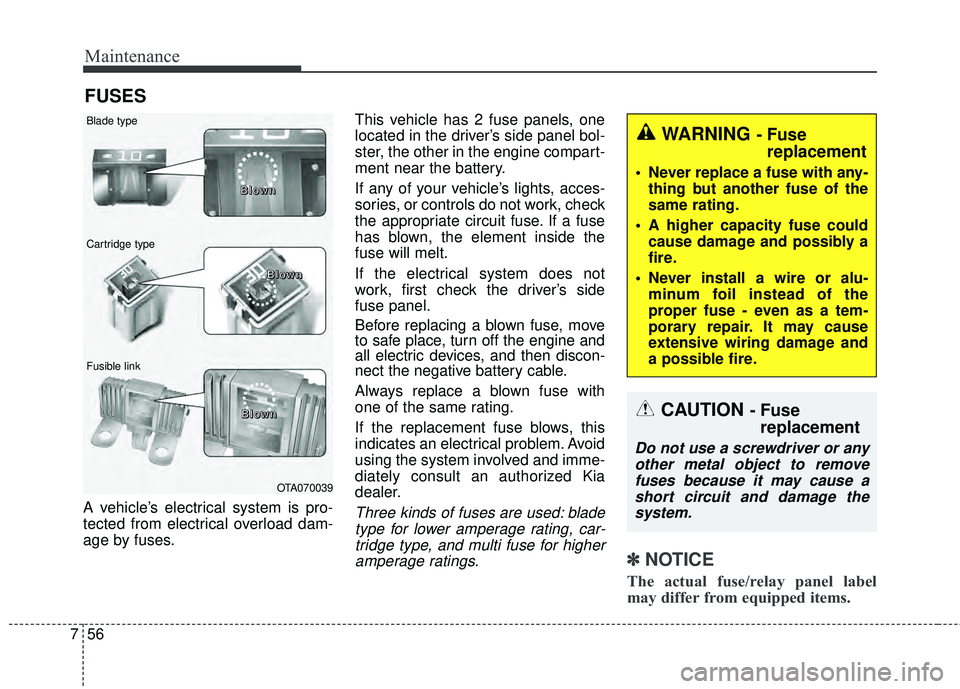
A vehicle’s electrical system is pro-
tected from electrical overload dam-
age by fuses. This vehicle has 2 fuse panels, one
located in the driver’s side panel bol-
ster, the other in the engine compart-
ment near the battery.
If any of your vehicle’s lights, acces-
sories, or controls do not work, check
the appropriate circuit fuse. If a fuse
has blown, the element inside the
fuse will melt.
If the electrical system does not
work, first check the driver’s side
fuse panel.
Before replacing a blown fuse, move
to safe place, turn off the engine and
all electric devices, and then discon-
nect the negative battery cable.
Always replace a blown fuse with
one of the same rating.
If the replacement fuse blows, this
indicates an electrical problem. Avoid
using the system involved and imme-
diately consult an authorized Kia
dealer.Three kinds of fuses are used: blade
type for lower amperage rating, car-tridge type, and multi fuse for higheramperage ratings.
✽ ✽ NOTICE
The actual fuse/relay panel label
may differ from equipped items.
WARNING - Fuse
replacement
Never replace a fuse with any-
thing but another fuse of the
same rating.
A higher capacity fuse could cause damage and possibly a
fire.
Never install a wire or alu- minum foil instead of the
proper fuse - even as a tem-
porary repair. It may cause
extensive wiring damage and
a possible fire.
OTA070039
Blade type
Cartridge type
Fusible link B B
B
B
l
l
l
l
o
o
o
o
w
w
w
w
n
n
n
n
B
B
B
B
l
l
l
l
o
o
o
o
w
w
w
w
n
n
n
n
B
B
B
B
l
l
l
l
o
o
o
o
w
w
w
w
n
n
n
n
CAUTION - Fuse
replacement
Do not use a screwdriver or any
other metal object to removefuses because it may cause ashort circuit and damage thesystem.
Page 388 of 447

757
Maintenance
Instrument panel fuse replace-ment
1. Turn the ignition switch and all other switches off.
2. Open the fuse panel cover.
3. Pull the suspected fuse straight out. Use the removal tool provided
in the engine compartment fuse
panel.
4. Check the removed fuse; replace it if it is blown.
5. Push in a new fuse of the same rating, and make sure it fits tightly
in the clips.
If it fits loosely, consult an authorized
Kia dealer.
If you do not have a spare, use a fuse of the same rating from a circuityou may not need for operating thevehicle, such as the cigar lighterfuse.
If the headlights or other electrical
components do not work and the
fuses are OK, check the fuse block in
the engine compartment. If a fuse is
blown, it must be replaced.
OUB071019WARNING - Electrical Fire
When replacing a blown fuse or relay with a new one, make
sure the new fuse or relay fits
tightly into the clips The incom-
plete fastening fuse or relay
may cause the vehicle wiring
and electric systems damage
and a possible fire.
Do not remove fuses, relays and terminals fastened with
bolts or nuts. The fuses, relays
and terminals may be fastened
incompletely, and it may cause
a possible fire. If fuses, relays
and terminals fastened with
bolts or nuts are blown, we rec-
ommend that you consult with
an authorized Kia dealer.
CAUTION- FuseReplacement
Do not input any other objectsexcept fuses or relays intofuse/relay terminals such as adriver or wiring. It may causecontact failure and system mal-function.
Page 389 of 447
Maintenance
58
7
Memory fuse
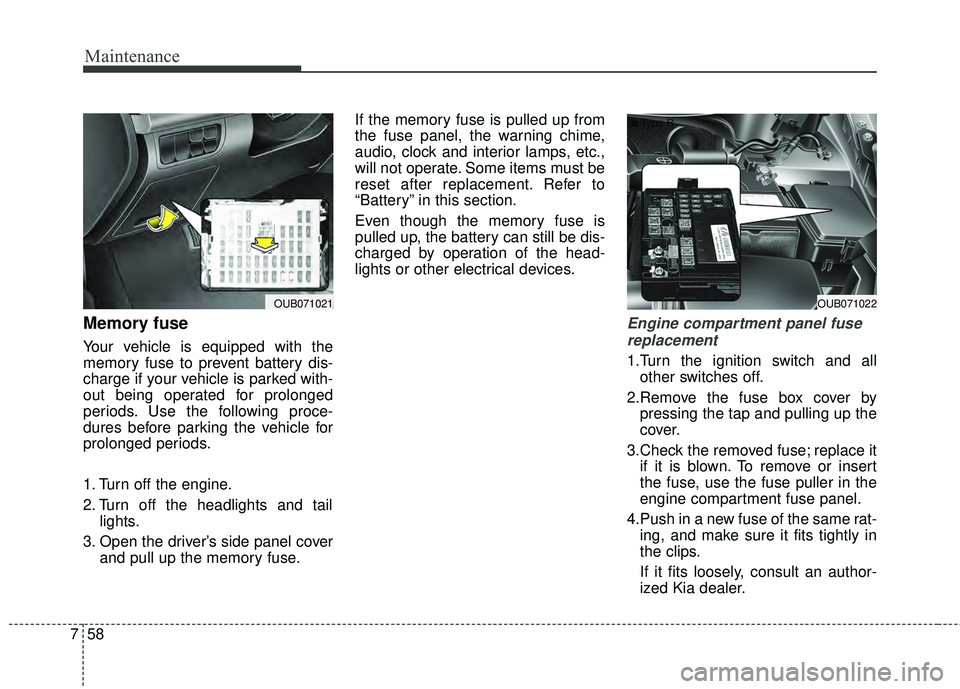
Your vehicle is equipped with the
memory fuse to prevent battery dis-
charge if your vehicle is parked with-
out being operated for prolonged
periods. Use the following proce-
dures before parking the vehicle for
prolonged periods.
1. Turn off the engine.
2. Turn off the headlights and tail
lights.
3. Open the driver’s side panel cover and pull up the memory fuse. If the memory fuse is pulled up from
the fuse panel, the warning chime,
audio, clock and interior lamps, etc.,
will not operate. Some items must be
reset after replacement. Refer to
“Battery” in this section.
Even though the memory fuse is
pulled up, the battery can still be dis-
charged by operation of the head-
lights or other electrical devices.
Engine compartment panel fuse
replacement
1.Turn the ignition switch and all other switches off.
2.Remove the fuse box cover by pressing the tap and pulling up the
cover.
3.Check the removed fuse; replace it if it is blown. To remove or insert
the fuse, use the fuse puller in the
engine compartment fuse panel.
4.Push in a new fuse of the same rat- ing, and make sure it fits tightly in
the clips.
If it fits loosely, consult an author-
ized Kia dealer.
OUB071022
■Type B
OUB071021
Page 390 of 447

759
Maintenance
Multi fuse
If the multi fuse is blown, consult an
authorized Kia dealer.
Fuse/relay panel description
Inside the fuse/relay panel covers,
you can find the fuse/relay label
describing fuse/relay name and
capacity.
✽ ✽NOTICE
Not all fuse panel descriptions in
this manual may be applicable to
your vehicle. It is accurate at the
time of printing. When you inspect
the fuse panel in your vehicle, refer
to the fuse panel label.
OUB071023N
CAUTION - Fuse panel
covers
After checking the fuse panel in
the engine compartment,securely install the fuse panelcover to prevent electrical fail-ures which may occur fromwater leaking in.
Page 391 of 447

Maintenance
60
7
Instrument panel fuse panel
✽
✽
NOTICE
The actual fuse/relay panel label
may differ from equipped items.
OUB074064N
OUB071025
Page 392 of 447

761
Maintenance
Engine compartment fuse
panel
✽ ✽NOTICE
The actual fuse/relay panel label
may differ from equipped items.
OUB074063N
OUB071026
Page 393 of 447
Maintenance
62
7
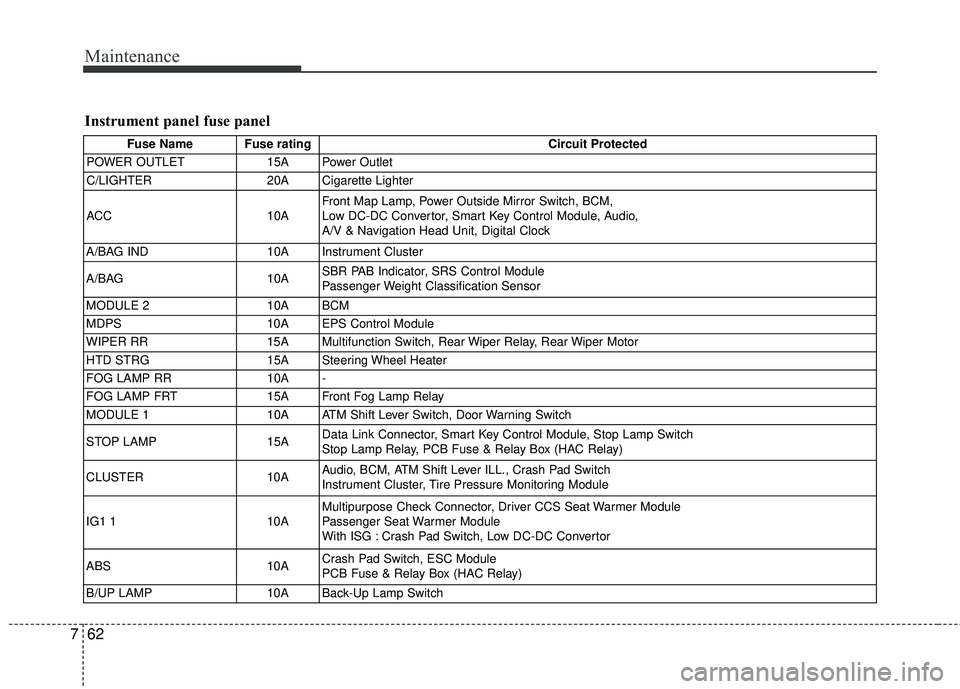
Instrument panel fuse panel
Fuse Name Fuse rating Circuit Protected
POWER OUTLET 15A Power Outlet
C/LIGHTER 20A Cigarette Lighter
ACC 10AFront Map Lamp, Power Outside Mirror Switch, BCM,
Low DC-DC Convertor, Smart Key Control Module, Audio,
A/V & Navigation Head Unit, Digital Clock
A/BAG IND 10A Instrument Cluster
A/BAG 10ASBR PAB Indicator, SRS Control Module
Passenger Weight Classification Sensor
MODULE 2 10A BCM
MDPS 10A EPS Control Module
WIPER RR 15A Multifunction Switch, Rear Wiper Relay, Rear Wiper Motor
HTD STRG 15A Steering Wheel Heater
FOG LAMP RR 10A -
FOG LAMP FRT 15A Front Fog Lamp Relay
MODULE 1 10A ATM Shift Lever Switch, Door Warning Switch
STOP LAMP 15AData Link Connector, Smart Key Control Module, Stop Lamp Switch
Stop Lamp Relay, PCB Fuse & Relay Box (HAC Relay)
CLUSTER 10AAudio, BCM, ATM Shift Lever ILL., Crash Pad Switch
Instrument Cluster, Tire Pressure Monitoring Module
IG1 1 10AMultipurpose Check Connector, Driver CCS Seat Warmer Module
Passenger Seat Warmer Module
With ISG : Crash Pad Switch, Low DC-DC Convertor
ABS 10ACrash Pad Switch, ESC Module
PCB Fuse & Relay Box (HAC Relay)
B/UP LAMP 10A Back-Up Lamp Switch