key KIA RIO HATCHBACK 2016 Repair Manual
[x] Cancel search | Manufacturer: KIA, Model Year: 2016, Model line: RIO HATCHBACK, Model: KIA RIO HATCHBACK 2016Pages: 477, PDF Size: 13.46 MB
Page 237 of 477
![KIA RIO HATCHBACK 2016 Repair Manual Features of your vehicle
4167
Contacts
Press the key Select
[Contacts]
The list of saved phone book entries
is displayed.
NOTE:
Find a contact in an alphabetical
order, press the key. Up to 1,000 co KIA RIO HATCHBACK 2016 Repair Manual Features of your vehicle
4167
Contacts
Press the key Select
[Contacts]
The list of saved phone book entries
is displayed.
NOTE:
Find a contact in an alphabetical
order, press the key. Up to 1,000 co](/img/2/57984/w960_57984-236.png)
Features of your vehicle
4167
Contacts
Press the key Select
[Contacts]
The list of saved phone book entries
is displayed.
NOTE:
Find a contact in an alphabetical
order, press the key. Up to 1,000 contacts saved in your
Bluetooth®Wireless Technology
phone can be downloaded into the
car contacts. Contacts that have
been downloaded to the car cannot
be edited or deleted on the phone.
Mobile phone contacts are man- aged separately for each paired
Bluetooth®Wireless Technology
device (max 5 devices x 1,000 con-
tacts each). Previously down-
loaded data is maintained even if
the Bluetooth®Wireless Technology
device has been disconnected.
(However, the contacts and call
history saved to the phone will be
deleted if a paired phone is delet-
ed.)
It is possible to download contacts during Bluetooth streaming audio.
When downloading contacts, the icon will be displayed within the
status bar. It is not possible to begin download-
ing a contact list when the contact
download feature has been turned off
within the
Bluetooth®Wireless
Technology device. In addition, some
devices may require device authori-
zation upon attempting to download
contacts. If downloading does not
normally occur, check the
Bluetooth®
Wireless Technology device settings
or the screen state.
The contacts download feature may not be supported in some mobile
phones. For more information of sup-
ported
Bluetooth®devices and func-
tion support, refer to your phone's
user's manual.
MENU
PHONE
Page 238 of 477
Features of your vehicle
168
4
Bluetooth®Wireless
Technology Setting
The Bluetooth®word mark and logos
are registered trademarks owned by
Bluetooth SIG, Inc. and any use of
such marks by Kia is under license.
Other trademarks and trade names
are those of their respective owners.
A Bluetooth
®enabled cell phone is
required to use
Bluetooth®Wireless
Technology.
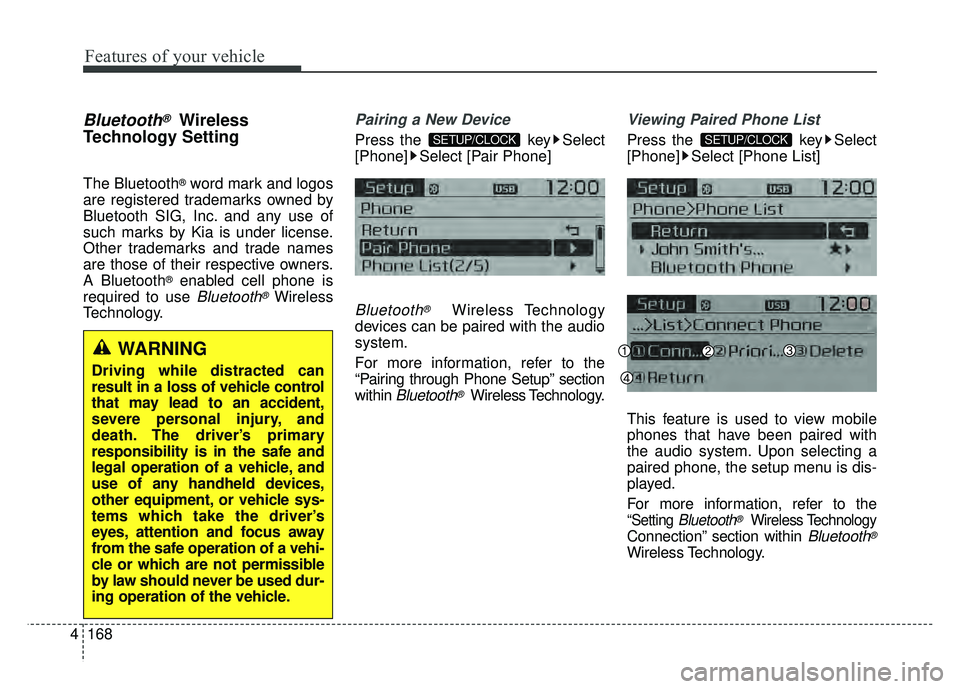
Pairing a New Device
Press the key Select
[Phone] Select [Pair Phone]
Bluetooth®Wireless Technology
devices can be paired with the audio
system.
For more information, refer to the
“Pairing through Phone Setup” section
within
Bluetooth®Wireless Technology.
Viewing Paired Phone List
Press the key Select
[Phone] Select [Phone List]
This feature is used to view mobile
phones that have been paired with
the audio system. Upon selecting a
paired phone, the setup menu is dis-
played.
For more information, refer to the
“Setting Bluetooth®Wireless Technology
Connection” section within Bluetooth®
Wireless Technology.
SETUP/CLOCKSETUP/CLOCK
WARNING
Driving while distracted can
result in a loss of vehicle control
that may lead to an accident,
severe personal injury, and
death. The driver’s primary
responsibility is in the safe and
legal operation of a vehicle, and
use of any handheld devices,
other equipment, or vehicle sys-
tems which take the driver’s
eyes, attention and focus away
from the safe operation of a vehi-
cle or which are not permissible
by law should never be used dur-
ing operation of the vehicle.
Page 239 of 477
Features of your vehicle
4169
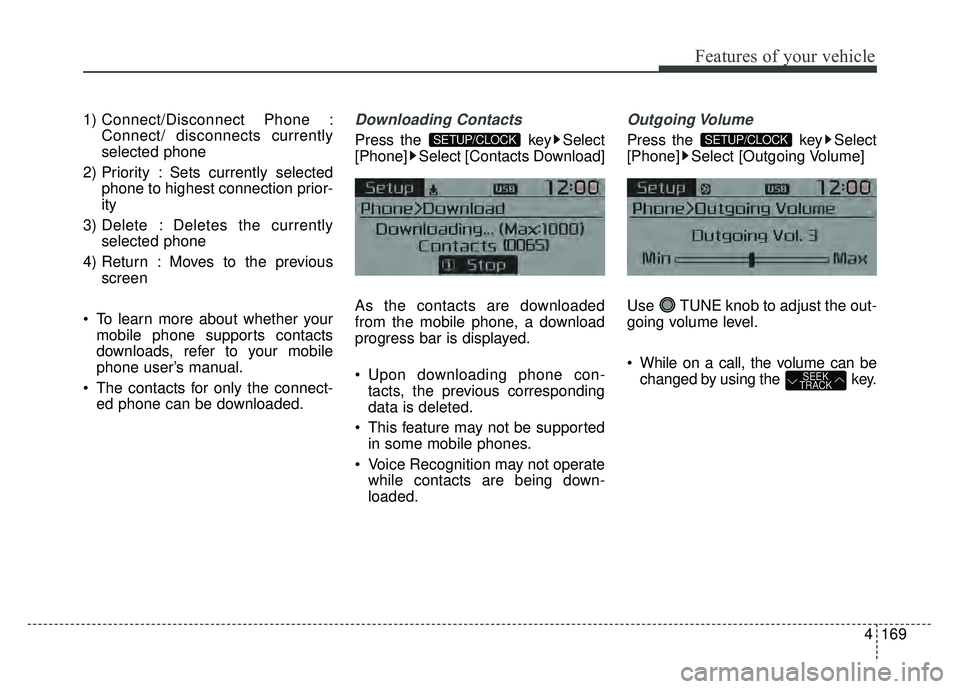
1) Connect/Disconnect Phone :Connect/ disconnects currently
selected phone
2) Priority : Sets currently selected phone to highest connection prior-
ity
3) Delete : Deletes the currently selected phone
4) Return : Moves to the previous screen
To learn more about whether your mobile phone supports contacts
downloads, refer to your mobile
phone user’s manual.
The contacts for only the connect- ed phone can be downloaded.Downloading Contacts
Press the key Select
[Phone] Select [Contacts Download]
As the contacts are downloaded
from the mobile phone, a download
progress bar is displayed.
Upon downloading phone con- tacts, the previous corresponding
data is deleted.
This feature may not be supported in some mobile phones.
Voice Recognition may not operate while contacts are being down-
loaded.
Outgoing Volume
Press the key Select
[Phone] Select [Outgoing Volume]
Use TUNE knob to adjust the out-
going volume level.
While on a call, the volume can be changed by using the key.
SEEK
TRACK
SETUP/CLOCKSETUP/CLOCK
Page 240 of 477
![KIA RIO HATCHBACK 2016 Repair Manual Features of your vehicle
170
4
Turning Bluetooth System Off
Press the key Select
[Phone] Select [Bluetooth System
Off]
Once
Bluetooth®Wireless Technology
is turned off,
Bluetooth®Wireless
Technol KIA RIO HATCHBACK 2016 Repair Manual Features of your vehicle
170
4
Turning Bluetooth System Off
Press the key Select
[Phone] Select [Bluetooth System
Off]
Once
Bluetooth®Wireless Technology
is turned off,
Bluetooth®Wireless
Technol](/img/2/57984/w960_57984-239.png)
Features of your vehicle
170
4
Turning Bluetooth System Off
Press the key Select
[Phone] Select [Bluetooth System
Off]
Once
Bluetooth®Wireless Technology
is turned off,
Bluetooth®Wireless
Technology related features will not be
supported within the audio system.
To turn
Bluetooth®Wireless Technology
back on, go to [Phone]
and select “Yes”.
SETUP/CLOCK
SETUP/CLOCK
Page 241 of 477
![KIA RIO HATCHBACK 2016 Repair Manual Features of your vehicle
4171
VOICE RECOGNITION
Using Voice Recognition
Starting Voice Recognition
Shortly press the key on the
steering wheel .Say a command
If prompt feedback is in [ON], then
the KIA RIO HATCHBACK 2016 Repair Manual Features of your vehicle
4171
VOICE RECOGNITION
Using Voice Recognition
Starting Voice Recognition
Shortly press the key on the
steering wheel .Say a command
If prompt feedback is in [ON], then
the](/img/2/57984/w960_57984-240.png)
Features of your vehicle
4171
VOICE RECOGNITION
Using Voice Recognition
Starting Voice Recognition
Shortly press the key on the
steering wheel .Say a command
If prompt feedback is in [ON], then
the system will say “Please say a
command after the beep (BEEP)”
If prompt feedback is in [OFF]mode, then the system will only
say “(BEEP)”
To change Prompt Feedback [On]/[Off], go to
[System] [Prompt Feedback]
For proper recognition, say the command after the voice instruc-
tion and beep tone.
Contact List Best Practices
1) Use full names vs. short or single- syllable names (“John Smith” vs.
“Dad”, “Smith Residence” vs.
“Home”)
2) Avoid using special characters or hyphens (@, &, #, /, -, *, +, etc.)
3) Avoid using acronyms (“In Case Emergency” vs. “ICE”)
4) Spell words completely, no abbre- viations (“Doctor Goodman” vs.
“Dr. Goodman”)
Skipping Prompt Messages
While prompt message is being stat-
ed Shortly press the key on the
steering remote controller
The prompt message is immediately
ended and the beep tone will sound.
After the “beep”, say the voice com-
mand.
Re-starting Voice Recognition
While system waits for a command
Shortly press the key on the
steering remote controller
The command wait state is immedi-
ately ended and the beep tone will
sound. After the “beep”, say the voice
command.
SETUP/CLOCK
Page 242 of 477
Features of your vehicle
172
4
ENDING VOICE
RECOGNITION
While Voice Recognition is operating
Press and hold the key on the
steering remote controller
ing any steering wheel control or a
different key will end voice com-
mand.
voice command, say “cancel” or
“end” to end voice command.
voice command, press and hold the key on the steering wheel to
end voice command.
Voice Recognition and Phone
Contact Tips:
The Kia Voice Recognition System may
have difficulty understanding some
accents or uncommon names. When
using Voice Recognition to place a call,
speak in a moderate tone, with clear
pronunciation.
To maximize the use of Voice
Recognition, consider these guidelines
when storing contacts :
Use full names vs. short or single syllable names (“John Smith” vs.
“Dad”, “Smith Residence” vs.
“Home”)
Avoid using special characters or hyphens (@, &, #, /, -, *, +, etc.)
Avoid using acronyms (“In Case Emergency” vs. “ICE”)
Spell words completely, no abbre- viations (“Doctor Goodman” vs.
“Dr. Goodman”)
Page 243 of 477
Features of your vehicle
4173
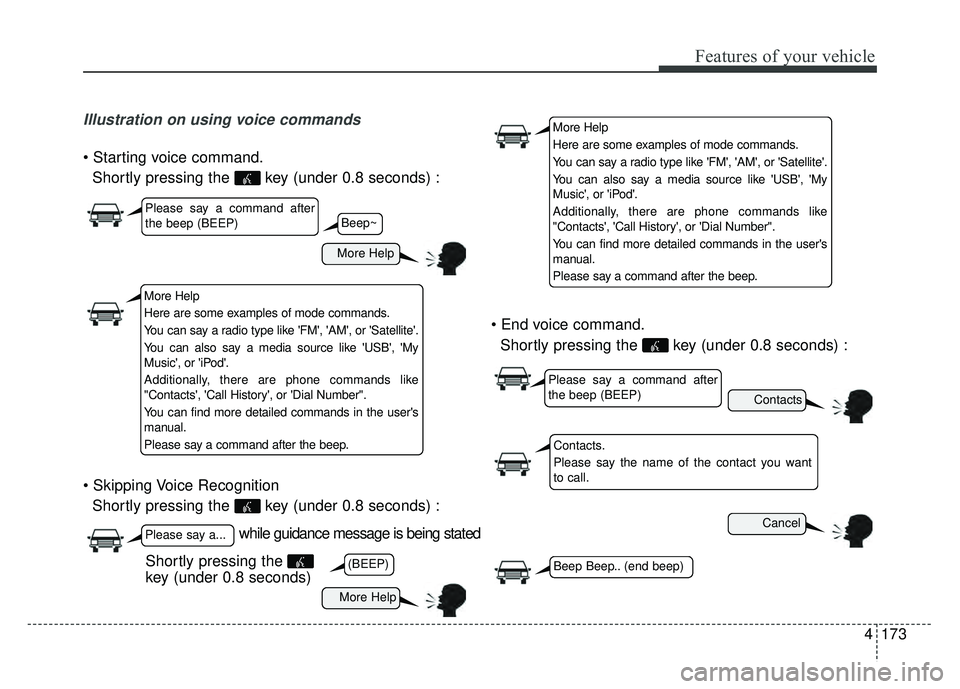
Illustration on using voice commands
Shortly pressing the key (under 0.8 seconds) :
Shortly pressing the key (under 0.8 seconds) :
Shortly pressing the key (under 0.8 seconds) :
while guidance message is being stated
More Help
Contacts
Cancel
More Help
Please say a command after
the beep (BEEP)
Please say a...
Contacts.
Please say the name of the contact you want
to call.
(BEEP)Beep Beep.. (end beep)Shortly pressing the
key (under 0.8 seconds)
Beep~
More Help
Here are some examples of mode commands.
You can say a radio type like 'FM', 'AM', or 'Satellite'.
You can also say a media source like 'USB', 'My
Music', or 'iPod'.
Additionally, there are phone commands like
"Contacts', 'Call History', or 'Dial Number".
You can find more detailed commands in the user's
manual.
Please say a command after the beep.
Please say a command after
the beep (BEEP)
Page 251 of 477
Driving your vehicle
Before driving . . . . . . . . . . . . . . . . . . . . . . . . . . . . . . 5-3
Key positions . . . . . . . . . . . . . . . . . . . . . . . . . . . . . . . 5-5
Engine START/STOP button . . . . . . . . . . . . . . . . . 5-7
• Illuminated ENGINE START/STOP button . . . . . . . 5-7
. . . . . . . . . . . 5-7
Starting the engine . . . . . . . . . . . . . . . . . . . . . . . . . 5-10
Manual transaxle . . . . . . . . . . . . . . . . . . . . . . . . . . 5-13
. . . . . . . . . . . . . . . . . . . . 5-13
Automatic transaxle . . . . . . . . . . . . . . . . . . . . . . . . 5-16
. . . . . . . . . . . . . . . . . . 5-16
Brake system . . . . . . . . . . . . . . . . . . . . . . . . . . . . . . 5-22
. . . . . . . . . . . . . . . . . . . . . . . . . . . . . . . . 5-22
. . . . . . . . . . . . . . . . . . . . . . . . . . . . . . . 5-24
. . . . . . . . . . . . . . . . . 5-26
. . . . . . . . . . . . . . . 5-27
. . . . . . . . . . . . . . . . . . 5-31
. . . . . . . . . . . . 5-31
Cruise control system. . . . . . . . . . . . . . . . . . . . . . . 5-35
ISG (idle stop and go) system . . . . . . . . . . . . . . . . 5-40
Active Eco System . . . . . . . . . . . . . . . . . . . . . . . . . 5-45
Economical operation . . . . . . . . . . . . . . . . . . . . . . 5-46Special driving conditions . . . . . . . . . . . . . . . . . . . 5-48
. . . . . . . . . . . . . . . . . . 5-48
. . . . . . . . . . . . . . . . . . . . . . . . . . . 5-48
. . . . . . . . . . . . . . . . . . . . . . . . . . . . 5-49
. . . . . . . . . . . . . . . . . . . . . . . . . . . . . . 5-49
. . . . . . . . . . . . . . . . . . . . . . . . . . . . 5-50
. . . . . . . . . . . . . . . . . . . . . . . 5-50
. . . . . . . . . . . . . . . . . . . . . . . . . . . . . . 5-51
. . . . . . . . . . . . . . . . . . . . . . . . . . . . . 5-51
Winter driving . . . . . . . . . . . . . . . . . . . . . . . . . . . . 5-52
Trailer towing . . . . . . . . . . . . . . . . . . . . . . . . . . . . . 5-55
Vehicle load limit . . . . . . . . . . . . . . . . . . . . . . . . . . 5-56
. . . . . . . . . . . . . . 5-56
. . . . . . . . . . . . . . . . . . . . . . . . . . . . 5-59
Vehicle weight . . . . . . . . . . . . . . . . . . . . . . . . . . . . . 5-61
. . . . . . . . . . . . . . . . . . . . . . . . . . . . . 5-61
. . . . . . . . . . . . . . . . . . . . . . . . . . . 5-61
. . . . . . . . . . . . . . . . . . . . . . . . . . . . . . . . 5-61
. . . . . . . . . . . . . . . . . . . . . . 5-61
. . . . . . . . . . . . . . . 5-61
. . . . . . . . . . . . . . . . . . . 5-61
. . . . . . . . . . . . 5-61
5
Page 255 of 477
55
Driving your vehicle
Illuminated ignition switch
(if equipped)
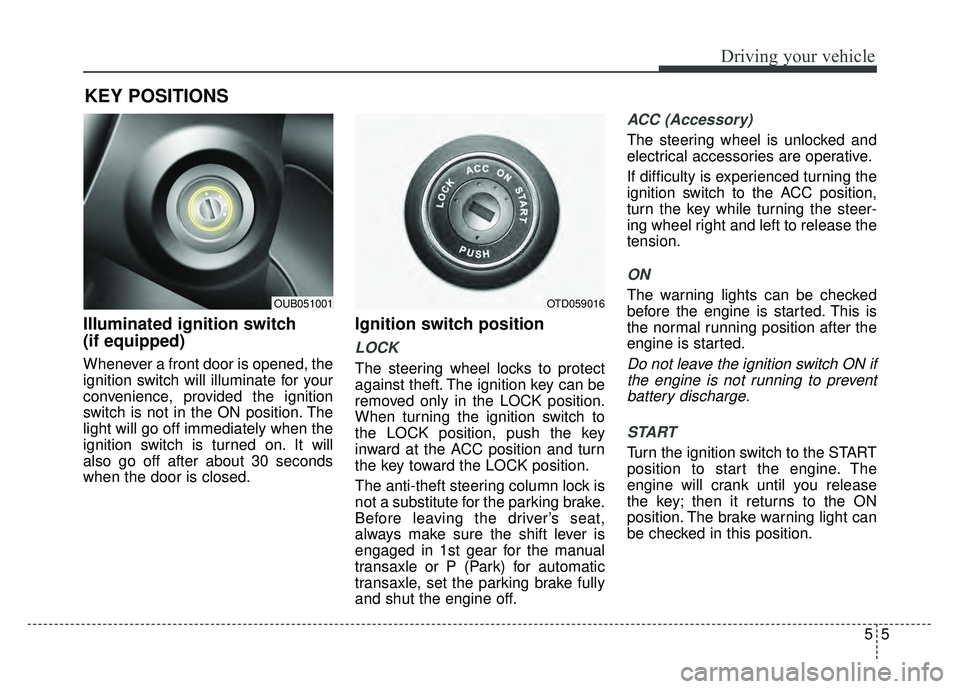
Whenever a front door is opened, the
ignition switch will illuminate for your
convenience, provided the ignition
switch is not in the ON position. The
light will go off immediately when the
ignition switch is turned on. It will
also go off after about 30 seconds
when the door is closed.
Ignition switch position
LOCK
The steering wheel locks to protect
against theft. The ignition key can be
removed only in the LOCK position.
When turning the ignition switch to
the LOCK position, push the key
inward at the ACC position and turn
the key toward the LOCK position.
The anti-theft steering column lock is
not a substitute for the parking brake.
Before leaving the driver’s seat,
always make sure the shift lever is
engaged in 1st gear for the manual
transaxle or P (Park) for automatic
transaxle, set the parking brake fully
and shut the engine off.
ACC (Accessory)
The steering wheel is unlocked and
electrical accessories are operative.
If difficulty is experienced turning the
ignition switch to the ACC position,
turn the key while turning the steer-
ing wheel right and left to release the
tension.
ON
The warning lights can be checked
before the engine is started. This is
the normal running position after the
engine is started.
Do not leave the ignition switch ON ifthe engine is not running to preventbattery discharge.
START
Turn the ignition switch to the START
position to start the engine. The
engine will crank until you release
the key; then it returns to the ON
position. The brake warning light can
be checked in this position.
KEY POSITIONS
OTD059016OUB051001
Page 260 of 477
Driving your vehicle
10
5
Starting the engine with an
ignition key (if equipped)
1.Make sure the parking brake is
applied.
2. Manual Transaxle - Depress the
clutch pedal fully and shift the
transaxle into Neutral. Keep the
clutch pedal and brake pedal
depressed while turning the igni-
tion switch to the start position.
Automatic Transaxle - Place the
transaxle shift lever in P (Park).
Depress the brake pedal fully.
You can also start the engine when
the shift lever is in the N (Neutral)
position. 3. Turn the ignition switch to START
and hold it there until the engine
starts (a maximum of 10 seconds),
then release the key.
It should be started withoutdepressing the accelerator.
4.Do not wait for the engine to warm up while the vehicle remains sta-
tionary.
Start driving at moderate engine
speeds. (Steep accelerating and
decelerating should be avoided.)
If the engine stalls while the vehicle
is in motion, do not attempt to move
the shift lever to the P (Park) posi-
tion. If traffic and road conditions per-
mit, you may put the shift lever in the
N (Neutral) position while the vehicle
is still moving and turn the ignition
switch to the START position in an
attempt to restart the engine.
STARTING THE ENGINE
WARNING - Proper footwear
Always wear appropriate shoes
when operating your vehicle.
Unsuitable shoes (high heels,
ski boots, sandals, etc.) may
interfere with your ability to use
the brake and accelerator pedal.
CAUTION - Starter
Do not engage the starter for
more than 10 seconds. If theengine stalls or fails to start,wait 5 to 10 seconds before re-engaging the starter. Improperuse of the starter may damageit.