boot KIA RIO HATCHBACK 2019 Owners Manual
[x] Cancel search | Manufacturer: KIA, Model Year: 2019, Model line: RIO HATCHBACK, Model: KIA RIO HATCHBACK 2019Pages: 503, PDF Size: 10.42 MB
Page 169 of 503
491
Features of your vehicle
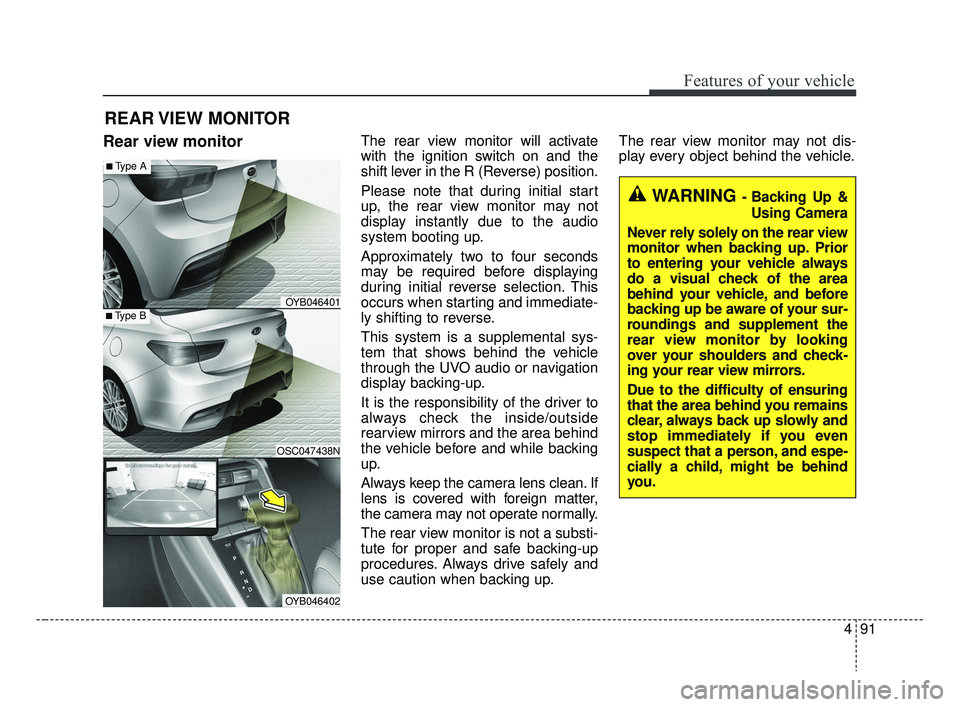
Rear view monitorThe rear view monitor will activate
with the ignition switch on and the
shift lever in the R (Reverse) position.
Please note that during initial start
up, the rear view monitor may not
display instantly due to the audio
system booting up.
Approximately two to four seconds
may be required before displaying
during initial reverse selection. This
occurs when starting and immediate-
ly shifting to reverse.
This system is a supplemental sys-
tem that shows behind the vehicle
through the UVO audio or navigation
display backing-up.
It is the responsibility of the driver to
always check the inside/outside
rearview mirrors and the area behind
the vehicle before and while backing
up.
Always keep the camera lens clean. If
lens is covered with foreign matter,
the camera may not operate normally.
The rear view monitor is not a substi-
tute for proper and safe backing-up
procedures. Always drive safely and
use caution when backing up.The rear view monitor may not dis-
play every object behind the vehicle.
REAR VIEW MONITOR
WARNING - Backing Up &
Using Camera
Never rely solely on the rear view
monitor when backing up. Prior
to entering your vehicle always
do a visual check of the area
behind your vehicle, and before
backing up be aware of your sur-
roundings and supplement the
rear view monitor by looking
over your shoulders and check-
ing your rear view mirrors.
Due to the difficulty of ensuring
that the area behind you remains
clear, always back up slowly and
stop immediately if you even
suspect that a person, and espe-
cially a child, might be behind
you.
■Type B
■Type A
OSC047438N
OYB046401
OYB046402
SC CAN (ENG) 4.QXP 7/18/2018 5:49 PM Page 91
Page 252 of 503
Audio system
532 Some
Bluetooth®Wireless Technology
devices are subject to intermittent
Bluetooth®Wireless Technology
connection failures. In this case,
use the following method.
1) Turn the
Bluetooth®Wireless
Technology function off on your
Bluetooth®Wireless Technology
device ➟Turn it on and try again.
2) Delete the paired device from both the audio system and
Bluetooth®Wireless Technology
device, then pair again.
3) Power down your
Bluetooth®
Wireless Technology device ➟
Turn it on and try again.
4) Completely remove the battery from your
Bluetooth®Wireless
Technology device; reinsert it,
reboot, and attempt connection.
5) Restart the vehicle and reat- tempt connection.
Pairing a Bluetooth®Wireless
Technology device
Information on pairing Bluetooth®
Wireless Technology devices
Pairing refers to the process of pair-
ing
Bluetooth®Wireless Technology
cell phones or devices with the
system prior to connection. This is
a necessary procedure for
Bluetooth®
Wireless Technology connection
and usage.
Up to five devices can be paired.
Pairing the first Bluetooth
®Wireless
Technology device
Press the [PHONE] button on the
audio system or the [CALL] button
on the steering wheel remote control
➟ Search for the vehicle from the
Bluetooth®Wireless Technology
device, and pair ➟ Enter the passkey
on the
Bluetooth®Wireless Technology
device or approve passkey ➟
Bluetooth®Wireless Technology pair-
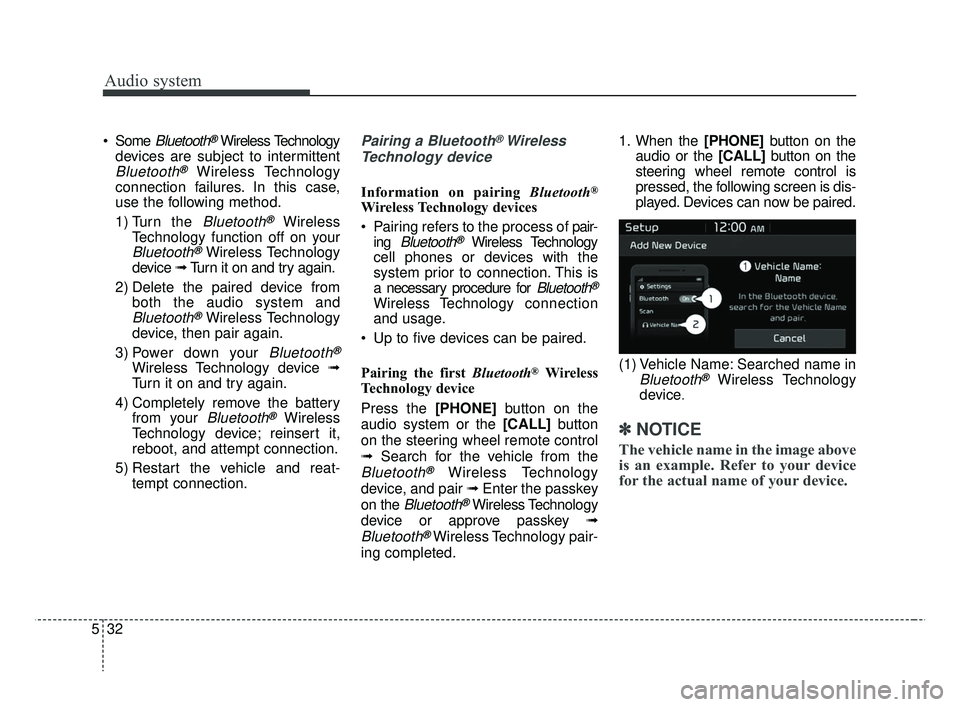
ing completed. 1. When the [PHONE]
button on the
audio or the [CALL] button on the
steering wheel remote control is
pressed, the following screen is dis-
played. Devices can now be paired.
(1) Vehicle Name: Searched name in
Bluetooth®Wireless Technology
device
.
✽ ✽ NOTICE
The vehicle name in the image above
is an example. Refer to your device
for the actual name of your device.
SC CAN (ENG) 5(audio).qxp 7/18/2018 6:02 PM Page 32
Page 267 of 503
65
Driving your vehicle
WARNING- Check sur-roundings
Always check the surrounding
areas near your vehicle for peo-
ple, especially children, before
putting a vehicle into D (Drive)
or R (Reverse).
WARNING- Fire risk
When you intend to park or stop
the vehicle with the engine on,
be careful not to depress the
accelerator pedal for a long
period of time. It may overheat
the engine or exhaust system
and cause fire.WARNING- Loose objects
Securely store items in your
vehicle. When you make a sud-
den stop or turn the steering
wheel rapidly, loose objects
may drop on the floor and it
could interfere with the opera-
tion of the foot pedals, possibly
causing an accident.WARNING- Driving while intoxicated
Do not drive while intoxicated.
Drinking and driving is danger-
ous. Even a small amount of
alcohol will affect your reflexes,
perceptions and judgment.
Driving while under the influ-
ence of drugs is as dangerous
as or more dangerous than driv-
ing drunk.
WARNING- Proper footwear
Always wear appropriate shoes
when operating your vehicle.
Unsuitable shoes (high heels, ski
boots, sandals, etc.) may inter-
fere with your ability to use the
brake and accelerator pedals.
SC CAN (ENG) 6.QXP 7/18/2018 5:41 PM Page 5
Page 274 of 503
Driving your vehicle
12
6
Starting the engine with an
ignition key (if equipped)
1. Make sure the parking brake is
applied.
2. Manual Transmission - Depress
the clutch pedal fully and shift the
transmission into Neutral. Keep
the clutch pedal and brake pedal
depressed while turning the igni-
tion switch to the start position.
Automatic Transmission - Place
the transmission shift lever in P
(Park). Depress the brake pedal
fully.
You can also start the engine when the shift lever is in the N(Neutral) position.
3. Turn the ignition switch to START and hold it there until the engine
starts (a maximum of 10 seconds),
then release the key.
It should be started withoutdepressing the accelerator.
4. Do not wait for the engine to warm up while the vehicle remains sta-
tionary.
Start driving at moderate engine
speeds. (Steep accelerating and
decelerating should be avoided.)
If the engine stalls while the vehicle
is in motion, do not attempt to move
the shift lever to the P (Park) posi-
tion. If traffic and road conditions per-
mit, you may put the shift lever in the
N (Neutral) position while the vehicle
is still moving and turn the ignition
switch to the START position in an
attempt to restart the engine.
STARTING THE ENGINE
WARNING- Proper footwear
Always wear appropriate shoes
when operating your vehicle.
Unsuitable shoes (high heels, ski
boots, sandals, etc.) may inter-
fere with your ability to use the
brake and accelerator pedals.
CAUTION- Starter
Do not engage the starter for more than 10 seconds. If theengine stalls or fails to start,wait 5 to 10 seconds before re-engaging the starter. Improperuse of the starter may damageit.
SC CAN (ENG) 6.QXP 7/18/2018 5:41 PM Page 12
Page 384 of 503
Maintenance
12
8
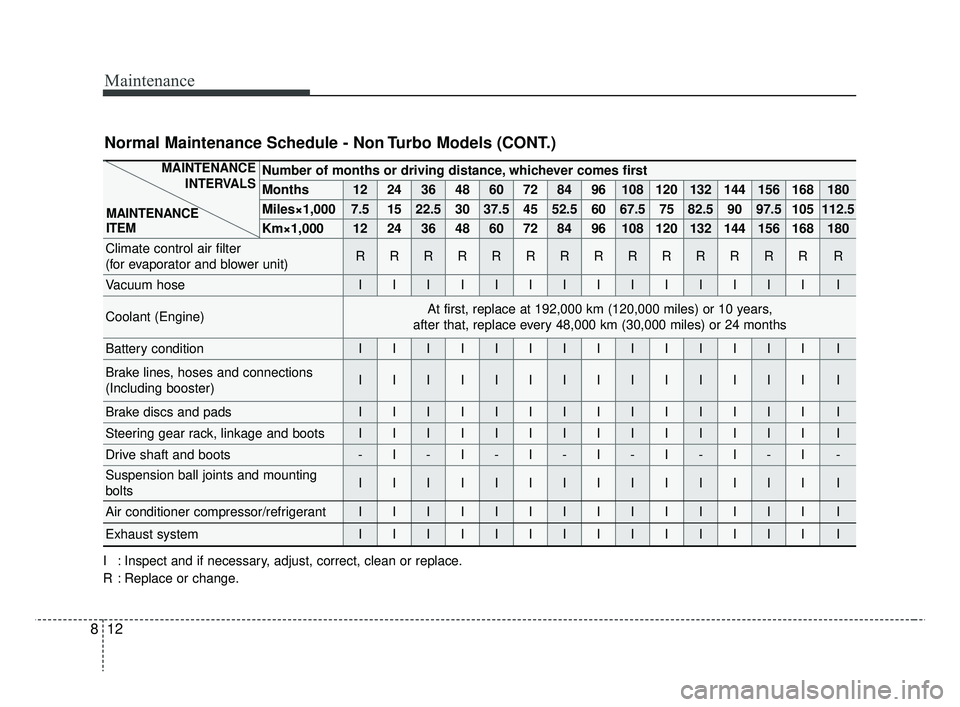
Normal Maintenance Schedule - Non Turbo Models (CONT.)
Number of months or driving distance, whichever comes first
Months1224364860728496108120132144156168180
Miles×1,0007.51522.530 37.5 45 52.5 60 67.5 75 82.5 90 97.5 105 112.5
Km×1,00012 24 36 48 60 72 84 96 108 120 132 144 156 168 180
Climate control air filter
(for evaporator and blower unit)RRRRRRRRRRRRRRR
Vacuum hoseIIIIIIIIIIIIIII
Coolant (Engine)At first, replace at 192,000 km (120,000 miles) or 10 years,
after that, replace every 48,000 km (30,000 miles) or 24 months
Battery conditionIIIIIIIIIIIIIII
Brake lines, hoses and connections
(Including booster)IIIIIIIIIIIIIII
Brake discs and padsIIIIIIIIIIIIIII
Steering gear rack, linkage and bootsIIIIIIIIIIIIIII
Drive shaft and boots-I-I-I-I-I-I-I-
Suspension ball joints and mounting
boltsIIIIIIIIIIIIIII
Air conditioner compressor/refrigerantIIIIIIIIIIIIIII
Exhaust systemIIIIIIIIIIIIIII
I : Inspect and if necessary, adjust, correct, clean or replace.
R : Replace or change.
MAINTENANCE INTERVALS
MAINTENANCE
ITEM
SC CAN (ENG) 8.qxp 7/18/2018 5:32 PM Page 12
Page 386 of 503

Maintenance
14
8
Maintenance Under Severe Usage Conditions - Non Turbo Models
The following items must be serviced more frequently on cars normally used under severe driving conditions. Refer
to the chart below for the appropriate maintenance intervals.
R : Replace I : Inspect and, after inspection, clean, adjust, repair or replace if neces\
sary
MAINTENANCE ITEMMAINTENANCE
OPERATIONMAINTENANCE INTERVALSDRIVING
CONDITION
Engine oil and
engine oil filterGamma 1.6L GDIREvery 6,000 km (3,750 miles) or 6 monthsA, B, C, D, E,
F, G, H, I, J, K
Air cleaner filterRMore frequentlyC, E
Spark plugs RMore frequentlyA, B, F, G, H, I, K
Automatic transmission fluidREvery 96,000 km (60,000 miles)A, C, D, E,
F, G, H, I, J
Manual transmission fluidREvery 120,000 km (75,000 miles)C, D, E, F, G, H, I, J
Brake discs and pads, calipers and rotorsIMore frequentlyC, D, E, G, H
Parking brakeIMore frequentlyC, D, G, H
Steering gear rack, linkage and bootsIMore frequentlyC, D, E, F, G
Suspension ball joints and mounting boltsIMore frequentlyC, D, E, F, G
SC CAN (ENG) 8.qxp 7/18/2018 5:32 PM Page 14
Page 387 of 503
815
Maintenance
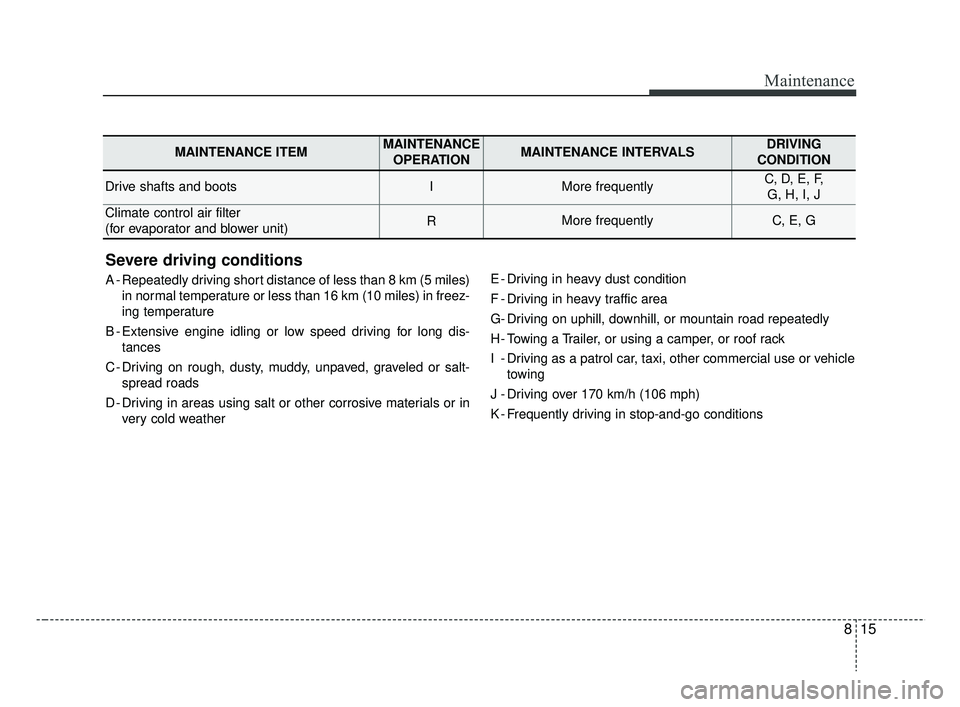
Severe driving conditions
A - Repeatedly driving short distance of less than 8 km (5 miles)in normal temperature or less than 16 km (10 miles) in freez-
ing temperature
B - Extensive engine idling or low speed driving for long dis- tances
C - Driving on rough, dusty, muddy, unpaved, graveled or salt- spread roads
D - Driving in areas using salt or other corrosive materials or in very cold weather E - Driving in heavy dust condition
F - Driving in heavy traffic area
G- Driving on uphill, downhill, or mountain road repeatedly
H - Towing a Trailer, or using a camper, or roof rack
I - Driving as a patrol car, taxi, other commercial use or vehicle
towing
J - Driving over 170 km/h (106 mph)
K - Frequently driving in stop-and-go conditions
MAINTENANCE ITEMMAINTENANCE OPERATIONMAINTENANCE INTERVALSDRIVING
CONDITION
Drive shafts and bootsIMore frequentlyC, D, E, F, G, H, I, J
Climate control air filter
(for evaporator and blower unit)RMore frequentlyC, E, G
SC CAN (ENG) 8.qxp 7/18/2018 5:32 PM Page 15
Page 391 of 503
819
Maintenance
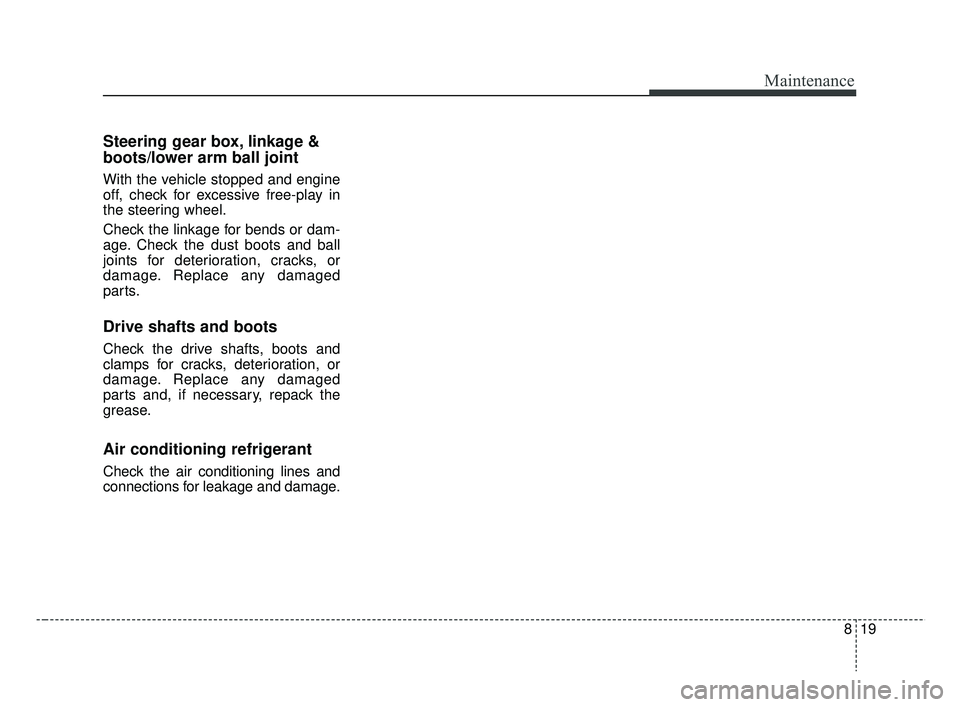
Steering gear box, linkage &
boots/lower arm ball joint
With the vehicle stopped and engine
off, check for excessive free-play in
the steering wheel.
Check the linkage for bends or dam-
age. Check the dust boots and ball
joints for deterioration, cracks, or
damage. Replace any damaged
parts.
Drive shafts and boots
Check the drive shafts, boots and
clamps for cracks, deterioration, or
damage. Replace any damaged
parts and, if necessary, repack the
grease.
Air conditioning refrigerant
Check the air conditioning lines and
connections for leakage and damage.
SC CAN (ENG) 8.qxp 7/18/2018 5:32 PM Page 19
Page 472 of 503
Maintenance
100
8
OJB037800
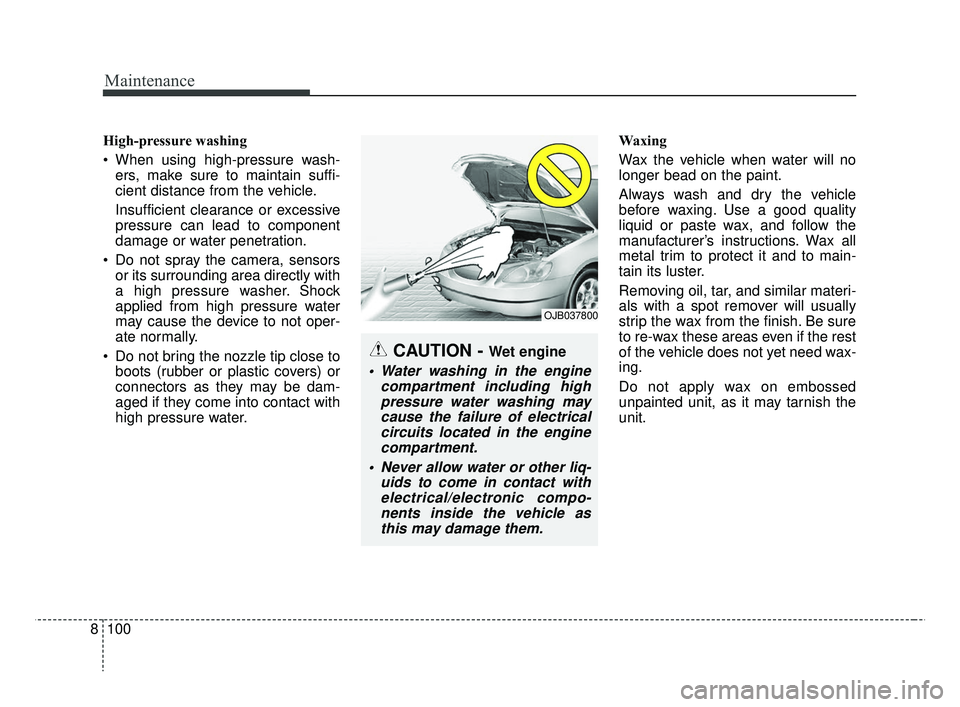
CAUTION - Wet engine
Water washing in the engine
compartment including highpressure water washing maycause the failure of electricalcircuits located in the enginecompartment.
Never allow water or other liq- uids to come in contact withelectrical/electronic compo-nents inside the vehicle asthis may damage them.
High-pressure washing
When using high-pressure wash- ers, make sure to maintain suffi-
cient distance from the vehicle.
Insufficient clearance or excessive
pressure can lead to component
damage or water penetration.
Do not spray the camera, sensors or its surrounding area directly with
a high pressure washer. Shock
applied from high pressure water
may cause the device to not oper-
ate normally.
Do not bring the nozzle tip close to boots (rubber or plastic covers) or
connectors as they may be dam-
aged if they come into contact with
high pressure water. Waxing
Wax the vehicle when water will no
longer bead on the paint.
Always wash and dry the vehicle
before waxing. Use a good quality
liquid or paste wax, and follow the
manufacturer’s instructions. Wax all
metal trim to protect it and to main-
tain its luster.
Removing oil, tar, and similar materi-
als with a spot remover will usually
strip the wax from the finish. Be sure
to re-wax these areas even if the rest
of the vehicle does not yet need wax-
ing.
Do not apply wax on embossed
unpainted unit, as it may tarnish the
unit.
SC CAN (ENG) 8.qxp 7/18/2018 5:37 PM Page 100