tank KIA Rondo 2008 2.G Owner's Manual
[x] Cancel search | Manufacturer: KIA, Model Year: 2008, Model line: Rondo, Model: KIA Rondo 2008 2.GPages: 341, PDF Size: 6.23 MB
Page 6 of 341
13
Introduction
A020101AUN-EUYour new vehicle is designed to use only
unleaded fuel having a pump octane
number ((R+M)/2) of 87 or highter.
Your new vehicle is designed to obtain
maximum performance with UNLEADED
FUEL, as well as minimize exhaust emis-
sions and spark plug fouling.
A020103AUN-EUGasoline containing alcohol and
methanolGasohol, a mixture of gasoline and
ethanol (also known as grain alcohol),
and gasoline or gasohol containing
methanol (also known as wood alcohol)
are being marketed along with or instead
of unleaded gasoline.
Do not use gasohol containing more than
10% ethanol, and do not use gasoline or
gasohol containing any methanol. Either
of these fuels may cause drivability prob-
lems and damage to the fuel system.
Discontinue using gasohol of any kind if
drivability problems occur.
Vehicle damage or drivability problems
may not be covered by the manufactur-
er’s warranty if they result from the use
of:
1. Gasohol containing more than 10%
ethanol.
2. Gasoline or gasohol containing
methanol.
3. Leaded fuel or leaded gasohol."E85" fuel is an alternative fuel com-
prised of 85 percent ethanol and 15 per-
cent gasoline, and is manufactured
exclusively for use in Flexible Fuel
Vehicles. “E85” is not compatible with
your vehicle. Use of “E85” may result in
poor engine performance and damage to
your vehicle's engine and fuel system.
KIA recommends that customers do not
use fuel with an ethanol content exceed-
ing 10 percent.
FUEL REQUIREMENTS
CAUTION
Never add any fuel system cleaning
agents to the fuel tank other than
what has been specified. (Consult
an authorized KIA dealer for
details.)
CAUTION
Never use gasohol which contains
methanol. Discontinue use of any
gasohol product which impairs dri-
vability.
CAUTION
Your New Vehicle Limited Warranty
does not cover damage to the fuel
system or any performance prob-
lems caused by the use of “E85” fuel.
WARNING
Do not "top off" after the nozzle
automatically shuts off when
refueling.
Tighten the cap until it clicks,
otherwise the Check Engine
light will illuminate.
Always check that the fuel cap is
installed securely to prevent fuel
spillage in the event of an acci-
dent.
Page 101 of 341
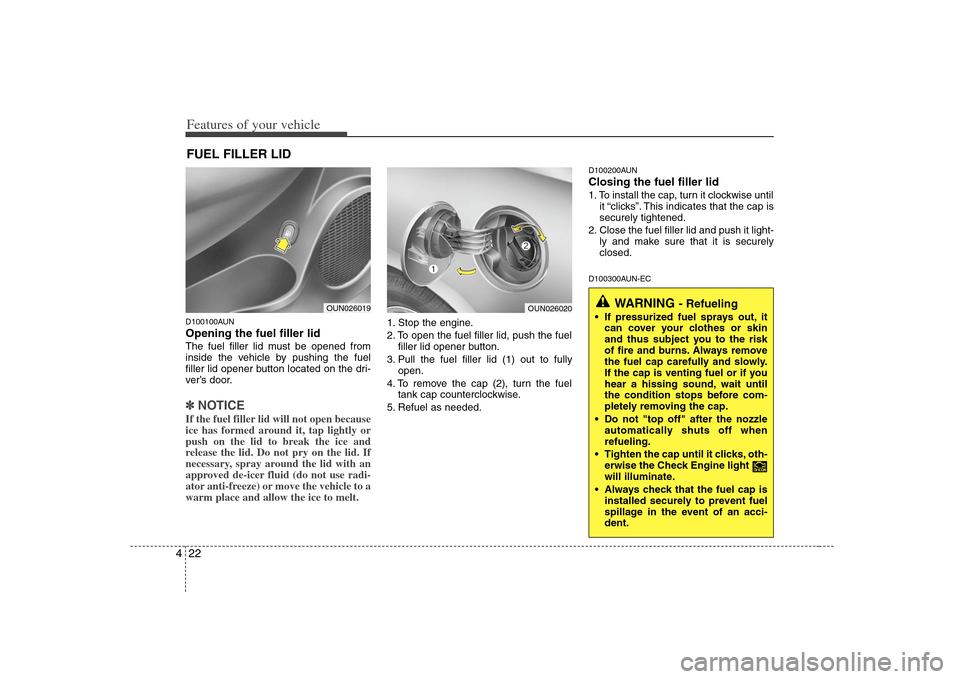
Features of your vehicle22 4D100100AUNOpening the fuel filler lidThe fuel filler lid must be opened from
inside the vehicle by pushing the fuel
filler lid opener button located on the dri-
ver’s door.✽ ✽
NOTICEIf the fuel filler lid will not open because
ice has formed around it, tap lightly or
push on the lid to break the ice and
release the lid. Do not pry on the lid. If
necessary, spray around the lid with an
approved de-icer fluid (do not use radi-
ator anti-freeze) or move the vehicle to a
warm place and allow the ice to melt.
1. Stop the engine.
2. To open the fuel filler lid, push the fuel
filler lid opener button.
3. Pull the fuel filler lid (1) out to fully
open.
4. To remove the cap (2), turn the fuel
tank cap counterclockwise.
5. Refuel as needed.
D100200AUNClosing the fuel filler lid1. To install the cap, turn it clockwise until
it “clicks”. This indicates that the cap is
securely tightened.
2. Close the fuel filler lid and push it light-
ly and make sure that it is securely
closed.D100300AUN-EC
FUEL FILLER LID
OUN026019
OUN026020
WARNING
- Refueling
If pressurized fuel sprays out, it
can cover your clothes or skin
and thus subject you to the risk
of fire and burns. Always remove
the fuel cap carefully and slowly.
If the cap is venting fuel or if you
hear a hissing sound, wait until
the condition stops before com-
pletely removing the cap.
Do not "top off" after the nozzle
automatically shuts off when
refueling.
Tighten the cap until it clicks, oth-
erwise the Check Engine light
will illuminate.
Always check that the fuel cap is
installed securely to prevent fuel
spillage in the event of an acci-
dent.
Page 116 of 341
437
Features of your vehicle
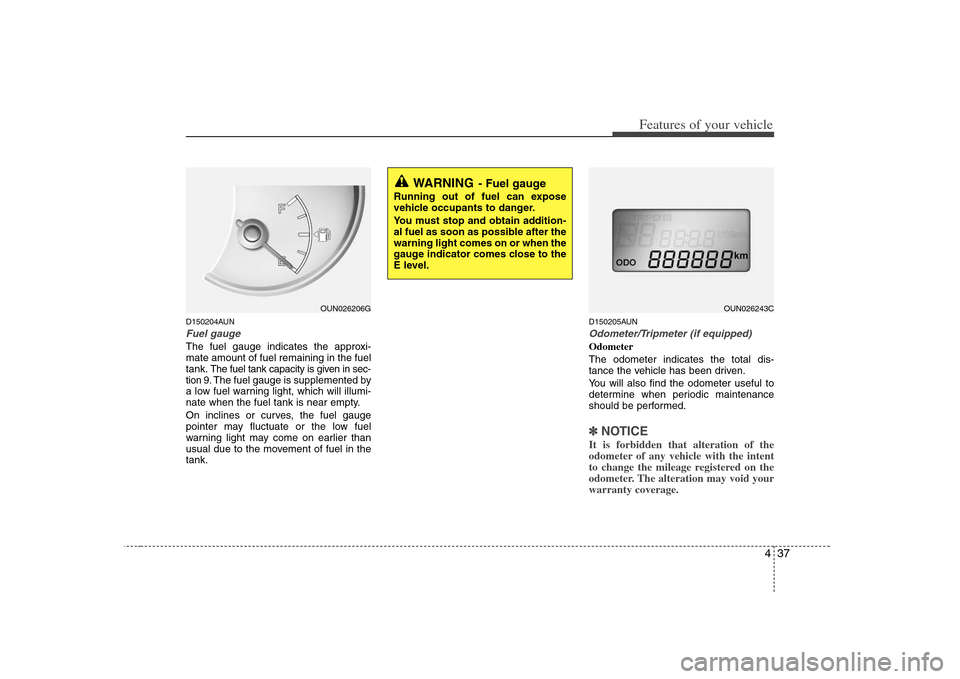
D150204AUNFuel gaugeThe fuel gauge indicates the approxi-
mate amount of fuel remaining in the fuel
tank.
The fuel tank capacity is given in sec-
tion 9.The fuel gauge is supplemented by
a low fuel warning light, which will illumi-
nate when the fuel tank is near empty.
On inclines or curves, the fuel gauge
pointer may fluctuate or the low fuel
warning light may come on earlier than
usual due to the movement of fuel in the
tank.
D150205AUNOdometer/Tripmeter (if equipped)Odometer
The odometer indicates the total dis-
tance the vehicle has been driven.
You will also find the odometer useful to
determine when periodic maintenance
should be performed.✽ ✽
NOTICEIt is forbidden that alteration of the
odometer of any vehicle with the intent
to change the mileage registered on the
odometer. The alteration may void your
warranty coverage.
OUN026206G
WARNING
- Fuel gauge
Running out of fuel can expose
vehicle occupants to danger.
You must stop and obtain addition-
al fuel as soon as possible after the
warning light comes on or when the
gauge indicator comes close to the
E level.
OUN026243C
Page 120 of 341

441
Features of your vehicle
Distance to empty
This mode indicates the estimated dis-
tance to empty based on the current fuel
in the fuel tank and the amount of fuel
delivered to the engine.
When the remaining distance is below 50
km, “----” will be displayed and the dis-
tance to empty indicator will blink.
The meter’s working range is from 50 to
999 km.
✽ ✽
NOTICE• If the vehicle is not on level ground or
the battery power has been interrupt-
ed, the “Distance to empty” function
may not operate correctly.
The trip computer may not register
additional fuel if less than 6 liters (1.6
gallons) of fuel are added to the vehi-
cle.
• The fuel consumption and distance to
empty values may vary significantly
based on driving conditions, driving
habits, and condition of the vehicle.
• The distance to empty value is an esti-
mate of the available driving distance.
This value may differ from the actual
driving distance available.
D150300AUNWarnings and indicatorsAll warning lights are checked by turning
the ignition switch ON (do not start the
engine). Any light that does not illuminate
should be checked by an authorized KIA
dealer.
After starting the engine, check to make
sure that all warning lights are off. If any
are still on, this indicates a situation that
needs attention. When releasing the
parking brake, the brake system warning
light should go off. The fuel warning light
will stay on if the fuel level is low.
OUN026213C
Page 125 of 341
Features of your vehicle46 4D150318AUNLow fuel level warningThis warning light indicates the fuel tank
is nearly empty. When it comes on, you
should add fuel as soon as possible.
Driving with the fuel level warning light on
or with the fuel level below “E” can cause
the engine to misfire and damage the
catalytic converter.D150319AUNLow washer fluid level
warning indicator
(if equipped)This warning light indicates the washer
fluid reservoir is near empty. Refill the
washer fluid as soon as possible.
D150320AUN-EUMalfunction indicator lamp
(MIL) (check engine light) This indicator light is part of the Engine
Control System which monitors various
emission control system components. If
this light illuminates while driving, it indi-
cates that a potential malfunction has
been detected somewhere in the emis-
sion control system.
This light will also illuminate when the
ignition switch is turned to the ON posi-
tion, and will go out in a few seconds
after the engine is started. If it illuminates
while driving, or does not illuminate when
the ignition switch is turned to the ON
position, take your vehicle to your near-
est authorized KIA dealer and have the
system checked.
Generally, your vehicle will continue to be
drivable, but have the system checked by
an authorized KIA dealer promptly.
CHECKCHECK
CAUTION
Prolonged driving with the
Emission Control System
Malfunction Indicator Light
illuminated may cause damage to
the emission control systems
which could effect drivability
and/or fuel economy.
If the
Emission
Control System
Malfunction Indicator Light illumi-
nates, potential catalytic convert-
er damage is possible which
could result in loss of engine
power. Have the Engine Control
System inspected as soon as pos-
sible by an authorized KIA dealer.
Page 249 of 341
549
Driving your vehicle
E160000AUNThis section will guide you in the proper
loading of your vehicle and/or trailer, to
keep your loaded vehicle weight within its
design rating capability, with or without a
trailer. Properly loading your vehicle will
provide maximum return of the vehicle
design performance. Before loading your
vehicle, familiarize yourself with the fol-
lowing terms for determining your vehi-
cle's weight ratings, with or without a
trailer, from the vehicle's specifications
and the certification label:E160100AUNBase curb weight
This is the weight of the vehicle including
a full tank of fuel and all standard equip-
ment. It does not include passengers,
cargo, or optional equipment.E160200AUNVehicle curb weight
This is the weight of your new vehicle
when you picked it up from your dealer
plus any aftermarket equipment.
E160300AUNCargo weight
This figure includes all weight added to
the Base Curb Weight, including cargo
and optional equipment.E160400AUNGAW (Gross axle weight)
This is the total weight placed on each
axle (front and rear) - including vehicle
curb weight and all payload.E160500AUNGAWR (Gross axle weight rating)This is the maximum allowable weight
that can be carried by a single axle (front
or rear). These numbers are shown on
the certification label.
The total load on each axle must never
exceed its GAWR.E160600AUNGVW (Gross vehicle weight)
This is the Base Curb Weight plus actual
Cargo Weight plus passengers.
E160700AUN-EUGVWR (Gross vehicle weight rating)
This is the maximum allowable weight of
the fully loaded vehicle (including all
options, equipment, passengers and
cargo). The GVWR is shown on the cer-
tification label located on the driver’s
door sill.
VEHICLE WEIGHT
Page 277 of 341
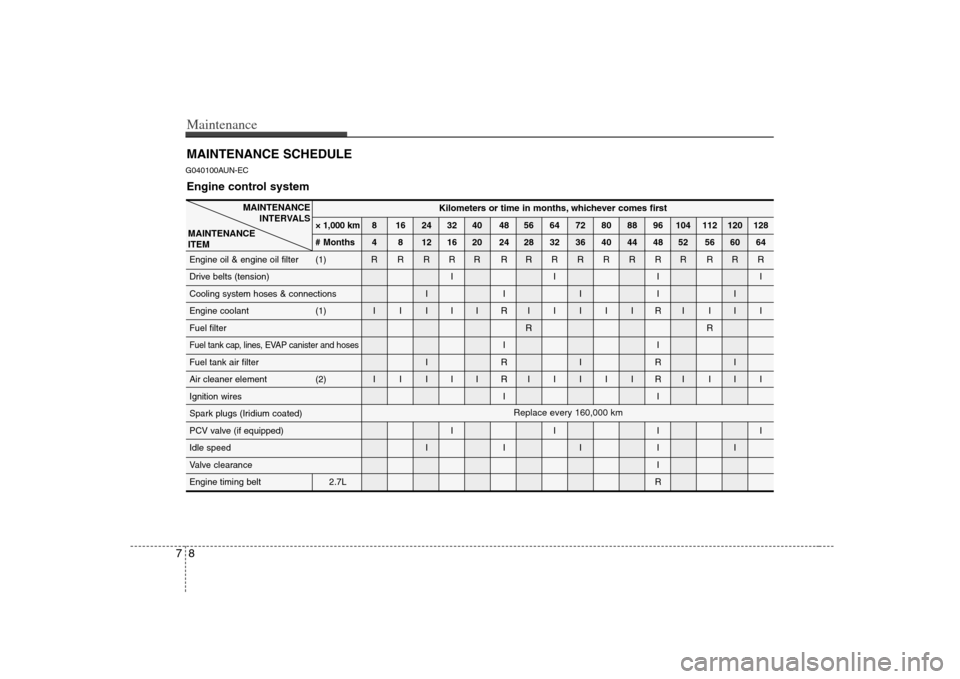
Maintenance8 7MAINTENANCE SCHEDULEG040100AUN-EC
MAINTENANCE
INTERVALS
MAINTENANCE
ITEM
Engine control system
Kilometers or time in months, whichever comes first
× 1,000 km 8 16 24 32 40 48 56 64 72 80 88 96 104 112 120 128
# Months 4 8 12 16 20 24 28 32 36 40 44 48 52 56 60 64
Engine oil & engine oil filter (1) R R R R R RRRRRRRR RRR
Drive belts (tension) I I I I
Cooling system hoses & connections I I I I I
Engine coolant (1) I I I I I RIIIIIRI III
Fuel filterRR
Fuel tank cap, lines, EVAP canister and hoses
II
Fuel tank air filter I R I R I
Air cleaner element (2) I I I I I RIIIIIRI III
Ignition wires I I
Spark plugs (Iridium coated)
PCV valve (if equipped) I I I I
Idle speed I I I I I
Valve clearance I
Engine timing belt 2.7LRReplace every 160,000 km
Page 281 of 341
Maintenance12 7EXPLANATION OF SCHEDULED MAINTENANCE ITEMSG050100AUNEngine oil and filterThe engine oil and filter should be
changed at the intervals specified in the
maintenance schedule. If the car is being
driven in severe conditions, more fre-
quent oil and filter changes are required.G050200AUNDrive beltsInspect all drive belts for evidence of
cuts, cracks, excessive wear or oil satu-
ration and replace if necessary. Drive
belts should be checked periodically for
proper tension and adjusted as neces-
sary.
G050300AUNFuel filter (cartridge)A clogged filter can limit the speed at
which the vehicle may be driven, damage
the emission system and cause multiple
issues such as hard starting. If an exces-
sive amount of foreign matter accumu-
lates in the fuel tank, the filter may
require replacement more frequently.
After installing a new filter, run the engine
for several minutes, and check for leaks
at the connections. Fuel filters should be
installed by an authorized KIA dealer.
G050400AUN-EUFuel lines, fuel hoses and con-
nectionsCheck the fuel lines, fuel hoses and con-
nections for leakage and damage. Have
an authorized KIA dealer replace any
damaged or leaking parts immediately.
Page 290 of 341
721
Maintenance
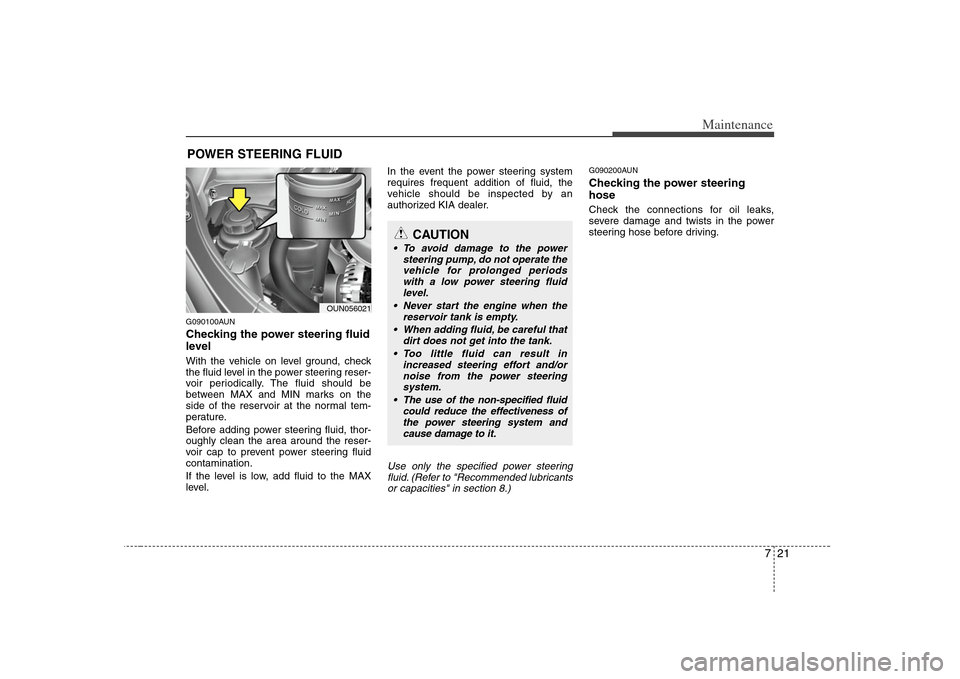
POWER STEERING FLUIDG090100AUNChecking the power steering fluid
level With the vehicle on level ground, check
the fluid level in the power steering reser-
voir periodically. The fluid should be
between MAX and MIN marks on the
side of the reservoir at the normal tem-
perature.
Before adding power steering fluid, thor-
oughly clean the area around the reser-
voir cap to prevent power steering fluid
contamination.
If the level is low, add fluid to the MAX
level.In the event the power steering system
requires frequent addition of fluid, the
vehicle should be inspected by an
authorized KIA dealer.
Use only the specified power steering
fluid. (Refer to "Recommended lubricants
or capacities" in section 8.)
G090200AUNChecking the power steering
hoseCheck the connections for oil leaks,
severe damage and twists in the power
steering hose before driving.
CAUTION
To avoid damage to the power
steering pump, do not operate the
vehicle for prolonged periods
with a low power steering fluid
level.
Never start the engine when the
reservoir tank is empty.
When adding fluid, be careful that
dirt does not get into the tank.
Too little fluid can result in
increased steering effort and/or
noise from the power steering
system.
The use of the non-specified fluid
could reduce the effectiveness of
the power steering system and
cause damage to it.
OUN056021
Page 328 of 341
759
Maintenance
EMISSION CONTROL SYSTEMG270000AUN-EUThe emission control system of your
vehicle is covered by a written limited
warranty. Please see the warranty infor-
mation contained in the Warranty &
Maintenance booklet in your vehicle.
Your vehicle is equipped with an emis-
sion control system to meet all emission
regulations.
There are three emission control sys-
tems which are as follows.
(1) Crankcase emission control system
(2) Evaporative emission control system
(3) Exhaust emission control system
In order to assure the proper function of
the emission control systems, it is rec-
ommended that you have your car
inspected and maintained by an author-
ized KIA dealer in accordance with the
maintenance schedule in this manual.Caution for the Inspection and
Maintenance Test (With Electronic
Stability Control (ESC) system)
To prevent the vehicle from misfir-
ing during dynamometer testing,
turn the Electronic Stability Control
(ESC) system off by pressing the
ESC switch.
After dynamometer testing is com-
pleted, turn the ESC system back on
by pressing the ESC switch again.
G270100AUN1. Crankcase emission control
systemThe positive crankcase ventilation sys-
tem is employed to prevent air pollution
caused by blow-by gases being emitted
from the crankcase. This system supplies
fresh filtered air to the crankcase through
the air intake hose. Inside the crankcase,
the fresh air mixes with blow-by gases,
which then pass through the PCV valve
into the induction system.G270200AUN2. Evaporative emission control
(including ORVR: Onboard
Refueling Vapor Recovery) sys-
temThe Evaporative Emission Control
System is designed to prevent fuel
vapors from escaping into the atmos-
phere.
(The ORVR system is designed to allow
the vapors from the fuel tank to be
loaded into a canister while refueling at
the gas station, preventing the escape of
fuel vapors into the atmosphere.)