Center KIA Rondo 2015 3.G Owner's Manual
[x] Cancel search | Manufacturer: KIA, Model Year: 2015, Model line: Rondo, Model: KIA Rondo 2015 3.GPages: 564, PDF Size: 19.11 MB
Page 14 of 564
25
Your vehicle at a glance
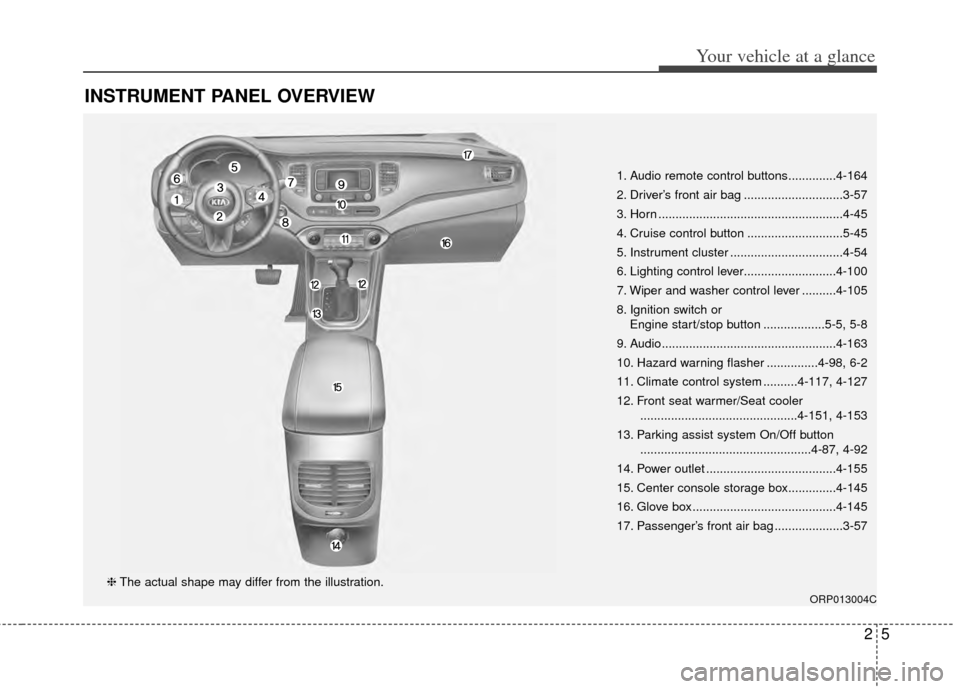
INSTRUMENT PANEL OVERVIEW
1. Audio remote control buttons..............4-164
2. Driver’s front air bag .............................3-57
3. Horn ......................................................4-45
4. Cruise control button ............................5-45
5. Instrument cluster .................................4-54
6. Lighting control lever...........................4-100
7. Wiper and washer control lever ..........4-105
8. Ignition switch orEngine start/stop button ..................5-5, 5-8
9. Audio...................................................4-163
10. Hazard warning flasher ...............4-98, 6-2
11. Climate control system ..........4-117, 4-127
12. Front seat warmer/Seat cooler ..............................................4-151, 4-153
13. Parking assist system On/Off button ..................................................4-87, 4-92
14. Power outlet ......................................4-155
15. Center console storage box..............4-145
16. Glove box ..........................................4-145
17. Passenger’s front air bag ....................3-57
ORP013004C
❈ The actual shape may differ from the illustration.
Page 24 of 564
39
Safety features of your vehicle
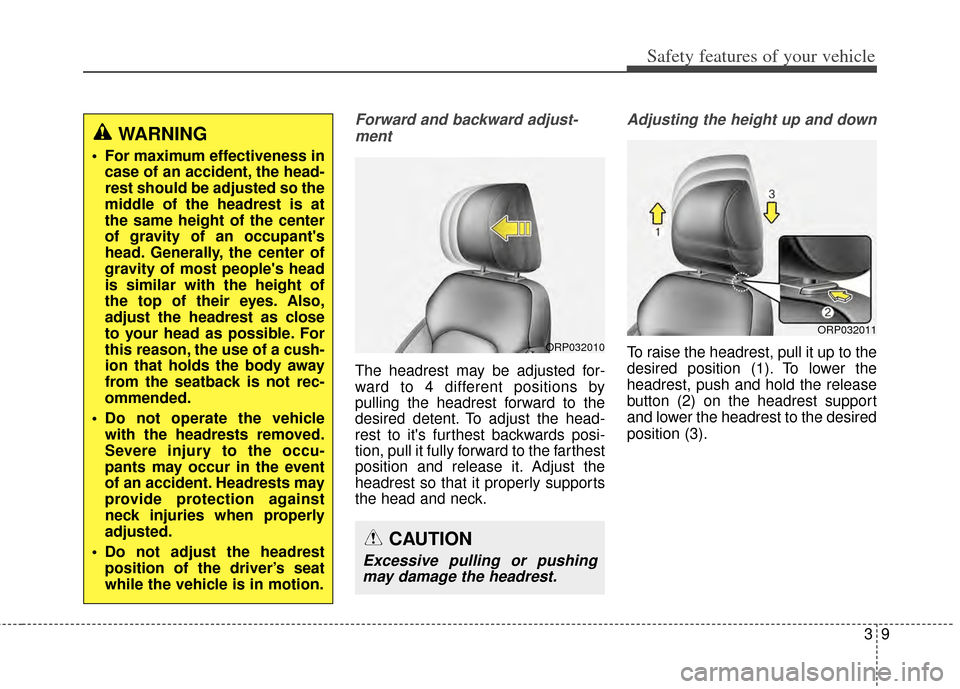
Forward and backward adjust-ment
The headrest may be adjusted for-
ward to 4 different positions by
pulling the headrest forward to the
desired detent. To adjust the head-
rest to it's furthest backwards posi-
tion, pull it fully forward to the farthest
position and release it. Adjust the
headrest so that it properly supports
the head and neck.
Adjusting the height up and down
To raise the headrest, pull it up to the
desired position (1). To lower the
headrest, push and hold the release
button (2) on the headrest support
and lower the headrest to the desired
position (3).
WARNING
For maximum effectiveness in case of an accident, the head-
rest should be adjusted so the
middle of the headrest is at
the same height of the center
of gravity of an occupant's
head. Generally, the center of
gravity of most people's head
is similar with the height of
the top of their eyes. Also,
adjust the headrest as close
to your head as possible. For
this reason, the use of a cush-
ion that holds the body away
from the seatback is not rec-
ommended.
Do not operate the vehicle with the headrests removed.
Severe injury to the occu-
pants may occur in the event
of an accident. Headrests may
provide protection against
neck injuries when properly
adjusted.
Do not adjust the headrest position of the driver’s seat
while the vehicle is in motion.
ORP032010
ORP032011
CAUTION
Excessive pulling or pushingmay damage the headrest.
Page 29 of 564
Safety features of your vehicle
14
3
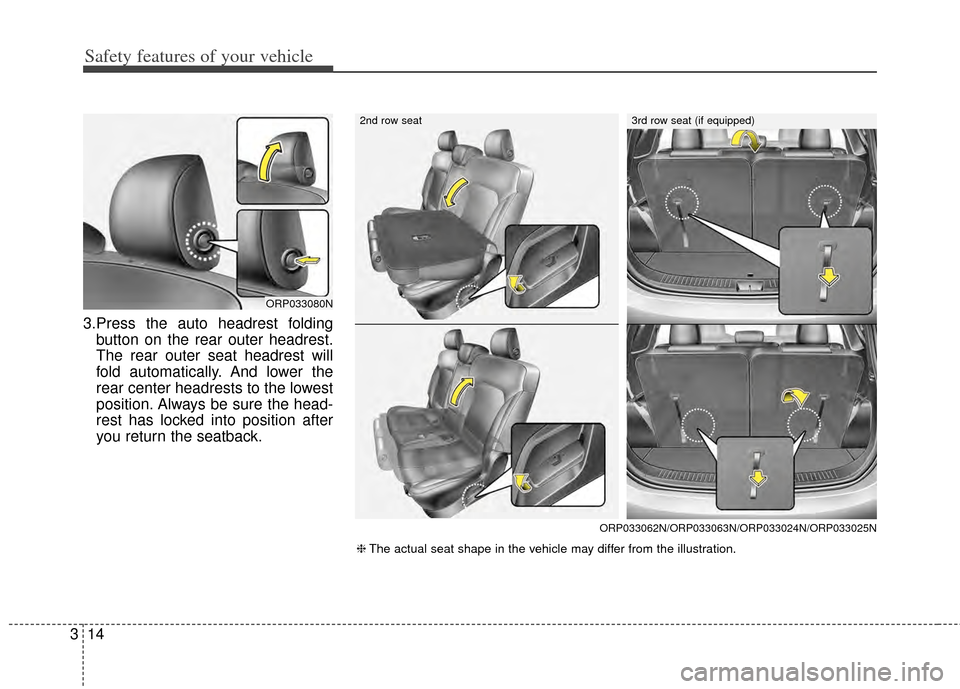
3.Press the auto headrest folding
button on the rear outer headrest.
The rear outer seat headrest will
fold automatically. And lower the
rear center headrests to the lowest
position. Always be sure the head-
rest has locked into position after
you return the seatback.
ORP033080N
2nd row seat
ORP033062N/ORP033063N/ORP033024N/ORP033025N
❈ The actual seat shape in the vehicle may differ from the illustration.
3rd row seat (if equipped)
Page 31 of 564
Safety features of your vehicle
16
3
Armrest
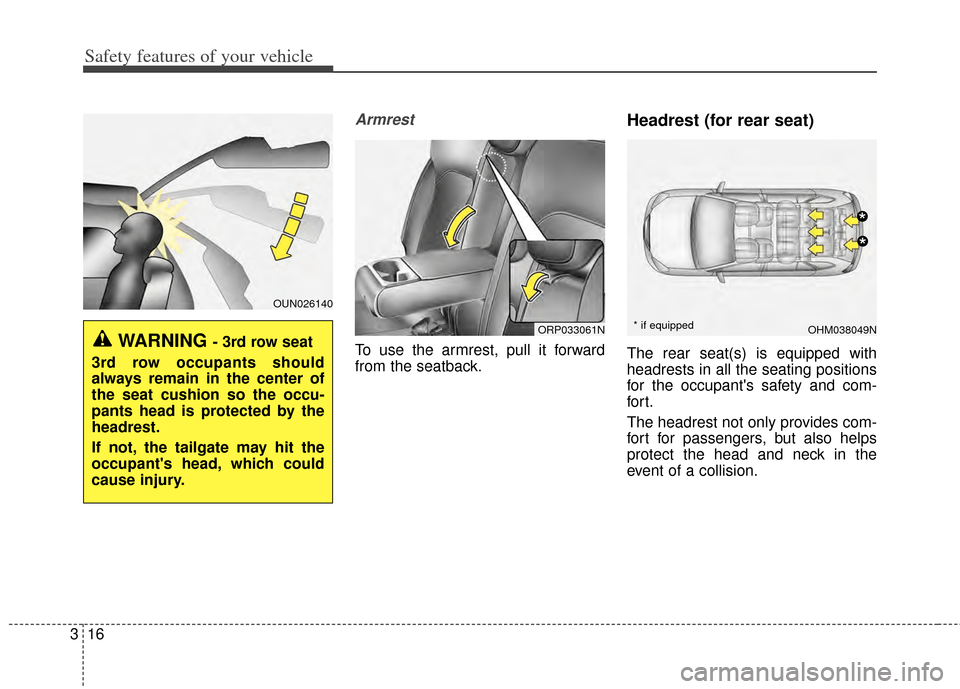
To use the armrest, pull it forward
from the seatback.
Headrest (for rear seat)
The rear seat(s) is equipped with
headrests in all the seating positions
for the occupant's safety and com-
for t.
The headrest not only provides com-
fort for passengers, but also helps
protect the head and neck in the
event of a collision.
OUN026140
WARNING - 3rd row seat
3rd row occupants should
always remain in the center of
the seat cushion so the occu-
pants head is protected by the
headrest.
If not, the tailgate may hit the
occupant's head, which could
cause injury.ORP033061NOHM038049N
*
*
* if equipped
Page 32 of 564
317
Safety features of your vehicle
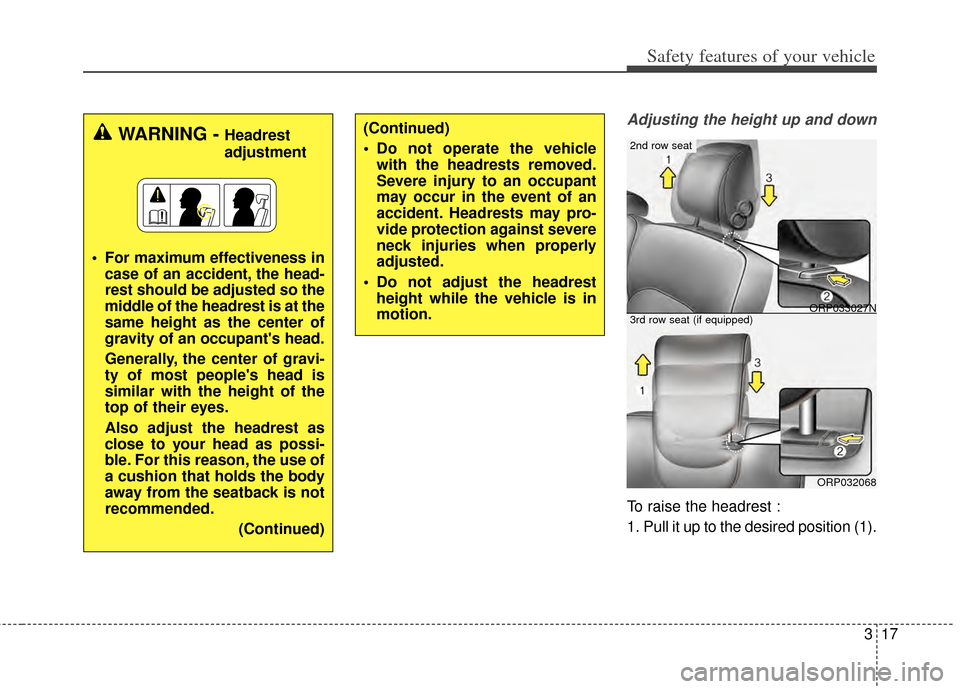
Adjusting the height up and down
To raise the headrest :
1. Pull it up to the desired position (1).
WARNING - Headrest
adjustment
For maximum effectiveness in case of an accident, the head-
rest should be adjusted so the
middle of the headrest is at the
same height as the center of
gravity of an occupant's head.
Generally, the center of gravi-
ty of most people's head is
similar with the height of the
top of their eyes.
Also adjust the headrest as
close to your head as possi-
ble. For this reason, the use of
a cushion that holds the body
away from the seatback is not
recommended.
(Continued)(Continued)
Do not operate the vehiclewith the headrests removed.
Severe injury to an occupant
may occur in the event of an
accident. Headrests may pro-
vide protection against severe
neck injuries when properly
adjusted.
Do not adjust the headrest height while the vehicle is in
motion.
ORP032068
ORP033027N
2nd row seat
3rd row seat (if equipped)
Page 39 of 564
Safety features of your vehicle
24
3
It automatically adjusts to the proper
length only after the lap belt portion
of the seat belt is adjusted manually
so that it fits snugly around your hips.
When the seat belt is fully extended
from the retractor to allow the instal-
lation of a child restraint system, the
seat belt operation changes to allow
the belt to retract, but not to extend
(Automatic Locking Retractor Type).
Refer to “Using a child restraint sys-
tem” in this chapter.
✽ ✽
NOTICE
Although the combination retractor
provides the same level of protection
for seated passengers in either emer-
gency or automatic locking modes,
have the seated passengers use the
emergency locking feature for
improved convenience. The auto-
matic locking function is intended to
facilitate child restraint installation.
To convert from the automatic lock-
ing feature to the emergency locking
operation mode, allow the unbuck-
led seat belt to fully retract.
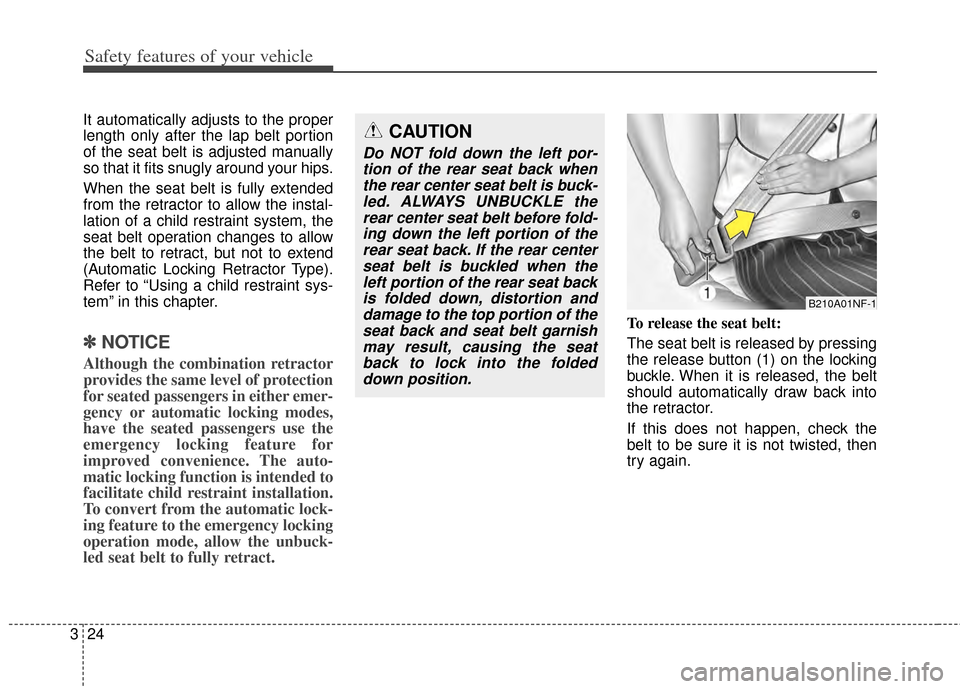
To release the seat belt:
The seat belt is released by pressing
the release button (1) on the locking
buckle. When it is released, the belt
should automatically draw back into
the retractor.
If this does not happen, check the
belt to be sure it is not twisted, then
try again.
CAUTION
Do NOT fold down the left por-
tion of the rear seat back whenthe rear center seat belt is buck-led. ALWAYS UNBUCKLE therear center seat belt before fold-ing down the left portion of therear seat back. If the rear centerseat belt is buckled when theleft portion of the rear seat backis folded down, distortion anddamage to the top portion of theseat back and seat belt garnishmay result, causing the seatback to lock into the foldeddown position.
B210A01NF-1
Page 40 of 564
325
Safety features of your vehicle
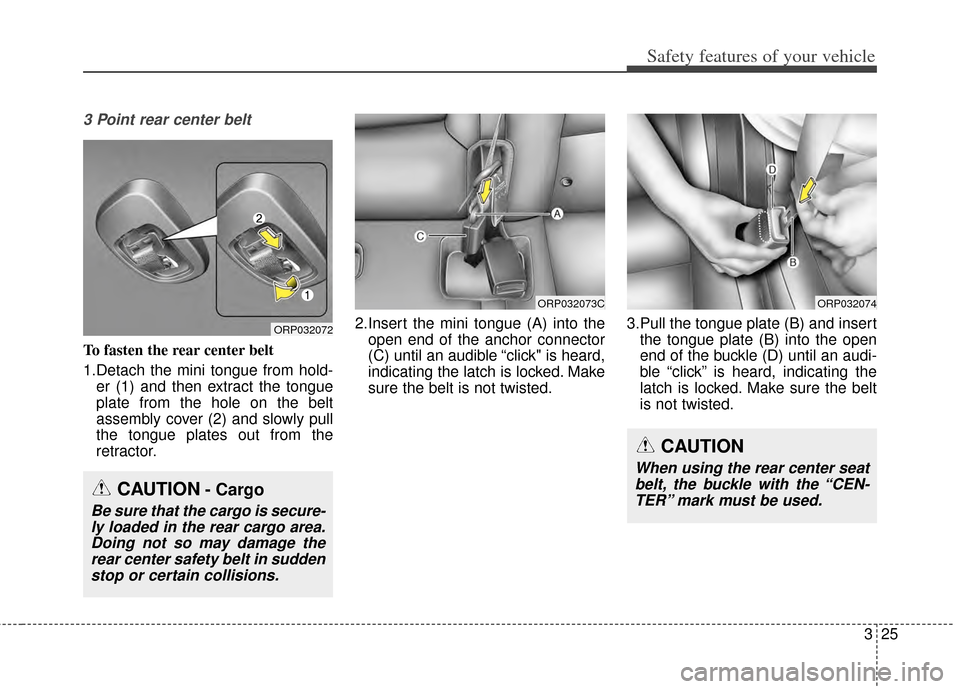
3 Point rear center belt
To fasten the rear center belt
1.Detach the mini tongue from hold-er (1) and then extract the tongue
plate from the hole on the belt
assembly cover (2) and slowly pull
the tongue plates out from the
retractor. 2.Insert the mini tongue (A) into the
open end of the anchor connector
(C) until an audible “click" is heard,
indicating the latch is locked. Make
sure the belt is not twisted. 3.Pull the tongue plate (B) and insert
the tongue plate (B) into the open
end of the buckle (D) until an audi-
ble “click” is heard, indicating the
latch is locked. Make sure the belt
is not twisted.
ORP032072
ORP032073CORP032074
CAUTION- Cargo
Be sure that the cargo is secure-ly loaded in the rear cargo area.Doing not so may damage therear center safety belt in suddenstop or certain collisions.
CAUTION
When using the rear center seatbelt, the buckle with the “CEN-TER” mark must be used.
Page 41 of 564
Safety features of your vehicle
26
3
There will be an audible “click” when
the tab locks in the buckle. The seat
belt automatically adjusts to the
proper length only after the lap belt is
adjusted manually so that it fits snug-
ly around your hips, if you lean for-
ward in a slow, easy motion, the belt
will extend and let you move around.
If there is a sudden stop or impact,
the belt will lock into position. It will
also lock if you try to lean forward too
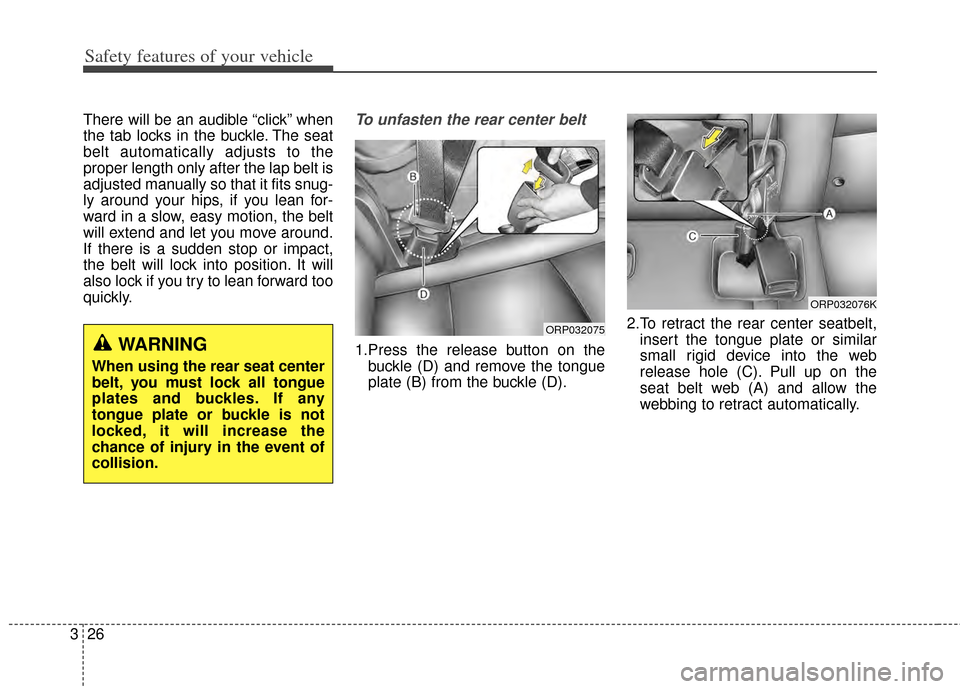
quickly.To unfasten the rear center belt
1.Press the release button on the
buckle (D) and remove the tongue
plate (B) from the buckle (D). 2.To retract the rear center seatbelt,
insert the tongue plate or similar
small rigid device into the web
release hole (C). Pull up on the
seat belt web (A) and allow the
webbing to retract automatically.WARNING
When using the rear seat center
belt, you must lock all tongue
plates and buckles. If any
tongue plate or buckle is not
locked, it will increase the
chance of injury in the event of
collision.
ORP032075
ORP032076K
Page 47 of 564
Safety features of your vehicle
32
3
Larger children
Children who are too large for child
restraint systems should always
occupy the rear seat and use the
available lap/shoulder belts. The lap
portion should be fastened and
snugged on the hips and as low as
possible. Check if the belt fits period-
ically. A child's squirming could put
the belt out of position. Children are
given the most safety in the event of
an accident when they are restrained
by a proper restraint system in the
rear seat. If a larger child (over age
12) must be seated in the front seat,
the child should be securely
restrained by the available lap/shoul-
der belt and the seat should be
placed in the rearmost position.
Children age 12 and under should be
restrained securely in the rear seat.
NEVER place a child age 12 and
under in the front seat. NEVER place
a rear facing child seat in the front
seat of a vehicle. If the shoulder belt portion slightly
touches the child’s neck or face, try
placing the child closer to the center of
the vehicle. If the shoulder belt still
touches their face or neck they need to
be returned to a child restraint system.
Restraint of pregnant women
Pregnant women should wear
lap/shoulder belt assemblies when-
ever possible according to specific
recommendations by their doctors.
The lap portion of the belt should be
worn AS SECURELY AND LOW AS
POSSIBLE.
WARNING - Pregnant
women
Pregnant women must never
place the lap portion of the
safety belt over the area of the
abdomen where the fetus is
located or above the abdomen
where the belt could crush the
fetus during an impact.
WARNING- Shoulder
belts on small children
Do not allow small children to ride in the vehicle without an
appropriate child restrain sys-
tem.
Never allow a shoulder belt to be in contact with a child’s
neck or face while the vehicle
is in motion.
If seat belts are not properly worn and adjusted on chil-
dren, there is a risk of death or
serious injury.
Page 53 of 564
Safety features of your vehicle
38
3
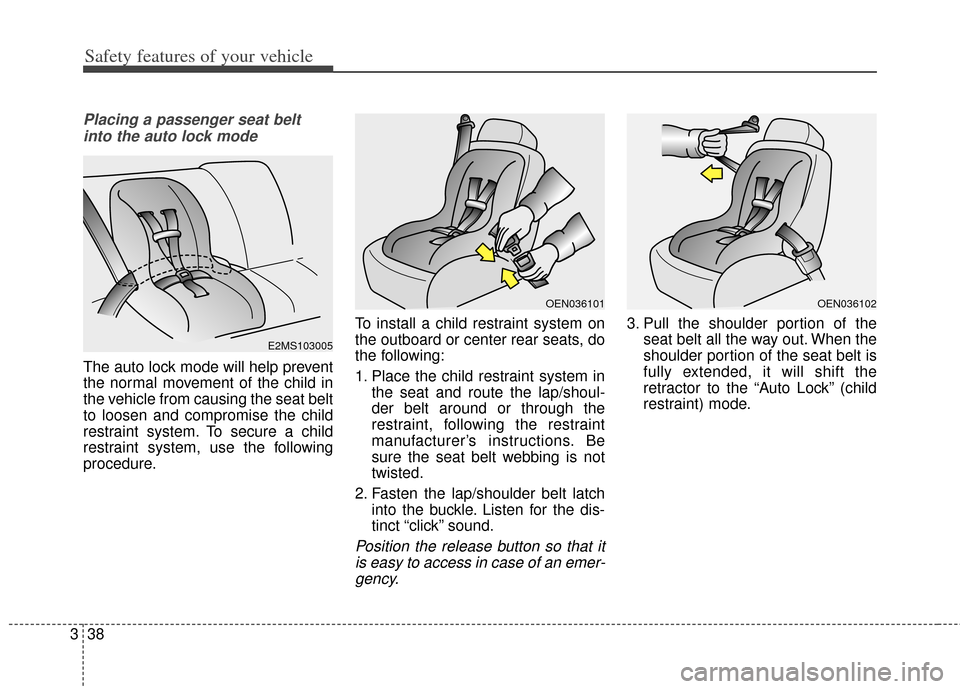
Placing a passenger seat belt
into the auto lock mode
The auto lock mode will help prevent
the normal movement of the child in
the vehicle from causing the seat belt
to loosen and compromise the child
restraint system. To secure a child
restraint system, use the following
procedure. To install a child restraint system on
the outboard or center rear seats, do
the following:
1. Place the child restraint system in
the seat and route the lap/shoul-
der belt around or through the
restraint, following the restraint
manufacturer’s instructions. Be
sure the seat belt webbing is not
twisted.
2. Fasten the lap/shoulder belt latch into the buckle. Listen for the dis-
tinct “click” sound.
Position the release button so that itis easy to access in case of an emer-gency.
3. Pull the shoulder portion of the seat belt all the way out. When the
shoulder portion of the seat belt is
fully extended, it will shift the
retractor to the “Auto Lock” (child
restraint) mode.
E2MS103005
OEN036101OEN036102