lock KIA Rondo 2017 3.G Owner's Manual
[x] Cancel search | Manufacturer: KIA, Model Year: 2017, Model line: Rondo, Model: KIA Rondo 2017 3.GPages: 625, PDF Size: 19.69 MB
Page 7 of 625
Introduction
41
"E85" fuel is an alternative fuel com-
prised of 85 percent ethanol and 15
percent gasoline, and is manufac-
tured exclusively for use in Flexible
Fuel Vehicles. “E85” is not compati-
ble with your vehicle. Use of “E85”
may result in poor engine perform-
ance and damage to your vehicle's
engine and fuel system. Kia recom-
mends that customers do not use
fuel with an ethanol content exceed-
ing 15 percent.
✽ ✽
NOTICE
Your New Vehicle Limited Warranty
does not cover damage to the fuel sys-
tem or any performance problems
caused by the use of “E85” fuel.
✽ ✽
NOTICE
Never use any fuel containing
methanol. Discontinue use of any
methanol containing product which
may inhibit proper drivability.
Other fuels
Using fuels that contain Silicone (Si),
MMT (Manganese, Mn), Ferrocene
(Fe), and Other metalic additives,
may cause vehicle and engine dam-
age or cause misfiring, poor acceler-
ation, engine stalling, catalyst melt-
ing, clogging, abnormal corrosion,
life cycle reduction, etc.
Also, the Malfunction Indicator Lamp
(MIL) may illuminate.
✽ ✽
NOTICE
Damage to the fuel system or per-
formance problem caused by the use
of these fuels may not be covered by
your New Vehicle Limited
Warranty.
Use of MTBE
Kia recommends avoiding fuels con-
taining MTBE (Methyl Tertiary Butyl
Ether) over 15.0% vol. (Oxygen
Content 2.7% weight) in your vehicle.
Fuel containing MTBE over 15.0%
vol. (Oxygen Content 2.7% weight)
may reduce vehicle performance and
produce vapor lock or hard starting.
✽ ✽
NOTICE
Your New Vehicle Limited
Warranty may not cover damage to
the fuel system and any perform-
ance problems that are caused by
the use of fuels containing methanol
or fuels containing MTBE (Methyl
Tertiary Butyl Ether) over 15.0%
vol. (Oxygen Content 2.7% weight.)
Page 13 of 625
23
Your vehicle at a glance
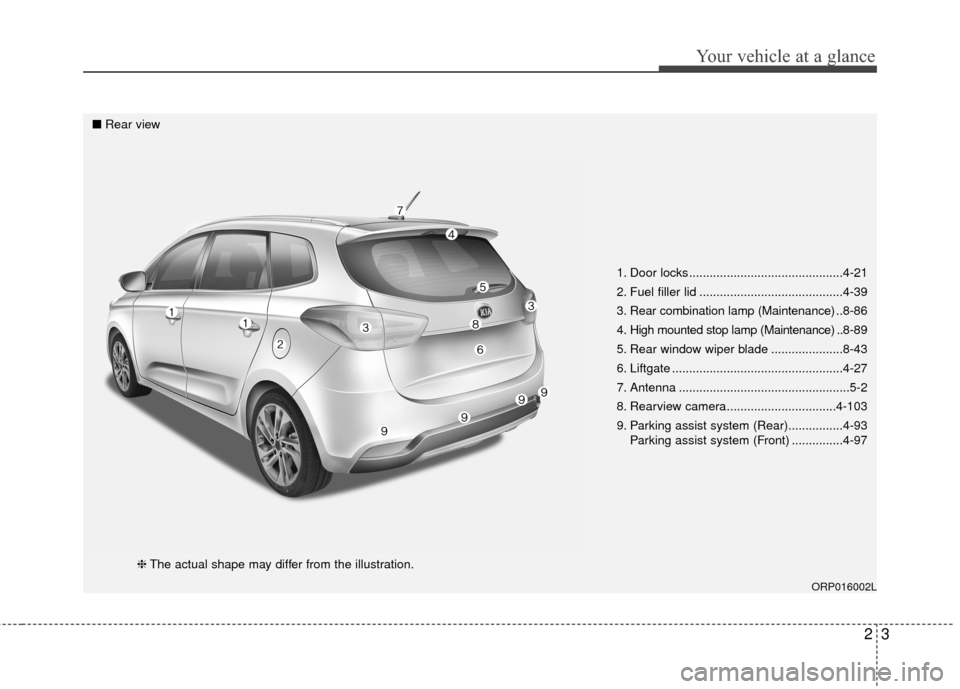
1. Door locks .............................................4-21
2. Fuel filler lid ..........................................4-39
3. Rear combination lamp (Maintenance) ..8-86
4. High mounted stop lamp (Maintenance) .. 8-89
5. Rear window wiper blade .....................8-43
6. Liftgate ..................................................4-27
7. Antenna ..................................................5-2
8. Rearview camera................................4-103
9. Parking assist system (Rear)................4-93 Parking assist system (Front) ...............4-97
ORP016002L
■Rear view
❈The actual shape may differ from the illustration.
Page 14 of 625
Your vehicle at a glance
42
INTERIOR OVERVIEW
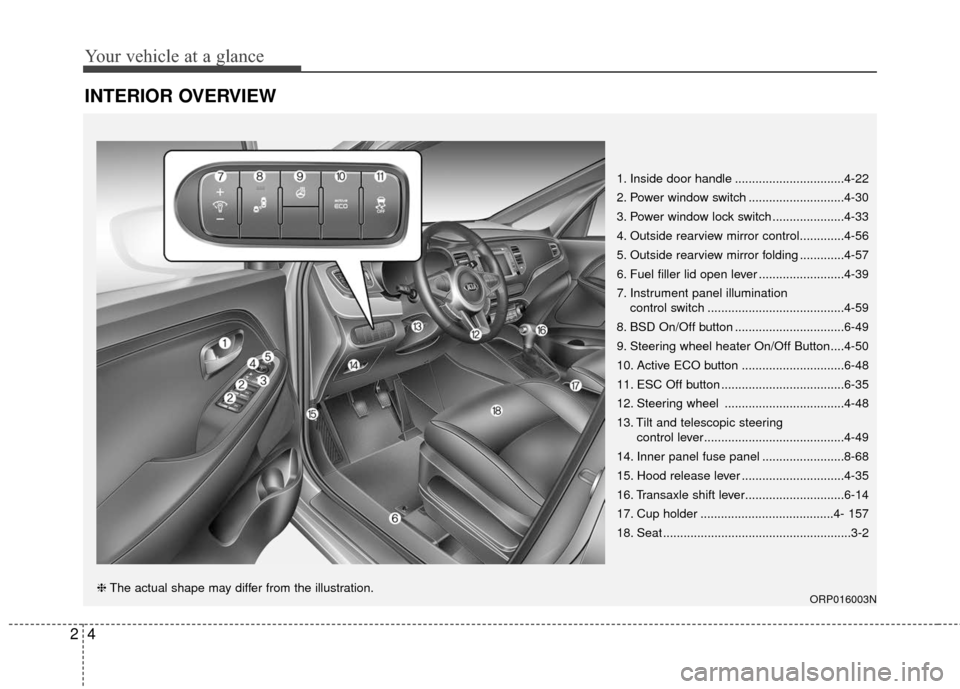
1. Inside door handle ................................4-22
2. Power window switch ............................4-30
3. Power window lock switch .....................4-33
4. Outside rearview mirror control.............4-56
5. Outside rearview mirror folding .............4-57
6. Fuel filler lid open lever .........................4-39
7. Instrument panel illuminationcontrol switch ........................................4-59
8. BSD On/Off button ................................6-49
9. Steering wheel heater On/Off Button....4-50
10. Active ECO button ..............................6-48
11. ESC Off button ....................................6-35
12. Steering wheel ...................................4-48
13. Tilt and telescopic steering control lever.........................................4-49
14. Inner panel fuse panel ........................8-68
15. Hood release lever ..............................4-35
16. Transaxle shift lever.............................6-14
17. Cup holder .......................................4- 157
18. Seat .......................................................3-2
ORP016003N❈ The actual shape may differ from the illustration.
Page 21 of 625
35
Safety features of your vehicle
Front seat adjustment - manual
Forward and backward
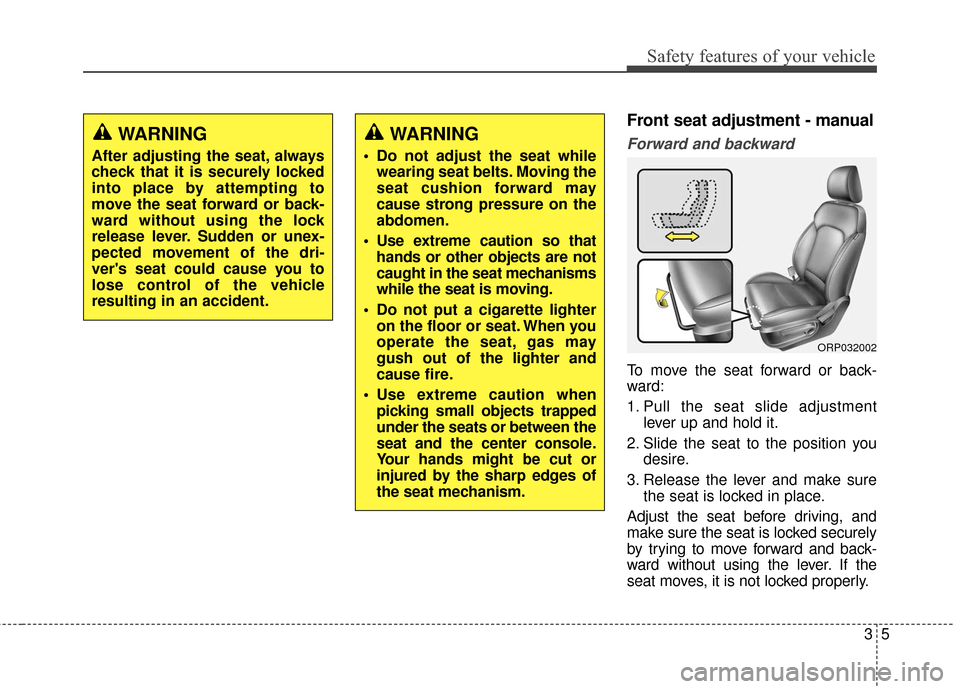
To move the seat forward or back-
ward:
1. Pull the seat slide adjustmentlever up and hold it.
2. Slide the seat to the position you desire.
3. Release the lever and make sure the seat is locked in place.
Adjust the seat before driving, and
make sure the seat is locked securely
by trying to move forward and back-
ward without using the lever. If the
seat moves, it is not locked properly.
WARNING
After adjusting the seat, always
check that it is securely locked
into place by attempting to
move the seat forward or back-
ward without using the lock
release lever. Sudden or unex-
pected movement of the dri-
ver's seat could cause you to
lose control of the vehicle
resulting in an accident.
WARNING
Do not adjust the seat while wearing seat belts. Moving the
seat cushion forward may
cause strong pressure on the
abdomen.
Use extreme caution so that hands or other objects are not
caught in the seat mechanisms
while the seat is moving.
Do not put a cigarette lighter on the floor or seat. When you
operate the seat, gas may
gush out of the lighter and
cause fire.
Use extreme caution when picking small objects trapped
under the seats or between the
seat and the center console.
Your hands might be cut or
injured by the sharp edges of
the seat mechanism.
ORP032002
Page 22 of 625
Safety features of your vehicle
63
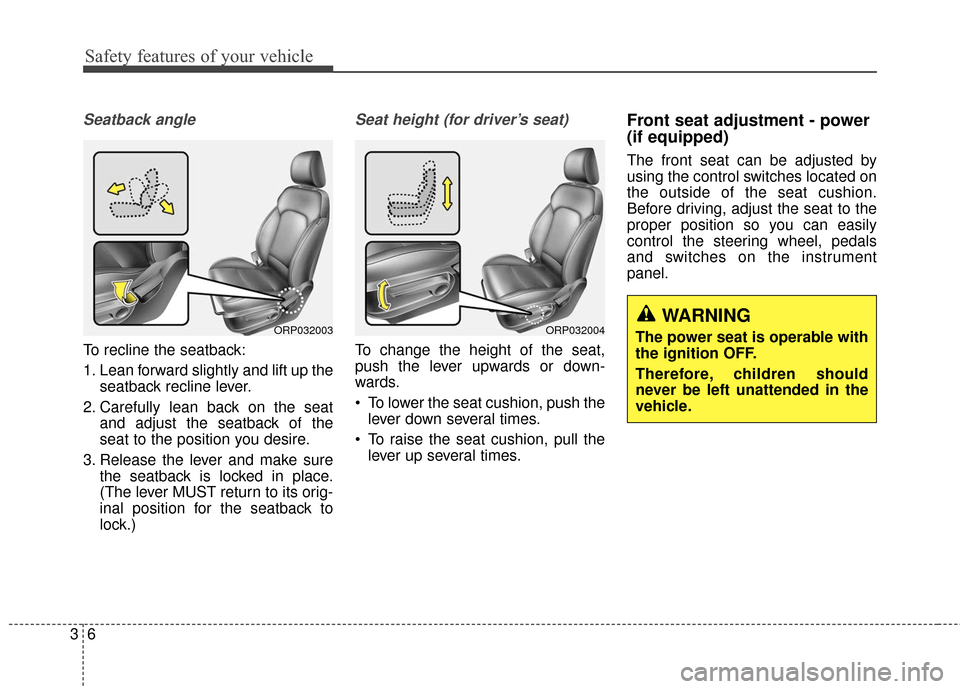
Seatback angle
To recline the seatback:
1. Lean forward slightly and lift up theseatback recline lever.
2. Carefully lean back on the seat and adjust the seatback of the
seat to the position you desire.
3. Release the lever and make sure the seatback is locked in place.
(The lever MUST return to its orig-
inal position for the seatback to
lock.)
Seat height (for driver’s seat)
To change the height of the seat,
push the lever upwards or down-
wards.
To lower the seat cushion, push thelever down several times.
To raise the seat cushion, pull the lever up several times.
Front seat adjustment - power
(if equipped)
The front seat can be adjusted by
using the control switches located on
the outside of the seat cushion.
Before driving, adjust the seat to the
proper position so you can easily
control the steering wheel, pedals
and switches on the instrument
panel.
ORP032003ORP032004WARNING
The power seat is operable with
the ignition OFF.
Therefore, children should
never be left unattended in the
vehicle.
Page 28 of 625
Safety features of your vehicle
12
3
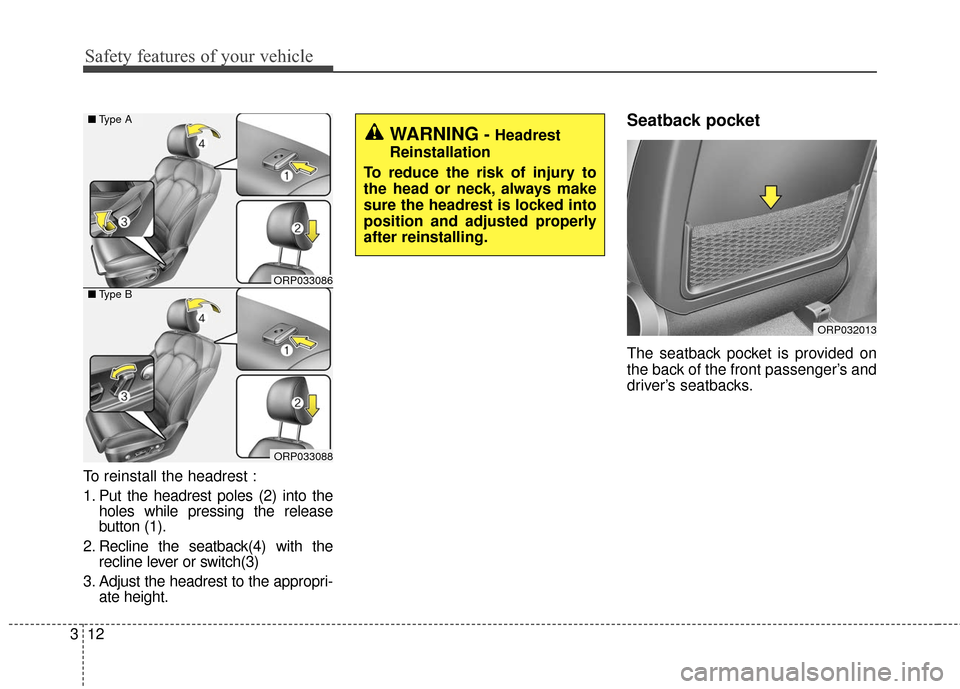
To reinstall the headrest :
1. Put the headrest poles (2) into the
holes while pressing the release
button (1).
2. Recline the seatback(4) with the recline lever or switch(3)
3. Adjust the headrest to the appropri- ate height.
Seatback pocket
The seatback pocket is provided on
the back of the front passenger’s and
driver’s seatbacks.
ORP033086
ORP033088
■Type A
■Type B
ORP032013
WARNING- Headrest
Reinstallation
To reduce the risk of injury to
the head or neck, always make
sure the headrest is locked into
position and adjusted properly
after reinstalling.
Page 29 of 625
313
Safety features of your vehicle
Rear seat adjustment
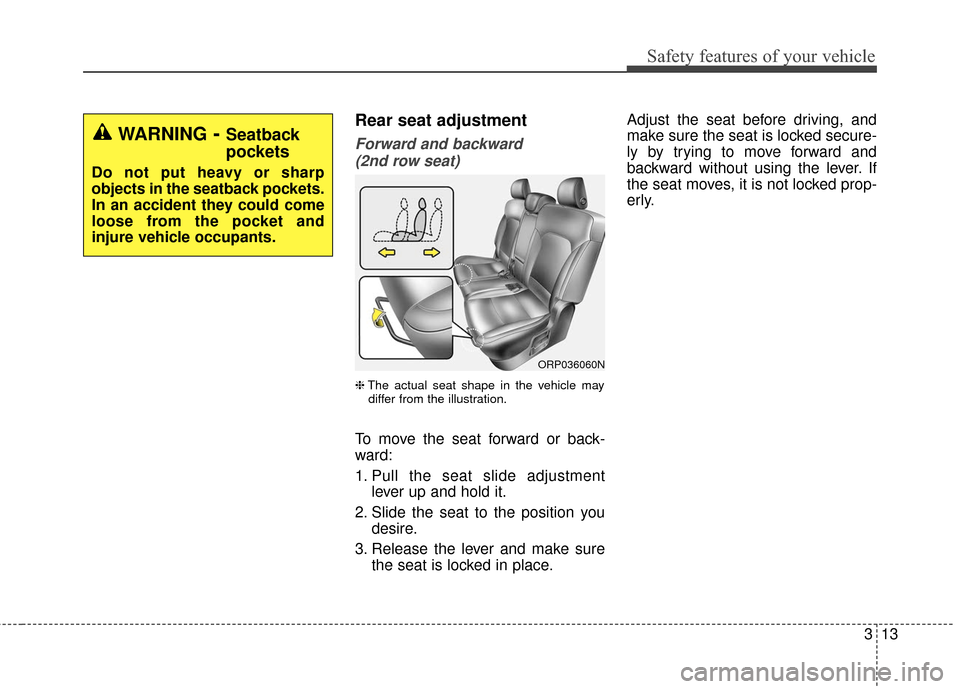
Forward and backward (2nd row seat)
❈ The actual seat shape in the vehicle may
differ from the illustration.
To move the seat forward or back-
ward:
1. Pull the seat slide adjustment lever up and hold it.
2. Slide the seat to the position you desire.
3. Release the lever and make sure the seat is locked in place. Adjust the seat before driving, and
make sure the seat is locked secure-
ly by trying to move forward and
backward without using the lever. If
the seat moves, it is not locked prop-
erly.
WARNING- Seatback
pockets
Do not put heavy or sharp
objects in the seatback pockets.
In an accident they could come
loose from the pocket and
injure vehicle occupants.
ORP036060N
Page 30 of 625
Safety features of your vehicle
14
3
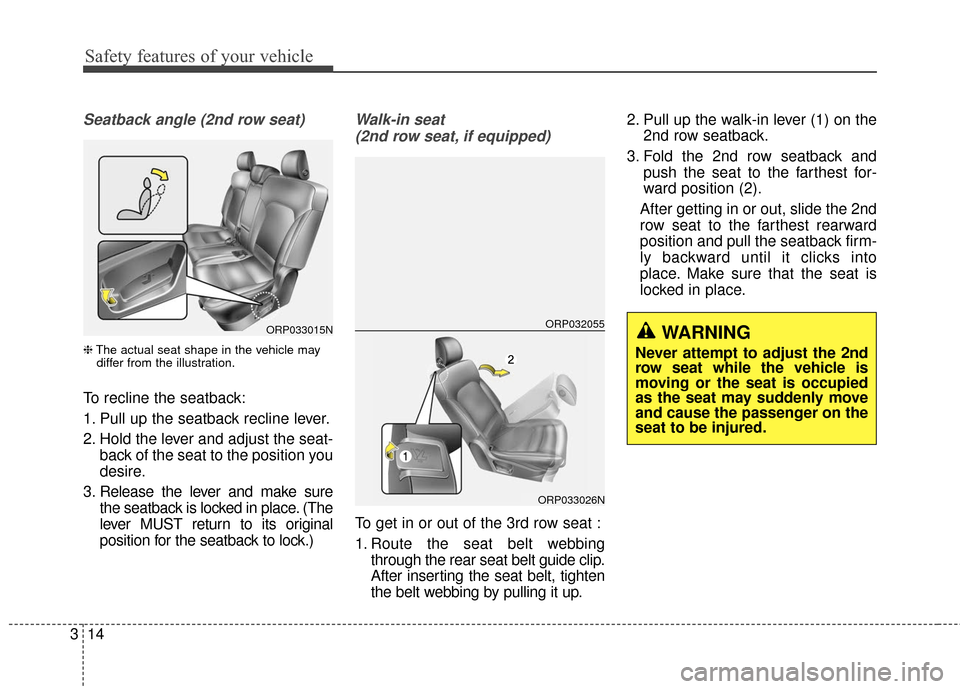
Seatback angle (2nd row seat)
❈ The actual seat shape in the vehicle may
differ from the illustration.
To recline the seatback:
1. Pull up the seatback recline lever.
2. Hold the lever and adjust the seat- back of the seat to the position you
desire.
3. Release the lever and make sure the seatback is locked in place. (The
lever MUST return to its original
position for the seatback to lock.)
Walk-in seat
(2nd row seat, if equipped)
To get in or out of the 3rd row seat :
1. Route the seat belt webbing through the rear seat belt guide clip.
After inserting the seat belt, tighten
the belt webbing by pulling it up. 2. Pull up the walk-in lever (1) on the
2nd row seatback.
3. Fold the 2nd row seatback and push the seat to the farthest for-
ward position (2).
After getting in or out, slide the 2nd
row seat to the farthest rearward
position and pull the seatback firm-
ly backward until it clicks into
place. Make sure that the seat is
locked in place.
ORP033015NORP032055
ORP033026N
WARNING
Never attempt to adjust the 2nd
row seat while the vehicle is
moving or the seat is occupied
as the seat may suddenly move
and cause the passenger on the
seat to be injured.
Page 32 of 625
Safety features of your vehicle
16
3
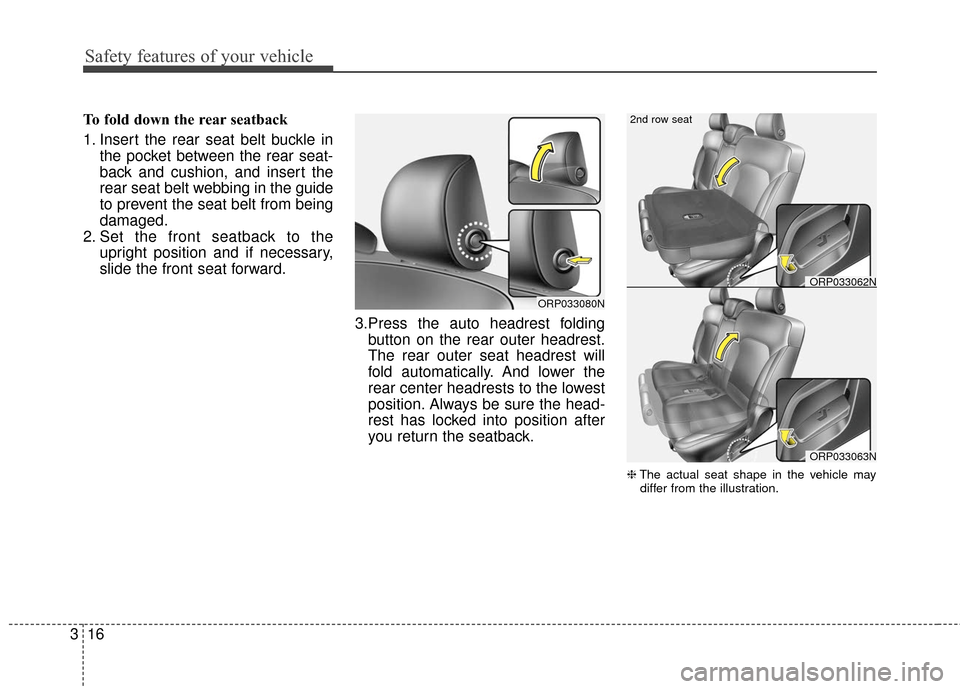
To fold down the rear seatback
1. Insert the rear seat belt buckle in
the pocket between the rear seat-
back and cushion, and insert the
rear seat belt webbing in the guide
to prevent the seat belt from being
damaged.
2. Set the front seatback to the upright position and if necessary,
slide the front seat forward.
3.Press the auto headrest foldingbutton on the rear outer headrest.
The rear outer seat headrest will
fold automatically. And lower the
rear center headrests to the lowest
position. Always be sure the head-
rest has locked into position after
you return the seatback.
❈ The actual seat shape in the vehicle may
differ from the illustration.
ORP033080N
ORP033063N
ORP033062N
2nd row seat
Page 33 of 625
317
Safety features of your vehicle
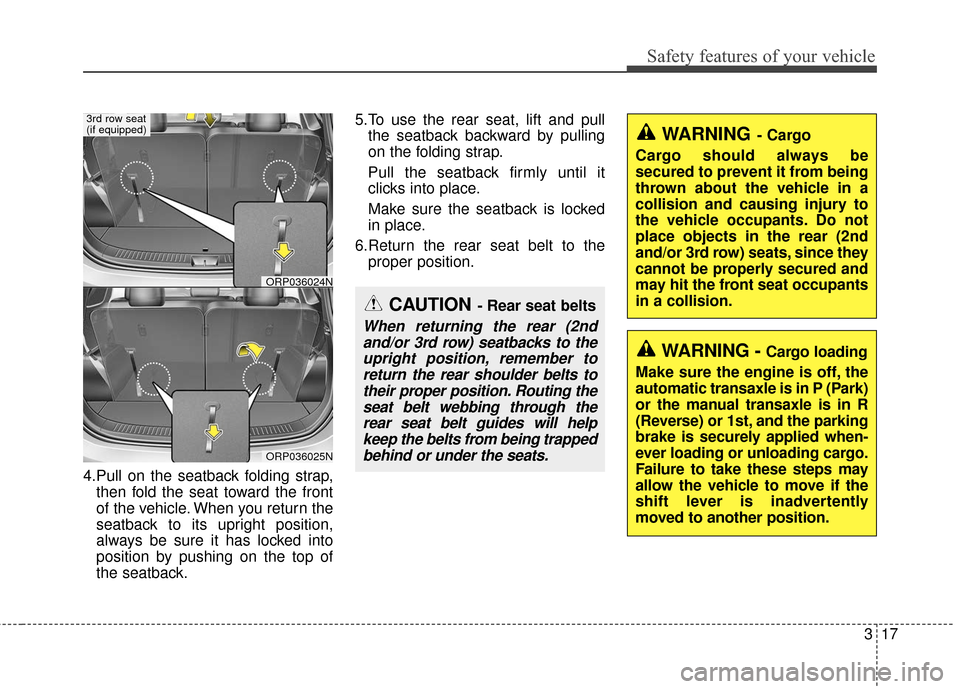
4.Pull on the seatback folding strap,then fold the seat toward the front
of the vehicle. When you return the
seatback to its upright position,
always be sure it has locked into
position by pushing on the top of
the seatback. 5.To use the rear seat, lift and pull
the seatback backward by pulling
on the folding strap.
Pull the seatback firmly until it
clicks into place.
Make sure the seatback is locked
in place.
6.Return the rear seat belt to the proper position.
ORP036025N
ORP036024N
3rd row seat
(if equipped)
CAUTION- Rear seat belts
When returning the rear (2ndand/or 3rd row) seatbacks to theupright position, remember toreturn the rear shoulder belts totheir proper position. Routing theseat belt webbing through therear seat belt guides will helpkeep the belts from being trappedbehind or under the seats.
WARNING- Cargo
Cargo should always be
secured to prevent it from being
thrown about the vehicle in a
collision and causing injury to
the vehicle occupants. Do not
place objects in the rear (2nd
and/or 3rd row) seats, since they
cannot be properly secured and
may hit the front seat occupants
in a collision.
WARNING - Cargo loading
Make sure the engine is off, the
automatic transaxle is in P (Park)
or the manual transaxle is in R
(Reverse) or 1st, and the parking
brake is securely applied when-
ever loading or unloading cargo.
Failure to take these steps may
allow the vehicle to move if the
shift lever is inadvertently
moved to another position.