KIA Sedona 2008 2.G Workshop Manual
Manufacturer: KIA, Model Year: 2008, Model line: Sedona, Model: KIA Sedona 2008 2.GPages: 339, PDF Size: 6.71 MB
Page 51 of 339
Features of your vehicle
42 3
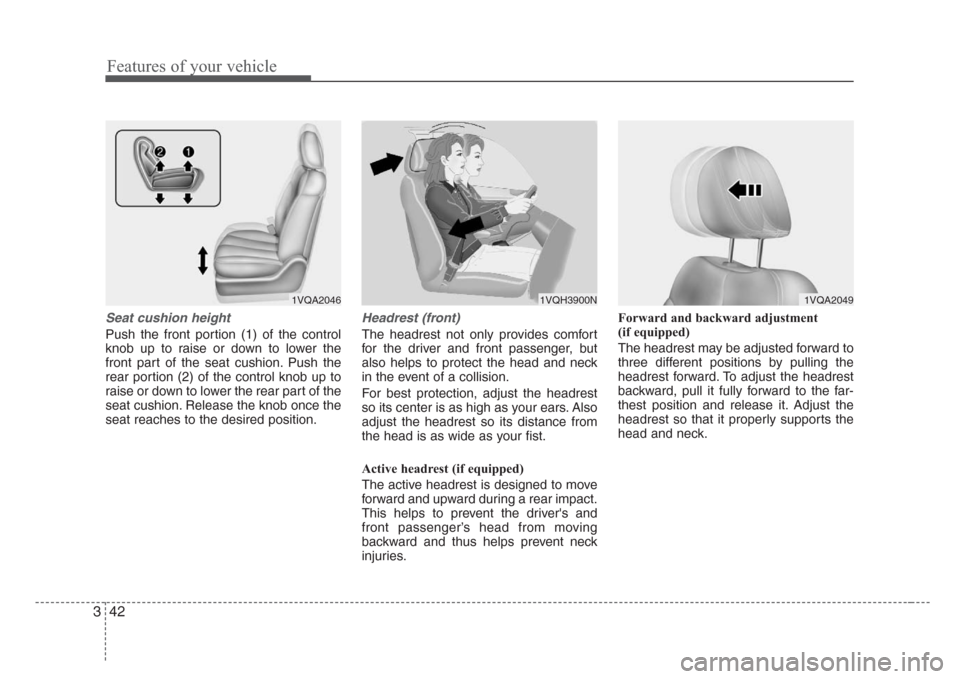
Seat cushion height
Push the front portion (1) of the control
knob up to raise or down to lower the
front part of the seat cushion. Push the
rear portion (2) of the control knob up to
raise or down to lower the rear part of the
seat cushion. Release the knob once the
seat reaches to the desired position.
Headrest (front)
The headrest not only provides comfort
for the driver and front passenger, but
also helps to protect the head and neck
in the event of a collision.
For best protection, adjust the headrest
so its center is as high as your ears. Also
adjust the headrest so its distance from
the head is as wide as your fist.
Active headrest (if equipped)
The active headrest is designed to move
forward and upward during a rear impact.
This helps to prevent the driver's and
front passenger’s head from moving
backward and thus helps prevent neck
injuries.Forward and backward adjustment
(if equipped)
The headrest may be adjusted forward to
three different positions by pulling the
headrest forward. To adjust the headrest
backward, pull it fully forward to the far-
thest position and release it. Adjust the
headrest so that it properly supports the
head and neck.
1VQA20461VQH3900N1VQA2049
Page 52 of 339
343
Features of your vehicle
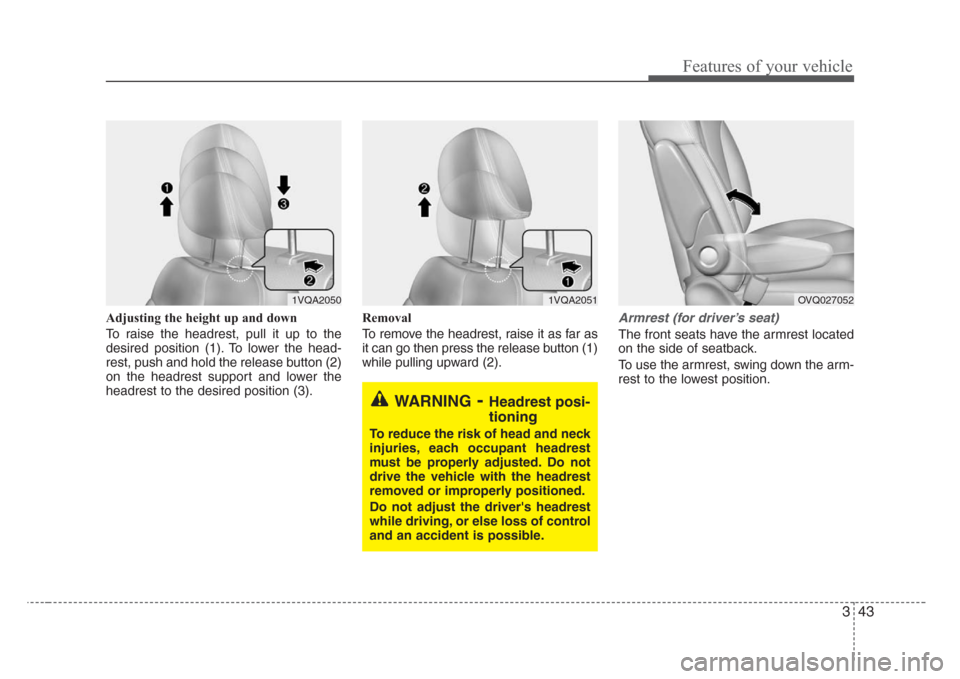
Adjusting the height up and down
To raise the headrest, pull it up to the
desired position (1). To lower the head-
rest, push and hold the release button (2)
on the headrest support and lower the
headrest to the desired position (3).Removal
To remove the headrest, raise it as far as
it can go then press the release button (1)
while pulling upward (2).Armrest (for driver’s seat)
The front seats have the armrest located
on the side of seatback.
To use the armrest, swing down the arm-
rest to the lowest position.
WARNING-Headrest posi-
tioning
To reduce the risk of head and neck
injuries, each occupant headrest
must be properly adjusted. Do not
drive the vehicle with the headrest
removed or improperly positioned.
Do not adjust the driver's headrest
while driving, or else loss of control
and an accident is possible.
1VQA20511VQA2050OVQ027052
Page 53 of 339
Features of your vehicle
44 3
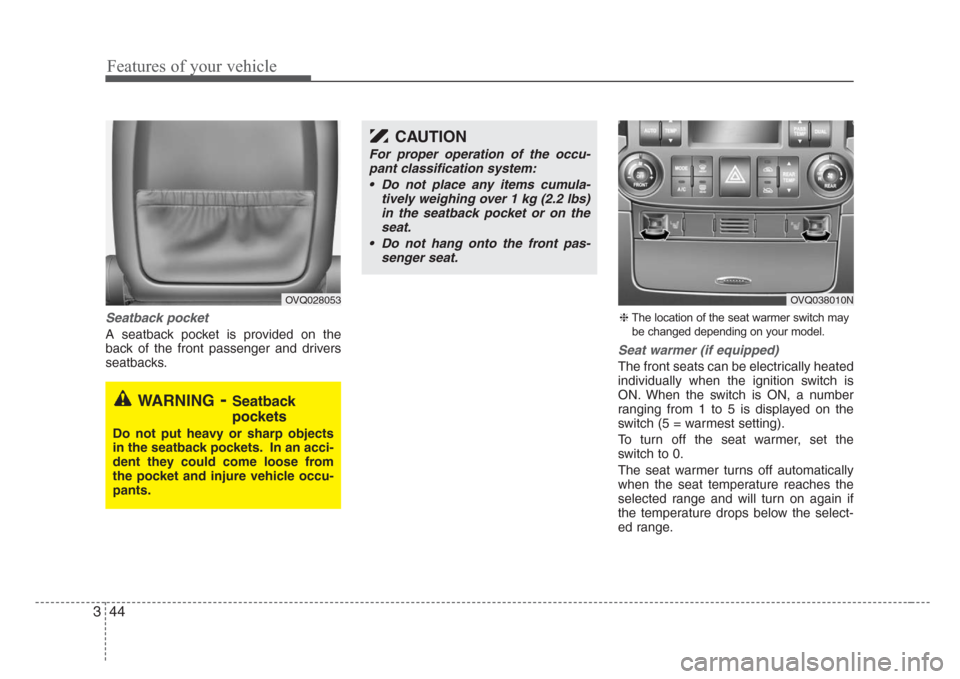
Seatback pocket
A seatback pocket is provided on the
back of the front passenger and drivers
seatbacks.
Seat warmer (if equipped)
The front seats can be electrically heated
individually when the ignition switch is
ON. When the switch is ON, a number
ranging from 1 to 5 is displayed on the
switch (5 = warmest setting).
To turn off the seat warmer, set the
switch to 0.
The seat warmer turns off automatically
when the seat temperature reaches the
selected range and will turn on again if
the temperature drops below the select-
ed range.
WARNING-Seatback
pockets
Do not put heavy or sharp objects
in the seatback pockets. In an acci-
dent they could come loose from
the pocket and injure vehicle occu-
pants.
OVQ028053
❈The location of the seat warmer switch may
be changed depending on your model.
OVQ038010N
CAUTION
For proper operation of the occu-
pant classification system:
• Do not place any items cumula-
tively weighing over 1 kg (2.2 lbs)
in the seatback pocket or on the
seat.
• Do not hang onto the front pas-
senger seat.
Page 54 of 339

345
Features of your vehicle
Lumbar support (driver’s seat only)
(if equipped)
You can adjust the lumbar support by
moving the lever on the outside of the dri-
ver’s seatback. Pivoting the lever increas-
es or decreases the lumbar support.
WARNING- Seat heater
burns
Passengers should use extreme
caution when using seat warmers
due to the possibility of excess
heating or burns. In particular, the
driver must exercise extreme care
for the following types of passen-
gers:
1. Infants, children, elderly or hand-
icapped persons, or hospital out-
patients
2. Persons with sensitive skin or
those that burn easily
3. Fatigued individuals
4. Intoxicated individuals
5. Individuals taking medication
that can cause drowsiness or
sleepiness (sleeping pills, cold
tablets, etc.)
CAUTION
• When cleaning the seats, do not
use an organic solvent such as
thinner, benzene, alcohol and
gasoline. Doing so may damage
the surface of the heater or seats.
• To prevent overheating the seat
warmer, do not place blankets,
cushions or seat covers on the
seats while the seat warmer is in
operation.
• Do not place heavy or sharp
objects on seats equipped with
seat warmers. Damage to the seat
warming components could
occur.
1VQA2042
Page 55 of 339
Features of your vehicle
46 3
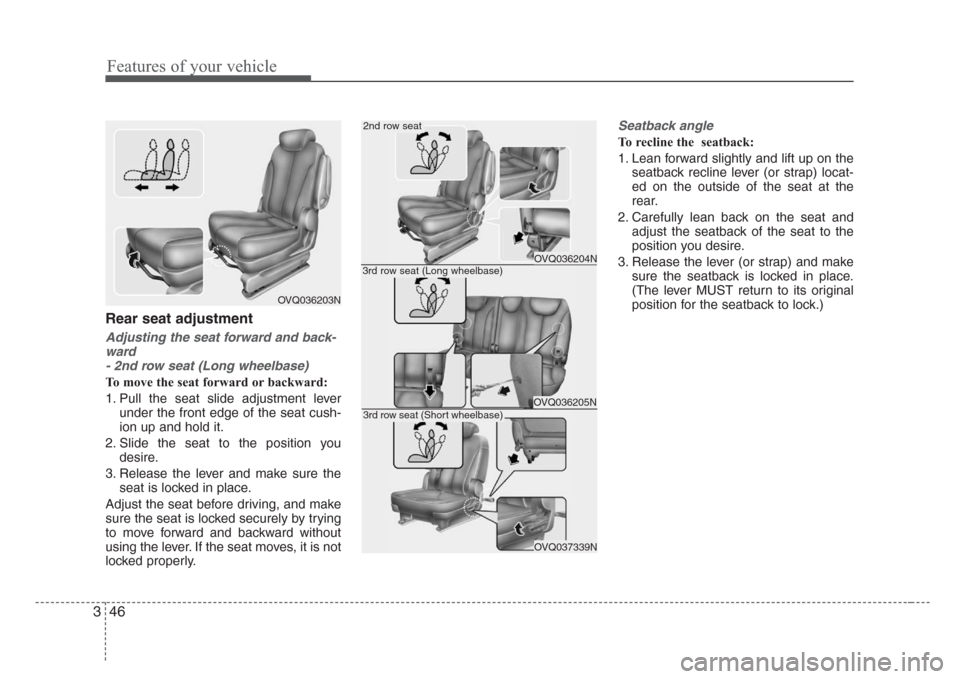
Rear seat adjustment
Adjusting the seat forward and back-
ward
- 2nd row seat (Long wheelbase)
To move the seat forward or backward:
1. Pull the seat slide adjustment lever
under the front edge of the seat cush-
ion up and hold it.
2. Slide the seat to the position you
desire.
3. Release the lever and make sure the
seat is locked in place.
Adjust the seat before driving, and make
sure the seat is locked securely by trying
to move forward and backward without
using the lever. If the seat moves, it is not
locked properly.
Seatback angle
To recline the seatback:
1. Lean forward slightly and lift up on the
seatback recline lever (or strap) locat-
ed on the outside of the seat at the
rear.
2. Carefully lean back on the seat and
adjust the seatback of the seat to the
position you desire.
3. Release the lever (or strap) and make
sure the seatback is locked in place.
(The lever MUST return to its original
position for the seatback to lock.)
OVQ036203N
OVQ036205N
3rd row seat (Long wheelbase)
OVQ037339N
3rd row seat (Short wheelbase)
OVQ036204N
2nd row seat
Page 56 of 339
347
Features of your vehicle
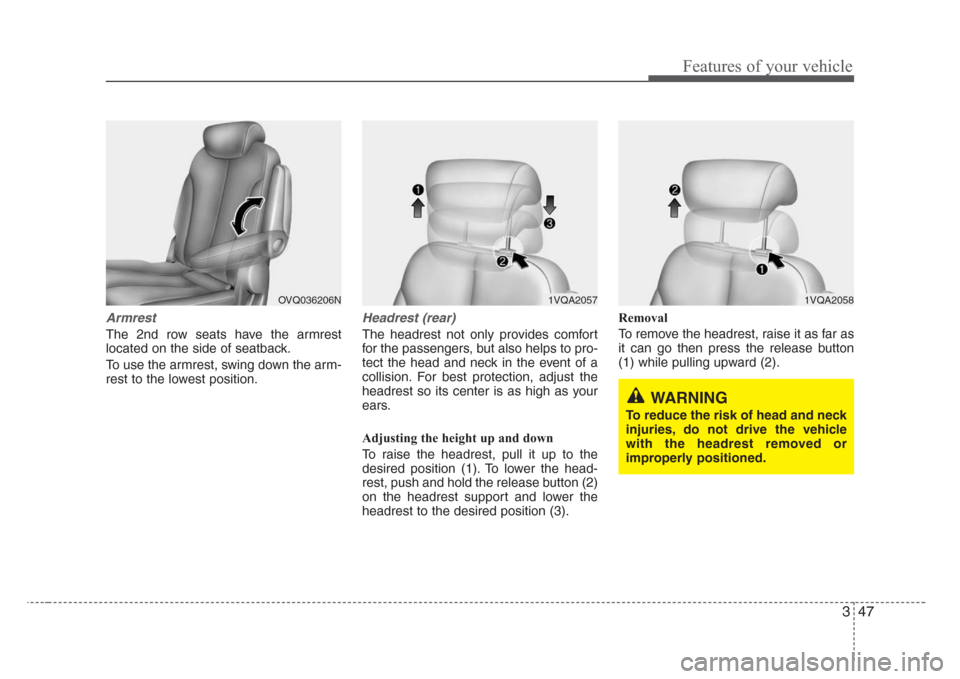
Armrest
The 2nd row seats have the armrest
located on the side of seatback.
To use the armrest, swing down the arm-
rest to the lowest position.
Headrest (rear)
The headrest not only provides comfort
for the passengers, but also helps to pro-
tect the head and neck in the event of a
collision. For best protection, adjust the
headrest so its center is as high as your
ears.
Adjusting the height up and down
To raise the headrest, pull it up to the
desired position (1). To lower the head-
rest, push and hold the release button (2)
on the headrest support and lower the
headrest to the desired position (3).Removal
To remove the headrest, raise it as far as
it can go then press the release button
(1) while pulling upward (2).
1VQA2057OVQ036206N1VQA2058
WARNING
To reduce the risk of head and neck
injuries, do not drive the vehicle
with the headrest removed or
improperly positioned.
Page 57 of 339
Features of your vehicle
48 3
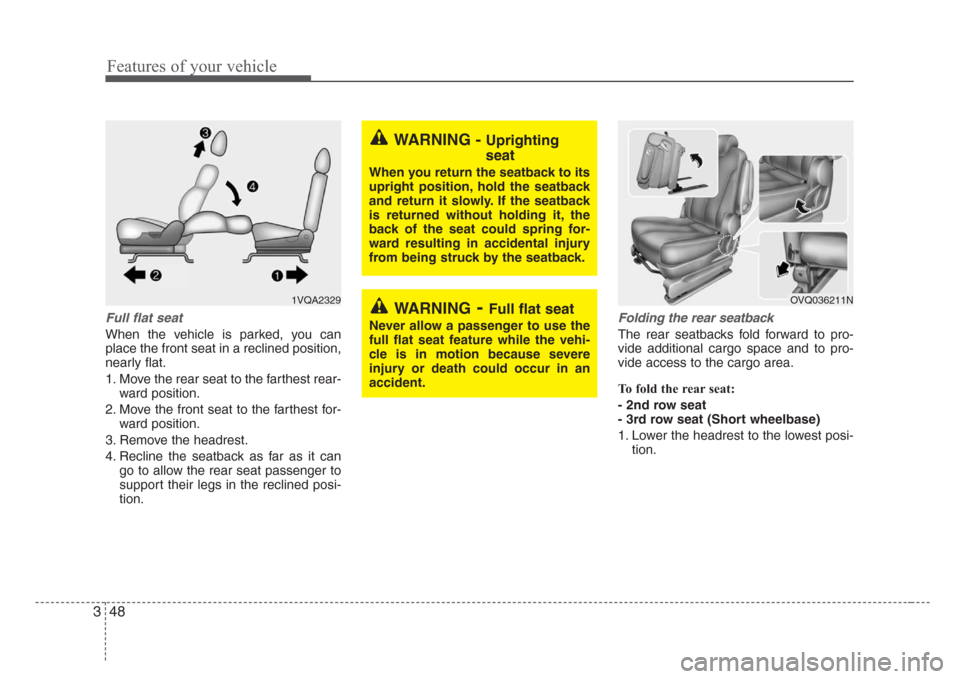
Full flat seat
When the vehicle is parked, you can
place the front seat in a reclined position,
nearly flat.
1. Move the rear seat to the farthest rear-
ward position.
2. Move the front seat to the farthest for-
ward position.
3. Remove the headrest.
4. Recline the seatback as far as it can
go to allow the rear seat passenger to
support their legs in the reclined posi-
tion.
Folding the rear seatback
The rear seatbacks fold forward to pro-
vide additional cargo space and to pro-
vide access to the cargo area.
To fold the rear seat:
- 2nd row seat
- 3rd row seat (Short wheelbase)
1. Lower the headrest to the lowest posi-
tion.
WARNING-Full flat seat
Never allow a passenger to use the
full flat seat feature while the vehi-
cle is in motion because severe
injury or death could occur in an
accident.
WARNING - Uprighting
seat
When you return the seatback to its
upright position, hold the seatback
and return it slowly. If the seatback
is returned without holding it, the
back of the seat could spring for-
ward resulting in accidental injury
from being struck by the seatback.
1VQA2329OVQ036211N
Page 58 of 339
349
Features of your vehicle
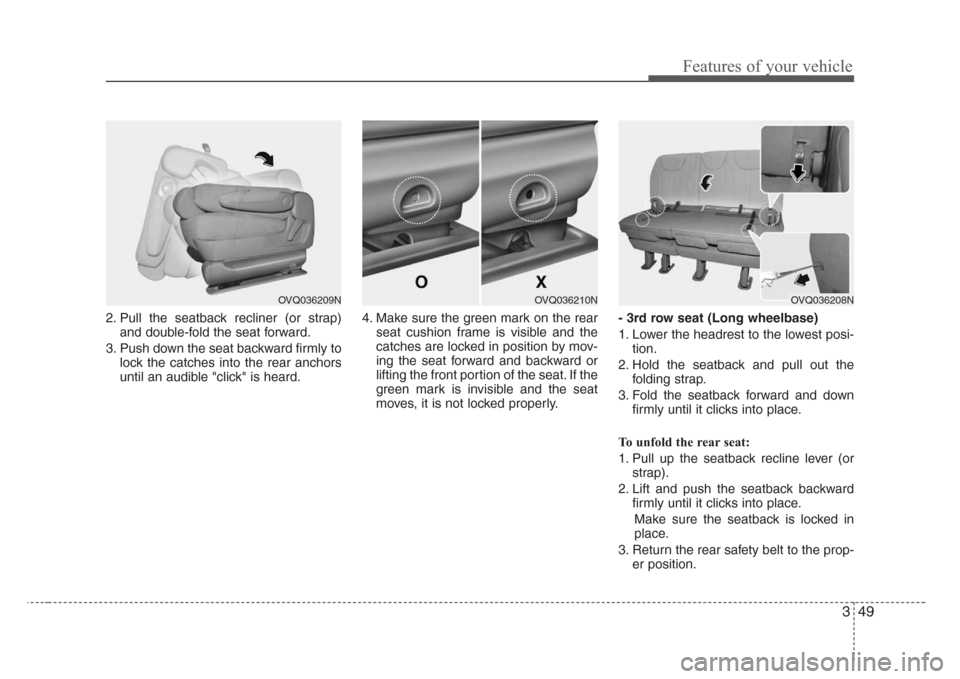
2. Pull the seatback recliner (or strap)
and double-fold the seat forward.
3. Push down the seat backward firmly to
lock the catches into the rear anchors
until an audible "click" is heard.4. Make sure the green mark on the rear
seat cushion frame is visible and the
catches are locked in position by mov-
ing the seat forward and backward or
lifting the front portion of the seat. If the
green mark is invisible and the seat
moves, it is not locked properly.- 3rd row seat (Long wheelbase)
1. Lower the headrest to the lowest posi-
tion.
2. Hold the seatback and pull out the
folding strap.
3. Fold the seatback forward and down
firmly until it clicks into place.
To unfold the rear seat:
1. Pull up the seatback recline lever (or
strap).
2. Lift and push the seatback backward
firmly until it clicks into place.
Make sure the seatback is locked in
place.
3. Return the rear safety belt to the prop-
er position.
OVQ036208NOVQ036209NOVQ036210N
Page 59 of 339
Features of your vehicle
50 3
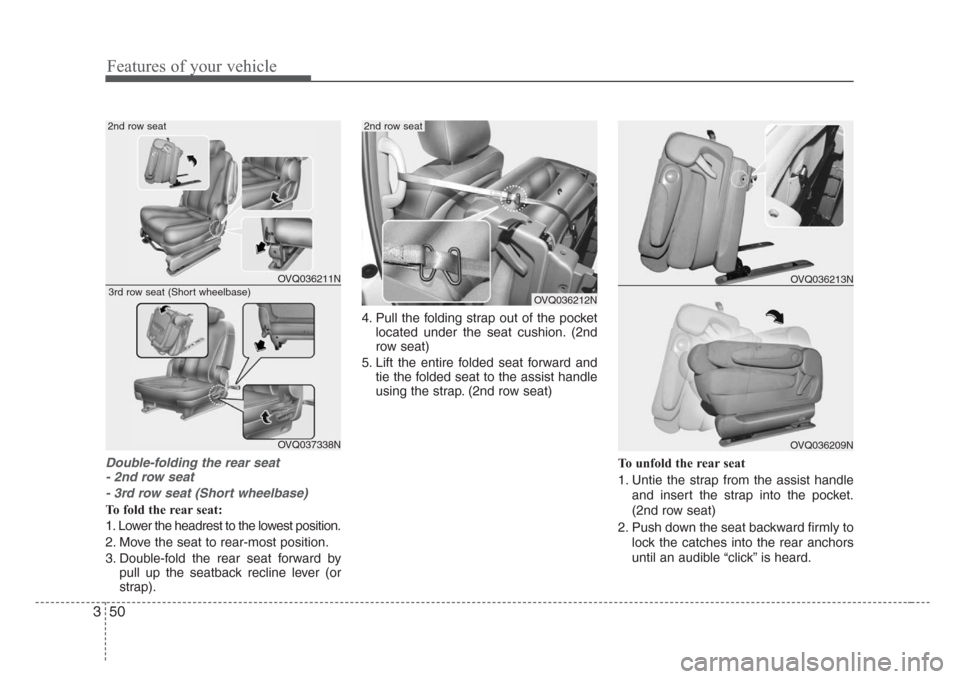
Double-folding the rear seat
- 2nd row seat
- 3rd row seat (Short wheelbase)
To fold the rear seat:
1. Lower the headrest to the lowest position.
2. Move the seat to rear-most position.
3. Double-fold the rear seat forward by
pull up the seatback recline lever (or
strap).4. Pull the folding strap out of the pocket
located under the seat cushion. (2nd
row seat)
5. Lift the entire folded seat forward and
tie the folded seat to the assist handle
using the strap. (2nd row seat)
To unfold the rear seat
1. Untie the strap from the assist handle
and insert the strap into the pocket.
(2nd row seat)
2. Push down the seat backward firmly to
lock the catches into the rear anchors
until an audible “click” is heard.
OVQ036212N
OVQ036211N
2nd row seat2nd row seat
OVQ037338N
3rd row seat (Short wheelbase)
OVQ036213N
OVQ036209N
Page 60 of 339
351
Features of your vehicle
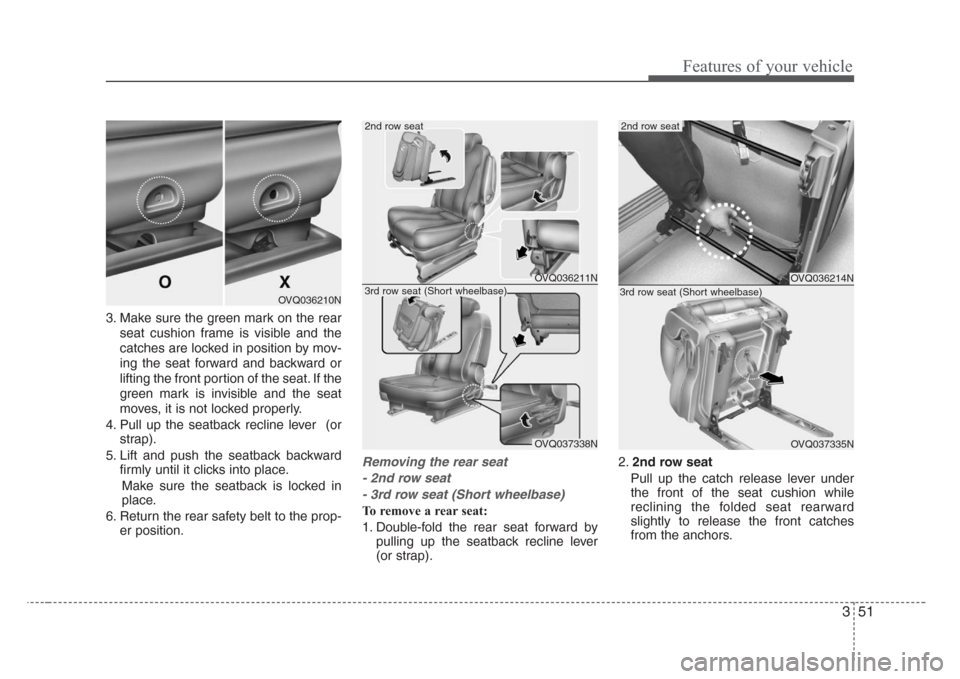
3. Make sure the green mark on the rear
seat cushion frame is visible and the
catches are locked in position by mov-
ing the seat forward and backward or
lifting the front portion of the seat. If the
green mark is invisible and the seat
moves, it is not locked properly.
4. Pull up the seatback recline lever (or
strap).
5. Lift and push the seatback backward
firmly until it clicks into place.
Make sure the seatback is locked in
place.
6. Return the rear safety belt to the prop-
er position.
Removing the rear seat
- 2nd row seat
- 3rd row seat (Short wheelbase)
To remove a rear seat:
1. Double-fold the rear seat forward by
pulling up the seatback recline lever
(or strap).2.2nd row seat
Pull up the catch release lever under
the front of the seat cushion while
reclining the folded seat rearward
slightly to release the front catches
from the anchors.
OVQ036210N
OVQ036211N
2nd row seat
OVQ037338N
3rd row seat (Short wheelbase)
OVQ036214N
OVQ037335N
2nd row seat
3rd row seat (Short wheelbase)