height KIA Sedona 2008 2.G Owner's Manual
[x] Cancel search | Manufacturer: KIA, Model Year: 2008, Model line: Sedona, Model: KIA Sedona 2008 2.GPages: 339, PDF Size: 6.71 MB
Page 46 of 339
337
Features of your vehicle
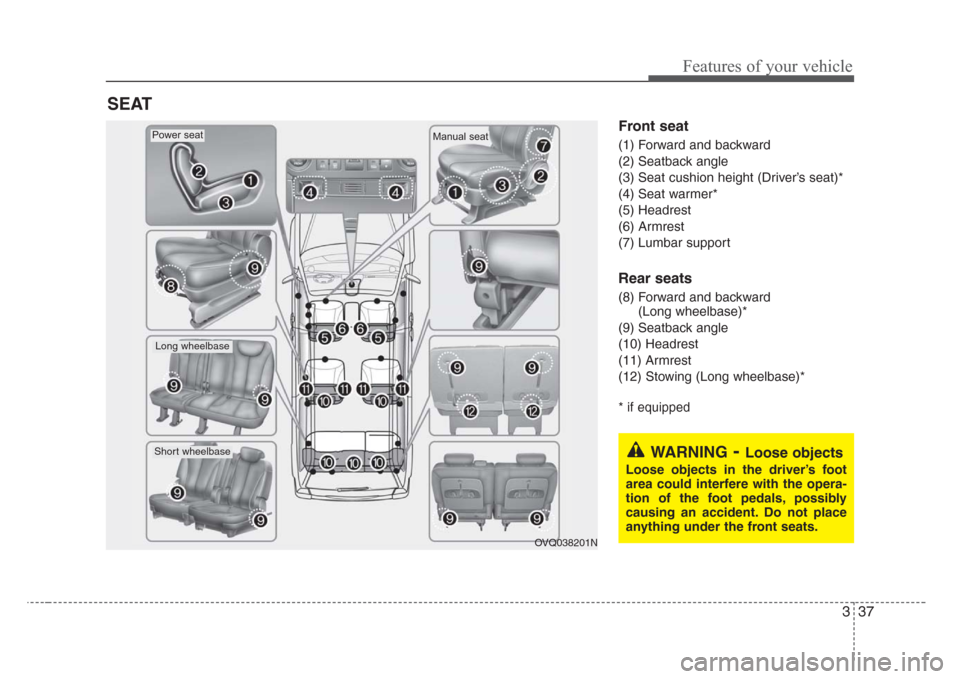
Front seat
(1) Forward and backward
(2) Seatback angle
(3) Seat cushion height (Driver’s seat)*
(4) Seat warmer*
(5) Headrest
(6) Armrest
(7) Lumbar support
Rear seats
(8) Forward and backward
(Long wheelbase)*
(9) Seatback angle
(10) Headrest
(11) Armrest
(12) Stowing (Long wheelbase)*
* if equipped
SEAT
OVQ038201N
Long wheelbase
Short wheelbase
Power seatManual seat
WARNING-Loose objects
Loose objects in the driver’s foot
area could interfere with the opera-
tion of the foot pedals, possibly
causing an accident. Do not place
anything under the front seats.
Page 49 of 339
Features of your vehicle
40 3
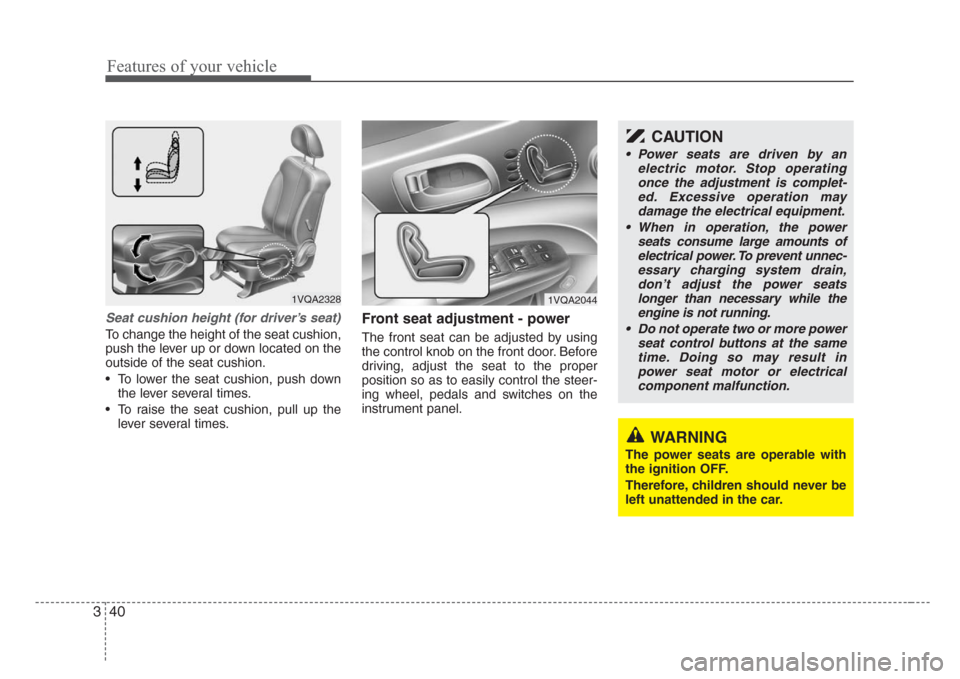
Seat cushion height (for driver’s seat)
To change the height of the seat cushion,
push the lever up or down located on the
outside of the seat cushion.
• To lower the seat cushion, push down
the lever several times.
• To raise the seat cushion, pull up the
lever several times.
Front seat adjustment - power
The front seat can be adjusted by using
the control knob on the front door. Before
driving, adjust the seat to the proper
position so as to easily control the steer-
ing wheel, pedals and switches on the
instrument panel.
1VQA2328
WARNING
The power seats are operable with
the ignition OFF.
Therefore, children should never be
left unattended in the car.
CAUTION
• Power seats are driven by an
electric motor. Stop operating
once the adjustment is complet-
ed. Excessive operation may
damage the electrical equipment.
• When in operation, the power
seats consume large amounts of
electrical power. To prevent unnec-
essary charging system drain,
don’t adjust the power seats
longer than necessary while the
engine is not running.
• Do not operate two or more power
seat control buttons at the same
time. Doing so may result in
power seat motor or electrical
component malfunction.
1VQA2044
Page 51 of 339
Features of your vehicle
42 3
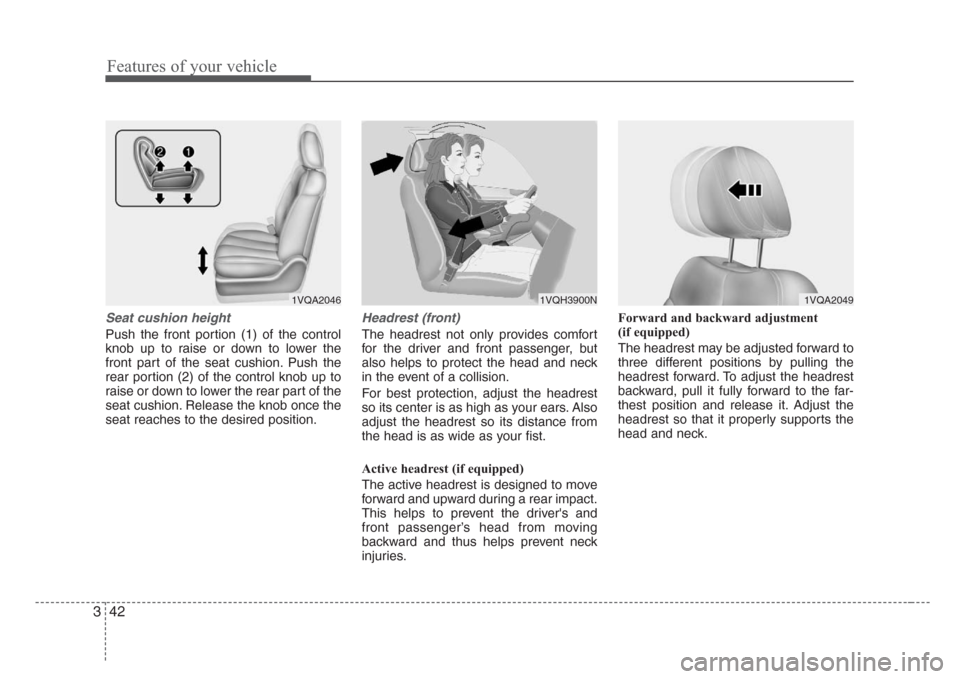
Seat cushion height
Push the front portion (1) of the control
knob up to raise or down to lower the
front part of the seat cushion. Push the
rear portion (2) of the control knob up to
raise or down to lower the rear part of the
seat cushion. Release the knob once the
seat reaches to the desired position.
Headrest (front)
The headrest not only provides comfort
for the driver and front passenger, but
also helps to protect the head and neck
in the event of a collision.
For best protection, adjust the headrest
so its center is as high as your ears. Also
adjust the headrest so its distance from
the head is as wide as your fist.
Active headrest (if equipped)
The active headrest is designed to move
forward and upward during a rear impact.
This helps to prevent the driver's and
front passenger’s head from moving
backward and thus helps prevent neck
injuries.Forward and backward adjustment
(if equipped)
The headrest may be adjusted forward to
three different positions by pulling the
headrest forward. To adjust the headrest
backward, pull it fully forward to the far-
thest position and release it. Adjust the
headrest so that it properly supports the
head and neck.
1VQA20461VQH3900N1VQA2049
Page 52 of 339
343
Features of your vehicle
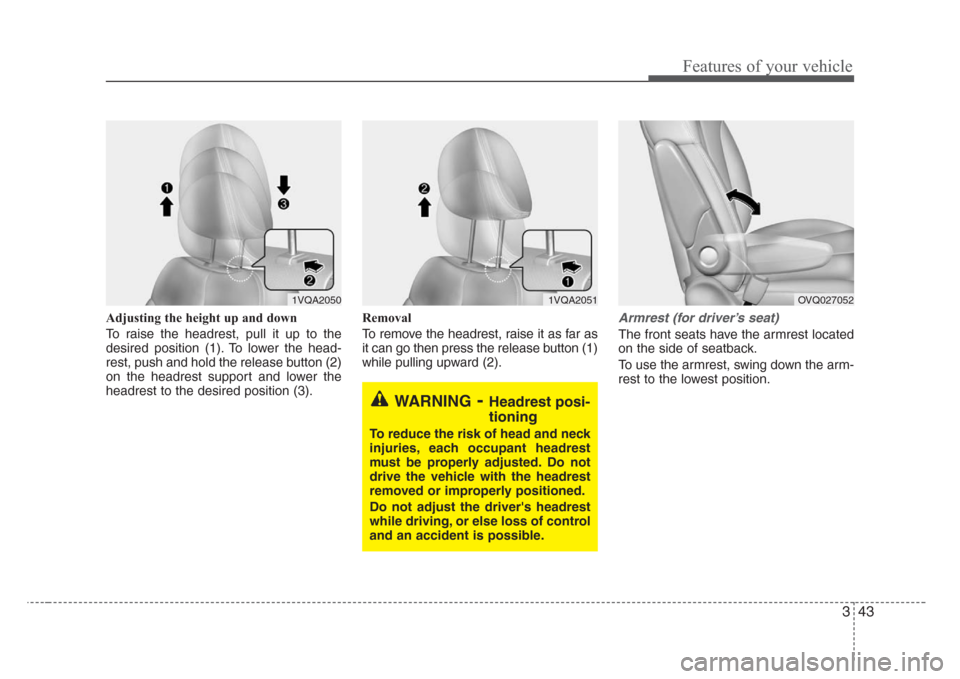
Adjusting the height up and down
To raise the headrest, pull it up to the
desired position (1). To lower the head-
rest, push and hold the release button (2)
on the headrest support and lower the
headrest to the desired position (3).Removal
To remove the headrest, raise it as far as
it can go then press the release button (1)
while pulling upward (2).Armrest (for driver’s seat)
The front seats have the armrest located
on the side of seatback.
To use the armrest, swing down the arm-
rest to the lowest position.
WARNING-Headrest posi-
tioning
To reduce the risk of head and neck
injuries, each occupant headrest
must be properly adjusted. Do not
drive the vehicle with the headrest
removed or improperly positioned.
Do not adjust the driver's headrest
while driving, or else loss of control
and an accident is possible.
1VQA20511VQA2050OVQ027052
Page 56 of 339
347
Features of your vehicle
Armrest
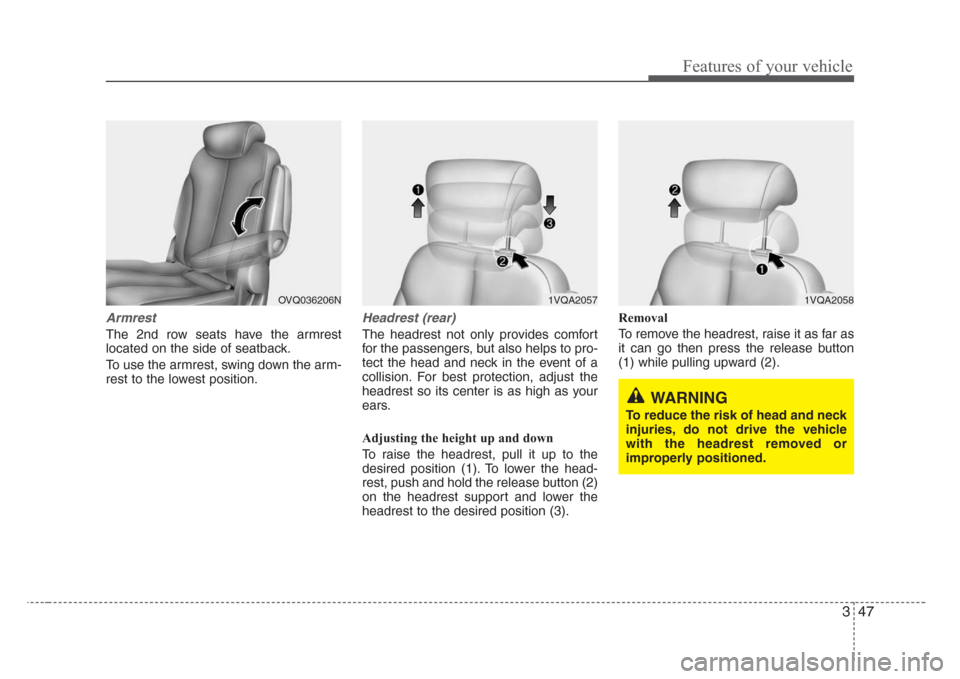
The 2nd row seats have the armrest
located on the side of seatback.
To use the armrest, swing down the arm-
rest to the lowest position.
Headrest (rear)
The headrest not only provides comfort
for the passengers, but also helps to pro-
tect the head and neck in the event of a
collision. For best protection, adjust the
headrest so its center is as high as your
ears.
Adjusting the height up and down
To raise the headrest, pull it up to the
desired position (1). To lower the head-
rest, push and hold the release button (2)
on the headrest support and lower the
headrest to the desired position (3).Removal
To remove the headrest, raise it as far as
it can go then press the release button
(1) while pulling upward (2).
1VQA2057OVQ036206N1VQA2058
WARNING
To reduce the risk of head and neck
injuries, do not drive the vehicle
with the headrest removed or
improperly positioned.
Page 72 of 339
363
Features of your vehicle
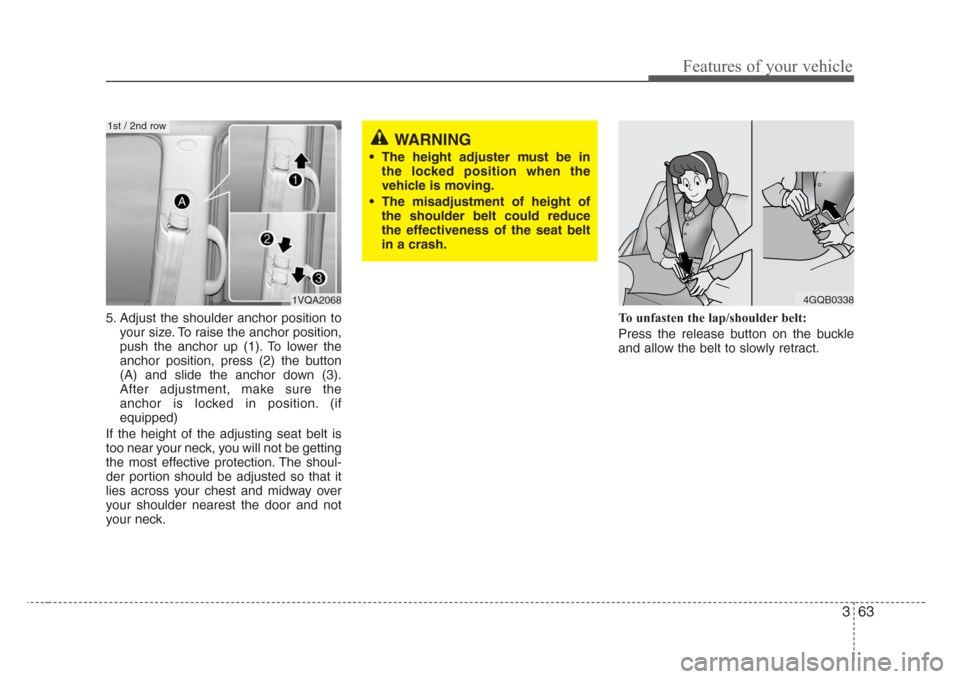
5. Adjust the shoulder anchor position to
your size. To raise the anchor position,
push the anchor up (1). To lower the
anchor position, press (2) the button
(A) and slide the anchor down (3).
After adjustment, make sure the
anchor is locked in position. (if
equipped)
If the height of the adjusting seat belt is
too near your neck, you will not be getting
the most effective protection. The shoul-
der portion should be adjusted so that it
lies across your chest and midway over
your shoulder nearest the door and not
your neck.To unfasten the lap/shoulder belt:
Press the release button on the buckle
and allow the belt to slowly retract.
4GQB0338
WARNING
• The height adjuster must be in
the locked position when the
vehicle is moving.
• The misadjustment of height of
the shoulder belt could reduce
the effectiveness of the seat belt
in a crash.
1VQA2068
1st / 2nd row
Page 220 of 339
3211
Features of your vehicle
✽
NOTICE
The RSE will enter standby mode when
the vehicle ignition is turned off and
back on. Press the SRC or
PLAY/PAUSE( ) button to “wake
up” the unit and resume disc play.
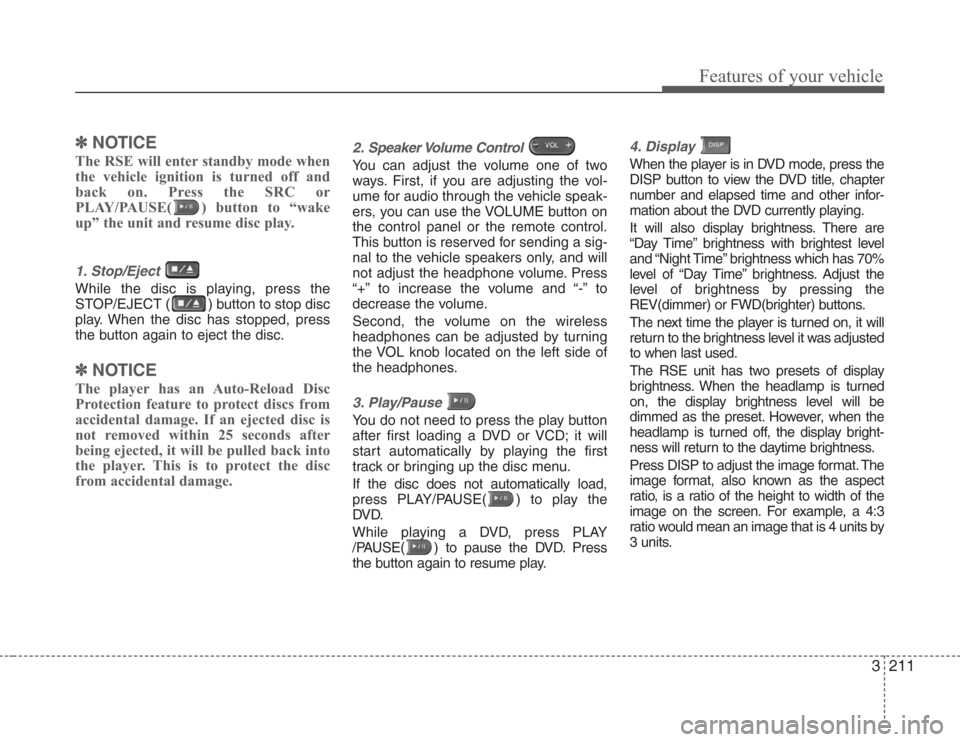
1. Stop/Eject
While the disc is playing, press the
STOP/EJECT ( ) button to stop disc
play. When the disc has stopped, press
the button again to eject the disc.
✽
NOTICE
The player has an Auto-Reload Disc
Protection feature to protect discs from
accidental damage. If an ejected disc is
not removed within 25 seconds after
being ejected, it will be pulled back into
the player. This is to protect the disc
from accidental damage.
2. Speaker Volume Control
You can adjust the volume one of two
ways. First, if you are adjusting the vol-
ume for audio through the vehicle speak-
ers, you can use the VOLUME button on
the control panel or the remote control.
This button is reserved for sending a sig-
nal to the vehicle speakers only, and will
not adjust the headphone volume. Press
“+” to increase the volume and “-” to
decrease the volume.
Second, the volume on the wireless
headphones can be adjusted by turning
the VOL knob located on the left side of
the headphones.
3. Play/Pause
You do not need to press the play button
after first loading a DVD or VCD; it will
start automatically by playing the first
track or bringing up the disc menu.
If the disc does not automatically load,
press PLAY/PAUSE( ) to play the
DV D.
While playing a DVD, press PLAY
/PAUSE( ) to pause the DVD. Press
the button again to resume play.
4. Display
When the player is in DVD mode, press the
DISP button to view the DVD title, chapter
number and elapsed time and other infor-
mation about the DVD currently playing.
It will also display brightness. There are
“Day Time” brightness with brightest level
and “Night Time” brightness which has 70%
level of “Day Time” brightness. Adjust the
level of brightness by pressing the
REV(dimmer) or FWD(brighter) buttons.
The next time the player is turned on, it will
return to the brightness level it was adjusted
to when last used.
The RSE unit has two presets of display
brightness. When the headlamp is turned
on, the display brightness level will be
dimmed as the preset. However, when the
headlamp is turned off, the display bright-
ness will return to the daytime brightness.
Press DISP to adjust the image format. The
image format, also known as the aspect
ratio, is a ratio of the height to width of the
image on the screen. For example, a 4:3
ratio would mean an image that is 4 units by
3 units.
Page 224 of 339
3215
Features of your vehicle
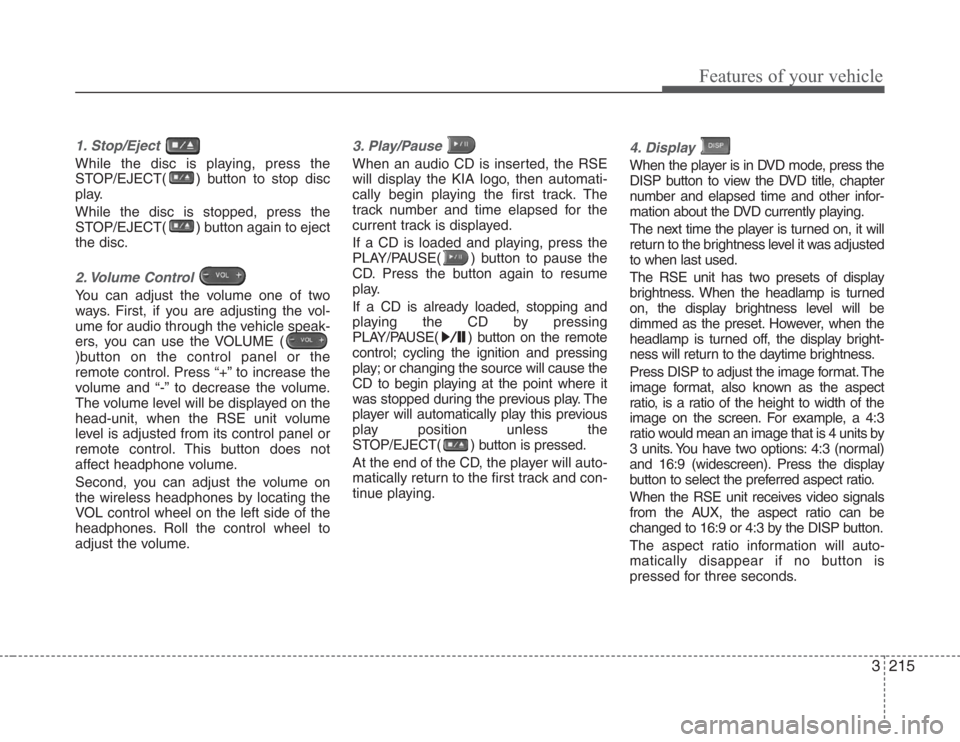
1. Stop/Eject
While the disc is playing, press the
STOP/EJECT( ) button to stop disc
play.
While the disc is stopped, press the
STOP/EJECT( ) button again to eject
the disc.
2. Volume Control
You can adjust the volume one of two
ways. First, if you are adjusting the vol-
ume for audio through the vehicle speak-
ers, you can use the VOLUME (
)button on the control panel or the
remote control. Press “+” to increase the
volume and “-” to decrease the volume.
The volume level will be displayed on the
head-unit, when the RSE unit volume
level is adjusted from its control panel or
remote control. This button does not
affect headphone volume.
Second, you can adjust the volume on
the wireless headphones by locating the
VOL control wheel on the left side of the
headphones. Roll the control wheel to
adjust the volume.
3. Play/Pause
When an audio CD is inserted, the RSE
will display the KIA logo, then automati-
cally begin playing the first track. The
track number and time elapsed for the
current track is displayed.
If a CD is loaded and playing, press the
PLAY/PAUSE( ) button to pause the
CD. Press the button again to resume
play.
If a CD is already loaded, stopping and
playing the CD by pressing
PLAY/PAUSE( ) button on the remote
control; cycling the ignition and pressing
play; or changing the source will cause the
CD to begin playing at the point where it
was stopped during the previous play. The
player will automatically play this previous
play position unless the
STOP/EJECT( ) button is pressed.
At the end of the CD, the player will auto-
matically return to the first track and con-
tinue playing.
4. Display
When the player is in DVD mode, press the
DISP button to view the DVD title, chapter
number and elapsed time and other infor-
mation about the DVD currently playing.
The next time the player is turned on, it will
return to the brightness level it was adjusted
to when last used.
The RSE unit has two presets of display
brightness. When the headlamp is turned
on, the display brightness level will be
dimmed as the preset. However, when the
headlamp is turned off, the display bright-
ness will return to the daytime brightness.
Press DISP to adjust the image format. The
image format, also known as the aspect
ratio, is a ratio of the height to width of the
image on the screen. For example, a 4:3
ratio would mean an image that is 4 units by
3 units. You have two options: 4:3 (normal)
and 16:9 (widescreen). Press the display
button to select the preferred aspect ratio.
When the RSE unit receives video signals
from the AUX, the aspect ratio can be
changed to 16:9 or 4:3 by the DISP button.
The aspect ratio information will auto-
matically disappear if no button is
pressed for three seconds.
Page 227 of 339
Features of your vehicle
218 3
Using the Remote Control
In addition to having all the buttons and
functionality listed in the DVD and CD
Controls section, the remote control has
several other buttons that offer additional
functions. It is an infrared remote control,
and must be pointed at the face of the
RSE at a 45° angle for best results. It
requires a CR2025 battery (included).
The remote control has the following
additional buttons:
✽
NOTICE
The RSE system is always “awake”
when the vehicle's ignition is turned on
or when the vehicle is in “accessory
power mode.”
1. Stop
Pressing this button once will stop DVD
or CD play. To eject a disc, you must use
the eject button on the control panel.
2. Speaker Volume “+” and “-”
These buttons control the volume of the
audio of a DVD or CD through the vehicle
speakers, not the volume from head-
phones. Press “+” to turn the volume up
and “-” to turn the volume down.
3. Play/Pause
When an audio CD(VCD/DVD) is insert-
ed, the RSE will display the KIA logo,
then automatically begin playing the first
track. The track number and time elapsed
for the current track is displayed.
If a CD(VCD/DVD) is loaded and playing,
press the PLAY/PAUSE( ) button to
pause the CD(VCD/DVD). Press the but-
ton again to resume play.
If a CD(VCD/DVD) is already loaded, stop-
ping and playing the CD(VCD/ DVD) by
pressing PLAY/PAUSE( ) button on
the remote control; cycling the ignition and
pressing play; or changing the source will
cause the CD(VCD/DVD) to begin playing
at the point where it was stopped during
the previous play. The player will automati-
cally play this previous play position unless
the STOP/EJECT( ) button is pressed.
At the end of the CD(VCD/DVD), the
player will automatically return to the first
track and continue playing.
4. Display
When the player is in DVD mode, press the
DISP button to view the DVD title, chapter
number and elapsed time and other infor-
mation about the DVD currently playing.It will also display brightness. There are
“Day Time” brightness with brightest level
and “Night Time” brightness which has 70%
level of “Day Time” brightness. Adjust the
level of brightness by pressing the
REV(dimmer) or FWD(brighter) buttons.
The next time the player is turned on, it will
return to the brightness level it was adjusted
to when last used.
The RSE unit has two presets of display
brightness. When the headlamp is turned
on, the display brightness level will be
dimmed as the preset. However, when the
headlamp is turned off, the display bright-
ness will return to the daytime brightness.
Press DISP to adjust the image format. The
image format, also known as the aspect
ratio, is a ratio of the height to width of the
image on the screen. For example, a 4:3
ratio would mean an image that is 4 units by
3 units. You have two options: 4:3 (normal)
and 16:9 (widescreen). Press the display
button to select the preferred aspect ratio.
When the RSE unit receives video signals
from the AUX, the aspect ratio can be
changed to 16:9 or 4:3 by the DISP button.
The aspect ratio information will auto-
matically disappear if no button is
pressed for three seconds.
Page 255 of 339
423
Driving your vehicle
Non-operational conditions of
rear parking assist system
Rear parking assist system may not
operate normally when:
1. Moisture is frozen to the sensor. (It will
operate normally when moisture
melts.)
2. Sensor is covered with foreign matter,
such as snow or water, or the sensor
cover is blocked. (It will operate nor-
mally when the material is removed or
the sensor is no longer blocked.)
3. Driving on uneven road surfaces
(unpaved roads, gravel, bumps, gradi-
ent).
4. Objects generating excessive noise
(vehicle horns, loud motorcycle
engines, or truck air brakes) are within
range of the sensor.
5. Heavy rain or water spray exists.
6. Wireless transmitters or mobile phones
are within range of the sensor.
7. Sensor is covered with snow.
8. Trailer towing
Detecting range may decrease when:
1. Sensor is stained with foreign matter
such as snow or water. (Sensing range
will return to normal when removed.)
2. Outside air temperature is extremely
hot or cold.
Following objects may not be recog-
nized by the sensor:
1. Sharp or slim objects such as ropes,
chains or small poles.
2. Objects which tend to absorb sensor
frequency such as clothes, spongy
material or snow.
3. Undetectable objects smaller than 1 m
(40 in.) and narrower than 14 cm (6 in.)
in diameter.
CAUTION
1. The rear parking assist system
may not sound sequentially
depending on the speed and
shapes of the objects detected.
2. The rear parking assist system
may malfunction if the vehicle
bumper height or sensor installa-
tion has been modified or dam-
aged. Any non-factory installed
equipment or accessories may
also interfere with the sensor per-
formance.
3. Sensor may not recognize
objects less than 40 cm (15 in.)
from the sensor, or it may sense
an incorrect distance. Use cau-
tion.
4. When sensor is frozen or stained
with snow, dirt, or water, sensor
may be inoperative until the
stains are removed using a soft
cloth.
5. Do not push, scratch or strike the
sensor. Sensor damage could
occur.