ECO mode KIA Sedona 2009 2.G Owner's Guide
[x] Cancel search | Manufacturer: KIA, Model Year: 2009, Model line: Sedona, Model: KIA Sedona 2009 2.GPages: 356, PDF Size: 4.04 MB
Page 208 of 356
3199
Features of your vehicle
How to Use SIRIUS Satellite
RadioYour Kia vehicle is equipped with 3 months
complimentary period of SIRIUS Satellite
Radio so you have access to over 130
channels of music, information, and enter-
tainment programming.ActivationIn order to extend or reactivate your sub-
scription to SIRIUS Satellite Radio, you
will need to contact SIRIUS Customer
Care at 888-539-7474. Have your 12 digit
SID (Sirius Identification Number)/ESN
(Electronic Serial Number) ready. To
retrieve the SID/ESN, turn on the radio,
press the [SAT] button and tune to chan-
nel zero. Please note that the vehicle will
need to be turned on, in Sirius mode, and
have an unobstructed view of the sky in
order for the radio to receive the activa-
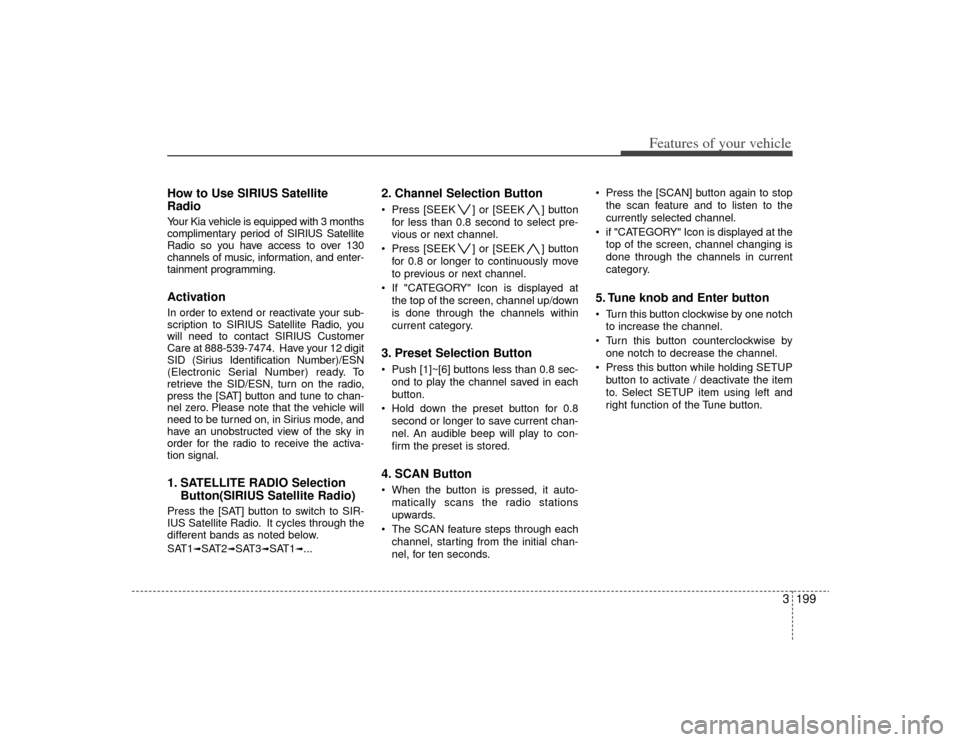
tion signal.1. SATELLITE RADIO SelectionButton(SIRIUS Satellite Radio)Press the [SAT] button to switch to SIR-
IUS Satellite Radio. It cycles through the
different bands as noted below.
SAT1
➟SAT2
➟SAT3
➟SAT1
➟...
2. Channel Selection Button Press [SEEK ] or [SEEK ] button
for less than 0.8 second to select pre-
vious or next channel.
Press [SEEK ] or [SEEK ] button for 0.8 or longer to continuously move
to previous or next channel.
If "CATEGORY" Icon is displayed at the top of the screen, channel up/down
is done through the channels within
current category.3. Preset Selection Button Push [1]~[6] buttons less than 0.8 sec-ond to play the channel saved in each
button.
Hold down the preset button for 0.8 second or longer to save current chan-
nel. An audible beep will play to con-
firm the preset is stored.4. SCAN Button When the button is pressed, it auto-matically scans the radio stations
upwards.
The SCAN feature steps through each channel, starting from the initial chan-
nel, for ten seconds. Press the [SCAN] button again to stop
the scan feature and to listen to the
currently selected channel.
if "CATEGORY" Icon is displayed at the top of the screen, channel changing is
done through the channels in current
category.
5. Tune knob and Enter button Turn this button clockwise by one notchto increase the channel.
Turn this button counterclockwise by one notch to decrease the channel.
Press this button while holding SETUP button to activate / deactivate the item
to. Select SETUP item using left and
right function of the Tune button.
Page 209 of 356
![KIA Sedona 2009 2.G Owners Guide Features of your vehicle200
36. CAT/FOLDER Button Press [CAT ] or [CAT ] button to
enter the Category List Mode, it dis-
plays cateogry items and highlights the
category that currently tuned channe](/img/2/2910/w960_2910-208.png "KIA Sedona 2009 2.G Owners Guide Features of your vehicle200
36. CAT/FOLDER Button Press [CAT ] or [CAT ] button to
enter the Category List Mode, it dis-
plays cateogry items and highlights the
category that currently tuned channe")
Features of your vehicle200
36. CAT/FOLDER Button Press [CAT ] or [CAT ] button to
enter the Category List Mode, it dis-
plays cateogry items and highlights the
category that currently tuned channel
belongs to.
On Category List Mode, press these buttons to navigate category list.
Press [ENTER] Button to select the lowest channel in highlighted category.
If channel is selected by selecting cate- gory "CATEGORY" Icon is displayed at
the top of the screen.7. INFO Selection ButtonDisplays the information of the channel
currently played by in the order of CATE-
GORY NAME
➟ARTIST NAME
➟COM-
POSER NAME(if available)
➟... (CH/ TITLE
Selection).
Displays the information of the channel
currently played by in the order of SONG
TITLE
➟ARTIST NAME
➟COMPOSER(if
available)
➟(CAT/CH Selection) (If there is
no information of COMPOSER NAME, it
returns to main display.)
8. SETUP ButtonPress this button to adjust to the SCROLL,
SDVC, SIRIUS and adjustment mode.
If no action is taken for 5 seconds after
pressing the button, it will return to the pre-
vious radio mode.(After entering SETUP
mode, move between items using the
left,right and PUSH functions of the TUNE
button.)
The setup item changes from SCROLL➟SDVC
➟SIRIUS
➟SCROLL
➟...
✽ ✽ Troubleshooting1. Antenna Error
If this message is displayed, the anten-
na or antenna cable is broken or
unplugged. Please consult with your
Kia dealership.
2. Acquiring Signal If this message is displayed, it means
that the antenna is covered and that
the SIRIUS Satellite Radio signal is
not available. Ensure the antenna is
uncovered and has a clear view of the
sky.
Page 213 of 356
Features of your vehicle204
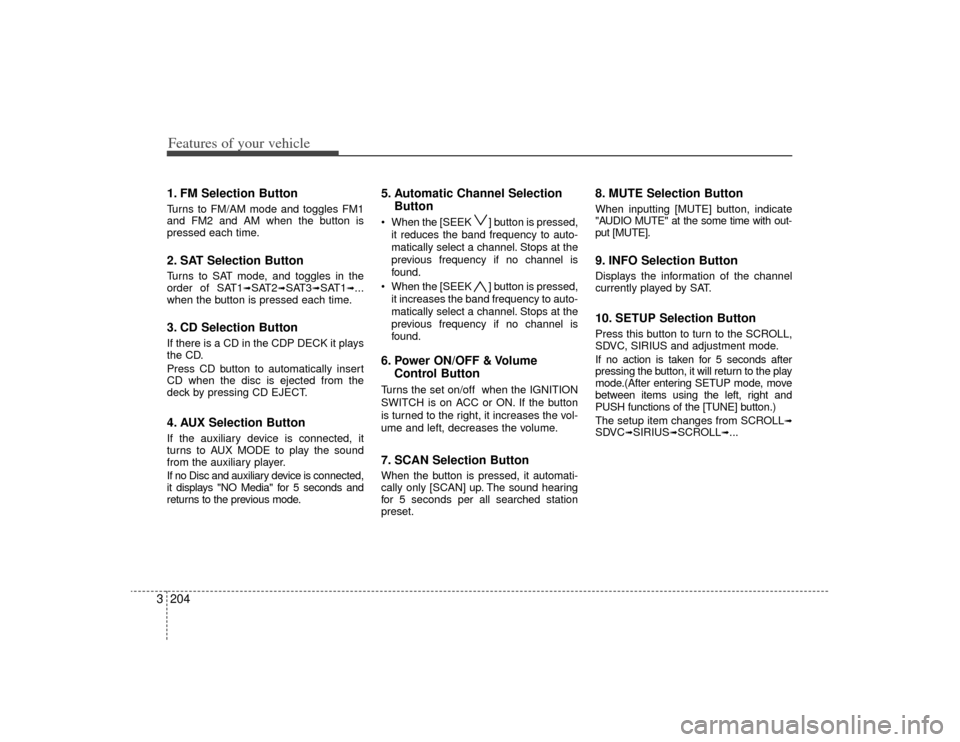
31. FM Selection ButtonTurns to FM/AM mode and toggles FM1
and FM2 and AM when the button is
pressed each time.2. SAT Selection ButtonTurns to SAT mode, and toggles in the
order of SAT1
➟SAT2
➟SAT3
➟SAT1
➟...
when the button is pressed each time.
3. CD Selection ButtonIf there is a CD in the CDP DECK it plays
the CD.
Press CD button to automatically insert
CD when the disc is ejected from the
deck by pressing CD EJECT.4. AUX Selection ButtonIf the auxiliary device is connected, it
turns to AUX MODE to play the sound
from the auxiliary player.
If no Disc and auxiliary device is connected,
it displays "NO Media" for 5 seconds and
returns to the previous mode.
5. Automatic Channel Selection Button When the [SEEK ] button is pressed,
it reduces the band frequency to auto-
matically select a channel. Stops at the
previous frequency if no channel is
found.
When the [SEEK ] button is pressed, it increases the band frequency to auto-
matically select a channel. Stops at the
previous frequency if no channel is
found.6. Power ON/OFF & Volume Control ButtonTurns the set on/off when the IGNITION
SWITCH is on ACC or ON. If the button
is turned to the right, it increases the vol-
ume and left, decreases the volume.7. SCAN Selection ButtonWhen the button is pressed, it automati-
cally only [SCAN] up. The sound hearing
for 5 seconds per all searched station
preset.
8. MUTE Selection ButtonWhen inputting [MUTE] button, indicate
"AUDIO MUTE" at the some time with out-
put [MUTE].9. INFO Selection ButtonDisplays the information of the channel
currently played by SAT.10. SETUP Selection ButtonPress this button to turn to the SCROLL,
SDVC, SIRIUS and adjustment mode.
If no action is taken for 5 seconds after
pressing the button, it will return to the play
mode.(After entering SETUP mode, move
between items using the left, right and
PUSH functions of the [TUNE] button.)
The setup item changes from SCROLL
➟
SDVC
➟SIRIUS
➟SCROLL
➟...
Page 217 of 356
Features of your vehicle208
3When you have finished loading discs,
press LOAD button to cancel the loading
function or wait for 10 seconds. The CD
player will begin to play the last CD
loaded. As each CD starts to play, the
DISC number will appear on the display.✽ ✽
NOTICEThe disc player takes up to six discs. Do
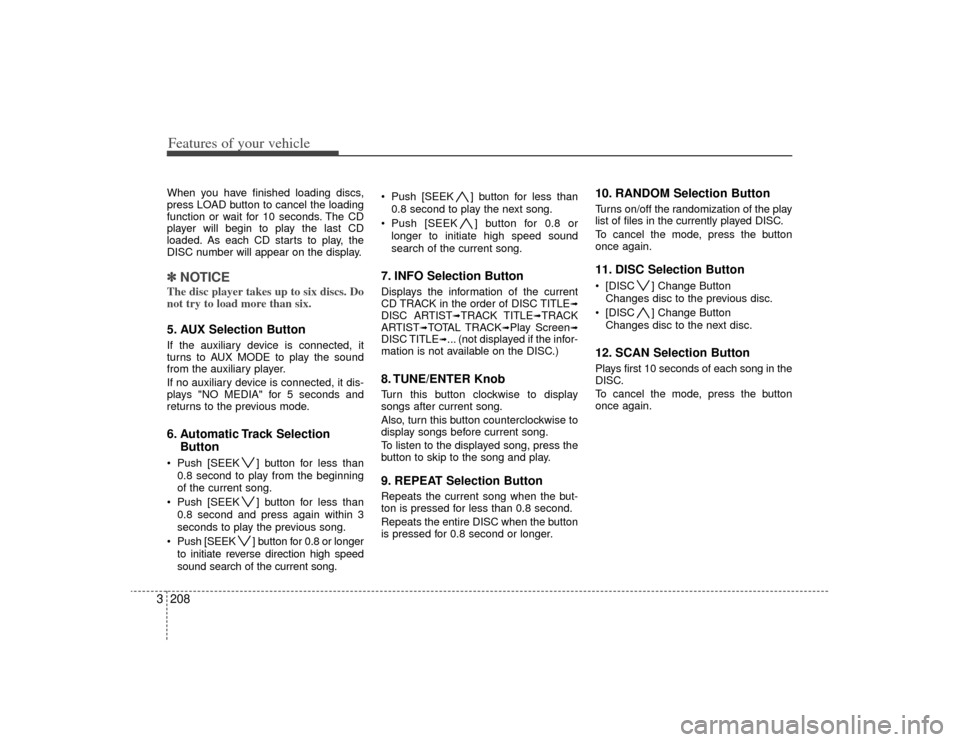
not try to load more than six.5. AUX Selection ButtonIf the auxiliary device is connected, it
turns to AUX MODE to play the sound
from the auxiliary player.
If no auxiliary device is connected, it dis-
plays "NO MEDIA" for 5 seconds and
returns to the previous mode.6. Automatic Track Selection
Button Push [SEEK ] button for less than
0.8 second to play from the beginning
of the current song.
Push [SEEK ] button for less than 0.8 second and press again within 3
seconds to play the previous song.
Push [SEEK ] button for 0.8 or longer to initiate reverse direction high speed
sound search of the current song. Push [SEEK ] button for less than
0.8 second to play the next song.
Push [SEEK ] button for 0.8 or longer to initiate high speed sound
search of the current song.
7. INFO Selection ButtonDisplays the information of the current
CD TRACK in the order of DISC TITLE
➟
DISC ARTIST
➟TRACK TITLE
➟TRACK
ARTIST
➟TOTAL TRACK
➟Play Screen
➟
DISC TITLE
➟... (not displayed if the infor-
mation is not available on the DISC.)
8. TUNE/ENTER KnobTurn this button clockwise to display
songs after current song.
Also, turn this button counterclockwise to
display songs before current song.
To listen to the displayed song, press the
button to skip to the song and play.9. REPEAT Selection ButtonRepeats the current song when the but-
ton is pressed for less than 0.8 second.
Repeats the entire DISC when the button
is pressed for 0.8 second or longer.
10. RANDOM Selection ButtonTurns on/off the randomization of the play
list of files in the currently played DISC.
To cancel the mode, press the button
once again.11. DISC Selection Button [DISC ] Change Button
Changes disc to the previous disc.
[DISC ] Change Button Changes disc to the next disc.12. SCAN Selection ButtonPlays first 10 seconds of each song in the
DISC.
To cancel the mode, press the button
once again.
Page 218 of 356
3209
Features of your vehicle
CAUTION -
Using USB
device
To use an external USB device,make sure the device is notmounted when starting up thevehicle and mount the device after starting up.
If you start the vehicle when the USB device is mounted, it maydamage the USB device. (USB isnot ESA)
If the vehicle is started up or turned off while the external USBdevice is connected, the externalUSB device may not work.
It may not play inauthentic MP3 or WMA files.
1) It can only play MP3 files with the compression rate between8Kbps~320Kbps.
2) It can only play WMA music files with the compression ratebetween 8Kbps~320Kbps.
Take cautions for static electricity when mounting or dismountingthe external USB device.
An encoded MP3 PLAYER is not recognizable.
(Continued)
(Continued) Depending on the condition of the external USB device, the con-nected external USB device canbe unrecognizable.
When the formatted byte/sector setting of External USB devices isnot either 512BYTE or 2048BYTE, then the device will not be recog-nized.
Use Only a USB device formatted to FAT 12/16/32.
USB devices without USB IF authentication may not be recog-nizable.
Make sure the USB connection terminal does not come in contactwith a human body or any object.
If you repeat mounting or dis- mounting USB device in a shortperiod of time, it may break thedevice.
You might hear a strange noise when mounting or dismounting aUSB device.
(Continued)
(Continued) If you dismount the external USB device during playback in USBmode, the external USB device can be damaged or malfunction.Therefore, mount the external USBdevice when the engine is turnedoff or in another mode.
Depending on the type and capac- ity of the external USB device orthe type of the files stored in thedevice, there is a difference in thetime taken for recognition of the device, but this is not an indicatorof trouble and you only have towait.
Do not use the USB device for other purposes than playing music files.
Use of USB accessories such as recharger or heater using USB I/Fmay lower performance or causetrouble.
If you use devices such as a USB hub you purchased separately,the vehicle’s audio system maynot recognize the USB device. Connect the USB device directlyto the multimedia terminal of the vehicle.
(Continued)
Page 221 of 356
Features of your vehicle212
3Using a USB that is connected to the
multiple terminal inside the console on
the right hand side of the driver’s seat.
When USB is connected, the ‘USB’ icon
will be displayed on the top right corner
of the display screen.1. AUX Selection ButtonIf USB is not connected, it switches to the
USB mode from the Radio and CD mode
to play the song files stored in the USB.
If AUX is not connected, it is invalid button.2. Track Moving Button Press the [SEEK ] button for less
than 0.8 second to play from the begin-
ning of the song currently played.
Press the button for less than 0.8 sec-
ond and press it again within 1 second
to move to and play the previous track.
Press the button for 0.8 second or
longer to play the song in reverse direc-
tion in fast speed.
Press the [SEEK ] button but ton for
less than 0.8 second to move to the
next track.
Press the button for 0.8 second or
longer to play the song in forward direc-
tion in fast speed.
3. INFO Selection ButtonDisplays the information of the file current-
ly played in the order of FILE NAME
➟
TITLE
➟ARTIST
➟ALBUM
➟FOLDER
➟TO
TAL FILE
➟PLAY SCREEN
➟FILE NAME
➟… (Displays no information if the file has
no song information.)4. Folder Moving Button Moves [FLDR ] button sub folder of
the current folder and displays the first
song in the folder. Press ENT/TUNE
button to move to the folder displayed.
It will play the first song in the folder.
Moves [FLDR ] button main folder and displays the first song in the folder.
Press ENT/TUNE button to move to
the folder displayed. It will play the first
song in the folder.5. TUNE/ENTER KnobTurn this button clockwise to display the
songs next to the currently played song.
Turn the button counterclockwise to dis-
play the songs before the currently
played song.
Press the button to skip to and play the
selected song.
6. RANDOM Playback ButtonPress the button for less than 0.8 second
to start or stop the random playback of
the songs in the current folder.
Press the button for more than 0.8 sec-
ond to randomly play the entire songs in
the USB device.
Press the button again to cancel the mode.7. REPEAT Selection ButtonPress the button for less than 0.8 second
to repeat the song currently played.
Press the button for more than 0.8 sec-
ond to repeat the entire songs in the USB
device.8. SCAN Selection ButtonPlays 10 seconds of each song in the USB
device.
Press the button once again to cancel
scanning.
Page 223 of 356
Features of your vehicle214
3Using an iPod when the exclusive cable
is connected to the multiple terminal
inside the console on the right hand side
of the driver’s seat. When the iPod is con-
nected, the ‘iPod’ icon will be displayed
on the top right corner of the display
screen.1. iPod Selection ButtonIf an iPod is connected, it switches to the
iPod mode from the Radio and CD mode
to play the song files stored in the iPod.
If there are no CD and AUX mode from
the Radio mode, it displays "NO MEDIA".2. Track Moving Button Press the [SEEK ] button for less
than 0.8 second to play from the begin-
ning of the current song.
Press the button for less than 0.8 sec-
ond and press it again within 1 second
to move to and play the previous track.
Press the button for 0.8 second or
longer to play the song in reverse
direction in fast speed. Press the [SEEK ] button for
less
than 0.8 second to move to the next
track.
Press the button for 0.8 second or
longer to play the song in forward direc-
tion in fast speed.
3. INFO Selection ButtonDisplays the information of the file cur-
rently played in the order of FILE NAME➟TITLE
➟ARTIST
➟ALBUM
➟FILE NAME
➟… (Displays no information if the file
has no song information.)4. MENU Selection ButtonMoves to the upper category from cur-
rently played category of the iPod.
To move to (play) the category (song)
displayed, press TUNE/ENTER knob.
You will be able to search through the
lower category of the selected category.
The order of iPod’s category is SONG,
ALBUMES, ARTISTS, GENRES, and
iPod.
5. TUNE/ENTER KnobWhen you turn the button clockwise, it
will display the songs (category) next to
the song currently played (category in
the same level).
Also, when you turn the button counter-
clockwise, it will display the songs (cate-
gory) before the song currently played
(category in the same level).
If you want to listen to the song displayed
in the song category, press the button,
then it will skip to the selected song and
play.6. RANDOM Playback ButtonPress the button for less than 0.8 second
to activate or deactivate the random play-
back of the songs within the current cat-
egory.
Press the button for longer than 0.8 sec-
ond to randomly play all songs in the
entire album of the iPod.
Press the button once again to cancel the
mode.7. REPEAT Selection ButtonRepeats the song currently played.
Page 226 of 356
3217
Features of your vehicle
How to Use SIRIUS Satellite
RadioYour Kia vehicle is equipped with 3 months
complimentary period of SIRIUS Satellite
Radio so you have access to over 130
channels of music, information, and enter-
tainment programming.ActivationIn order to extend or reactivate your sub-
scription to SIRIUS Satellite Radio, you
will need to contact SIRIUS Customer
Care at 888-539-7474. Have your 12 digit
SID (Sirius Identification Number)/ESN
(Electronic Serial Number) ready. To
retrieve the SID/ESN, turn on the radio,
press the [SAT] button and tune to chan-
nel zero. Please note that the vehicle will
need to be turned on, in Sirius mode, and
have an unobstructed view of the sky in
order for the radio to receive the activa-
tion signal.1. SATELLITE RADIO SelectionButton(SIRIUS Satellite Radio)Press the [SAT] button to switch to SIR-
IUS Satellite Radio. It cycles through the
different bands as noted below.
SAT1
➟SAT2
➟SAT3
➟SAT1
➟...
2. Channel Selection Button Press [SEEK ] or [SEEK ] button
for less than 0.8 second to select pre-
vious or next channel.
Press [SEEK ] or [SEEK ] button for 0.8 or longer to continuously move
to previous or next channel.
If "CATEGORY" Icon is displayed at the top of the screen, channel up/down
is done through the channels within
current category.3. Preset Selection Button Push [1]~[6] buttons less than 0.8 sec-ond to play the channel saved in each
button.
Hold down the preset button for 0.8 second or longer to save current chan-
nel. An audible beep will play to con-
firm the preset is stored.4. SCAN Button When the button is pressed, it auto-matically scans the radio stations
upwards.
The SCAN feature steps through each channel, starting from the initial chan-
nel, for ten seconds. Press the [SCAN] button again to stop
the scan feature and to listen to the
currently selected channel.
if "CATEGORY" Icon is displayed at the top of the screen, channel changing is
done through the channels in current
category.
5. Tune knob and Enter button Turn this button clockwise by one notchto increase the channel.
Turn this button counterclockwise by one notch to decrease the channel.
Press this button while holding SETUP button to activate / deactivate the item
to. Select SETUP item using left and
right function of the Tune button.
Page 227 of 356
![KIA Sedona 2009 2.G Owners Guide Features of your vehicle218
36. CAT/FOLDER Button Press [CAT ] or [CAT ] button to
enter the Category List Mode, it dis-
plays cateogry items and highlights the
category that currently tuned channe](/img/2/2910/w960_2910-226.png "KIA Sedona 2009 2.G Owners Guide Features of your vehicle218
36. CAT/FOLDER Button Press [CAT ] or [CAT ] button to
enter the Category List Mode, it dis-
plays cateogry items and highlights the
category that currently tuned channe")
Features of your vehicle218
36. CAT/FOLDER Button Press [CAT ] or [CAT ] button to
enter the Category List Mode, it dis-
plays cateogry items and highlights the
category that currently tuned channel
belongs to.
On Category List Mode, press these buttons to navigate category list.
Press [ENTER] Button to select the lowest channel in highlighted category.
If channel is selected by selecting cate- gory "CATEGORY" Icon is displayed at
the top of the screen.7. INFO Selection ButtonDisplays the information of the channel
currently played by in the order of CATE-
GORY NAME
➟ARTIST NAME
➟COM-
POSER NAME(if available)
➟... (CH/
TITLE Selection).
Displays the information of the channel
currently played by in the order of SONG
TITLE
➟ARTIST NAME
➟COMPOSER(if
available)
➟(CAT/CH Selection) (If there
is no information of COMPOSER NAME,
it returns to main display.)
8. SETUP ButtonPress this button to adjust to the
SCROLL, SDVC, SIRIUS and adjustment
mode.
If no action is taken for 5 seconds after
pressing the button, it will return to the
previous radio mode.(After entering
SETUP mode, move between items
using the left,right and PUSH functions of
the TUNE button.)
The setup item changes from SCROLL➟SDVC
➟SIRIUS
➟SCROLL
➟...
✽ ✽ Troubleshooting1. Antenna Error
If this message is displayed, the anten-
na or antenna cable is broken or
unplugged. Please consult with your
Kia dealership.
2. Acquiring Signal If this message is displayed, it means
that the antenna is covered and that
the SIRIUS Satellite Radio signal is
not available. Ensure the antenna is
uncovered and has a clear view of the
sky.
Page 230 of 356
3221
Features of your vehicle
WelcomeThe Rear Seat Entertainment (RSE)
System is a compact, built-in, easy-to-use
entertainment system designed to provide
family fun while you are on the road. Enjoy
great quality sound from the vehicle
speakers, or have a private, quiet viewing
with the wireless headphones.
The display unit is mounted to the ceiling
in the rear passenger area of the vehicle,
allowing rear-seat passengers to play
DVD movies, video CDs or music CDs.
Users may also plug in a game platform or
VHS player. Headphones, game car-
tridges and other accessories can be kept
neatly out of the way in the 3rd-row arm-
rest compartment.System OverviewThe RSE System includes a mounted
color monitor with a built-in audio/video
control panel and a DVD player. It also
includes a remote control and two (2)
sets of battery-operated wireless head-
phones (batteries are included).
Connections / SetupThe RSE system is designed to make
your time on the road more enjoyable.
Please follow these instructions carefully
to get the most out of your RSE.
✽ ✽NOTICERSE operation is prevented during the
first 2 seconds after the ignition switch is
turned to ignition on or accessory mode.The RSE system is already set up and
ready for use. The system is always
“awake” when the vehicle's ignition is
turned on or when the vehicle is in
“accessory power mode.”
REAR SEAT ENTERTAINMENT SYSTEM (IF EQUIPPED)
CAUTION
Refrain from using food or drinks
near the RSE, the wireless head-phones or the remote control.
Direct sunlight may interfere with the headphone's operation andperformance.
Normal RSE operation cannot be guaranteed with unofficial dupli-cated discs.
In order to prevent inadvertent battery discharge, the RSE willremain in standby mode whenignition switch is turn to ignitionON or accessory mode.
Use of rear seat entertainment system without the engine run-ning will reduce battery power.
CAUTION
Disclaimer: The RSE system is pro- grammed to the regional displayformats for your region (NTSC or PAL). Please note that your RSE willnot read DVDs from a different region.