engine overheat KIA Sedona 2010 2.G Owner's Manual
[x] Cancel search | Manufacturer: KIA, Model Year: 2010, Model line: Sedona, Model: KIA Sedona 2010 2.GPages: 360, PDF Size: 6.17 MB
Page 121 of 360
Features of your vehicle
112
3
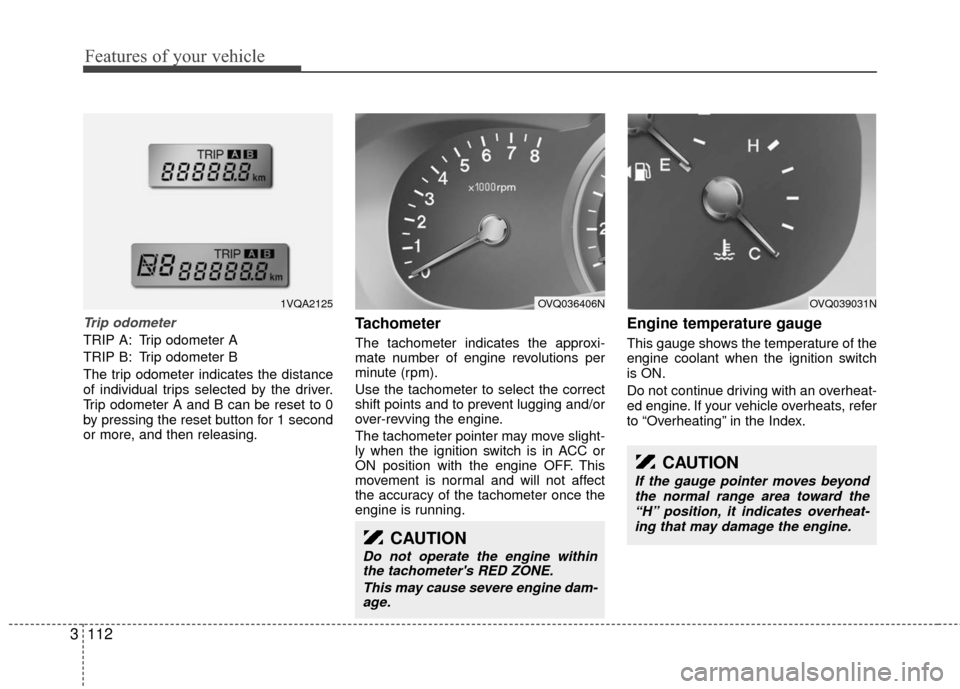
Trip odometer
TRIP A: Trip odometer A
TRIP B: Trip odometer B
The trip odometer indicates the distance
of individual trips selected by the driver.
Trip odometer A and B can be reset to 0
by pressing the reset button for 1 second
or more, and then releasing.
Tachometer
The tachometer indicates the approxi-
mate number of engine revolutions per
minute (rpm).
Use the tachometer to select the correct
shift points and to prevent lugging and/or
over-revving the engine.
The tachometer pointer may move slight-
ly when the ignition switch is in ACC or
ON position with the engine OFF. This
movement is normal and will not affect
the accuracy of the tachometer once the
engine is running.
Engine temperature gauge
This gauge shows the temperature of the
engine coolant when the ignition switch
is ON.
Do not continue driving with an overheat-
ed engine. If your vehicle overheats, refer
to “Overheating” in the Index.
CAUTION
Do not operate the engine within
the tachometer's RED ZONE.
This may cause severe engine dam-age.
CAUTION
If the gauge pointer moves beyond
the normal range area toward the“H” position, it indicates overheat- ing that may damage the engine.
OVQ039031NOVQ036406N1VQA2125
Page 158 of 360
Features of your vehicle
148
3
System operation
Ventilation
1. Set the mode to the position.
2. Set the air intake control to the outside
(fresh) air position.
3. Set the temperature control to the desired position.
4. Set the fan speed control to the desired speed.
Heating
1. Set the mode to the position.
2. Set the air intake control to the outside(fresh) air position.
3. Set the temperature control to the desired position.
4. Set the fan speed control to the desired speed.
5. If dehumidified heating is desired, turn the air conditioning system (if
equipped) on.
If the windshield fogs up, set the mode to the
,position.
Air conditioning (if equipped)
All Kia Air Conditioning Systems are
filled with environmentally friendly
R-134a refrigerant which is not damag-
ing to the ozone layer.
1. Start the engine. Push the air condi- tioning button.
2. Set the mode to the position.
3. Set the air intake control to the outside air or recirdulation air position.
4. Set the temperature control to the desired position.
5. Set the fan speed control to the desired speed.
6. Adjust the fan speed control and tem- perature control to maintain maximum
comfort.
When maximum cooling is desired, set the temperature control to the COOL
(blue) position, set the air intake con-
trol to the recirculated air position, then
set the fan speed control to the highest
speed.CAUTION
When using the air conditioning system, monitor the temperaturegauge closely while driving up hills or in heavy traffic when out-side temperatures are high. Air conditioning system operationmay cause engine overheating. Continue to use the blower fanbut turn the air conditioning sys-tem off if the temperature gaugeindicates engine overheating.
When opening the windows in humid weather air conditioningmay create water droplets insidethe vehicle. Since excessive water droplets may cause dam-age to electrical equipment, air conditioning should only be runwith the windows closed.
Page 172 of 360
Features of your vehicle
162
3
System operation
Ventilation
1. Set the mode to the position.
2. Set the air intake control to the outside
(fresh) air position.
3. Set the temperature control to the desired position.
4. Set the fan speed control to the desired speed.
Heating
1. Set the mode to the position.
2. Set the air intake control to the outside(fresh) air position.
3. Set the temperature control to the desired position.
4. Set the fan speed control to the desired speed.
5. If dehumidified heating is desired, turn the air conditioning system on.
If the windshield fogs up, set the mode to the , position.
Air conditioning
All Kia Air Conditioning Systems are
filled with environmentally friendly
R-134a refrigerant which is not damag-
ing to the ozone layer.
1. Start the engine. Push the air condi-
tioning button.
2. Set the mode to the position.
3. Set the air intake control to the outside air or recirculated air position.
4. Set the temperature control to the desired position.
5. Set the fan speed control to the desired speed.
6. Adjust the fan speed control and tem- perature control to maintain maximum
comfort.
the temperature control to the minimum
LO (17°C/62°F) and set the air intake
to the recirculated air position, then set
the fan speed control to the highest
speed.CAUTION
When using the air conditioningsystem, monitor the temperaturegauge closely while driving up hills or in heavy traffic when out-side temperatures are high. Air conditioning system operationmay cause engine overheating. Continue to use the blower fanbut turn the air conditioning sys-tem off if the temperature gaugeindicates engine overheating.
When opening the windows in humid weather air conditioningmay create water droplets insidethe vehicle. Since excessive water droplets may cause dam-age to electrical equipment, air conditioning should only be runwith the windows closed.
Page 186 of 360
Features of your vehicle
176
3
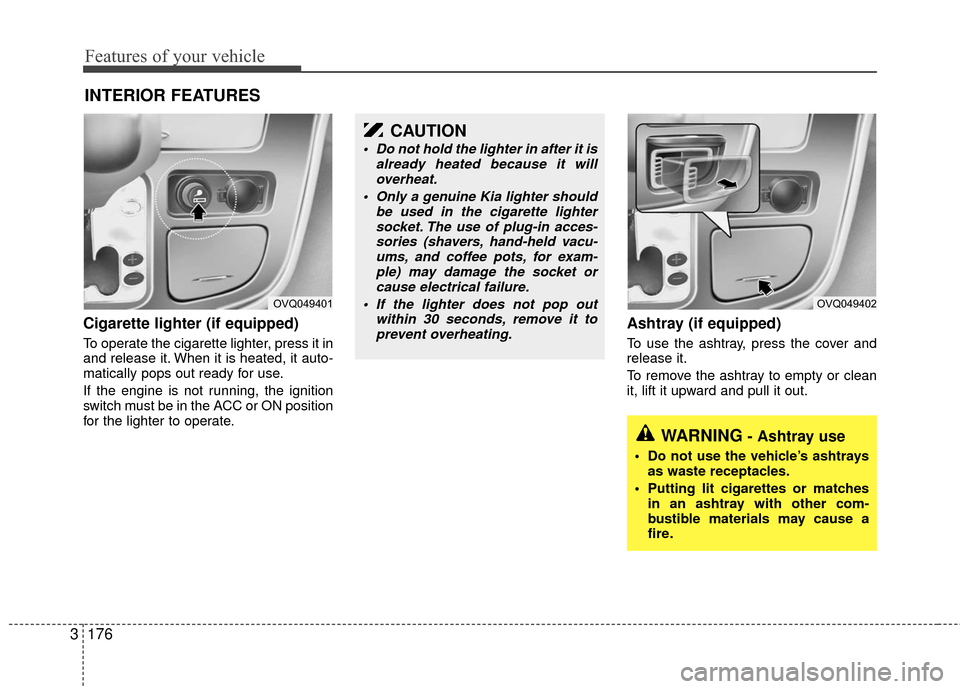
Cigarette lighter (if equipped)
To operate the cigarette lighter, press it in
and release it. When it is heated, it auto-
matically pops out ready for use.
If the engine is not running, the ignition
switch must be in the ACC or ON position
for the lighter to operate.
Ashtray (if equipped)
To use the ashtray, press the cover and
release it.
To remove the ashtray to empty or clean
it, lift it upward and pull it out.
INTERIOR FEATURES
OVQ049401OVQ049402
CAUTION
Do not hold the lighter in after it is
already heated because it willoverheat.
Only a genuine Kia lighter should be used in the cigarette lightersocket. The use of plug-in acces-sories (shavers, hand-held vacu-ums, and coffee pots, for exam-ple) may damage the socket orcause electrical failure.
If the lighter does not pop out within 30 seconds, remove it toprevent overheating.
WARNING- Ashtray use
Do not use the vehicle’s ashtrays as waste receptacles.
Putting lit cigarettes or matches in an ashtray with other com-
bustible materials may cause a
fire.
Page 255 of 360

43
Driving your vehicle
Illuminated ignition switch
(if equipped)
Whenever front door is opened, the igni-
tion switch will be illuminated for your
convenience, provided the ignition switch
is not in the ON position. The light will go
off immediately when the ignition switch
is turned on or go off after about 10 sec-
onds when the door is closed.
Ignition switch and anti-theft
steering column lock
Ignition switch position
LOCKThe steering wheel locks to protect
against theft. The ignition key can be
removed only in the LOCK position.
When turning the ignition switch to the
LOCK position, push the key inward at
the ACC position and turn the key toward
the LOCK position.
ACC (Accessory)
The steering wheel is unlocked and elec-
trical accessories are operative.ON
The warning lights can be checked
before the engine is started. This is the
normal running position after the engine
is started.
Do not leave the ignition switch ON if the
engine is not running to prevent battery discharge.
START
Turn the ignition key to the START posi-
tion to start the engine. The engine will
crank until you release the key; then it
returns to the ON position. The brake
warning lamp can be checked in this
position.
✽ ✽ NOTICE
If difficulty is experienced turning the
ignition switch to the ACC position, turn
the key while turning the steering wheel
right and left to release the tension.
KEY POSITIONS
1VQA30171VQA3018
WARNING
When you intend to park or stop the
vehicle with the engine on, be care-
ful not to depress the accelerator
pedal for a long period of time. It
may overheat the engine or exhaust
system and cause fire.
Page 266 of 360
Driving your vehicle
14
4
Power brakes
Your vehicle has power-assisted brakes
that adjust automatically through normal
usage.
In the event that the power-assisted
brakes lose power because of a stalled
engine or some other reason, you can
still stop your vehicle by applying greater
force to the brake pedal than you nor-
mally would. The stopping distance, how-
ever, will be longer.
When the engine is not running, the
reserve brake power is partially depleted
each time the brake pedal is applied. Do
not pump the brake pedal when the
power assist has been interrupted.
Pump the brake pedal only when neces-
sary to maintain steering control on slip-
pery surfaces.
In the event of brake failure
If service brakes fail to operate while the
vehicle is in motion, you can make an
emergency stop with the parking brake.
The stopping distance, however, will be
much greater than normal.
BRAKE SYSTEM
(Continued)
When descending a long or steep
hill, shift to a lower gear and
avoid continuous application of
the brakes. Continuous brake
application will cause the brakes
to overheat and could result in a
temporary loss of braking per-
formance.
Wet brakes may result in the vehi- cle not slowing down at the usual
rate and pulling to one side when
the brakes are applied. Applying
the brakes lightly will indicate
whether they have been affected
in this way. Always test your
brakes in this fashion after driv-
ing through deep water. To dry the
brakes, apply them lightly while
maintaining a safe forward speed
until brake performance returns
to normal.
WARNING- Parking brake
Applying the parking brake while
the vehicle is moving at normal
speeds can cause a sudden loss of
control of the vehicle. If you must
use the parking brake to stop the
vehicle, use great caution in apply-
ing the brake.
WARNING- Brakes
Do not drive with your foot rest-ing on the brake pedal. This will
create abnormal high brake tem-
peratures, excessive brake lining
and pad wear, and increased
stopping distances.
(Continued)
Page 278 of 360
Driving your vehicle
26
4
Hazardous driving conditions
When hazardous driving conditions are
encountered such as water, snow, ice,
mud, sand, or similar hazards, follow
these suggestions:
Drive cautiously and allow extra dis-
tance for braking.
Avoid sudden movements in braking or steering.
When braking with non-ABS brakes pump the brake pedal with a light up-
and-down motion until the vehicle is
stopped.
If stalled in snow, mud, or sand, use second gear. Accelerate slowly to
avoid spinning the drive wheels.
Use sand, rock salt or other non-slip material under the drive wheels to pro-
vide traction when stalled in ice, snow,
or mud.
Rocking the vehicle
If it is necessary to rock the vehicle to
free it from snow, sand, or mud, first turn
the steering wheel right and left to clear
the area around your front wheels. Then,
shift back and forth between R (Reverse)
and any forward gear in vehicles
equipped with an automatic transaxle. Do
not race the engine, and spin the wheels
as little as possible. If you are still stuck
after a few tries, have the vehicle pulled
out by a tow vehicle to avoid engine over-
heating and possible damage to the
transaxle.
SPECIAL DRIVING CONDITIONS
WARNING - Downshifting
Downshifting with an automatic
transaxle, while driving on slippery
surfaces can cause an accident.
The sudden change in tire speed
could cause the tires to skid. Be
careful when downshifting on slip-
pery surfaces.
WARNING - ABS
Do not pump the brake pedal on a
vehicle equipped with ABS.
CAUTION
Prolonged rocking may causeengine over-heating, transaxle dam-age or failure, and tire damage.
CAUTION
The ESC system (if equipped)should be turned OFF prior to rock- ing the vehicle.
WARNING- Spinning tires
Do not spin the wheels, especially
at speeds more than 56 km/h (35
mph). Spinning the wheels at high
speeds when the vehicle is station-
ary could cause a tire to overheat,
explode and injure bystanders.
WARNING
If your vehicle becomes stuck in
snow, mud, sand, etc., then you may
attempt to rock the vehicle free by
moving it forward and backward. Do
not attempt this procedure if people
or objects are anywhere near the
vehicle. During the rocking opera-
tion the vehicle may suddenly move
forward or backward as it becomes
unstuck, causing injury or damage
to nearby people or objects.
Page 283 of 360
431
Driving your vehicle
Following distance
Stay at least twice as far behind the vehi-
cle ahead as you would when driving
your vehicle without a trailer. This can
help you avoid situations that require
heavy braking and sudden turns.
Passing
You’ll need more passing distance up
ahead when you’re towing a trailer. And,
because of the increased vehicle length,
you’ll need to go much farther beyond the
passed vehicle before you can return to
your lane.
Backing up
Hold the bottom of the steering wheel
with one hand. Then, to move the trailer
to the left, just move your hand to the left.
To move the trailer to the right, move your
hand to the right. Always back up slowly
and, if possible, have someone guide
you.
Making turns
When you’re turning with a trailer, make
wider turns than normal. Do this so your
trailer won’t strike soft shoulders, curbs,
road signs, trees, or other objects. Avoid
jerky or sudden maneuvers. Signal well
in advance.
Turn signals when towing a trailer
When you tow a trailer, your vehicle has
to have a different turn signal flasher and
extra wiring. The green arrows on your
instrument panel will flash whenever you
signal a turn or lane change. Properly
connected, the trailer lights will also flash
to alert other drivers you’re about to turn,
change lanes, or stop.
When towing a trailer, the green arrows
on your instrument panel will flash for
turns even if the bulbs on the trailer are
burned out. Thus, you may think drivers
behind you are seeing your signals
when, in fact, they are not. It’s important
to check occasionally to be sure the trail-
er bulbs are still working. You must also
check the lights every time you discon-
nect and then reconnect the wires.
Do not connect a trailer lighting system
directly to your vehicle’s lighting system.
Use only an approved trailer wiring har-
ness.
Your Authorized Kia Dealer can assist
you in installing the wiring harness.
Driving on grades
Reduce speed and shift to a lower gear
before you start down a long or steep
downgrade. If you don’t shift down, you
might have to use your brakes so much
that they would get hot and no longer
operate efficiently.
On a long uphill grade, shift down and
reduce your speed to around 70 km/h (45
mph) to reduce the possibility of engine
and transaxle overheating.
If your trailer weighs more than the max-
imum trailer weight without trailer brakes
and you have an automatic transaxle,
you should drive in D (Drive) when tow-
ing a trailer.
Operating your vehicle in D (Drive) when
towing a trailer will minimize heat build up
and extend the life of your transaxle.
WARNING
Failure to use an approved trailer
wiring harness could result in dam-
age to the vehicle electrical system
and/or personal injury.
Page 284 of 360
Driving your vehicle
32
4
Parking on hills
Generally, you should not park your vehi-
cle, with a trailer attached, on a hill.
People can be seriously or fatally injured,
and both your vehicle and the trailer can
be damaged if they begin a downhill tra-
jectory.
However, if you ever have to park your
trailer on a hill, here’s how to do it:
1. Apply your brakes, but don’t shift into
gear.
2. Have someone place chocks under the trailer wheels.
3. When the wheel chocks are in place, release the brakes until the chocks
absorb the load.
4. Reapply the brakes. Apply your park- ing brake, and then shift to P (Park) for
an automatic transaxle.
5. Release the brakes.
When you are ready to leave after parking on a hill
1. With the automatic transaxle in P (Park), apply your brakes and hold the
brake pedal down while you:
and
2. Slowly remove your foot from the brake pedal.
3. Drive slowly until the trailer is clear of the chocks.
4. Stop and have someone pick up and store the chocks.
CAUTION
When towing a trailer on steep grades (in excess of 6%) payclose attention to the enginecoolant temperature gauge toensure the engine does not over-heat. If the needle of the coolanttemperature gauge moves acrossthe dial towards “H” (HOT), pullover and stop as soon as it is safe to do so, and allow the engine toidle until it cools down. You mayproceed once the engine hascooled sufficiently.
You must decide driving speed depending on trailer weight anduphill grade to reduce the possi-bility of engine and transaxleoverheating.
WARNING- Parking on a hill
Parking your vehicle on a hill with a
trailer attached could cause serious
injury or death, should the trailer
break lose.
WARNING- Parking brake
It can be dangerous to get out of
your vehicle if the parking brake is
not firmly set.
If you have left the engine running,
the vehicle can move suddenly. You
or others could be seriously or
fatally injured.
Page 285 of 360

433
Driving your vehicle
Maintenance when trailer towing
Your vehicle will need service more often
when you regularly pull a trailer.
Important items to pay particular atten-
tion to include engine oil, automatic
transaxle fluid, axle lubricant and cooling
system fluid. Brake condition is another
important item to frequently check. Each
item is covered in this manual, and the
Index will help you find them quickly. If
you’re trailering, it’s a good idea to review
these sections before you start your trip.
Don’t forget to also maintain your trailer
and hitch. Follow the maintenance
schedule that accompanied your trailer
and check it periodically. Preferably, con-
duct the check at the start of each day’s
driving. Most importantly, all hitch nuts
and bolts should be tight.
If you do decide to pull a trailer
Here are some important points if you
decide to pull a trailer:
government have varying trailering
laws. Make sure your hitch, mirrors,
lights and wiring arrangements are
legal, not only where you live, but also
where you’ll be driving. A good source
for this information is provincial or local
law enforcement agencies.
Consider using a sway control. You can ask a hitch dealer about sway control.
After your odometer indicates 800 km (500 miles) or more, you can tow a
trailer. For the first 800 km (500 miles)
that you tow a trailer, don’t drive over
80 km/h (50 mph) and don’t make
starts at full throttle. This helps your
engine and other parts of your vehicle
“wear” in at the heavier loads.
Always drive your vehicle at a moder- ate speed (less than 100 km/h (60
mph)).
On a long uphill grade, do not exceed 70 km/h (45 mph) or the posted towing
speed limit, whichever is lower.
The important considerations have to do with weight:CAUTION
Due to higher load during trailer usage, overheating might occurin hot days or during uphill driv-ing. If the coolant gauge indicates over-heating, switch off the A/Cand stop the vehicle in a safe area to cool down the engine.
When towing check transaxle fluid more frequently.
If your vehicle is not equipped with the air conditioner, youshould install a condenser fan toimprove engine performancewhen towing a trailer.