lock KIA Sedona 2011 2.G Owners Manual
[x] Cancel search | Manufacturer: KIA, Model Year: 2011, Model line: Sedona, Model: KIA Sedona 2011 2.GPages: 370, PDF Size: 6.75 MB
Page 284 of 370
Driving your vehicle
22
4
Operation of the rear parking
assist system
Operating condition
This system will activate when backing
up with the ignition key ON.
If the vehicle is moved at speed over
5 km/h (3 mph), the system may not
activated correctly.
The sensing distance while the rear parking assist system is in operation is
approximately 120 cm (47 in.).
When more than two objects are sensed at the same time, the closest
one will be recognized first.
Types of warning sound
When an object is 120 cm to 81 cm (47in. to 32 in.) from the rear bumper :
Buzzer beeps intermittently
When an object is 80 cm to 41 cm (31 in. to 16 in.) from the rear bumper :
Buzzer beeps more frequently
When an object is within 40 cm (15 in.) of the rear bumper : Buzzer sounds
continuously.
Non-operational conditions of
rear parking assist system
Rear parking assist system may notoperate normally when:
1. Moisture is frozen to the sensor. (It will operate normally when moisture
melts.)
2. Sensor is covered with foreign matter, such as snow or water, or the sensor
cover is blocked. (It will operate nor-
mally when the material is removed or
the sensor is no longer blocked.)
3. Driving on uneven road surfaces (unpaved roads, gravel, bumps, gradi-
ent).
4. Objects generating excessive noise (vehicle horns, loud motorcycle
engines, or truck air brakes) are within
range of the sensor.
5. Heavy rain or water spray exists.
6. Wireless transmitters or mobile phones are within range of the sensor.
7. Sensor is covered with snow.
8. Trailer towing
Detecting range may decrease when:
1. Sensor is stained with foreign matter such as snow or water. (Sensing range
will return to normal when removed.)
2. Outside air temperature is extremely hot or cold.
Following objects may not be recog-nized by the sensor:
1. Sharp or slim objects such as ropes, chains or small poles.
2. Objects which tend to absorb sensor frequency such as clothes, spongy
material or snow.
3. Undetectable objects smaller than 1 m (40 in.) and narrower than 14 cm (6 in.)
in diameter.
Page 287 of 370
425
Driving your vehicle
Your vehicle's fuel economy depends
mainly on your style of driving, where you
drive and when you drive.
Each of these factors affects how many
kilometers (miles) you can get from a
liter (gallon) of fuel. To operate your vehi-
cle as economically as possible, use the
following driving suggestions to help
save money in both fuel and repairs:
Avoid lengthy warm-up idling. Once theengine is running smoothly, begin driv-
ing. Remember, engine warm-up may
take a little longer on cold days.
Save fuel by accelerating slowly after stopping.
Keep the engine in tune and follow the recommended periodic maintenance
schedule. This will increase the life of
all parts and lower your operating
costs. Do not use the air conditioner unnec-
essarily.
Slow down when driving on rough roads.
For longer tire life and better fuel econ- omy, always keep the tires inflated to
the recommended pressures.
Maintain a safe distance from other vehicles to avoid sudden stops. This
will reduce wear on brake linings and
pads. Driving in such a way will also
save fuel because extra fuel is required
to accelerate back to driving speed.
Do not carry unnecessary weight in the vehicle.
Do not rest your foot on the brake pedal while driving. This can cause
needless wear, possible damage to the
brakes, and poor fuel economy.
Improper wheel alignment results in faster tire wear and lower fuel econo-
my. Open windows at high speeds can
reduce fuel economy.
Fuel economy is less in crosswinds and headwinds. To help offset some of
this loss, slow down when driving in
these conditions.
Keeping a vehicle in good operating con-
dition is important both for economy and
safety. Therefore, have an authorized Kia
dealer perform scheduled inspections
and maintenance.
ECONOMICAL OPERATION
WARNING - Engine off dur- ing motion
Never turn the engine off to coast
down hills or anytime the vehicle is
in motion. The power steering and
power brakes will not function
properly without the engine run-
ning. Instead, keep the engine on
and downshift to an appropriate
gear for engine braking effect. In
addition, turning off the ignition
while driving could engage the
steering wheel lock resulting in
loss of vehicle steering which could
cause serious injury or death.
Page 290 of 370
Driving your vehicle
28
4
We recommend that you carry emer-
gency equipment, including a window
scraper, windshield de-icer, a bag of
sand or salt, flares, a small shovel and
jumper cables.
Make sure you have sufficient ethyl- ene-glycol coolant in the radiator.
Check the battery condition and cables. Cold temperatures reduce the
capacity of any battery, so it must be in
excellent condition to provide enough
winter starting power.
Make sure the engine oil viscosity is suitable for cold weather.
Check the ignition system for loose connections and damage.
Use antifreeze-formulated windshield washer fluid. (Do not use engine
coolant antifreeze.)
Do not use the parking brake if it might freeze. When parking, shift to P (Park)
with an automatic transaxle and block
the rear wheels.Snow tires
If you mount snow tires on your Kia,
make sure they are radial tires of the
same size and load range as the original
tires. Mount snow tires on all four wheels
to balance your vehicle’s handling in all
weather conditions. Keep in mind that the
traction provided by snow tires on dry
roads may not be as high as your vehi-
cle's original equipment tires. You should
drive cautiously even when the roads are
clear. Check with the tire dealer for max-
imum speed recommendations.
Do not install studded tires without firstchecking local, state and municipal regu-lations for possible restrictions againsttheir use.
WINTER DRIVING
WARNING- Snow tire size
Snow tires should be equivalent in
size and type to the vehicle's stan-
dard tires. Otherwise, the safety and
handling of your vehicle may be
adversely affected.
TRAILER TOWING
WARNING- Towing a trail- er
If you don't use the correct equip-
ment and drive improperly, you can
lose control when you pull a trailer.
For example, if the trailer is too
heavy, the brakes may not work well
- or even at all. You and your pas-
sengers could be seriously or fatal-
ly injured. Pull a trailer only if you
have followed all the steps in this
section.
WARNING- Weight limits
Before towing, make sure the total
trailer weight, gross combination
weight, gross vehicle weight, gross
axle weight and trailer tongue load
are all within the limits.
Page 298 of 370
Driving your vehicle
36
4
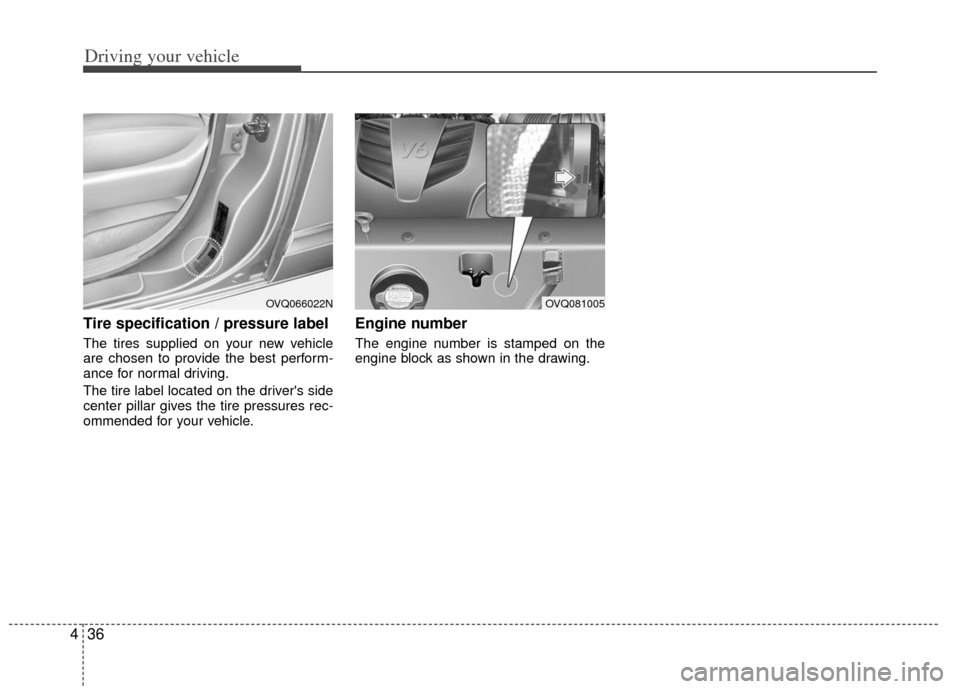
Tire specification / pressure label
The tires supplied on your new vehicle
are chosen to provide the best perform-
ance for normal driving.
The tire label located on the driver's side
center pillar gives the tire pressures rec-
ommended for your vehicle.
Engine number
The engine number is stamped on the
engine block as shown in the drawing.
OVQ081005OVQ066022N
Page 304 of 370
What to do in an emergency
65
IF YOU HAVE A FLAT TIRE
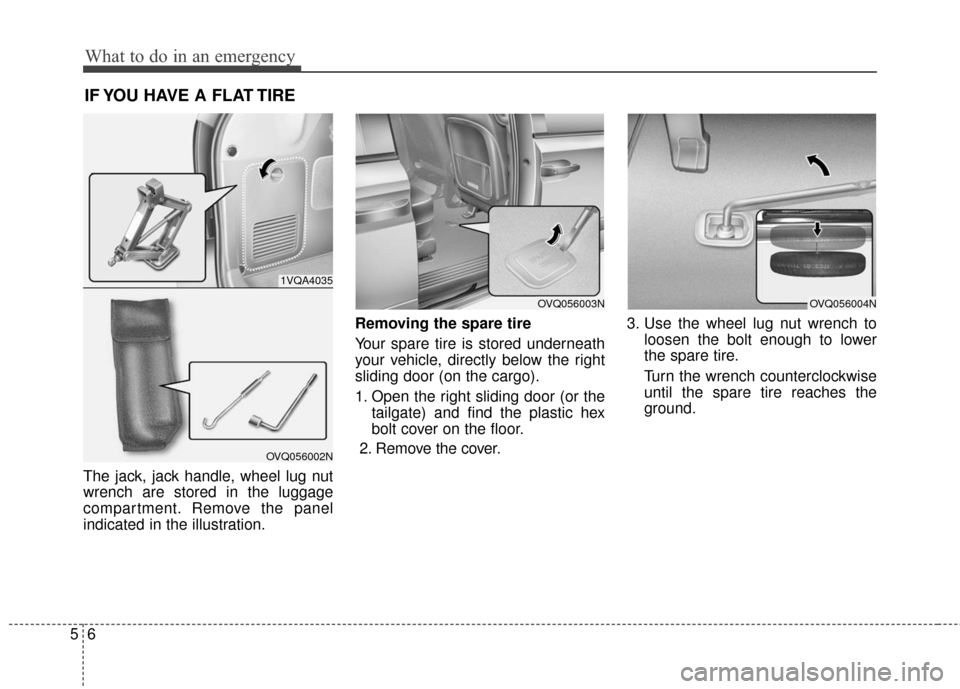
The jack, jack handle, wheel lug nut
wrench are stored in the luggage
compartment. Remove the panel
indicated in the illustration.Removing the spare tire
Your spare tire is stored underneath
your vehicle, directly below the right
sliding door (on the cargo).
1. Open the right sliding door (or the
tailgate) and find the plastic hex
bolt cover on the floor.
2. Remove the cover. 3. Use the wheel lug nut wrench to
loosen the bolt enough to lower
the spare tire.
Turn the wrench counterclockwise
until the spare tire reaches the
ground.
1VQA4035
OVQ056002N
OVQ056003NOVQ056004N
Page 305 of 370
57
What to do in an emergency
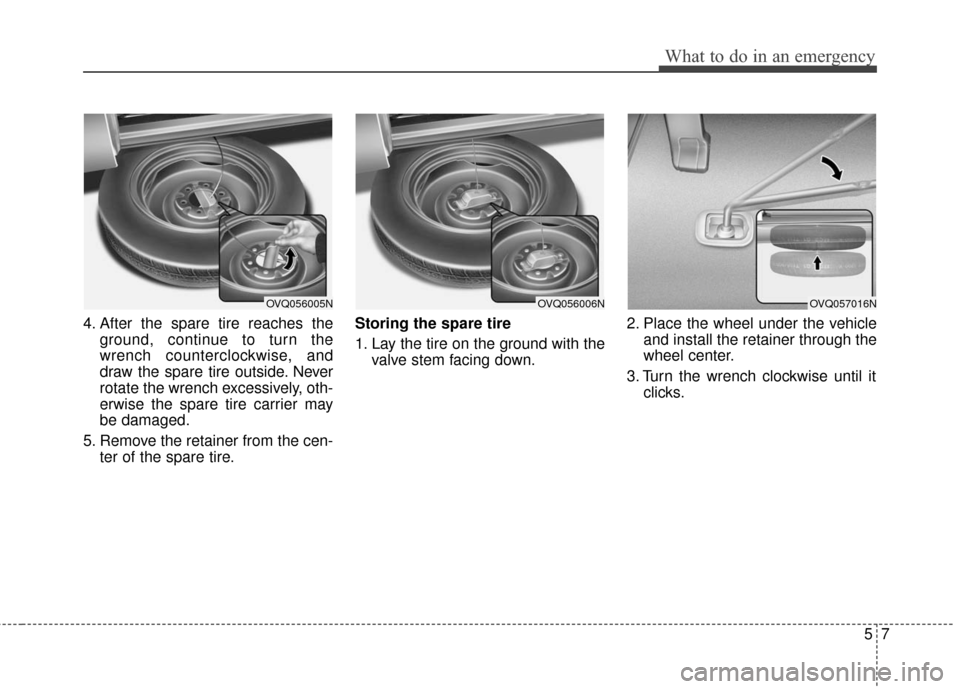
4. After the spare tire reaches theground, continue to turn the
wrench counterclockwise, and
draw the spare tire outside. Never
rotate the wrench excessively, oth-
erwise the spare tire carrier may
be damaged.
5. Remove the retainer from the cen- ter of the spare tire. Storing the spare tire
1. Lay the tire on the ground with the
valve stem facing down. 2. Place the wheel under the vehicle
and install the retainer through the
wheel center.
3. Turn the wrench clockwise until it clicks.
OVQ056005NOVQ056006NOVQ057016N
Page 307 of 370
59
What to do in an emergency
Do not take this vehicle through anautomatic car wash while the com-
pact spare tire is installed.
Do not use tire chains on the com- pact spare tire. Because of the
smaller size, a tire chain will not fit
properly. This could damage the
vehicle and result in loss of the
chain.
The compact spare tire should not be installed on the front axle if the
vehicle must be driven in snow or
on ice.
Do not use the compact spare tire on any other vehicle because this
tire has been designed especially
for your vehicle.
The compact spare tire’s tread life is shorter than a regular tire.
Inspect your compact spare tire
regularly and replace worn com-
pact spare tires with the same size
and design, mounted on the same
wheel. Changing tires
Jacking instructions
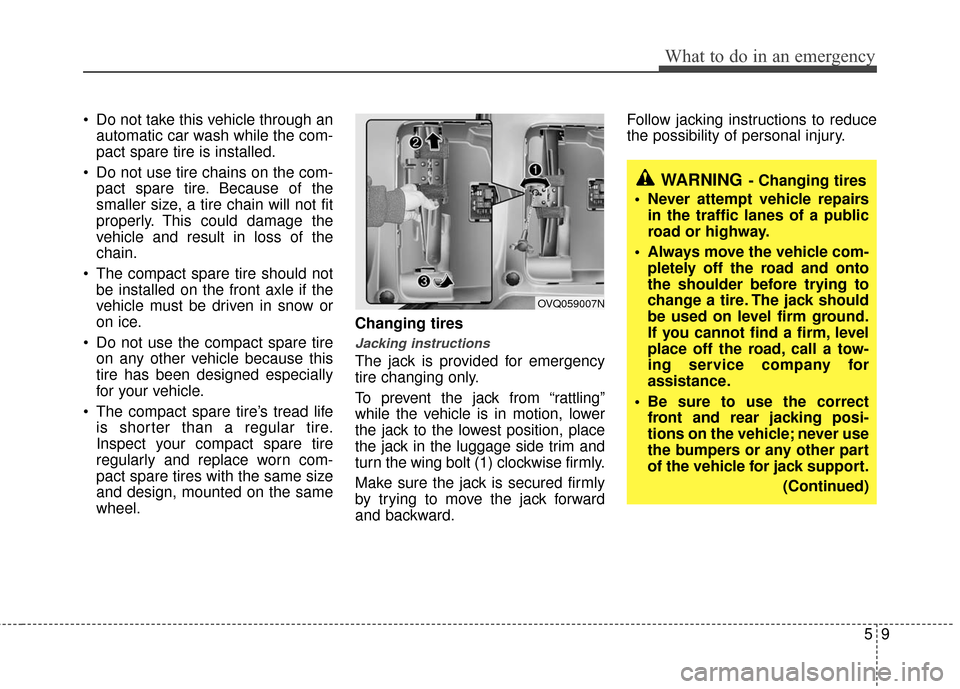
The jack is provided for emergency
tire changing only.
To prevent the jack from “rattling”
while the vehicle is in motion, lower
the jack to the lowest position, place
the jack in the luggage side trim and
turn the wing bolt (1) clockwise firmly.
Make sure the jack is secured firmly
by trying to move the jack forward
and backward. Follow jacking instructions to reduce
the possibility of personal injury.
WARNING- Changing tires
Never attempt vehicle repairs in the traffic lanes of a public
road or highway.
Always move the vehicle com- pletely off the road and onto
the shoulder before trying to
change a tire. The jack should
be used on level firm ground.
If you cannot find a firm, level
place off the road, call a tow-
ing service company for
assistance.
Be sure to use the correct front and rear jacking posi-
tions on the vehicle; never use
the bumpers or any other part
of the vehicle for jack support.
(Continued)
OVQ059007N
Page 308 of 370
What to do in an emergency
10
5
Tire replacement
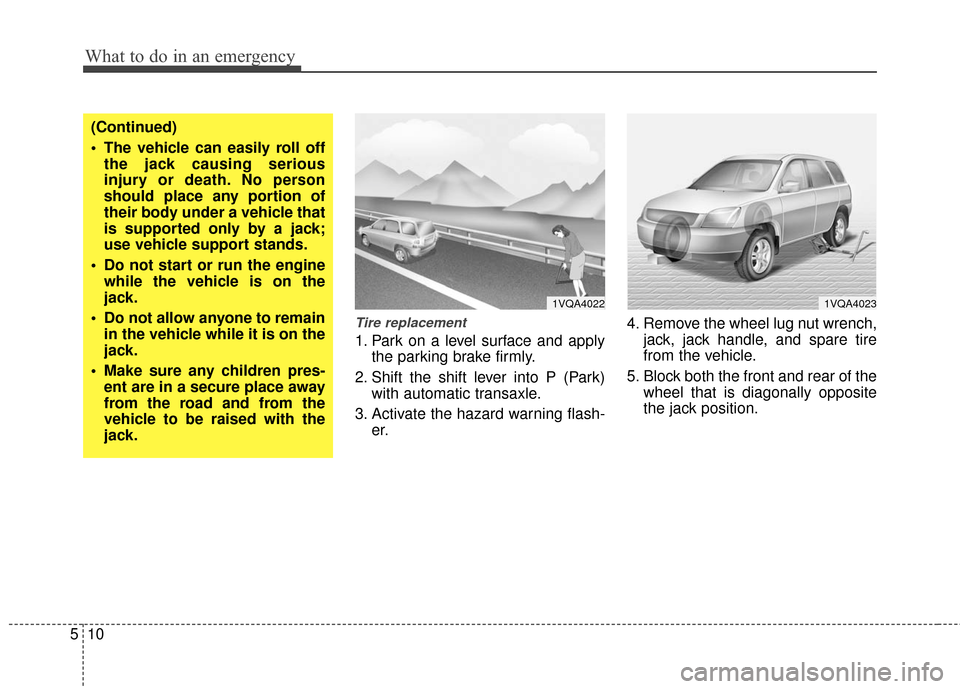
1. Park on a level surface and apply
the parking brake firmly.
2. Shift the shift lever into P (Park) with automatic transaxle.
3. Activate the hazard warning flash- er. 4. Remove the wheel lug nut wrench,
jack, jack handle, and spare tire
from the vehicle.
5. Block both the front and rear of the wheel that is diagonally opposite
the jack position.
1VQA40221VQA4023
(Continued)
The vehicle can easily roll offthe jack causing serious
injury or death. No person
should place any portion of
their body under a vehicle that
is supported only by a jack;
use vehicle support stands.
Do not start or run the engine while the vehicle is on the
jack.
Do not allow anyone to remain in the vehicle while it is on the
jack.
Make sure any children pres- ent are in a secure place away
from the road and from the
vehicle to be raised with the
jack.
Page 309 of 370
511
What to do in an emergency
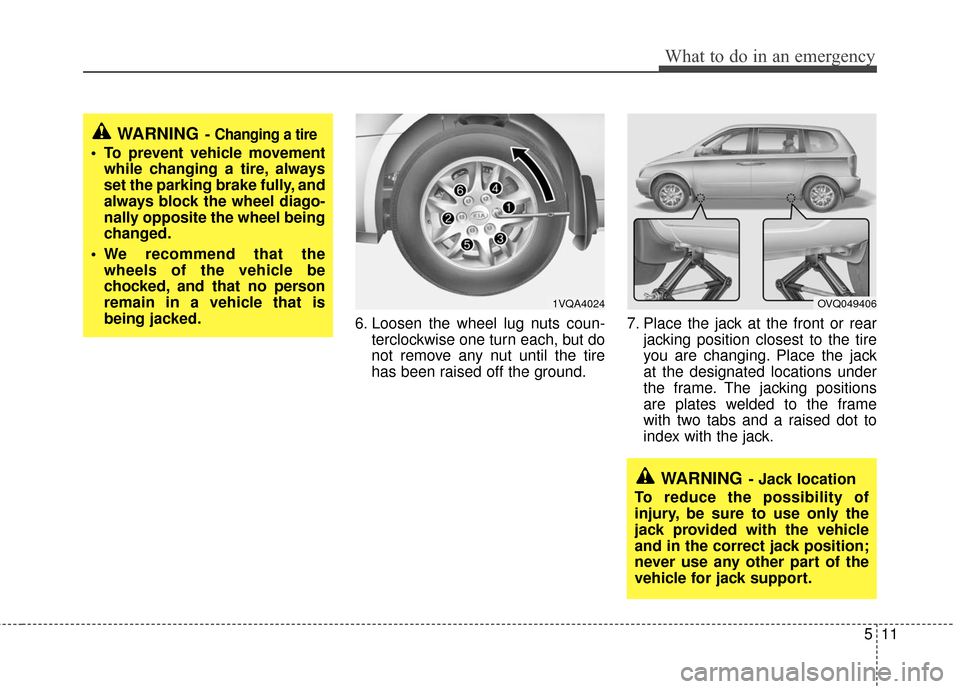
6. Loosen the wheel lug nuts coun-terclockwise one turn each, but do
not remove any nut until the tire
has been raised off the ground. 7. Place the jack at the front or rear
jacking position closest to the tire
you are changing. Place the jack
at the designated locations under
the frame. The jacking positions
are plates welded to the frame
with two tabs and a raised dot to
index with the jack.
WARNING- Jack location
To reduce the possibility of
injury, be sure to use only the
jack provided with the vehicle
and in the correct jack position;
never use any other part of the
vehicle for jack support.
1VQA4024OVQ049406
WARNING- Changing a tire
To prevent vehicle movement while changing a tire, always
set the parking brake fully, and
always block the wheel diago-
nally opposite the wheel being
changed.
We recommend that the wheels of the vehicle be
chocked, and that no person
remain in a vehicle that is
being jacked.
Page 310 of 370
What to do in an emergency
12
5
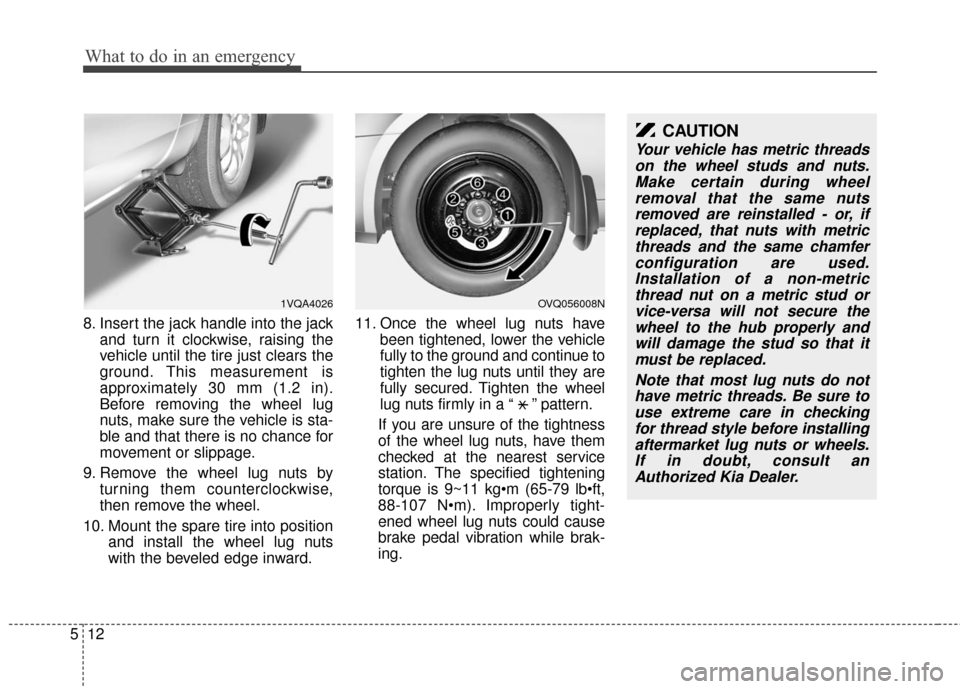
8. Insert the jack handle into the jack
and turn it clockwise, raising the
vehicle until the tire just clears the
ground. This measurement is
approximately 30 mm (1.2 in).
Before removing the wheel lug
nuts, make sure the vehicle is sta-
ble and that there is no chance for
movement or slippage.
9. Remove the wheel lug nuts by turning them counterclockwise,
then remove the wheel.
10. Mount the spare tire into position and install the wheel lug nuts
with the beveled edge inward. 11. Once the wheel lug nuts have
been tightened, lower the vehicle
fully to the ground and continue to
tighten the lug nuts until they are
fully secured. Tighten the wheel
lug nuts firmly in a “ ” pattern.
If you are unsure of the tightness
of the wheel lug nuts, have them
checked at the nearest service
station. The specified tightening
torque is 9~11 kg
88-107 N Improperly tight-
ened wheel lug nuts could cause
brake pedal vibration while brak-
ing.
CAUTION
Your vehicle has metric threads on the wheel studs and nuts.Make certain during wheelremoval that the same nutsremoved are reinstalled - or, ifreplaced, that nuts with metricthreads and the same chamferconfiguration are used.Installation of a non-metricthread nut on a metric stud orvice-versa will not secure thewheel to the hub properly andwill damage the stud so that itmust be replaced.
Note that most lug nuts do nothave metric threads. Be sure touse extreme care in checkingfor thread style before installingaftermarket lug nuts or wheels.If in doubt, consult anAuthorized Kia Dealer.
OVQ056008N1VQA4026
X