KIA Sedona 2014 3.G Owner's Manual
Manufacturer: KIA, Model Year: 2014, Model line: Sedona, Model: KIA Sedona 2014 3.GPages: 382, PDF Size: 4.67 MB
Page 241 of 382
Features of your vehicle
232
3
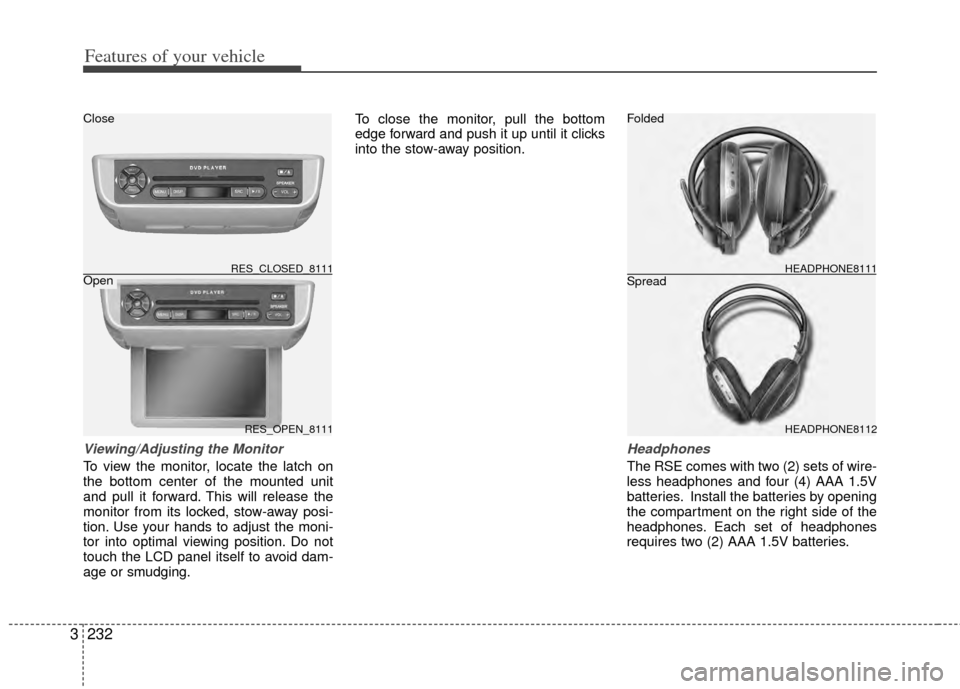
Viewing/Adjusting the Monitor
To view the monitor, locate the latch on
the bottom center of the mounted unit
and pull it forward. This will release the
monitor from its locked, stow-away posi-
tion. Use your hands to adjust the moni-
tor into optimal viewing position. Do not
touch the LCD panel itself to avoid dam-
age or smudging. To close the monitor, pull the bottom
edge forward and push it up until it clicks
into the stow-away position.
Headphones
The RSE comes with two (2) sets of wire-
less headphones and four (4) AAA 1.5V
batteries. Install the batteries by opening
the compartment on the right side of the
headphones. Each set of headphones
requires two (2) AAA 1.5V batteries.
RES_OPEN_8111
RES_CLOSED_8111HEADPHONE8112 HEADPHONE8111
Folded
Spread
Close
Open
Page 242 of 382
3233
Features of your vehicle
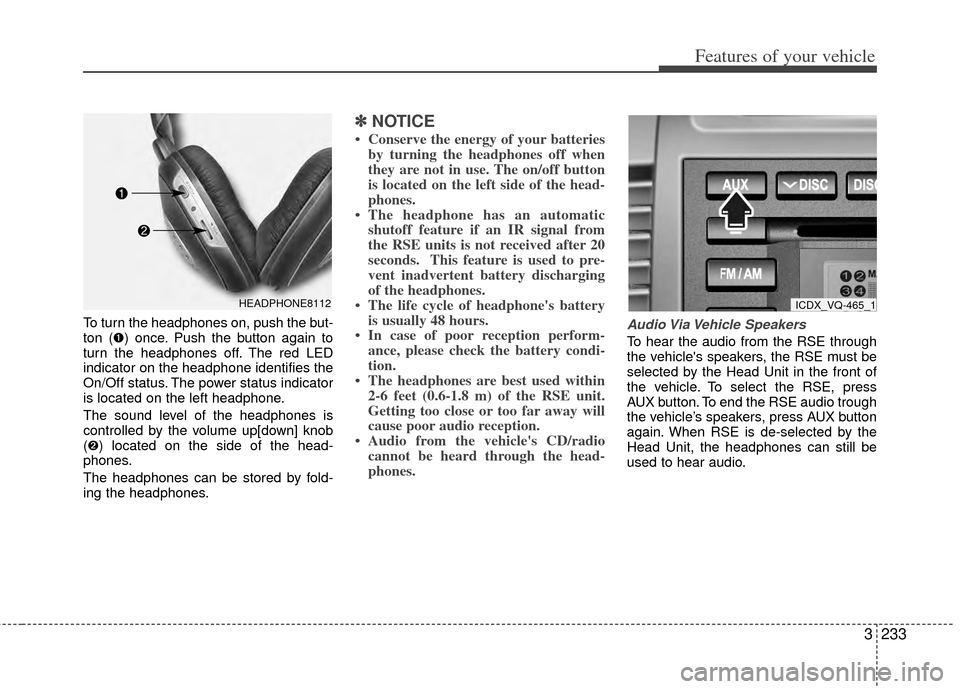
To turn the headphones on, push the but-
ton (➊) once. Push the button again to
turn the headphones off. The red LED
indicator on the headphone identifies the
On/Off status. The power status indicator
is located on the left headphone.
The sound level of the headphones is
controlled by the volume up[down] knob
(➋) located on the side of the head-
phones.
The headphones can be stored by fold-
ing the headphones.
✽ ✽NOTICE
• Conserve the energy of your batteries
by turning the headphones off when
they are not in use. The on/off button
is located on the left side of the head-
phones.
• The headphone has an automatic shutoff feature if an IR signal from
the RSE units is not received after 20
seconds. This feature is used to pre-
vent inadvertent battery discharging
of the headphones.
• The life cycle of headphone's battery is usually 48 hours.
• In case of poor reception perform- ance, please check the battery condi-
tion.
• The headphones are best used within 2-6 feet (0.6-1.8 m) of the RSE unit.
Getting too close or too far away will
cause poor audio reception.
• Audio from the vehicle's CD/radio cannot be heard through the head-
phones.
Audio Via Vehicle Speakers
To hear the audio from the RSE through
the vehicle's speakers, the RSE must be
selected by the Head Unit in the front of
the vehicle. To select the RSE, press
AUX button. To end the RSE audio trough
the vehicle’s speakers, press AUX button
again. When RSE is de-selected by the
Head Unit, the headphones can still be
used to hear audio.
HEADPHONE8112ICDX_VQ-465_1
Page 243 of 382
Features of your vehicle
234
3
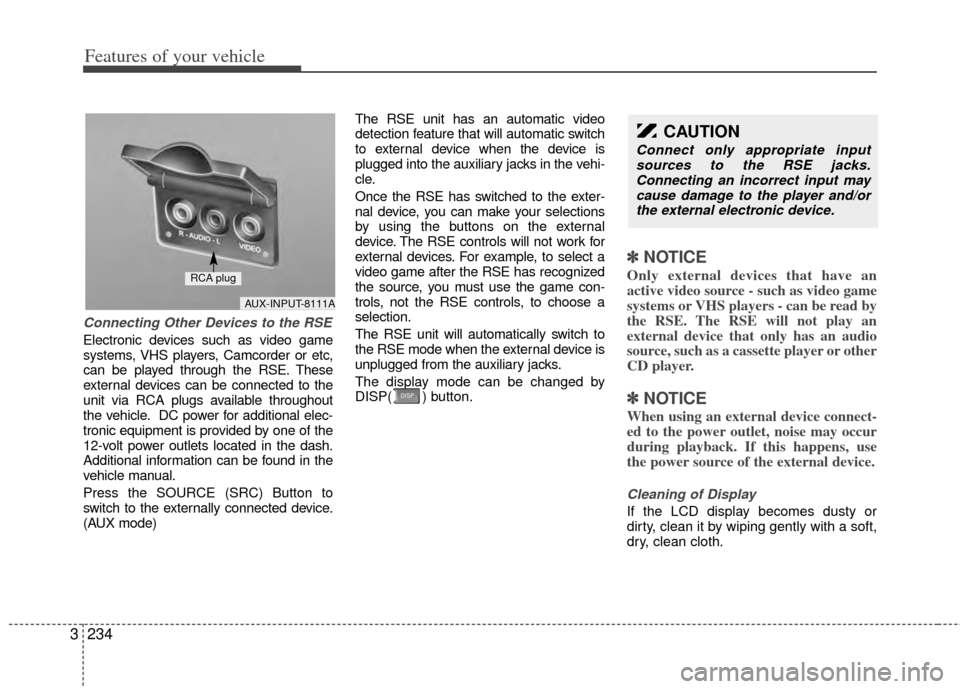
Connecting Other Devices to the RSE
Electronic devices such as video game
systems, VHS players, Camcorder or etc,
can be played through the RSE. These
external devices can be connected to the
unit via RCA plugs available throughout
the vehicle. DC power for additional elec-
tronic equipment is provided by one of the
12-volt power outlets located in the dash.
Additional information can be found in the
vehicle manual.
Press the SOURCE (SRC) Button to
switch to the externally connected device.
(AUX mode) The RSE unit has an automatic video
detection feature that will automatic switch
to external device when the device is
plugged into the auxiliary jacks in the vehi-
cle.
Once the RSE has switched to the exter-
nal device, you can make your selections
by using the buttons on the external
device. The RSE controls will not work for
external devices. For example, to select a
video game after the RSE has recognized
the source, you must use the game con-
trols, not the RSE controls, to choose a
selection.
The RSE unit will automatically switch to
the RSE mode when the external device is
unplugged from the auxiliary jacks.
The display mode can be changed by
DISP( ) button.
✽ ✽
NOTICE
Only external devices that have an
active video source - such as video game
systems or VHS players - can be read by
the RSE. The RSE will not play an
external device that only has an audio
source, such as a cassette player or other
CD player.
✽ ✽NOTICE
When using an external device connect-
ed to the power outlet, noise may occur
during playback. If this happens, use
the power source of the external device.
Cleaning of Display
If the LCD display becomes dusty or
dirty, clean it by wiping gently with a soft,
dry, clean cloth.
CAUTION
Connect only appropriate input
sources to the RSE jacks.Connecting an incorrect input may cause damage to the player and/orthe external electronic device.
AUX-INPUT-8111A
RCA plug
Page 244 of 382
3235
Features of your vehicle
Using the DVD player
Disc compatibility
Your RSE player accepts and plays all
DVDs in 4:3 (normal) and 16:9 (wide
screen) video formats. With DVDs that
offer multiple formats, the default format
is 16:9 and will stay that way unless the
user changes the format. (See “Display”
to learn how to adjust the format.)
✽ ✽NOTICE
• The DVD player has the capability to
play DVD-Video, DVD-R, DVD-RW,
CD-DA, CD-R, CD-RW and Video-
CD.
• The DVD player has the capability to play CD-DA, DVD, VCD, PCM,
Dolby Digital and DTS formats.
• Please refer to the appendix for the error messages.
Loading a Disc
Insert the disc part way into the load slot.
The player will automatically grip the disc
and pull it in the rest of the way. The player
will display “reading” on the screen and
show the “Kia Motors” logo before begin-
ning the DVD. The player is only capable of reading the
bottom side of a disc. When inserting a
single-sided disc, the label side should be
up. When inserting a two-sided disc, the
desired play side should be down.
✽ ✽
NOTICE
• Because there is no universal standard
for DVD programming, your disc may
behave differently than below. Some
DVDs may present warning messages
about unauthorized duplication, some
will go directly to a menu and others
may start playing the movie immedi-
ately.
• When the vehicle's ignition is active, the loading of any playable disc will
cause the player to initialize and auto-
matically play the disc. If a disc was
playing prior to the ignition being
turned off, it will not automatically
replay once the ignition is turned on
again. Instead, it will go into standby
mode. Press the SRC or
PLAY/PAUSE( ) button to “wake
up” the unit and resume disc play.
Disc Protection
The player has an Auto-Reload Disc
Protection feature to protect discs from
accidental damage. If an ejected disc is
not removed within 25 seconds after being
ejected, it will be pulled back into the play-
er. The disc will not begin playing. Disc can
be played by the SRC or
PLAY/PAUSE( ) buttons.
DVD Controls
You can control your DVD by using the
buttons on the unit's control panel or by
using the remote control. Instructions for
the controls listed below are the same
whether you are using the control panel
or the remote control. However, there are
functions that are only available from the
remote control. These buttons and their
functionality are discussed in the
“REMOTE CONTROL” section begin-
ning.
Page 245 of 382
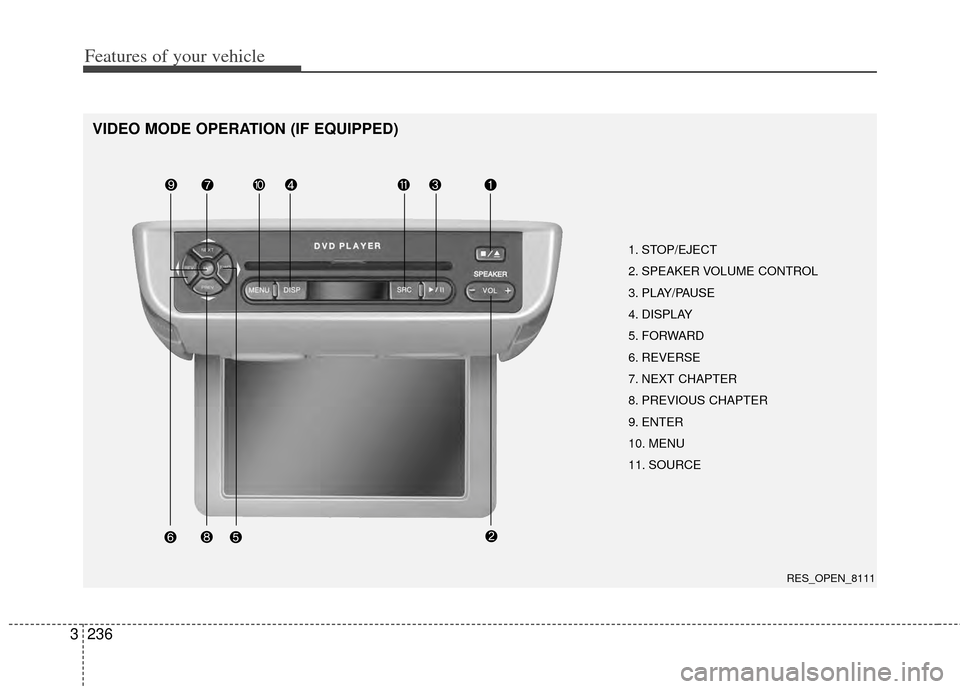
Features of your vehicle
236
3
VIDEO MODE OPERATION (IF EQUIPPED)
1. STOP/EJECT
2. SPEAKER VOLUME CONTROL
3. PLAY/PAUSE
4. DISPLAY
5. FORWARD
6. REVERSE
7. NEXT CHAPTER
8. PREVIOUS CHAPTER
9. ENTER
10. MENU
11. SOURCE
RES_OPEN_8111
Page 246 of 382
3237
Features of your vehicle
✽
✽NOTICE
The RSE will enter standby mode when
the vehicle ignition is turned off and
back on. Press the SRC or
PLAY/PAUSE( ) button to “wake
up” the unit and resume disc play.
1. Stop/Eject
While the disc is playing, press the
STOP/EJECT ( ) button to stop disc
play. When the disc has stopped, press
the button again to eject the disc.
✽ ✽NOTICE
The player has an Auto-Reload Disc
Protection feature to protect discs from
accidental damage. If an ejected disc is
not removed within 25 seconds after
being ejected, it will be pulled back into
the player. This is to protect the disc
from accidental damage.
2. Speaker Volume Control
You can adjust the volume one of two
ways. First, if you are adjusting the vol-
ume for audio through the vehicle speak-
ers, you can use the VOLUME button on
the control panel or the remote control.
This button is reserved for sending a sig-
nal to the vehicle speakers only, and will
not adjust the headphone volume. Press
“+” to increase the volume and “-” to
decrease the volume.
Second, the volume on the wireless
headphones can be adjusted by turning
the VOL knob located on the left side of
the headphones.
3. Play/Pause
You do not need to press the play button
after first loading a DVD or VCD; it will
start automatically by playing the first
track or bringing up the disc menu.
If the disc does not automatically load,
press PLAY/PAUSE( ) to play the DVD.
While playing a DVD, press PLAY
/PAUSE( ) to pause the DVD. Press
the button again to resume play.
4. Display
When the player is in DVD mode, press the
DISP button to view the DVD title, chapter
number and elapsed time and other infor-
mation about the DVD currently playing.
It will also display brightness. There are
“Day Time” brightness with brightest level
and “Night Time” brightness which has 70%
level of “Day Time” brightness. Adjust the
level of brightness by pressing the
REV(dimmer) or FWD(brighter) buttons.
The next time the player is turned on, it will
return to the brightness level it was adjusted
to when last used.
The RSE unit has two presets of display
brightness. When the headlamp is turned
on, the display brightness level will be
dimmed as the preset. However, when the
headlamp is turned off, the display bright-
ness will return to the daytime brightness.
Press DISP to adjust the image format. The
image format, also known as the aspect
ratio, is a ratio of the height to width of the
image on the screen. For example, a 4:3
ratio would mean an image that is 4 units by
3 units.
Page 247 of 382
Features of your vehicle
238
3
You have two options: 4:3 (normal) and 16:9
(widescreen). Press the display button to
select the preferred aspect ratio.
When the RSE unit receives video signals
from the AUX, the aspect ratio can be
changed to 16:9 or 4:3 by the DISP button.
The aspect ratio information will auto-
matically disappear if no button is
pressed for three seconds.
5. Forward
There are three DVD and VCD fast for-
ward speeds. Press and hold the FWD
button for up to 2 seconds and the player
will fast forward at 4 times the normal
speed (8 times for VCDs). Hold the but-
ton for more than 2 seconds but less than
4 seconds and the player will fast forward
at about 8 times the normal speed (20
times for VCDs). Hold the button for more
than 4 seconds and the fast forward will
increase to about 32 times the normal
speed for both DVDs and VCDs. Press
the FWD button again to stop fast for-
warding and return to normal speed play.
6. Reverse
There are three DVD and VCD fast
reverse speeds. Press and hold the REV
button for up to 2 seconds and the player
will reverse through the DVD at 4 times
the normal speed (8 times for VCDs).
Hold the button for more than 2 seconds
but less than 4 seconds and the player
will reverse at about 8 times the normal
speed (20 times for VCDs). Hold the but-
ton for more than 4 seconds and the
reverse will increase to 32 times the nor-
mal speed for both DVDs and VCDs.
Press the REV button again to stop
reversing and return to normal speed
play.
7. Next Chapter
While a DVD is playing, press the NEXT
button to skip to the next chapter. The
current chapter number is shown on the
screen. Press and hold the NEXT button
to move quickly through the chapters.
✽ ✽
NOTICE
Depending on the DVD, if NEXT is
pressed during the last chapter on a
DVD, a red circle with a “Invalid
icon[ �: �:
]” may be displayed, indicating
an invalid button press.
8. Previous Chapter
Press the PREV button to skip to the
beginning of the previous chapter. Press
and hold the PREV button to move quick-
ly through the chapters.
Depending on your DVD, if the PREV
button is pressed during the first 8 sec-
onds of the first chapter, the player will
skip to the beginning of the last chapter
of the DVD.
9. Enter
A momentary press shall initiate a select
or enter function of a selected menu
item.
10. Menu
DVDs may contain special programming
or features that are accessed by using the
menu. To use the menu with a DVD that is
playing, press the MENU button once to
display the DVD disc menu. Press the but-
ton a second time to exit the menu and
return to the DVD program.
The menu is not available during disc ini-
tialization, the beginning credits or any
copyright FBI warnings.
Page 248 of 382
3239
Features of your vehicle
When viewing a menu, pressing the
MENU button again will automatically
return to the movie at the point it was
being viewed. You can also select “play” or
any other option by using the NEXT,
PREV, FWD and REV buttons.
Press the NEXT button to move the cursor
up and the PREV button to move the cur-
sor down the menu.
Press the FWD button to move the cursor
to the right, and the REV button to move
the cursor to the left.
✽ ✽NOTICE
You must repeatedly push any button to
move through several items. Pressing
and holding any button will not advance
the cursor beyond the position just
moved.
Press ENTER to select the desired menu
choice.
11. Source
Press the SOURCE button to switch from
the RSE’s internal DVD player to an
external device such as a VCR or video
game. The sound and images from the
external source will be presented
through the RSE. Pressing the SRC button will switch
between the following RSE states:
Playback state - will play DVDs, VCDs, and
CDs
Auxiliary (AUX) state - will play video
games and other external devices
When an external source is selected, the
RSE’s internal DVD player turns off.
Press the SRC button to switch back
from the external source to the internal
DVD player.
If a disc is present in the DVD player, the
disc will begin to play. If another source
has been detected, such as a VCR or
video game, the RSE will enter the AUX
mode automatically and shall remain so
until a disc is inserted or until the PLAY/
SRC button is pressed on the RSE's front
panel or on the remote control. If the
vehicle ignition is on but the player isn't
being used, the display will power off.
The DVD mechanism will be in sleep
mode, but the main RSE's controller will
stay up to accept commands from the
front panel controls or the remote control.
✽ ✽
NOTICE
The external device must be correctly
connected to the RSE in order to play
properly.
Using the CD Player
The RSE will play audio CDs in both the
standard (12 cm) and mini-disc (8 cm)
format.
✽ ✽NOTICE
While the player will accept DVD
ROMs and CD ROMs discs, the RSE
cannot play discs in these formats and
will eject them.
With power applied to your unit, insert
the disc part way into the load slot. The
player will automatically grip the CD disc,
pull it the rest of the way in and begin
playing.
CD Controls
The following functions are available
when playing audio CDs.
Page 249 of 382
Features of your vehicle
240
3
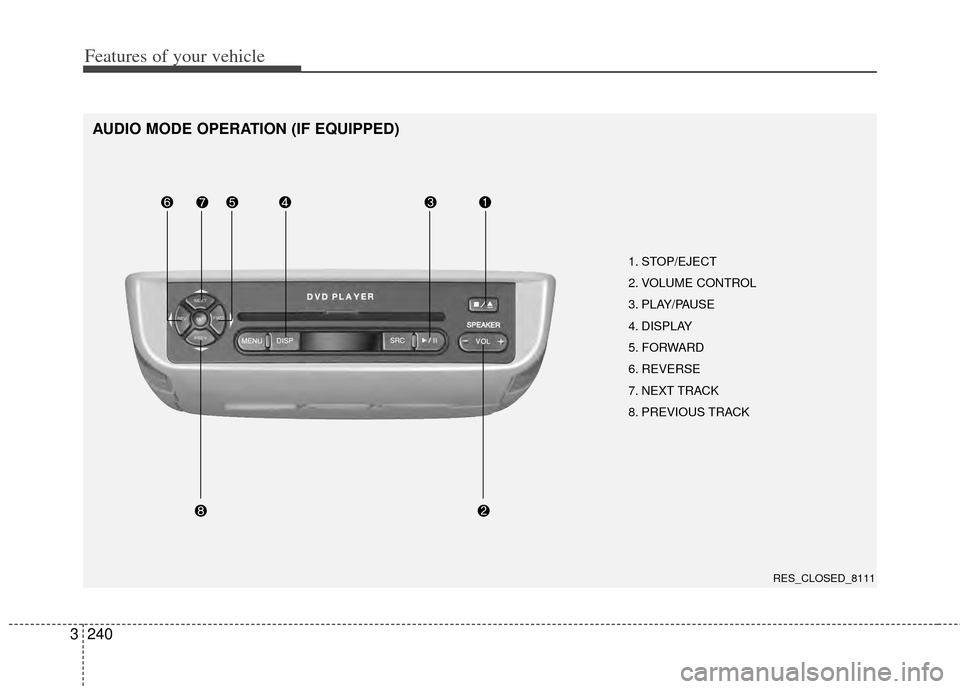
AUDIO MODE OPERATION (IF EQUIPPED)
1. STOP/EJECT
2. VOLUME CONTROL
3. PLAY/PAUSE
4. DISPLAY
5. FORWARD
6. REVERSE
7. NEXT TRACK
8. PREVIOUS TRACK
RES_CLOSED_8111
Page 250 of 382
3241
Features of your vehicle
1. Stop/Eject
While the disc is playing, press the
STOP/EJECT( ) button to stop disc
play.
While the disc is stopped, press the
STOP/EJECT( ) button again to eject
the disc.
2. Volume Control
You can adjust the volume one of two
ways. First, if you are adjusting the vol-
ume for audio through the vehicle speak-
ers, you can use the VOLUME (
)button on the control panel or the
remote control. Press “+” to increase the
volume and “-” to decrease the volume.
The volume level will be displayed on the
head-unit, when the RSE unit volume
level is adjusted from its control panel or
remote control. This button does not
affect headphone volume.
Second, you can adjust the volume on
the wireless headphones by locating the
VOL control wheel on the left side of the
headphones. Roll the control wheel to
adjust the volume.
3. Play/Pause
When an audio CD is inserted, the RSE
will display the Kia logo, then automati-
cally begin playing the first track. The
track number and time elapsed for the
current track is displayed.
If a CD is loaded and playing, press the
PLAY/PAUSE( ) button to pause the
CD. Press the button again to resume
play.
If a CD is already loaded, stopping and
playing the CD by pressing
PLAY/PAUSE( ) button on the remote
control; cycling the ignition and pressing
play; or changing the source will cause the
CD to begin playing at the point where it
was stopped during the previous play. The
player will automatically play this previous
play position unless the
STOP/EJECT( ) button is pressed.
At the end of the CD, the player will auto-
matically return to the first track and con-
tinue playing.
4. Display
When the player is in DVD mode, press the
DISP button to view the DVD title, chapter
number and elapsed time and other infor-
mation about the DVD currently playing.
The next time the player is turned on, it will
return to the brightness level it was adjusted
to when last used.
The RSE unit has two presets of display
brightness. When the headlamp is turned
on, the display brightness level will be
dimmed as the preset. However, when the
headlamp is turned off, the display bright-
ness will return to the daytime brightness.
Press DISP to adjust the image format. The
image format, also known as the aspect
ratio, is a ratio of the height to width of the
image on the screen. For example, a 4:3
ratio would mean an image that is 4 units by
3 units. You have two options: 4:3 (normal)
and 16:9 (widescreen). Press the display
button to select the preferred aspect ratio.
When the RSE unit receives video signals
from the AUX, the aspect ratio can be
changed to 16:9 or 4:3 by the DISP button.
The aspect ratio information will auto-
matically disappear if no button is
pressed for three seconds.