oil KIA Sedona 2014 3.G Owner's Guide
[x] Cancel search | Manufacturer: KIA, Model Year: 2014, Model line: Sedona, Model: KIA Sedona 2014 3.GPages: 382, PDF Size: 4.67 MB
Page 335 of 382
619
Maintenance
POWER STEERING
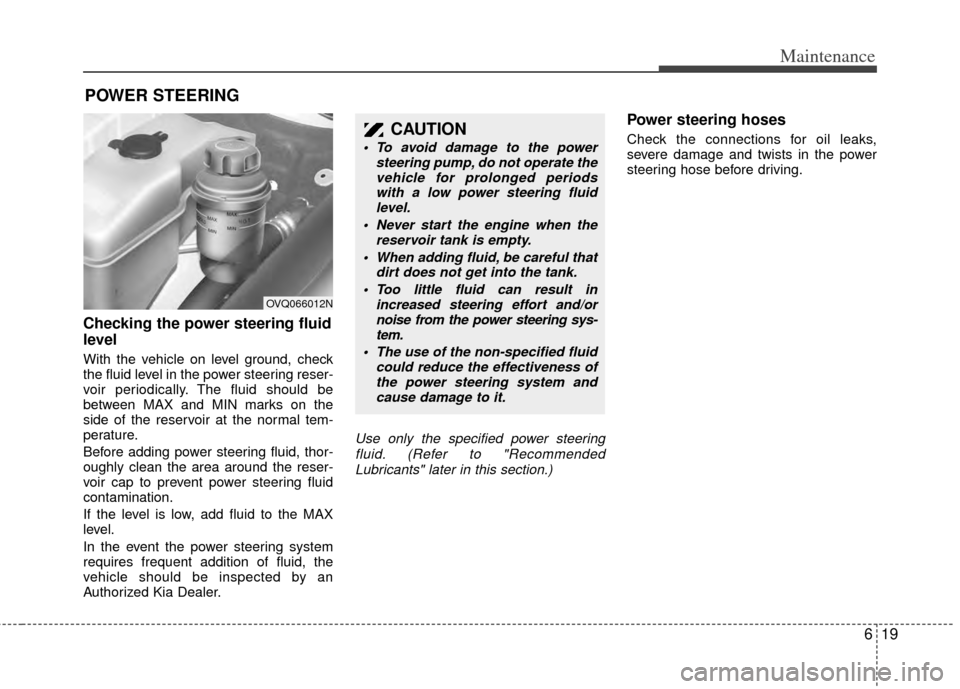
Checking the power steering fluid
level
With the vehicle on level ground, check
the fluid level in the power steering reser-
voir periodically. The fluid should be
between MAX and MIN marks on the
side of the reservoir at the normal tem-
perature.
Before adding power steering fluid, thor-
oughly clean the area around the reser-
voir cap to prevent power steering fluid
contamination.
If the level is low, add fluid to the MAX
level.
In the event the power steering system
requires frequent addition of fluid, the
vehicle should be inspected by an
Authorized Kia Dealer.
Use only the specified power steeringfluid. (Refer to "RecommendedLubricants" later in this section.)
Power steering hoses
Check the connections for oil leaks,
severe damage and twists in the power
steering hose before driving.CAUTION
To avoid damage to the power steering pump, do not operate thevehicle for prolonged periods with a low power steering fluidlevel.
Never start the engine when the reservoir tank is empty.
When adding fluid, be careful that dirt does not get into the tank.
Too little fluid can result in increased steering effort and/ornoise from the power steering sys-tem.
The use of the non-specified fluid could reduce the effectiveness ofthe power steering system andcause damage to it.
OVQ066012N
Page 339 of 382
623
Maintenance
FUSES
A vehicle’s electrical system is protected
from electrical overload damage by
fuses.This vehicle has three fuse panels, one
located in the driver’s side panel bolster,
another in the cargo area, the other in
the engine compartment near the bat-
tery.
If any of your vehicle’s lights, acces-
sories, or controls do not work, check the
appropriate circuit fuse. If a fuse has
blown, the element inside the fuse will be
melted.
If the electrical system does not work,
first check the driver’s side fuse panel.
Before replacing a blown fuse, discon-
nect the negative battery cable.
Always replace a blown fuse with one of
the same rating.
If the replacement fuse blows, this indi-
cates an electrical problem. Avoid using
the system involved and immediately
consult an Authorized Kia Dealer.
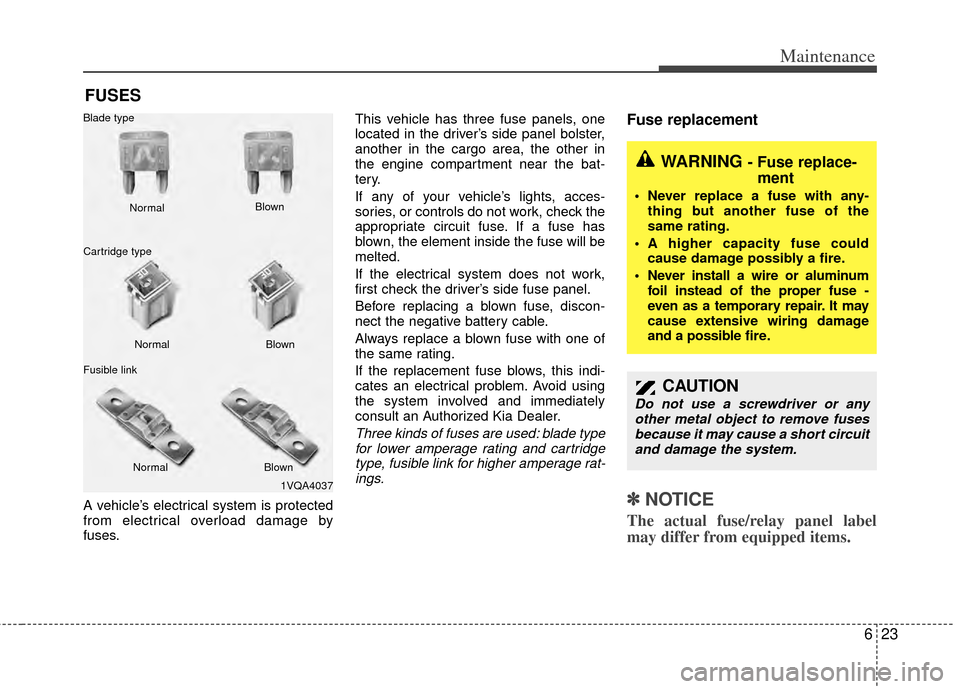
Three kinds of fuses are used: blade type
for lower amperage rating and cartridgetype, fusible link for higher amperage rat-ings.
Fuse replacement
✽ ✽ NOTICE
The actual fuse/relay panel label
may differ from equipped items.
1VQA4037
Normal
Normal
Blade type
Cartridge type
Fusible link Blown
Blown
Normal Blown
WARNING - Fuse replace-
ment
Never replace a fuse with any-
thing but another fuse of the
same rating.
A higher capacity fuse could cause damage possibly a fire.
Never install a wire or aluminum foil instead of the proper fuse -
even as a temporary repair. It may
cause extensive wiring damage
and a possible fire.
CAUTION
Do not use a screwdriver or anyother metal object to remove fuses because it may cause a short circuitand damage the system.
Page 345 of 382
629
Maintenance
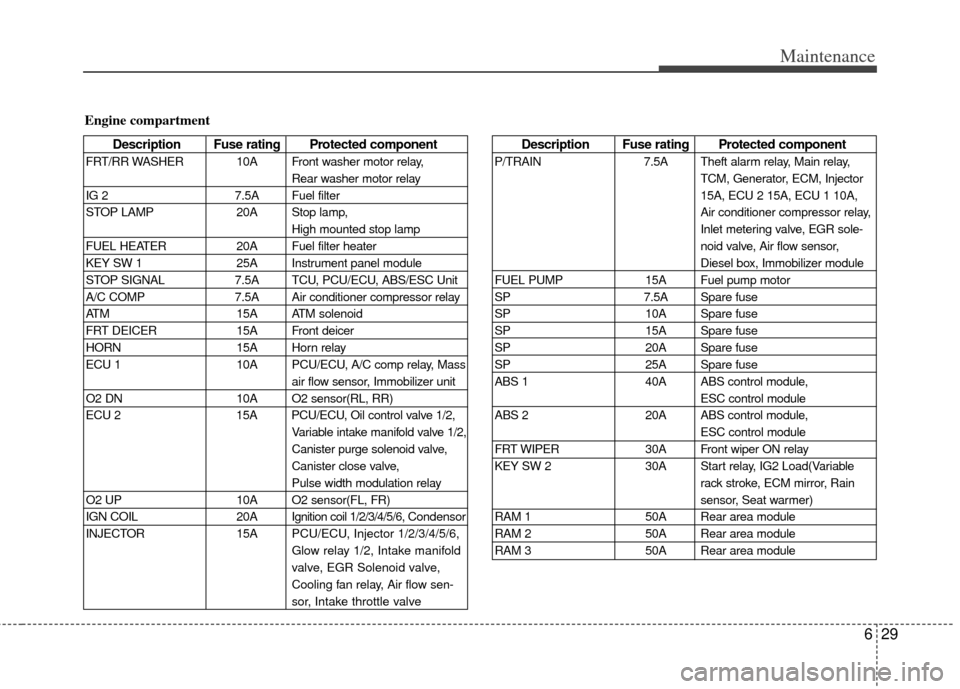
Description Fuse rating Protected component
P/TRAIN7.5A Theft alarm relay, Main relay,
TCM, Generator, ECM, Injector
15A, ECU 2 15A, ECU 1 10A,
Air conditioner compressor relay,
Inlet metering valve, EGR sole-
noid valve, Air flow sensor,
Diesel box, Immobilizer module
FUEL PUMP 15A Fuel pump motor
SP 7.5A Spare fuse
SP 10A Spare fuse
SP 15A Spare fuse
SP 20A Spare fuse
SP 25A Spare fuse
ABS 1 40A ABS control module,
ESC control module
ABS 2 20A ABS control module,
ESC control module
FRT WIPER 30A Front wiper ON relay
KEY SW 2 30A Start relay, IG2 Load(Variable
rack stroke, ECM mirror, Rain
sensor, Seat warmer)
RAM 1 50A Rear area module
RAM 2 50A Rear area module
RAM 3 50A Rear area module
Engine compartment
Description Fuse rating Protected component
FRT/RR WASHER 10A Front washer motor relay,
Rear washer motor relay
IG 2 7.5A Fuel filter
STOP LAMP 20A Stop lamp, High mounted stop lamp
FUEL HEATER 20A Fuel filter heater
KEY SW 1 25A Instrument panel module
STOP SIGNAL 7.5A TCU, PCU/ECU, ABS/ESC Unit
A/C COMP 7.5A Air conditioner compressor relay
ATM 15A ATM solenoid
FRT DEICER 15A Front deicer
HORN 15A Horn relay
ECU 1 10A PCU/ECU, A/C comp relay, Mass air flow sensor, Immobilizer unit
O2 DN 10A O2 sensor(RL, RR)
ECU 2 15A PCU/ECU, Oil control valve 1/2, Variable intake manifold valve 1/2,
Canister purge solenoid valve,
Canister close valve,
Pulse width modulation relay
O2 UP 10A O2 sensor(FL, FR)
IGN COIL 20A Ignition coil 1/2/3/4/5/6, Condensor
INJECTOR 15APCU/ECU, Injector 1/2/3/4/5/6,
Glow relay 1/2, Intake manifold
valve, EGR Solenoid valve,
Cooling fan relay, Air flow sen-
sor, Intake throttle valve
Page 349 of 382
633
Maintenance
For best battery service:
Keep the battery securely mounted.
Keep the battery top clean and dry.
Keep the terminals and connectionsclean, tight, and coated with petroleum
jelly or terminal grease.
Rinse any spilled electrolyte from the battery immediately with a solution of
water and baking soda.
If the vehicle is not going to be used for an extended time, disconnect the bat-
tery cables.
Battery recharging
Your vehicle has a maintenance-free,
calcium-based battery.
If the battery becomes discharged in ashort time (because, for example, the
headlights or interior lights were left on
while the vehicle was not in use),
recharge it by slow charging (trickle)
for 10 hours. If the battery gradually discharges
because of high electric load while the
vehicle is being used, recharge it at 20-
30A for two hours.
Items to be reset after the battery
has been discharged or the bat-
tery has been disconnected.
Clock (See Chapter 3)
Sunroof (See Chapter 3)
Trip computer (See Chapter 3)
Climate control system (See Chapter3)
Audio (See Chapter 3)
Power sliding door and power tailgate (See Chapter 3)
CAUTION
If you connect unauthorized elec-tronic devices to the battery, thebattery may be discharged. Neveruse unauthorized devices.
CAUTION
Before performing maintenance or recharging the battery, turn offall accessories and stop theengine.
The negative battery cable must be removed first and installed lastwhen the battery is disconnected.
WARNING- Recharging battery
When recharging the battery,
observe the following precautions:
The battery must be removed
from the vehicle and placed in an
area with good ventilation.
Do not allow cigarettes, sparks, or flame near the battery.
(Continued)
(Continued)
Watch the battery during charg-ing, and stop or reduce the charg-
ing rate if the battery cells begin
gassing (boiling) violently or if
the temperature of the electrolyte
of any cell exceeds 49°C (120°F).
Wear eye protection when check- ing the battery during charging.
Disconnect the battery charger in the following order.
1. Turn off the battery charger main switch.
2. Unhook the negative clamp from the negative battery terminal.
3. Unhook the positive clamp from the positive battery terminal.
Page 359 of 382
643
Maintenance
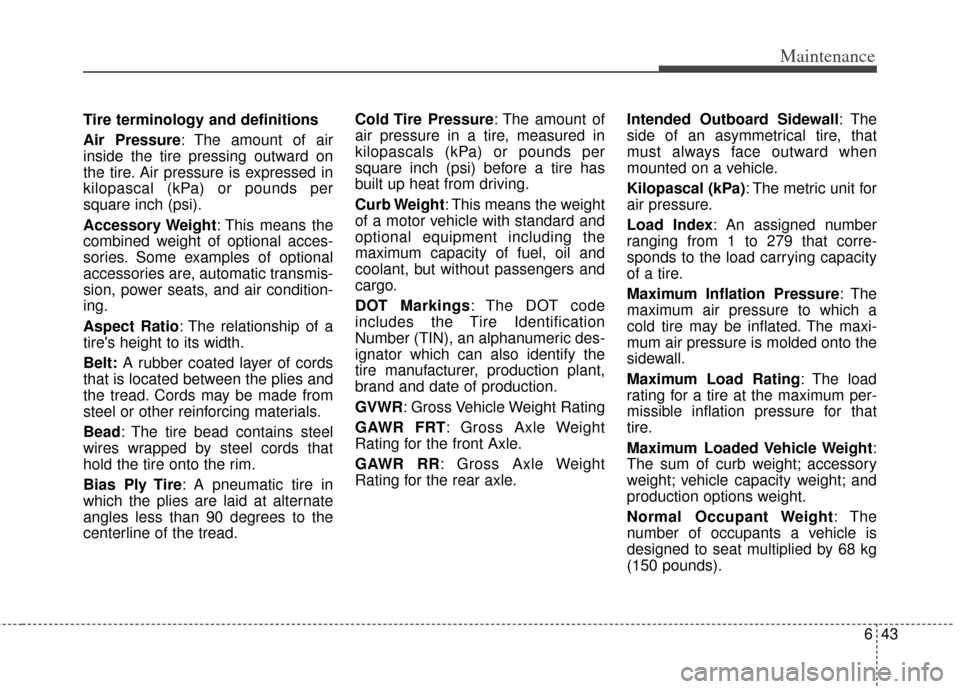
Tire terminology and definitions
Air Pressure: The amount of air
inside the tire pressing outward on
the tire. Air pressure is expressed in
kilopascal (kPa) or pounds per
square inch (psi).
Accessory Weight: This means the
combined weight of optional acces-
sories. Some examples of optional
accessories are, automatic transmis-
sion, power seats, and air condition-
ing.
Aspect Ratio : The relationship of a
tire's height to its width.
Belt: A rubber coated layer of cords
that is located between the plies and
the tread. Cords may be made from
steel or other reinforcing materials.
Bead: The tire bead contains steel
wires wrapped by steel cords that
hold the tire onto the rim.
Bias Ply Tire : A pneumatic tire in
which the plies are laid at alternate
angles less than 90 degrees to the
centerline of the tread. Cold Tire Pressure: The amount of
air pressure in a tire, measured in
kilopascals (kPa) or pounds per
square inch (psi) before a tire has
built up heat from driving.
Curb Weight: This means the weight
of a motor vehicle with standard and
optional equipment including the
maximum capacity of fuel, oil and
coolant, but without passengers and
cargo.
DOT Markings: The DOT code
includes the Tire Identification
Number (TIN), an alphanumeric des-
ignator which can also identify the
tire manufacturer, production plant,
brand and date of production.
GVWR: Gross Vehicle Weight Rating
GAWR FRT: Gross Axle Weight
Rating for the front Axle.
GAWR RR: Gross Axle Weight
Rating for the rear axle.
Intended Outboard Sidewall
: The
side of an asymmetrical tire, that
must always face outward when
mounted on a vehicle.
Kilopascal (kPa): The metric unit for
air pressure.
Load Index: An assigned number
ranging from 1 to 279 that corre-
sponds to the load carrying capacity
of a tire.
Maximum Inflation Pressure: The
maximum air pressure to which a
cold tire may be inflated. The maxi-
mum air pressure is molded onto the
sidewall.
Maximum Load Rating : The load
rating for a tire at the maximum per-
missible inflation pressure for that
tire.
Maximum Loaded Vehicle Weight:
The sum of curb weight; accessory
weight; vehicle capacity weight; and
production options weight.
Normal Occupant Weight: The
number of occupants a vehicle is
designed to seat multiplied by 68 kg
(150 pounds).
Page 363 of 382
647
Maintenance
LUBRICANT
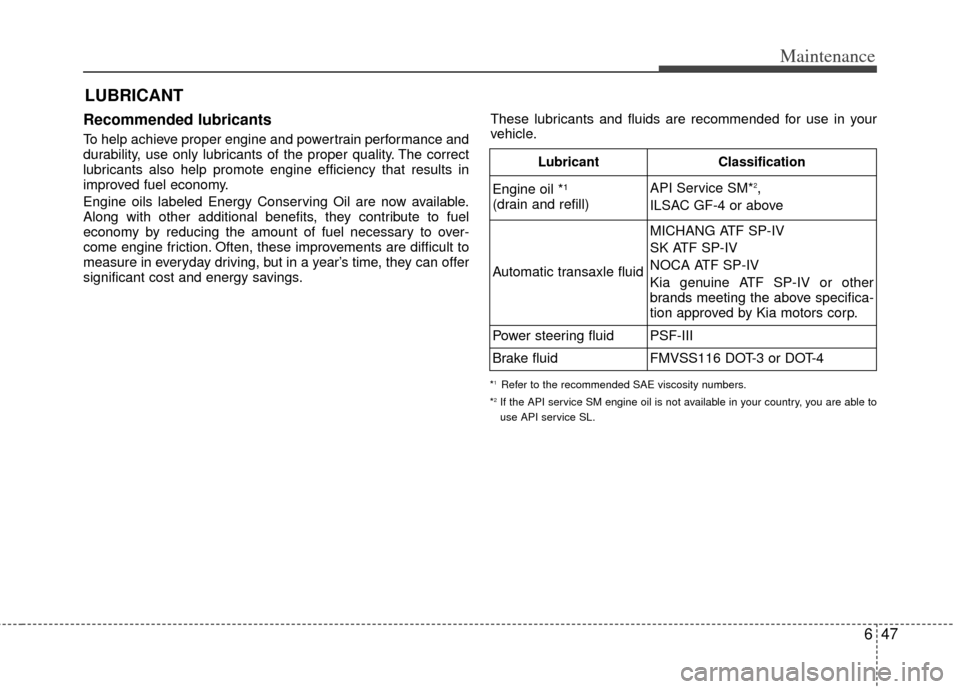
Recommended lubricants
To help achieve proper engine and powertrain performance and
durability, use only lubricants of the proper quality. The correct
lubricants also help promote engine efficiency that results in
improved fuel economy.
Engine oils labeled Energy Conserving Oil are now available.
Along with other additional benefits, they contribute to fuel
economy by reducing the amount of fuel necessary to over-
come engine friction. Often, these improvements are difficult to
measure in everyday driving, but in a year’s time, they can offer
significant cost and energy savings.
*1Refer to the recommended SAE viscosity numbers.
*2If the API service SM engine oil is not available in your country, you are able to
use API service SL.
These lubricants and fluids are recommended for use in your
vehicle.
LubricantClassification
Engine oil *¹
(drain and refill)API Service SM*2,
ILSAC GF-4 or above
Automatic transaxle fluid
MICHANG ATF SP-IV
SK ATF SP-IV
NOCA ATF SP-IV
Kia genuine ATF SP-IV or other
brands meeting the above specifica-
tion approved by Kia motors corp.
Power steering fluidPSF-III
Brake fluidFMVSS116 DOT-3 or DOT-4
Page 364 of 382
Maintenance
48
6
Recommended SAE viscosity
number
CAUTION
Always be sure to clean the area
around any filler plug, drain plug, ordipstick before checking or drain-ing any lubricant. This is especiallyimportant in dusty or sandy areasand when the vehicle is used onunpaved roads. Cleaning the plugand dipstick areas will prevent dirt and grit from entering the engineand other mechanisms that couldbe damaged.
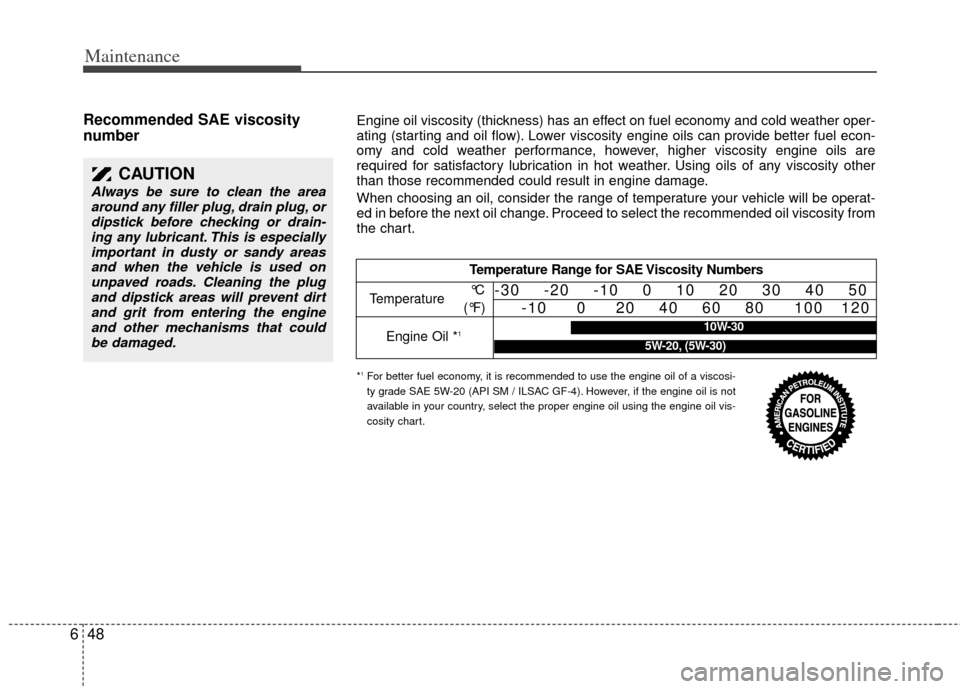
Temperature Range for SAE Viscosity Numbers
Temperature
Engine Oil *
1
°C
(°F)-30 -20 -10 0 10 20 30 40 50 -10 0 20 40 60 80 100 120
10W-30
5W-20, (5W-30)
*1For better fuel economy, it is recommended to use the engine oil of a viscosi-
ty grade SAE 5W-20 (API SM / ILSAC GF-4). However, if the engine oil is not
available in your country, select the proper engine oil using the engine oil vis-
cosity chart.
Engine oil viscosity (thickness) has an effect on fuel economy and cold weather oper-
ating (starting and oil flow). Lower viscosity engine oils can provide better fuel econ-
omy and cold weather performance, however, higher viscosity engine oils are
required for satisfactory lubrication in hot weather. Using oils of any viscosity other
than those recommended could result in engine damage.
When choosing an oil, consider the range of temperature your vehicle will be operat-
ed in before the next oil change. Proceed to select the recommended oil viscosity from
the chart.
Page 366 of 382
Maintenance
50
6
Waxing
Wax the vehicle when water will no
longer bead on the paint.
Always wash and dry the vehicle before
waxing. Use a good quality liquid or
paste wax, and follow the manufacturer’s
instructions. Wax all metal trim to protect
it and to maintain its luster.
Removing oil, tar, and similar materials
with a spot remover will usually strip the
wax from the finish. Be sure to re-wax
these areas even if the rest of the vehicle
does not yet need waxing.Finish damage repair
Deep scratches or stone chips in the
painted surface must be repaired
promptly. Exposed metal will quickly rust
and may develop into a major repair
expense.
✽ ✽
NOTICE
If your vehicle is damaged and requires
any metal repair or replacement, be sure
the body shop applies anti-corrosion
materials to the parts repaired or
replaced.
Bright-metal maintenance
To remove road tar and insects, use a
tar remover, not a scraper or other
sharp object.
To protect the surfaces of bright-metal parts from corrosion, apply a coating of
wax or chrome preservative and rub to
a high luster.
During winter weather or in coastal areas, cover the bright metal parts with
a heavier coating of wax or preserva-
tive. If necessary, coat the parts with
non-corrosive petroleum jelly or other
protective compound.CAUTION
Wiping dust or dirt off the body with a dry cloth will scratch thefinish.
Do not use steel wool, abrasive cleaners, or strong detergentscontaining highly alkaline or caustic agents on chrome-platedor anodized aluminum parts. Thismay result in damage to the pro-tective coating and cause discol-oration or paint deterioration.
CAUTION
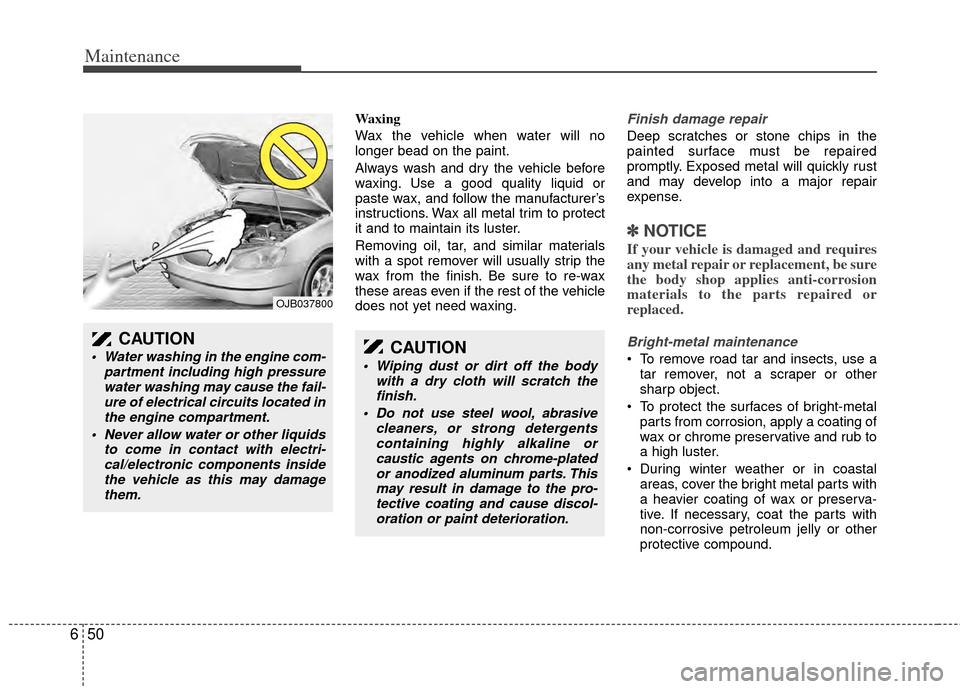
Water washing in the engine com- partment including high pressurewater washing may cause the fail- ure of electrical circuits located inthe engine compartment.
Never allow water or other liquids to come in contact with electri-cal/electronic components insidethe vehicle as this may damagethem.
OJB037800
Page 367 of 382
651
Maintenance
Underbody maintenance
Corrosive materials used for ice and
snow removal and dust control may col-
lect on the underbody. If these materials
are not removed, accelerated rusting can
occur on underbody parts such as the
fuel lines, frame, floor pan and exhaust
system, even though they have been
treated with rust protection.
Thoroughly flush the vehicle underbody
and wheel openings with lukewarm or
cold water once a month at the end of
each winter. Pay special attention to
these areas because it is difficult to see
all the mud and dirt. It will do more harm
than good to wet down the road grime
without removing it. The lower edges of
doors, rocker panels, and frame mem-
bers have drain holes that should not be
allowed to clog with dirt; trapped water in
these areas can cause rusting.
Aluminum or chrome wheel mainte-nance
The aluminum or chrome wheels are
coated with a clear protective finish.
Do not use any abrasive cleaner, pol- ishing compound, solvent, or wire
brushes on aluminum or chrome
wheels. They may scratch or damage
the finish.
Clean the wheel when it has cooled.
Use only a mild soap or neutral deter- gent, and rinse thoroughly with water.
Also, be sure to clean the wheels after
driving on salted roads. This helps pre-
vent corrosion.
Avoid washing the wheels with high- speed car wash brushes.
Do not use any alkaline or acid deter- gents. It may damage and corrode the
aluminum or chrome wheels coated
with a clear protective finish.
Interior care
Interior general precautions
Prevent chemicals such as perfume, cos-
metic oil, sun cream, hand cleaner, and
air freshener from contacting the interior
parts because they may cause damage
or discoloration. If they do contact the
interior parts, wipe them off immediately.
See the instructions for the proper way to
clean vinyl.
✽ ✽ NOTICE
Never allow water or other liquids to
come in contact with electrical/ electron-
ic components inside the vehicle as this
may damage them.
WARNING
After washing the vehicle, test the
brakes while driving slowly to see if
they have been affected by water. If
braking performance is impaired,
dry the brakes by applying them
lightly while maintaining a slow for-
ward speed.
CAUTION
When cleaning leather products
(steering wheel, seats etc.), use neutral detergents or low alcoholcontent solutions. If you use high alcohol content solutions oracid/alkaline detergents, the colorof the leather may fade or the sur-face may get stripped off.
Page 368 of 382
Maintenance
52
6
Cleaning the upholstery and interior
trim
Vinyl
Remove dust and loose dirt from vinyl
with a whisk broom or vacuum cleaner.
Clean vinyl surfaces with a vinyl cleaner.
Fabric
Remove dust and loose dirt from fabric
with a whisk broom or vacuum cleaner.
Clean with a mild soap solution recom-
mended for upholstery or carpets.
Remove fresh spots immediately with a
fabric spot cleaner. If fresh spots do not
receive immediate attention, the fabric
can be stained and its color can be
affected. Also, its fire-resistant properties
can be reduced if the material is not
properly maintained.
Cleaning the lap/shoulder belt web-bing
Clean the belt webbing with any mild
soap solution recommended for cleaning
upholstery or carpet. Follow the instruc-
tions provided with the soap. Do not
bleach or re-dye the webbing because
this may weaken it.
Cleaning the interior window glass
If the interior glass surfaces of the vehi-
cle become fogged (that is, covered with
an oily, greasy or waxy film), they should
be cleaned with glass cleaner. Follow the
directions on the glass cleaner container.
CAUTION
Do not scrape or scratch the insideof the rear window. This may resultin damage to the rear window defroster grid.
CAUTION
Using anything but recommendedcleaners and procedures may affectthe fabric’s appearance and fire-resistant properties.