fuel cap KIA Sedona 2014 3.G Owner's Manual
[x] Cancel search | Manufacturer: KIA, Model Year: 2014, Model line: Sedona, Model: KIA Sedona 2014 3.GPages: 382, PDF Size: 4.67 MB
Page 39 of 382
Features of your vehicle
30
3
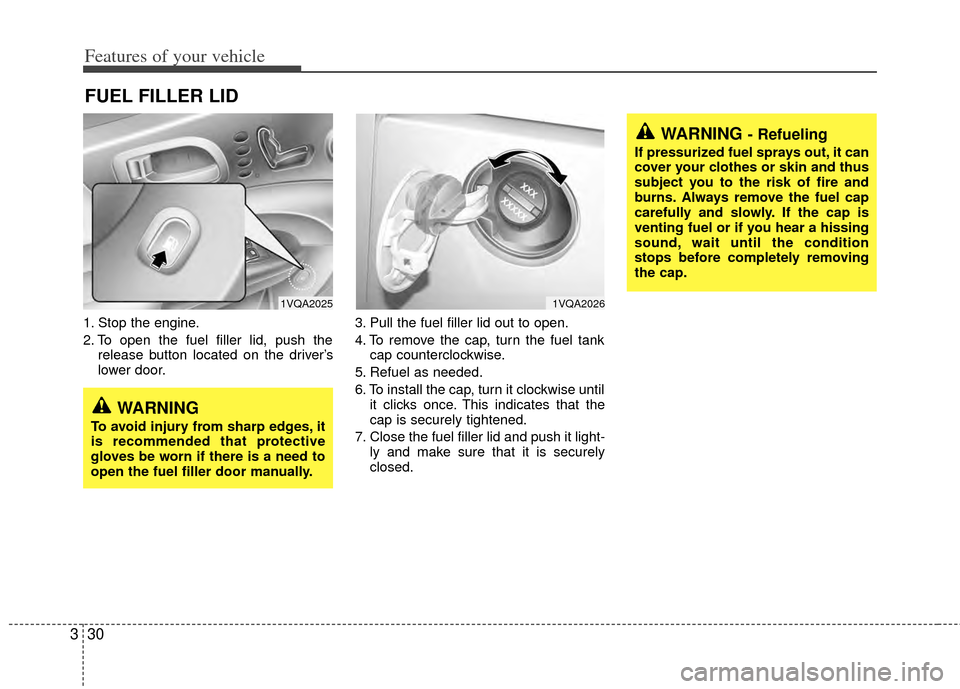
1. Stop the engine.
2. To open the fuel filler lid, push the
release button located on the driver’s
lower door. 3. Pull the fuel filler lid out to open.
4. To remove the cap, turn the fuel tank
cap counterclockwise.
5. Refuel as needed.
6. To install the cap, turn it clockwise until it clicks once. This indicates that the
cap is securely tightened.
7. Close the fuel filler lid and push it light- ly and make sure that it is securely
closed.
FUEL FILLER LID
1VQA2026
WARNING
To avoid injury from sharp edges, it
is recommended that protective
gloves be worn if there is a need to
open the fuel filler door manually.
WARNING - Refueling
If pressurized fuel sprays out, it can
cover your clothes or skin and thus
subject you to the risk of fire and
burns. Always remove the fuel cap
carefully and slowly. If the cap is
venting fuel or if you hear a hissing
sound, wait until the condition
stops before completely removing
the cap.
1VQA2025
Page 40 of 382
331
Features of your vehicle
WARNING - Refueling dan-
gers
Automotive fuels are flammable
materials. When refueling, please
note the following guidelines care-
fully. Failure to follow these guide-
lines may result in severe personal
injury, severe burns or death by fire
or explosion.
Before refueling note the locationof the Emergency Gasoline Shut-
Off, if available, at the gas station
facility.
Before touching the fuel nozzle, you should eliminate potentially
dangerous static electricity dis-
charge by touching another metal
part of the vehicle, a safe distance
away from the fuel filler neck, noz-
zle, or other gas source.
(Continued)
(Continued)
Do not get back into a vehicleonce you have begun refueling
since you can generate static
electricity by touching, rubbing or
sliding against any item or fabric
(polyester, satin, nylon, etc.)
capable of producing static elec-
tricity. Static electricity discharge
can ignite fuel vapors resulting in
rapid burning. If you must re-
enter the vehicle, you should
once again eliminate potentially
dangerous static electricity dis-
charge by touching a metal part
of the vehicle, away from the fuel
filler neck, nozzle or other gaso-
line source.
When using a portable fuel con- tainer be sure to place the con-
tainer on the ground prior to refu-
eling. Static electricity discharge
from the container can ignite fuel
vapors causing a fire. Once refu-
eling has begun, contact with the
vehicle should be maintained
until the filling is complete.
(Continued)(Continued)Use only portable plastic fuel
containers designed to carry and
store gasoline.
Do not use cellular phones while refueling. Electric current and/or
electronic interference from cellu-
lar phones can potentially ignite
fuel vapors causing a fire.
When refueling, always shut the engine off. Sparks produced by
electrical components related to
the engine can ignite fuel vapors
causing a fire. Once refueling is
complete, check to make sure the
filler cap and filler door are
securely closed, before starting
the engine.
DO NOT use matches or a lighter and DO NOT SMOKE or leave a lit
cigarette in your vehicle while at a
gas station especially during
refueling. Automotive fuel is high-
ly flammable and can, when ignit-
ed, result in fire.
(Continued)
Page 41 of 382
Features of your vehicle
32
3
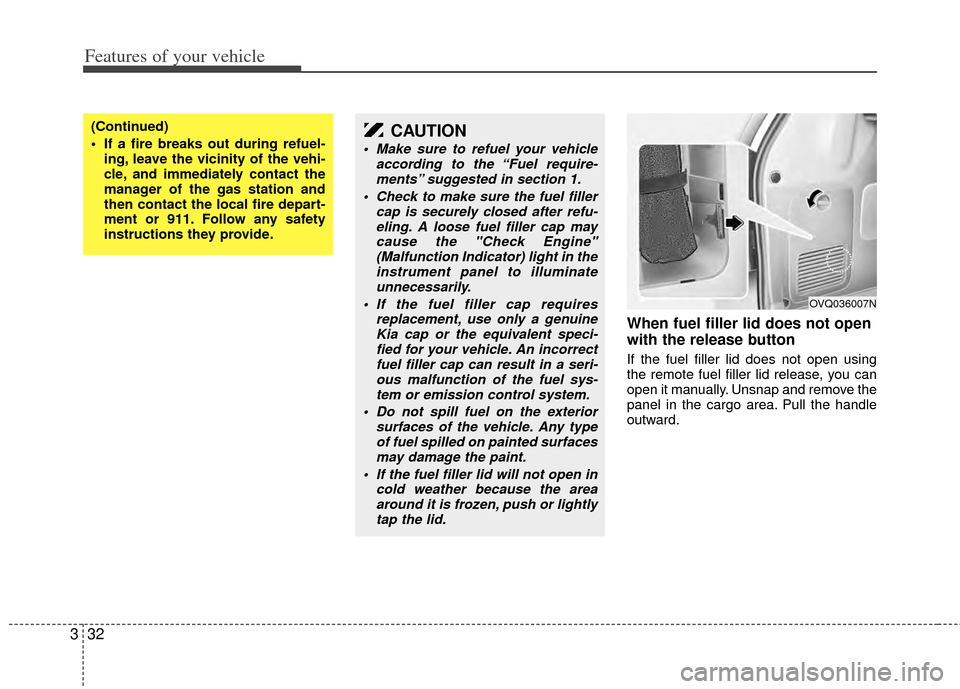
When fuel filler lid does not open
with the release button
If the fuel filler lid does not open using
the remote fuel filler lid release, you can
open it manually. Unsnap and remove the
panel in the cargo area. Pull the handle
outward.
(Continued)
If a fire breaks out during refuel-
ing, leave the vicinity of the vehi-
cle, and immediately contact the
manager of the gas station and
then contact the local fire depart-
ment or 911. Follow any safety
instructions they provide.CAUTION
Make sure to refuel your vehicle according to the “Fuel require-ments” suggested in section 1.
Check to make sure the fuel filler cap is securely closed after refu-eling. A loose fuel filler cap maycause the "Check Engine"(Malfunction Indicator) light in theinstrument panel to illuminateunnecessarily.
If the fuel filler cap requires replacement, use only a genuineKia cap or the equivalent speci-fied for your vehicle. An incorrect fuel filler cap can result in a seri-ous malfunction of the fuel sys-tem or emission control system.
Do not spill fuel on the exterior surfaces of the vehicle. Any typeof fuel spilled on painted surfacesmay damage the paint.
If the fuel filler lid will not open in cold weather because the areaaround it is frozen, push or lightlytap the lid.
OVQ036007N
Page 128 of 382
3119
Features of your vehicle
Engine temperature gauge
This gauge shows the temperature of the
engine coolant when the ignition switch
is ON.
Do not continue driving with an overheat-
ed engine. If your vehicle overheats, refer
to “Overheating” in the Index.
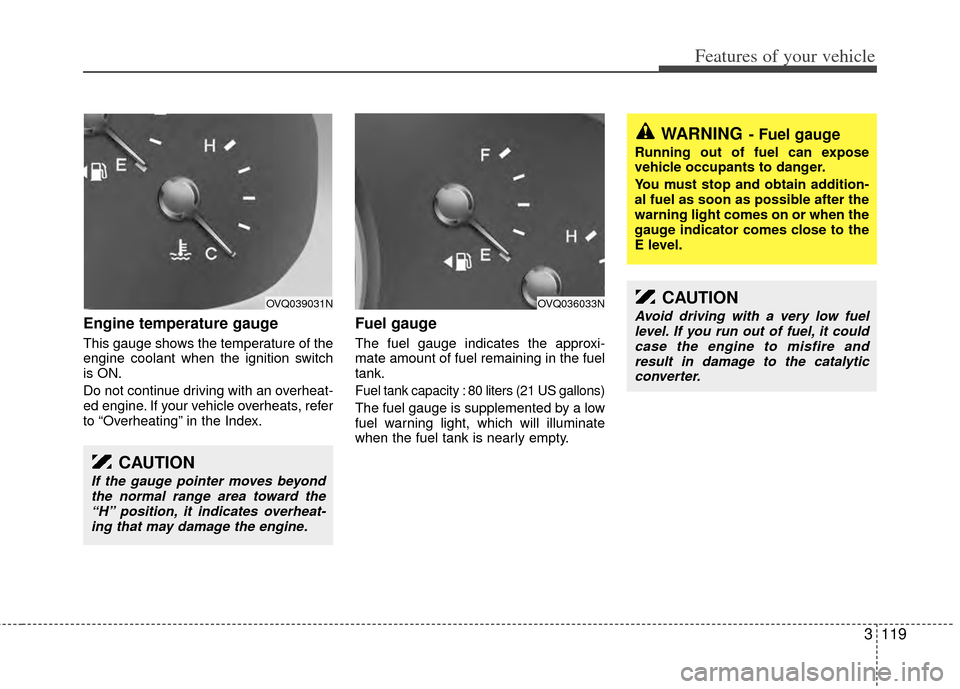
Fuel gauge
The fuel gauge indicates the approxi-
mate amount of fuel remaining in the fuel
tank.
Fuel tank capacity : 80 liters (21 US gallons)
The fuel gauge is supplemented by a low
fuel warning light, which will illuminate
when the fuel tank is nearly empty.
OVQ036033N
WARNING- Fuel gauge
Running out of fuel can expose
vehicle occupants to danger.
You must stop and obtain addition-
al fuel as soon as possible after the
warning light comes on or when the
gauge indicator comes close to the
E level.
CAUTION
Avoid driving with a very low fuellevel. If you run out of fuel, it couldcase the engine to misfire and result in damage to the catalyticconverter.
CAUTION
If the gauge pointer moves beyond the normal range area toward the“H” position, it indicates overheat- ing that may damage the engine.
OVQ039031N
Page 140 of 382
3131
Features of your vehicle
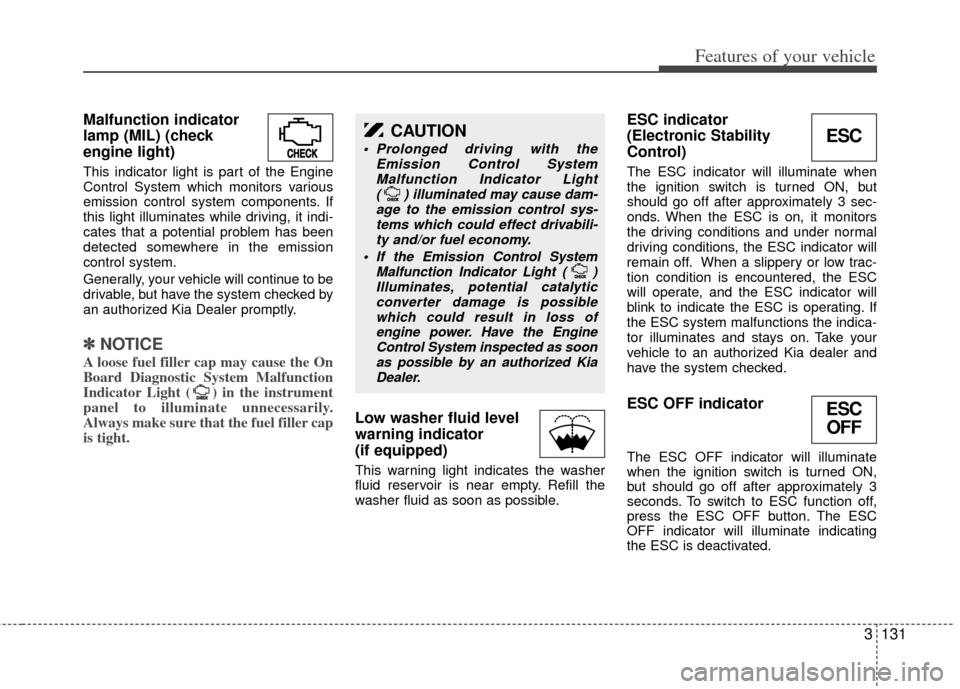
Malfunction indicator
lamp (MIL) (check
engine light)
This indicator light is part of the Engine
Control System which monitors various
emission control system components. If
this light illuminates while driving, it indi-
cates that a potential problem has been
detected somewhere in the emission
control system.
Generally, your vehicle will continue to be
drivable, but have the system checked by
an authorized Kia Dealer promptly.
✽ ✽NOTICE
A loose fuel filler cap may cause the On
Board Diagnostic System Malfunction
Indicator Light ( ) in the instrument
panel to illuminate unnecessarily.
Always make sure that the fuel filler cap
is tight.
Low washer fluid level
warning indicator
(if equipped)
This warning light indicates the washer
fluid reservoir is near empty. Refill the
washer fluid as soon as possible.
ESC indicator
(Electronic Stability
Control)
The ESC indicator will illuminate when
the ignition switch is turned ON, but
should go off after approximately 3 sec-
onds. When the ESC is on, it monitors
the driving conditions and under normal
driving conditions, the ESC indicator will
remain off. When a slippery or low trac-
tion condition is encountered, the ESC
will operate, and the ESC indicator will
blink to indicate the ESC is operating. If
the ESC system malfunctions the indica-
tor illuminates and stays on. Take your
vehicle to an authorized Kia dealer and
have the system checked.
ESC OFF indicator
The ESC OFF indicator will illuminate
when the ignition switch is turned ON,
but should go off after approximately 3
seconds. To switch to ESC function off,
press the ESC OFF button. The ESC
OFF indicator will illuminate indicating
the ESC is deactivated.
CAUTION
Prolonged driving with the
Emission Control SystemMalfunction Indicator Light ( ) illuminated may cause dam- age to the emission control sys-tems which could effect drivabili- ty and/or fuel economy.
If the EmissionControl System
Malfunction Indicator Light ( ) Illuminates, potential catalyticconverter damage is possible which could result in loss ofengine power. Have the EngineControl System inspected as soonas possible by an authorized Kia Dealer.
ESC
ESCOFF
Page 288 of 382
Driving your vehicle
30
4
Your vehicle can tow a trailer. To identify
what the vehicle trailering capacity is for
your vehicle, you should read the infor-
mation in “Weight of the Trailer” that
appears later in this section.
Remember that trailering is different than
just driving your vehicle by itself.
Trailering means changes in handling,
durability, and fuel economy. Successful,
safe trailering requires correct equip-
ment, and it has to be used properly. This section contains many time-tested,
important trailering tips and safety rules.
Many of these are important for your
safety and that of your passengers.
Please read this section carefully before
you pull a trailer.
Load-pulling components such as the
engine, transaxle, wheel assemblies, and
tires are forced to work harder against
the load of the added weight. The engine
is required to operate at relatively higher
speeds and under greater loads. This
additional burden generates extra heat.
The trailer also adds considerably to
wind resistance, increasing the pulling
requirements.
TRAILER TOWING
WARNING- Towing a trail-
er
If you don't use the correct equip-
ment and drive improperly, you can
lose control when you pull a trailer.
For example, if the trailer is too
heavy, the brakes may not work well
- or even at all. You and your pas-
sengers could be seriously or fatal-
ly injured. Pull a trailer only if you
have followed all the steps in this
section.
WARNING- Weight limits
Before towing, make sure the total
trailer weight, gross combination
weight, gross vehicle weight, gross
axle weight and trailer tongue load
are all within the limits.
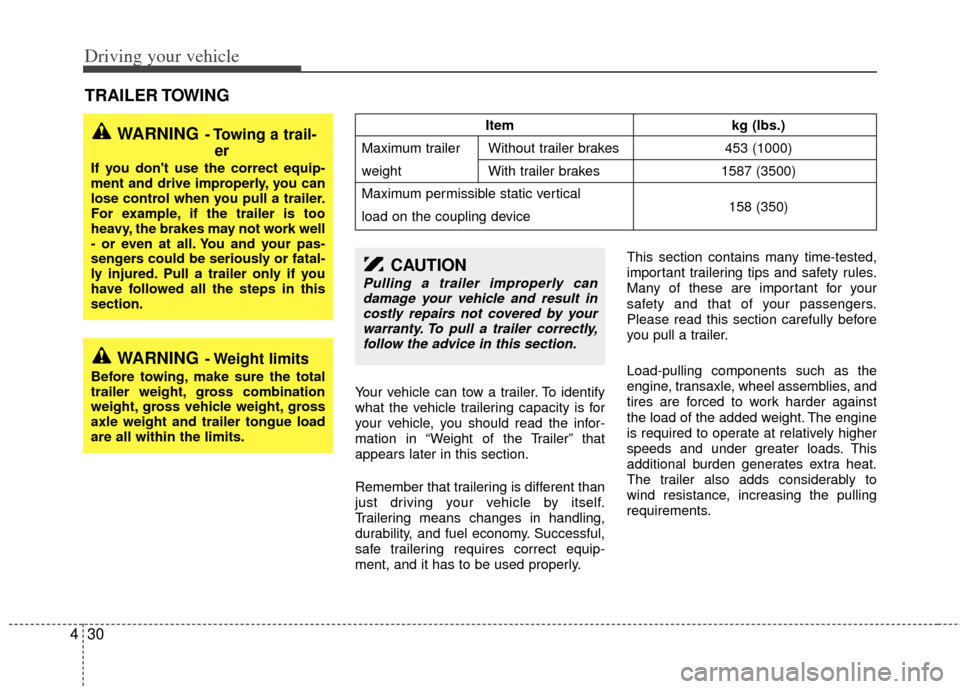
Item kg (lbs.)
Maximum trailer Without trailer brakes 453 (1000)
weight With trailer brakes 1587 (3500)
Maximum permissible static vertical
load on the coupling device 158 (350)
CAUTION
Pulling a trailer improperly can
damage your vehicle and result in costly repairs not covered by yourwarranty. To pull a trailer correctly, follow the advice in this section.
Page 319 of 382
63
Maintenance
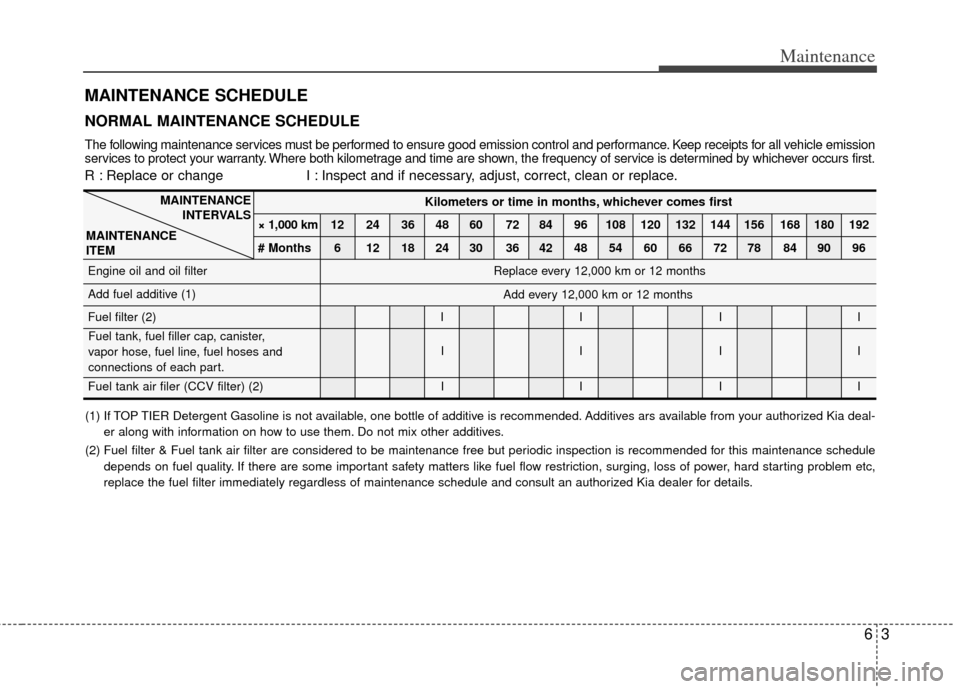
MAINTENANCE SCHEDULE
Kilometers or time in months, whichever comes first
× 1,000 km 12 24 36 48 60 72 84 96 108 120 132 144 156 168 180 192
# Months 6 12 18 24 30 36 42 48 54 60 66 72 78 84 90 96
Engine oil and oil filter
Add fuel additive (1)
Fuel filter (2) I I I I
II II
Fuel tank air filer (CCV filter) (2)II II
MAINTENANCE
INTERVALS
MAINTENANCE
ITEM
Replace every 12,000 km or 12 months
Add every 12,000 km or 12 months
(1) If TOP TIER Detergent Gasoline is not available, one bottle of additive is recommended. Additives ars available from your au thorized Kia deal-
er along with information on how to use them. Do not mix other additives.
(2) Fuel filter & Fuel tank air filter are considered to be maintenance free\
but periodic inspection is recommended for this maintenance schedule depends on fuel quality. If there are some important safety matters like fuel flow restriction, surging, loss of power, hard starting problem etc,
replace the fuel filter immediately regardless of maintenance schedule a\
nd consult an authorized Kia dealer for details.
The following maintenance services must be performed to ensure good emission control and performance. Keep receipts for all vehicle emission
services to protect your warranty. Where both kilometrage and time are shown, the frequency of service is determined by whichever occurs first.
R : Replace or change I : Inspect and if necessary, adjust, correct, clean or replace.
NORMAL MAINTENANCE SCHEDULE
Fuel tank, fuel filler cap, canister,
vapor hose, fuel line, fuel hoses and
connections of each part.
Page 351 of 382
635
Maintenance
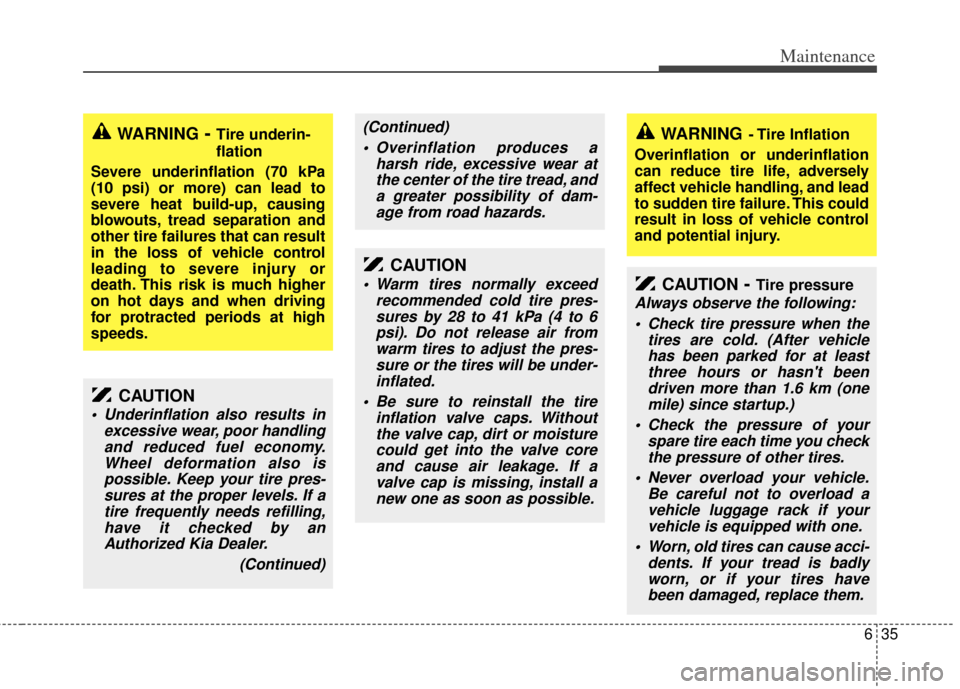
WARNING- Tire underin-
flation
Severe underinflation (70 kPa
(10 psi) or more) can lead to
severe heat build-up, causing
blowouts, t read separation and
other tire failures that can result
in the loss of vehicle control
leading to severe injury or
death. This risk is much higher
on hot days and when driving
for protracted periods at high
speeds.
CAUTION
Underinflation also results in excessive wear, poor handlingand reduced fuel economy.Wheel deformation also ispossible. Keep your tire pres-sures at the proper levels. If atire frequently needs refilling,have it checked by anAuthorized Kia Dealer.
(Continued)
WARNING- Tire Inflation
Overinflation or underinflation
can reduce tire life, adversely
affect vehicle handling, and lead
to sudden tire failure. This could
result in loss of vehicle control
and potential injury.
CAUTION- Tire pressure
Always observe the following: Check tire pressure when the tires are cold. (After vehiclehas been parked for at leastthree hours or hasn't beendriven more than 1.6 km (onemile) since startup.)
Check the pressure of your spare tire each time you checkthe pressure of other tires.
Never overload your vehicle. Be careful not to overload avehicle luggage rack if yourvehicle is equipped with one.
Worn, old tires can cause acci- dents. If your tread is badlyworn, or if your tires havebeen damaged, replace them.
CAUTION
Warm tires normally exceed recommended cold tire pres-sures by 28 to 41 kPa (4 to 6psi). Do not release air fromwarm tires to adjust the pres-sure or the tires will be under-inflated.
Be sure to reinstall the tire inflation valve caps. Withoutthe valve cap, dirt or moisturecould get into the valve coreand cause air leakage. If avalve cap is missing, install anew one as soon as possible.
(Continued)
Overinflation produces a harsh ride, excessive wear atthe center of the tire tread, anda greater possibility of dam-age from road hazards.
Page 359 of 382
643
Maintenance
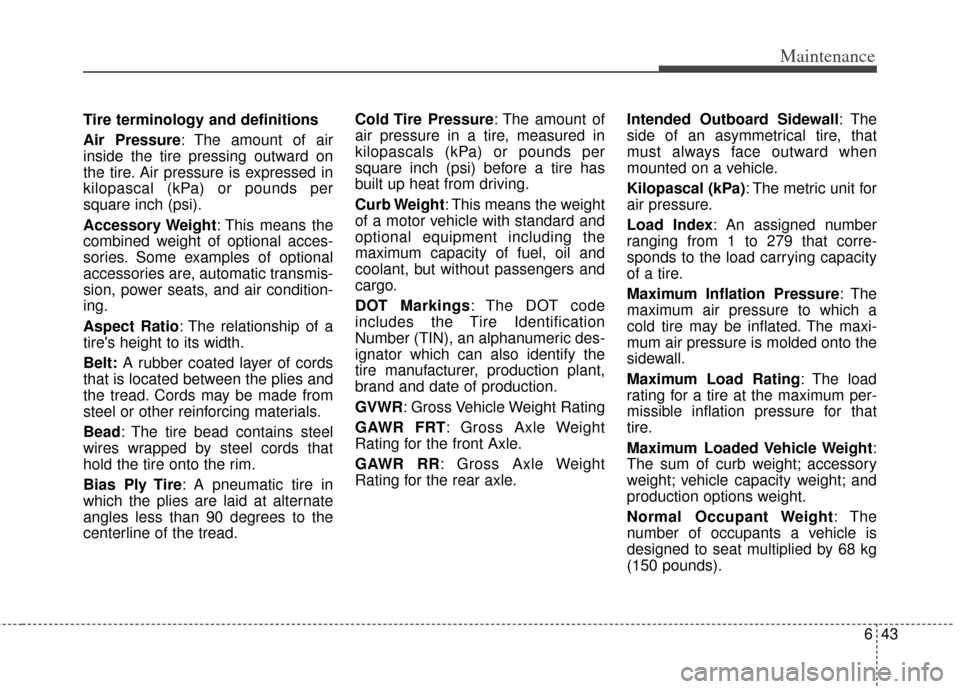
Tire terminology and definitions
Air Pressure: The amount of air
inside the tire pressing outward on
the tire. Air pressure is expressed in
kilopascal (kPa) or pounds per
square inch (psi).
Accessory Weight: This means the
combined weight of optional acces-
sories. Some examples of optional
accessories are, automatic transmis-
sion, power seats, and air condition-
ing.
Aspect Ratio : The relationship of a
tire's height to its width.
Belt: A rubber coated layer of cords
that is located between the plies and
the tread. Cords may be made from
steel or other reinforcing materials.
Bead: The tire bead contains steel
wires wrapped by steel cords that
hold the tire onto the rim.
Bias Ply Tire : A pneumatic tire in
which the plies are laid at alternate
angles less than 90 degrees to the
centerline of the tread. Cold Tire Pressure: The amount of
air pressure in a tire, measured in
kilopascals (kPa) or pounds per
square inch (psi) before a tire has
built up heat from driving.
Curb Weight: This means the weight
of a motor vehicle with standard and
optional equipment including the
maximum capacity of fuel, oil and
coolant, but without passengers and
cargo.
DOT Markings: The DOT code
includes the Tire Identification
Number (TIN), an alphanumeric des-
ignator which can also identify the
tire manufacturer, production plant,
brand and date of production.
GVWR: Gross Vehicle Weight Rating
GAWR FRT: Gross Axle Weight
Rating for the front Axle.
GAWR RR: Gross Axle Weight
Rating for the rear axle.
Intended Outboard Sidewall
: The
side of an asymmetrical tire, that
must always face outward when
mounted on a vehicle.
Kilopascal (kPa): The metric unit for
air pressure.
Load Index: An assigned number
ranging from 1 to 279 that corre-
sponds to the load carrying capacity
of a tire.
Maximum Inflation Pressure: The
maximum air pressure to which a
cold tire may be inflated. The maxi-
mum air pressure is molded onto the
sidewall.
Maximum Load Rating : The load
rating for a tire at the maximum per-
missible inflation pressure for that
tire.
Maximum Loaded Vehicle Weight:
The sum of curb weight; accessory
weight; vehicle capacity weight; and
production options weight.
Normal Occupant Weight: The
number of occupants a vehicle is
designed to seat multiplied by 68 kg
(150 pounds).
Page 374 of 382
Specifications
47
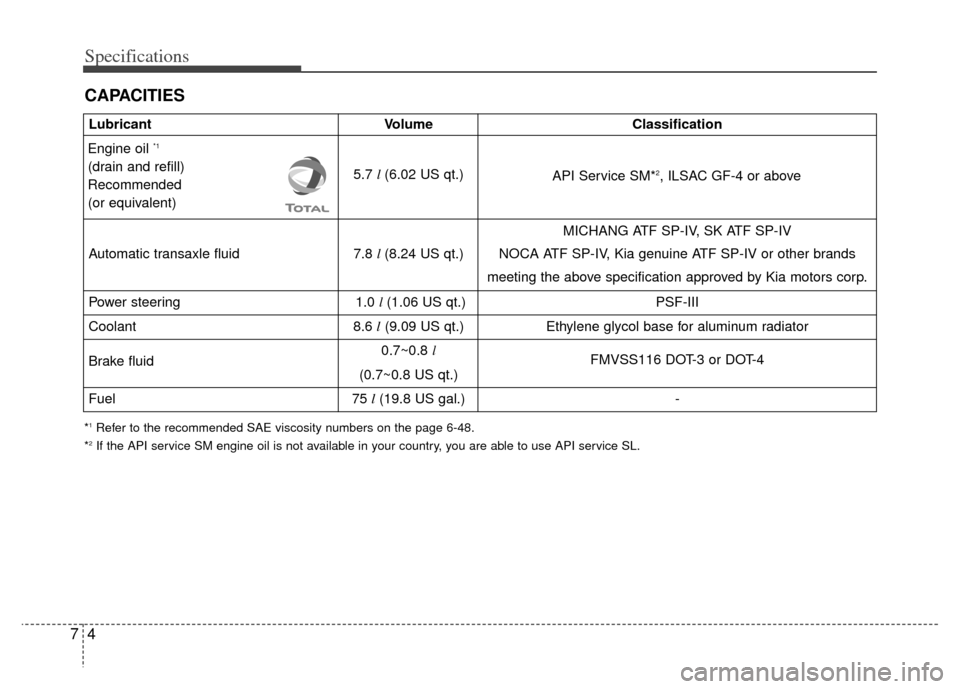
CAPACITIES
LubricantVolume Classification
5.7 l (6.02 US qt.)
MICHANG ATF SP-IV, SK ATF SP-IV
Automatic transaxle fluid 7.8 l (8.24 US qt.) NOCA ATF SP-IV, Kia genuine ATF SP-IV or other brands
meeting the above specification approved by Kia motors corp.
Power steering 1.0 l (1.06 US qt.) PSF-III
Coolant 8.6 l(9.09 US qt.) Ethylene glycol base for aluminum radiator
Brake fluid 0.7~0.8
l
FMVSS116 DOT-3 or DOT-4
(0.7~0.8 US qt.)
Fuel 75 l (19.8 US gal.) -
Engine oil *1
(drain and refill)
Recommended
(or equivalent) API Service SM*2, ILSAC GF-4 or above
*1Refer to the recommended SAE viscosity numbers on the page 6-48.
*2If the API service SM engine oil is not available in your country, you are able to use API service SL.