KIA Sedona 2014 3.G Repair Manual
Manufacturer: KIA, Model Year: 2014, Model line: Sedona, Model: KIA Sedona 2014 3.GPages: 382, PDF Size: 4.67 MB
Page 61 of 382
Features of your vehicle
52
3
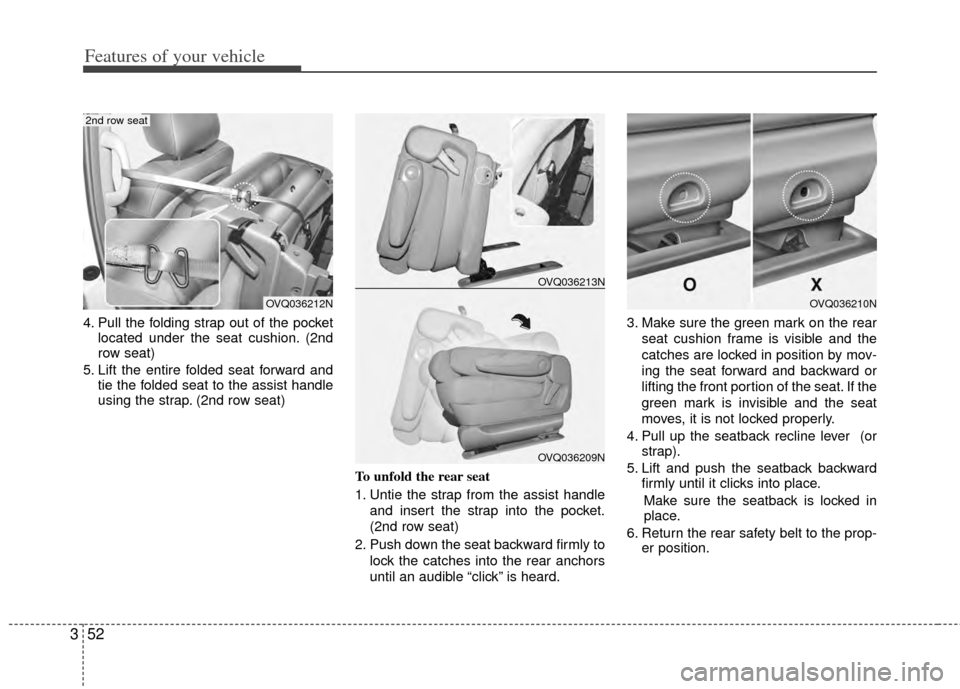
4. Pull the folding strap out of the pocket
located under the seat cushion. (2nd
row seat)
5. Lift the entire folded seat forward and tie the folded seat to the assist handle
using the strap. (2nd row seat)
To unfold the rear seat
1. Untie the strap from the assist handleand insert the strap into the pocket.
(2nd row seat)
2. Push down the seat backward firmly to lock the catches into the rear anchors
until an audible “click” is heard. 3. Make sure the green mark on the rear
seat cushion frame is visible and the
catches are locked in position by mov-
ing the seat forward and backward or
lifting the front portion of the seat. If the
green mark is invisible and the seat
moves, it is not locked properly.
4. Pull up the seatback recline lever (or strap).
5. Lift and push the seatback backward firmly until it clicks into place.
Make sure the seatback is locked in
place.
6. Return the rear safety belt to the prop- er position.
OVQ036213N
OVQ036209N
OVQ036210NOVQ036212N
2nd row seat
Page 62 of 382
353
Features of your vehicle
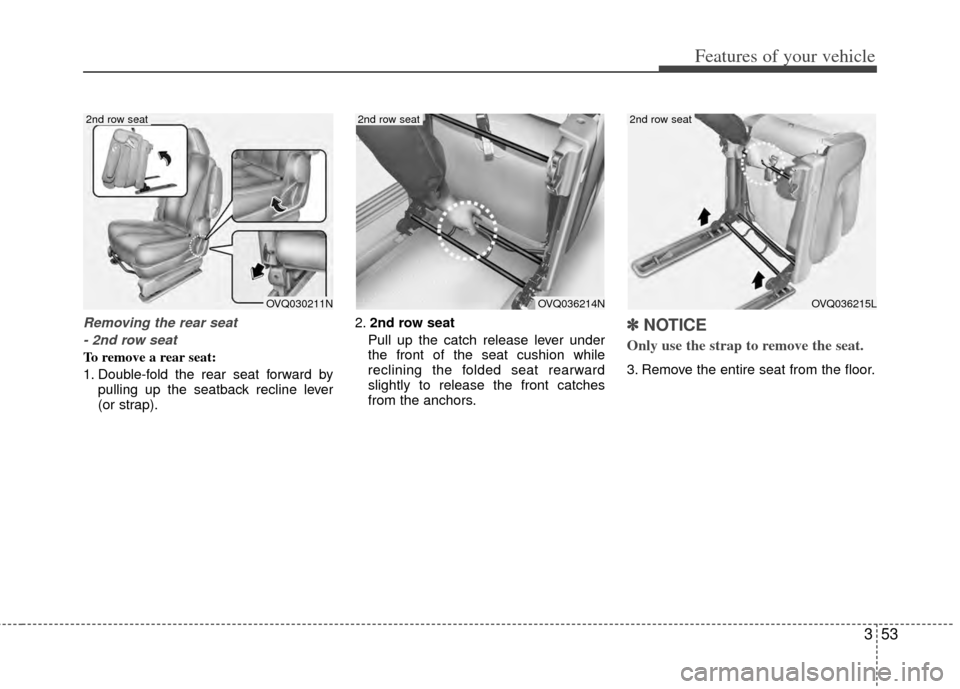
Removing the rear seat- 2nd row seat
To remove a rear seat:
1. Double-fold the rear seat forward by pulling up the seatback recline lever
(or strap). 2.
2nd row seat
Pull up the catch release lever under
the front of the seat cushion while
reclining the folded seat rearward
slightly to release the front catches
from the anchors.
✽ ✽ NOTICE
Only use the strap to remove the seat.
3. Remove the entire seat from the floor.
OVQ030211N
2nd row seat
OVQ036214N
2nd row seat
OVQ036215L
2nd row seat
Page 63 of 382
Features of your vehicle
54
3
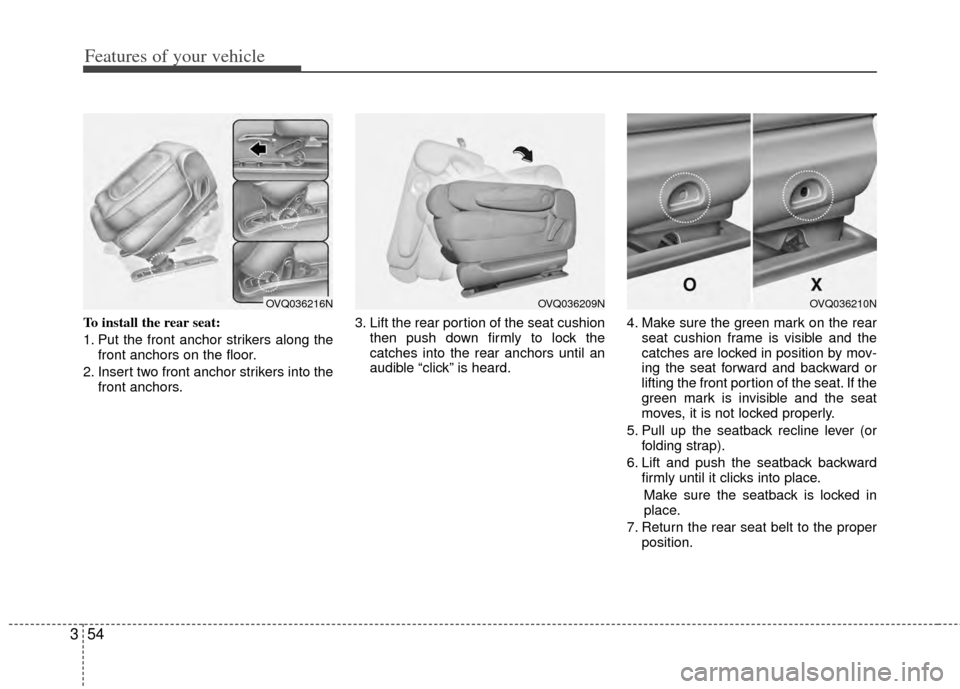
To install the rear seat:
1. Put the front anchor strikers along the
front anchors on the floor.
2. Insert two front anchor strikers into the front anchors. 3. Lift the rear portion of the seat cushion
then push down firmly to lock the
catches into the rear anchors until an
audible “click” is heard. 4. Make sure the green mark on the rear
seat cushion frame is visible and the
catches are locked in position by mov-
ing the seat forward and backward or
lifting the front portion of the seat. If the
green mark is invisible and the seat
moves, it is not locked properly.
5. Pull up the seatback recline lever (or folding strap).
6. Lift and push the seatback backward firmly until it clicks into place.
Make sure the seatback is locked in
place.
7. Return the rear seat belt to the proper position.
OVQ036209NOVQ036210NOVQ036216N
Page 64 of 382
355
Features of your vehicle
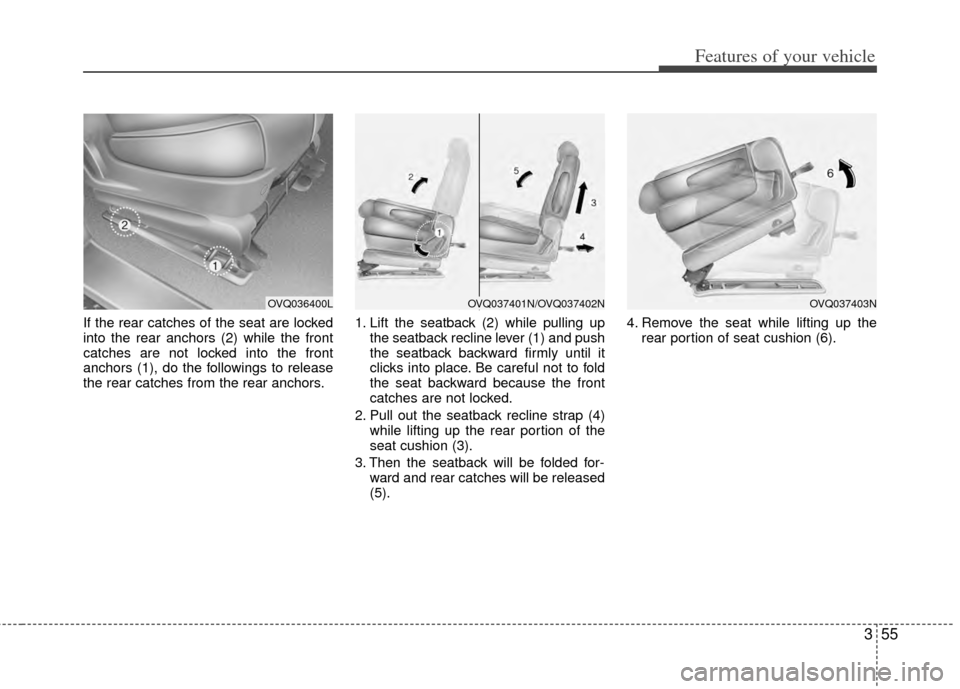
If the rear catches of the seat are locked
into the rear anchors (2) while the front
catches are not locked into the front
anchors (1), do the followings to release
the rear catches from the rear anchors.1. Lift the seatback (2) while pulling up
the seatback recline lever (1) and push
the seatback backward firmly until it
clicks into place. Be careful not to fold
the seat backward because the front
catches are not locked.
2. Pull out the seatback recline strap (4) while lifting up the rear portion of the
seat cushion (3).
3. Then the seatback will be folded for- ward and rear catches will be released
(5). 4. Remove the seat while lifting up the
rear portion of seat cushion (6).
OVQ037401N/OVQ037402NOVQ036400LOVQ037403N
Page 65 of 382
Features of your vehicle
56
3
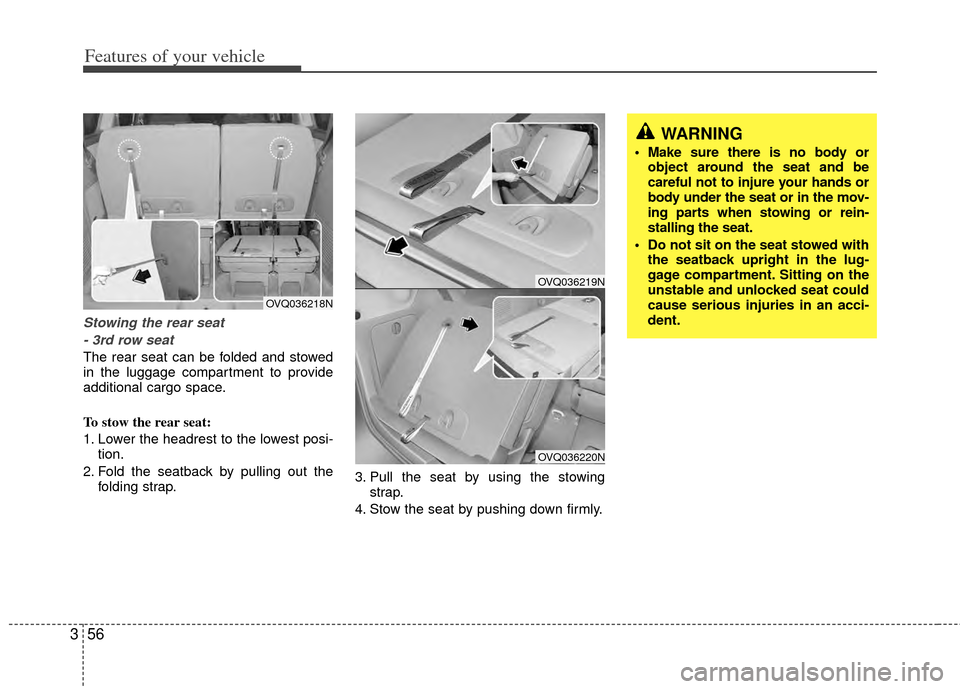
Stowing the rear seat
- 3rd row seat
The rear seat can be folded and stowed
in the luggage compartment to provide
additional cargo space.
To stow the rear seat:
1. Lower the headrest to the lowest posi- tion.
2. Fold the seatback by pulling out the folding strap. 3. Pull the seat by using the stowing
strap.
4. Stow the seat by pushing down firmly.
OVQ036219N
OVQ036220N
WARNING
Make sure there is no body or object around the seat and be
careful not to injure your hands or
body under the seat or in the mov-
ing parts when stowing or rein-
stalling the seat.
Do not sit on the seat stowed with the seatback upright in the lug-
gage compartment. Sitting on the
unstable and unlocked seat could
cause serious injuries in an acci-
dent.
OVQ036218N
Page 66 of 382
357
Features of your vehicle
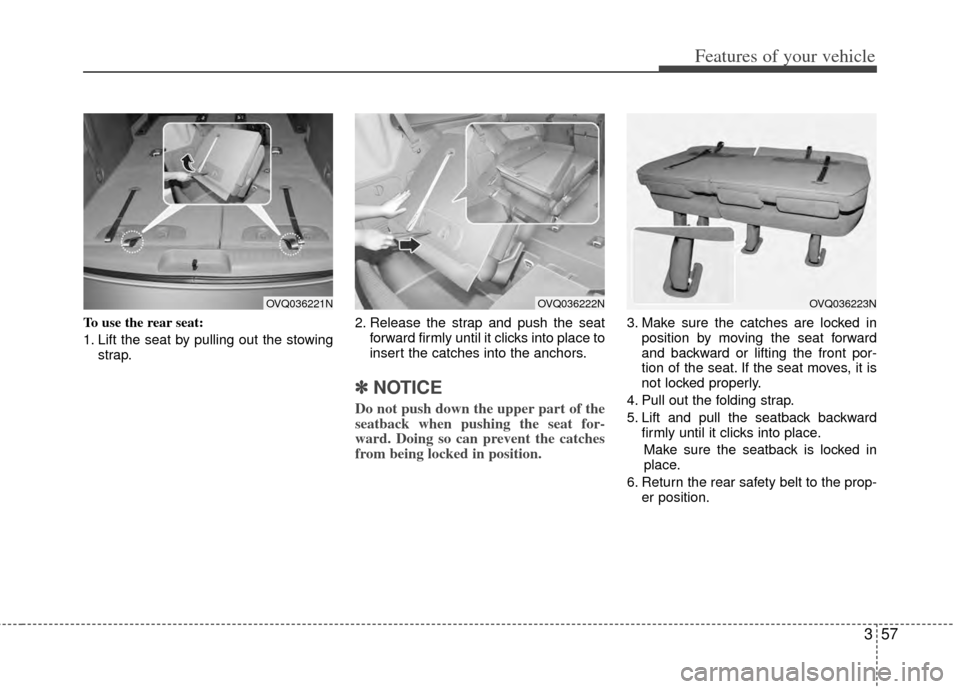
To use the rear seat:
1. Lift the seat by pulling out the stowingstrap. 2. Release the strap and push the seat
forward firmly until it clicks into place to
insert the catches into the anchors.
✽ ✽NOTICE
Do not push down the upper part of the
seatback when pushing the seat for-
ward. Doing so can prevent the catches
from being locked in position.
3. Make sure the catches are locked in
position by moving the seat forward
and backward or lifting the front por-
tion of the seat. If the seat moves, it is
not locked properly.
4. Pull out the folding strap.
5. Lift and pull the seatback backward firmly until it clicks into place.
Make sure the seatback is locked in
place.
6. Return the rear safety belt to the prop- er position.
OVQ036222NOVQ036223NOVQ036221N
Page 67 of 382
Features of your vehicle
58
3
WARNING- Cargo
Cargo should always be secured to
prevent it from being thrown about
the vehicle in a collision and caus-
ing injury to the vehicle occupants.
Special care should be taken of
objects placed in the rear seats,
since those may hit the front seat
occupants in a frontal collision.
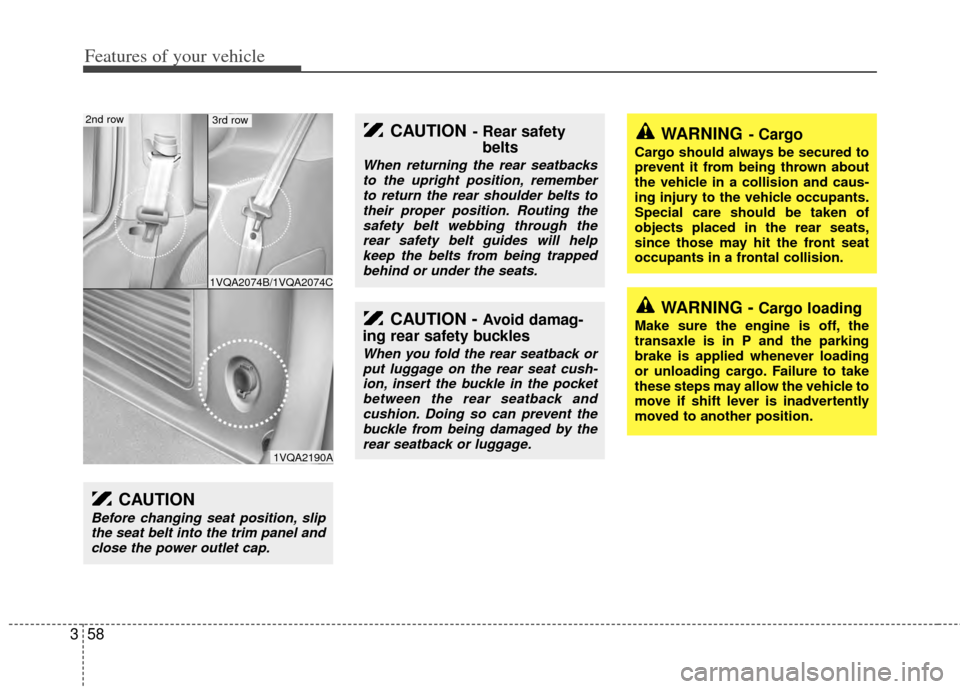
CAUTION- Rear safety
belts
When returning the rear seatbacks
to the upright position, rememberto return the rear shoulder belts totheir proper position. Routing thesafety belt webbing through therear safety belt guides will helpkeep the belts from being trappedbehind or under the seats.
WARNING - Cargo loading
Make sure the engine is off, the
transaxle is in P and the parking
brake is applied whenever loading
or unloading cargo. Failure to take
these steps may allow the vehicle to
move if shift lever is inadvertently
moved to another position.CAUTION - Avoid damag-
ing rear safety buckles
When you fold the rear seatback or
put luggage on the rear seat cush- ion, insert the buckle in the pocketbetween the rear seatback andcushion. Doing so can prevent thebuckle from being damaged by the rear seatback or luggage.
CAUTION
Before changing seat position, slipthe seat belt into the trim panel andclose the power outlet cap.
1VQA2190A
1VQA2074B/1VQA2074C
2nd row3rd row
Page 68 of 382
359
Features of your vehicle
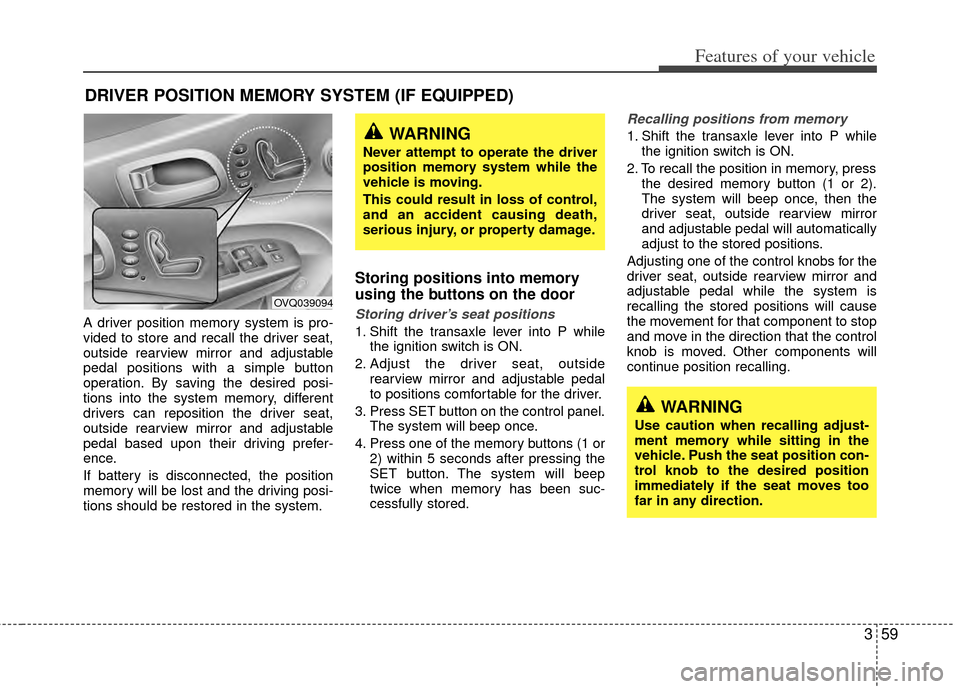
A driver position memory system is pro-
vided to store and recall the driver seat,
outside rearview mirror and adjustable
pedal positions with a simple button
operation. By saving the desired posi-
tions into the system memory, different
drivers can reposition the driver seat,
outside rearview mirror and adjustable
pedal based upon their driving prefer-
ence.
If battery is disconnected, the position
memory will be lost and the driving posi-
tions should be restored in the system.
Storing positions into memory
using the buttons on the door
Storing driver’s seat positions
1. Shift the transaxle lever into P whilethe ignition switch is ON.
2. Adjust the driver seat, outside rearview mirror and adjustable pedal
to positions comfortable for the driver.
3. Press SET button on the control panel. The system will beep once.
4. Press one of the memory buttons (1 or 2) within 5 seconds after pressing the
SET button. The system will beep
twice when memory has been suc-
cessfully stored.
Recalling positions from memory
1. Shift the transaxle lever into P whilethe ignition switch is ON.
2. To recall the position in memory, press the desired memory button (1 or 2).
The system will beep once, then the
driver seat, outside rearview mirror
and adjustable pedal will automatically
adjust to the stored positions.
Adjusting one of the control knobs for the
driver seat, outside rearview mirror and
adjustable pedal while the system is
recalling the stored positions will cause
the movement for that component to stop
and move in the direction that the control
knob is moved. Other components will
continue position recalling.
DRIVER POSITION MEMORY SYSTEM (IF EQUIPPED)
WARNING
Never attempt to operate the driver
position memory system while the
vehicle is moving.
This could result in loss of control,
and an accident causing death,
serious injury, or property damage.
WARNING
Use caution when recalling adjust-
ment memory while sitting in the
vehicle. Push the seat position con-
trol knob to the desired position
immediately if the seat moves too
far in any direction.
OVQ039094
Page 69 of 382
Features of your vehicle
60
3
Storing and recalling with trans-
mitter
Storing with the transmitter
Remove the key from the ignition switch
and lock all the doors using the transmit-
ter. The driver seat, outside rearview mir-
ror and adjustable pedal positions will be
stored in the system memory.
Driver’s position recalling with trans-
mitter
Unlock the door with the transmitter,
positions stored in the system memory
will be recalled automatically.
✽ ✽ NOTICE
The buzzer sounds 10 times if there is a
malfunction of the memory system.
Have the driver position memory system
checked by an authorized Kia dealer.
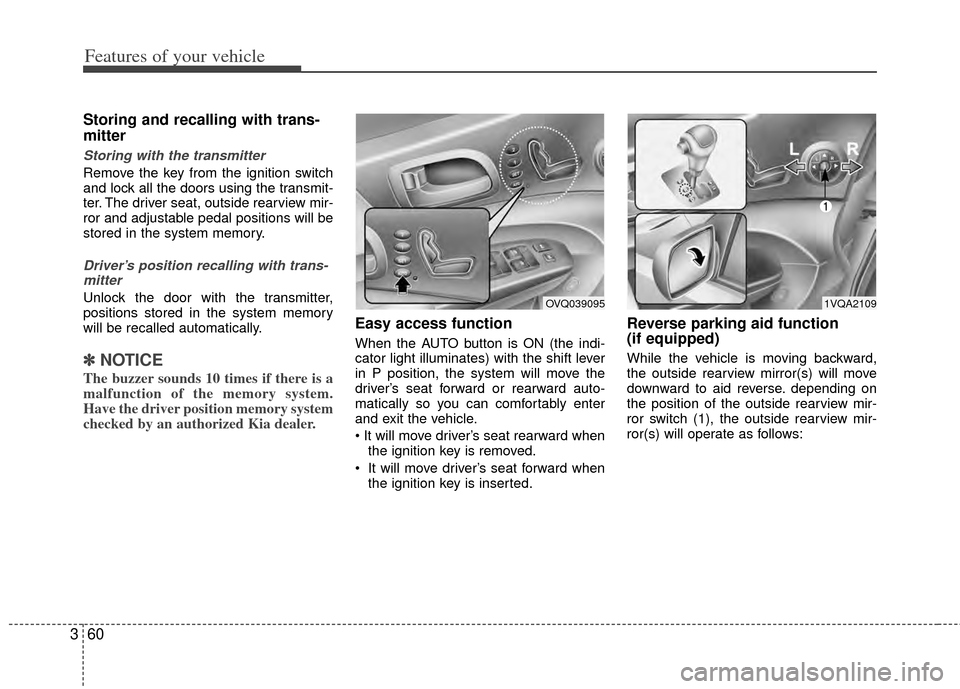
Easy access function
When the AUTO button is ON (the indi-
cator light illuminates) with the shift lever
in P position, the system will move the
driver’s seat forward or rearward auto-
matically so you can comfortably enter
and exit the vehicle.
the ignition key is removed.
It will move driver’s seat forward when the ignition key is inserted.
Reverse parking aid function
(if equipped)
While the vehicle is moving backward,
the outside rearview mirror(s) will move
downward to aid reverse. depending on
the position of the outside rearview mir-
ror switch (1), the outside rearview mir-
ror(s) will operate as follows:
OVQ0390951VQA2109
Page 70 of 382
361
Features of your vehicle
L/R: When the remote control outside
rearview mirror switch is selected to
the L (left) or R (right) position, both
outside rearview mirrors will move
downward.
Neutral : When the remote control out-
side rearview mirror switch is
placed in the middle position,
the outside rearview mirrors
will not operate while the vehi-
cle is moving backward.
✽ ✽ NOTICE
The outside rearview mirrors will auto-
matically revert to their original posi-
tions under the following conditions:
1. Ignition switch is in the LOCK posi-
tion.
2. Shift lever is moved to any position except R.
3. Remote control outside rearview mir- ror switch is placed in the middle
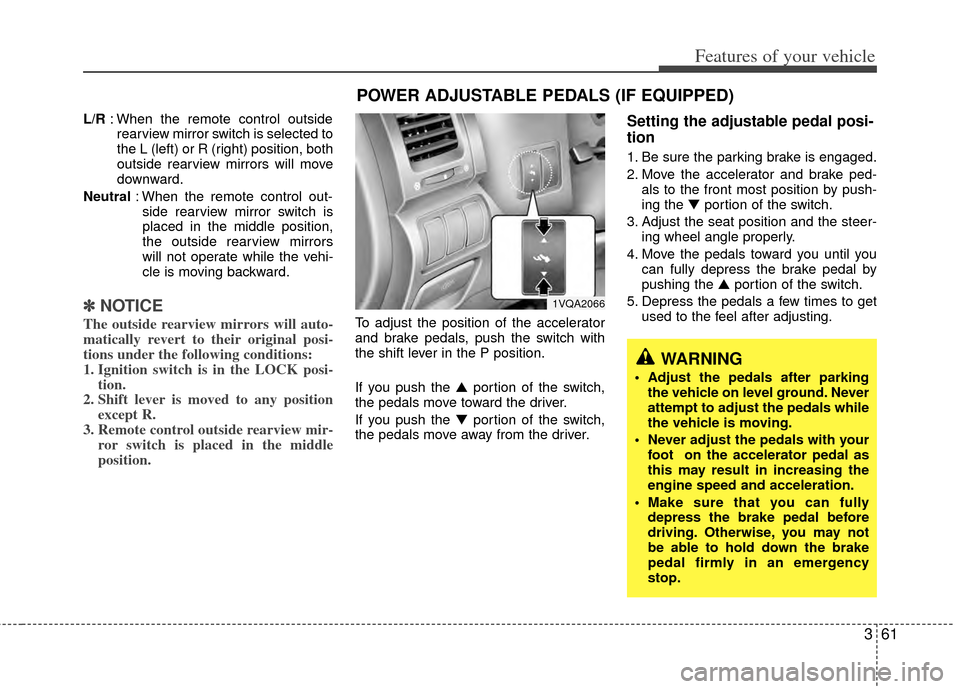
position.To adjust the position of the accelerator
and brake pedals, push the switch with
the shift lever in the P position.
If you push the ▲ portion of the switch,
the pedals move toward the driver.
If you push the ▼ portion of the switch,
the pedals move away from the driver.
Setting the adjustable pedal posi-
tion
1. Be sure the parking brake is engaged.
2. Move the accelerator and brake ped- als to the front most position by push-
ing the ▼ portion of the switch.
3. Adjust the seat position and the steer- ing wheel angle properly.
4. Move the pedals toward you until you can fully depress the brake pedal by
pushing the ▲ portion of the switch.
5. Depress the pedals a few times to get used to the feel after adjusting.
POWER ADJUSTABLE PEDALS (IF EQUIPPED)
1VQA2066
WARNING
Adjust the pedals after parkingthe vehicle on level ground. Never
attempt to adjust the pedals while
the vehicle is moving.
Never adjust the pedals with your foot on the accelerator pedal as
this may result in increasing the
engine speed and acceleration.
Make sure that you can fully depress the brake pedal before
driving. Otherwise, you may not
be able to hold down the brake
pedal firmly in an emergency
stop.