ignition KIA Sedona 2015 3.G Owners Manual
[x] Cancel search | Manufacturer: KIA, Model Year: 2015, Model line: Sedona, Model: KIA Sedona 2015 3.GPages: 566, PDF Size: 16.71 MB
Page 436 of 566
What to do in an emergency
46
IF THE ENGINE WILL NOT START
If engine doesn't turn over or
turns over slowly
1.If your vehicle has an automatictransaxle, be sure the shift lever is
in N (Neutral) or P (Park) and the
emergency brake is set.
2.Check the battery connections to be sure they are clean and tight.
3.Turn on the interior light. If the light dims or goes out when you operate
the starter, the battery is dis-
charged.
4.Check the starter connections to be sure they are securely tight-
ened.
5.Do not push or pull the vehicle to start it. See instructions for "Jump
starting".
If engine turns over normally
but does not start
1.Check the fuel level.
2.With the ignition switch in theLOCK position, check all connec-
tors at the ignition coils and spark
plugs. Reconnect any that may be
disconnected or loose.
3.Check the fuel line in the engine compartment.
4.If the engine still does not start, call an authorized Kia dealer or seek
other qualified assistance.
WARNING - Push/
pull start
If the engine will not start, do
not push or pull the vehicle to
start it. This could result in a
collision or cause other dam-
age. In addition, push or pull
starting may cause the catalytic
converter to overload and cre-
ate a fire hazard.
Page 437 of 566
65
What to do in an emergency
EMERGENCY STARTING
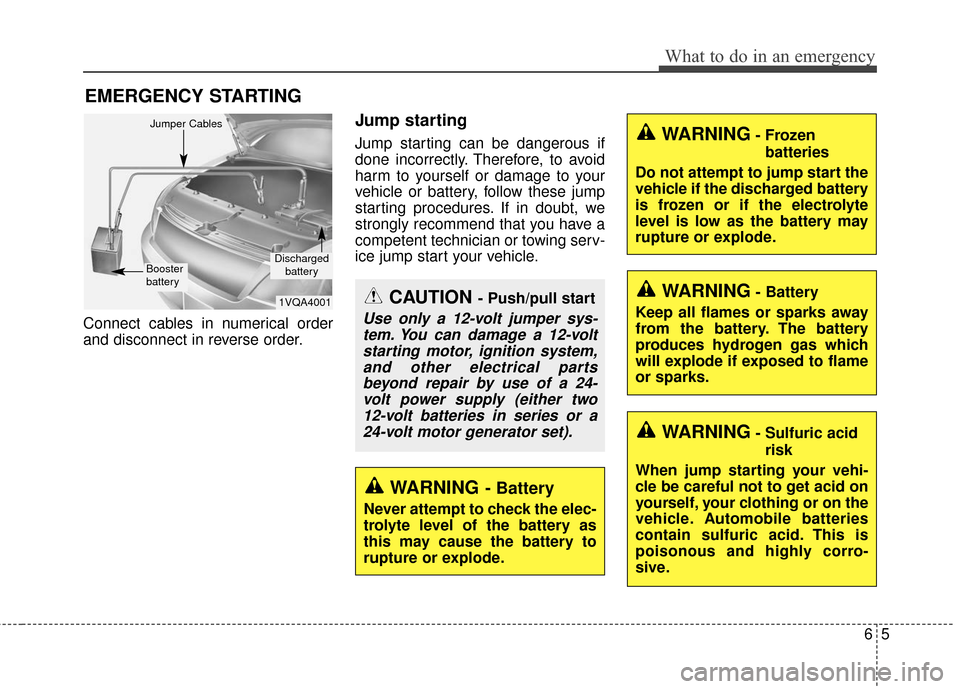
Connect cables in numerical order
and disconnect in reverse order.
Jump starting
Jump starting can be dangerous if
done incorrectly. Therefore, to avoid
harm to yourself or damage to your
vehicle or battery, follow these jump
starting procedures. If in doubt, we
strongly recommend that you have a
competent technician or towing serv-
ice jump start your vehicle.
CAUTION - Push/pull start
Use only a 12-volt jumper sys-tem. You can damage a 12-voltstarting motor, ignition system,and other electrical partsbeyond repair by use of a 24-volt power supply (either two12-volt batteries in series or a24-volt motor generator set).
WARNING- Battery
Never attempt to check the elec-
trolyte level of the battery as
this may cause the battery to
rupture or explode.
1VQA4001
Discharged
battery
Jumper Cables
Booster
battery
WARNING- Frozenbatteries
Do not attempt to jump start the
vehicle if the discharged battery
is frozen or if the electrolyte
level is low as the battery may
rupture or explode.
WARNING- Sulfuric acid risk
When jump starting your vehi-
cle be careful not to get acid on
yourself, your clothing or on the
vehicle. Automobile batteries
contain sulfuric acid. This is
poisonous and highly corro-
sive.
WARNING- Battery
Keep all flames or sparks away
from the battery. The battery
produces hydrogen gas which
will explode if exposed to flame
or sparks.
Page 450 of 566

What to do in an emergency
18
6
TOWING
Towing service
If emergency towing is necessary,
we recommend having it done by an
authorized Kia dealer or a commer-
cial tow-truck service. Proper lifting
and towing procedures are neces-
sary to prevent damage to the vehi-
cle. The use of wheel dollies or
flatbed is recommended.
For trailer towing guidelines informa-
tion, refer to “Trailer towing” in sec-tion 5.
It is acceptable to tow the vehicle
with the rear wheels on the ground
(without dollies) and the front wheels
off the ground.
If any of the loaded wheels or sus-
pension components are damaged
or the vehicle is being towed with the
front wheels on the ground, use a
towing dolly under the front wheels.
When being towed by a commercial
tow truck and wheel dollies are not
used, the front of the vehicle should
always be lifted, not the rear.
OYP064024N dolly
dolly
WARNING - Side and
curtain Air bag
If your vehicle is equipped with
side and curtain air bag, set the
ignition switch to LOCK or ACC
position when the vehicle is
being towed.
The side and curtain air bag
may deploy when the ignitions
is ON, and the rollover sensor
detects the situation as a
rollover.
Page 451 of 566
619
What to do in an emergency
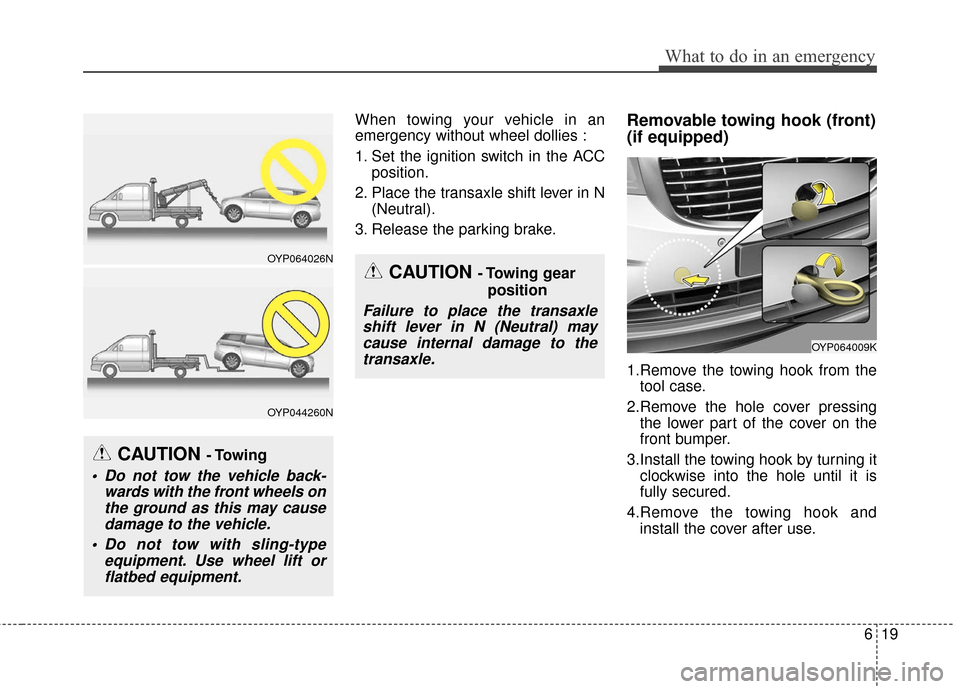
When towing your vehicle in an
emergency without wheel dollies :
1. Set the ignition switch in the ACCposition.
2. Place the transaxle shift lever in N (Neutral).
3. Release the parking brake.Removable towing hook (front)
(if equipped)
1.Remove the towing hook from the tool case.
2.Remove the hole cover pressing the lower part of the cover on the
front bumper.
3.Install the towing hook by turning it clockwise into the hole until it is
fully secured.
4.Remove the towing hook and install the cover after use.
CAUTION - Towing gear
position
Failure to place the transaxleshift lever in N (Neutral) maycause internal damage to thetransaxle.
CAUTION - Towing
Do not tow the vehicle back- wards with the front wheels onthe ground as this may causedamage to the vehicle.
Do not tow with sling-type equipment. Use wheel lift orflatbed equipment.
OYP064026N
OYP044260N
OYP064009K
Page 453 of 566
621
What to do in an emergency
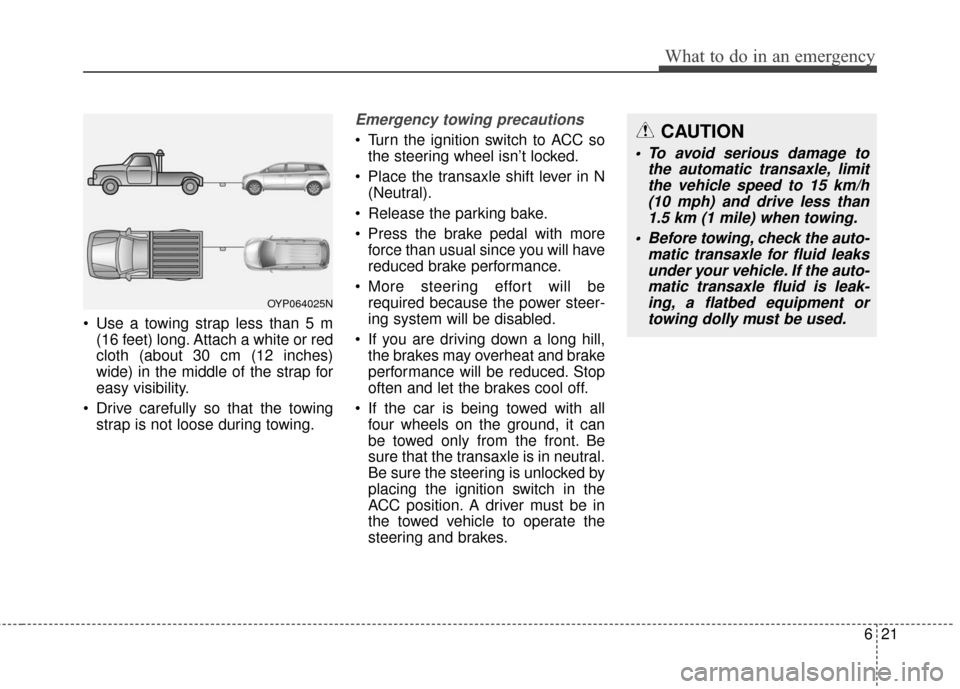
Use a towing strap less than 5 m(16 feet) long. Attach a white or red
cloth (about 30 cm (12 inches)
wide) in the middle of the strap for
easy visibility.
Drive carefully so that the towing strap is not loose during towing.
Emergency towing precautions
Turn the ignition switch to ACC sothe steering wheel isn’t locked.
Place the transaxle shift lever in N (Neutral).
Release the parking bake.
Press the brake pedal with more force than usual since you will have
reduced brake performance.
More steering effort will be required because the power steer-
ing system will be disabled.
If you are driving down a long hill, the brakes may overheat and brake
performance will be reduced. Stop
often and let the brakes cool off.
If the car is being towed with all four wheels on the ground, it can
be towed only from the front. Be
sure that the transaxle is in neutral.
Be sure the steering is unlocked by
placing the ignition switch in the
ACC position. A driver must be in
the towed vehicle to operate the
steering and brakes.
OYP064025N
CAUTION
To avoid serious damage to the automatic transaxle, limitthe vehicle speed to 15 km/h(10 mph) and drive less than1.5 km (1 mile) when towing.
Before towing, check the auto- matic transaxle for fluid leaksunder your vehicle. If the auto-matic transaxle fluid is leak-ing, a flatbed equipment ortowing dolly must be used.
Page 517 of 566
Maintenance
64
7
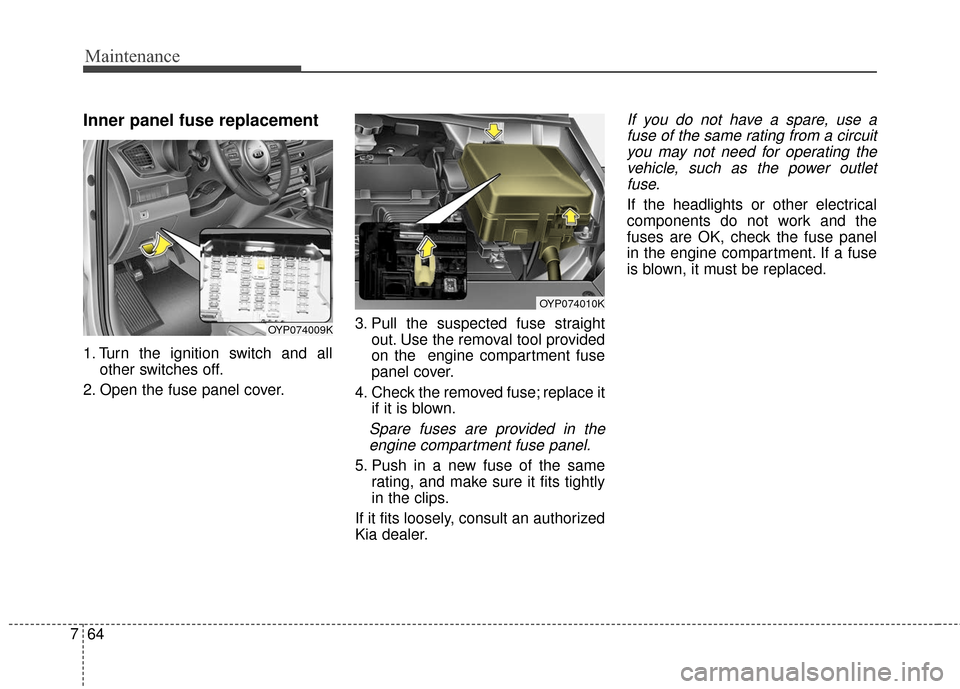
Inner panel fuse replacement
1. Turn the ignition switch and all
other switches off.
2. Open the fuse panel cover. 3. Pull the suspected fuse straight
out. Use the removal tool provided
on the engine compartment fuse
panel cover.
4. Check the removed fuse; replace it if it is blown.
Spare fuses are provided in theengine compartment fuse panel.
5. Push in a new fuse of the same rating, and make sure it fits tightly
in the clips.
If it fits loosely, consult an authorized
Kia dealer.
If you do not have a spare, use a fuse of the same rating from a circuityou may not need for operating thevehicle, such as the power outletfuse.
If the headlights or other electrical
components do not work and the
fuses are OK, check the fuse panel
in the engine compartment. If a fuse
is blown, it must be replaced.
OYP074009K
OYP074010K
Page 518 of 566
765
Maintenance
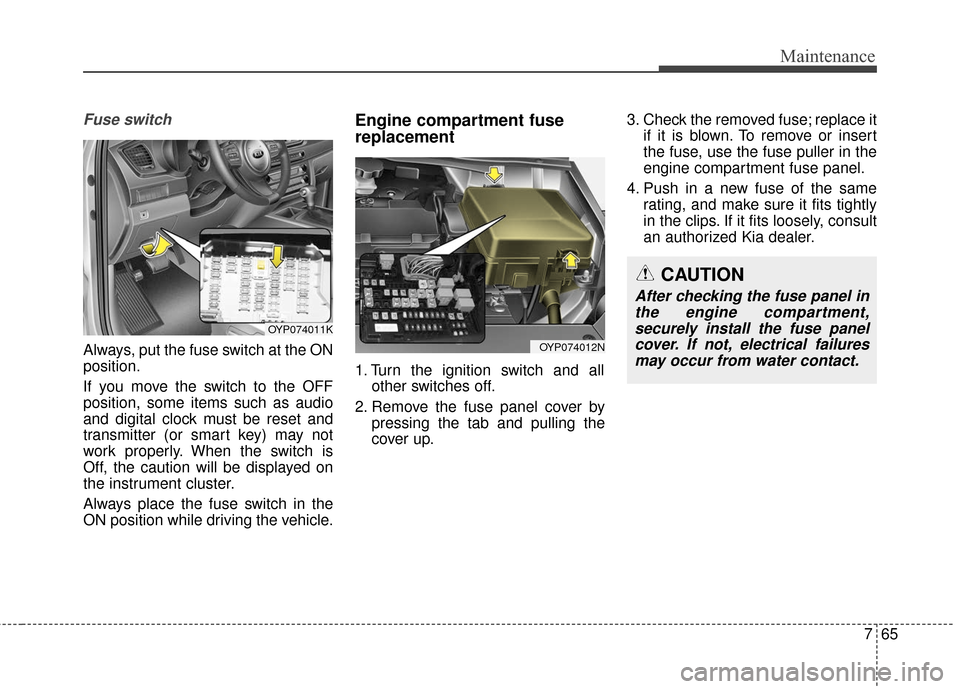
Fuse switch
Always, put the fuse switch at the ON
position.
If you move the switch to the OFF
position, some items such as audio
and digital clock must be reset and
transmitter (or smart key) may not
work properly. When the switch is
Off, the caution will be displayed on
the instrument cluster.
Always place the fuse switch in the
ON position while driving the vehicle.
Engine compartment fuse
replacement
1. Turn the ignition switch and allother switches off.
2. Remove the fuse panel cover by pressing the tab and pulling the
cover up. 3. Check the removed fuse; replace it
if it is blown. To remove or insert
the fuse, use the fuse puller in the
engine compartment fuse panel.
4. Push in a new fuse of the same rating, and make sure it fits tightly
in the clips. If it fits loosely, consult
an authorized Kia dealer.
OYP074011K
CAUTION
After checking the fuse panel inthe engine compartment,securely install the fuse panelcover. If not, electrical failuresmay occur from water contact.
OYP074012N
Page 524 of 566
771
Maintenance
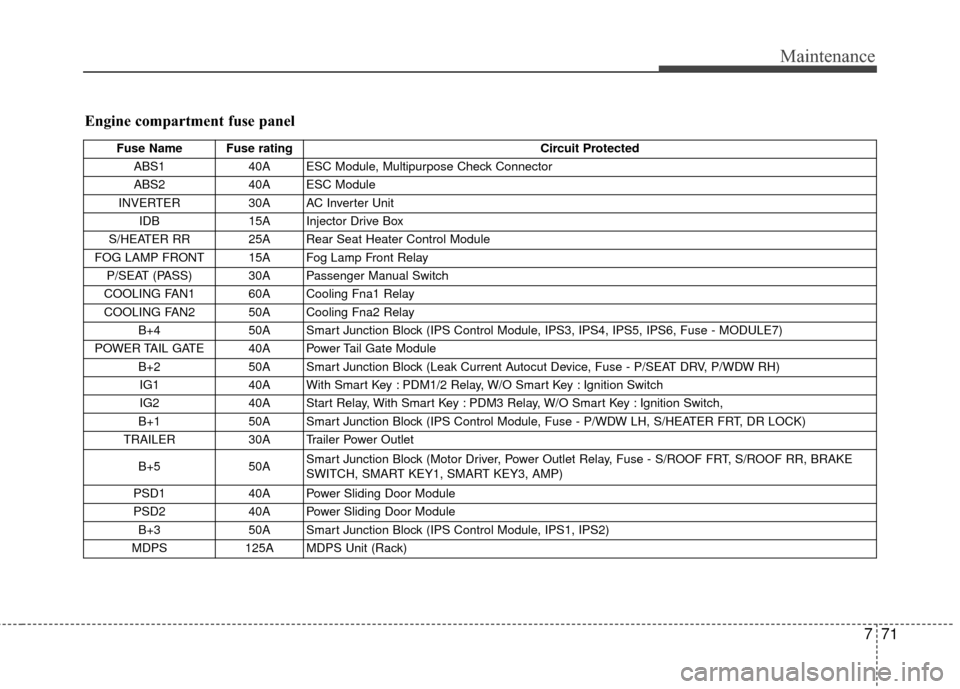
Engine compartment fuse panel
Fuse Name Fuse ratingCircuit Protected
ABS1 40A ESC Module, Multipurpose Check Connector
ABS2 40A ESC Module
INVERTER 30A AC Inverter Unit
IDB 15A Injector Drive Box
S/HEATER RR 25A Rear Seat Heater Control Module
FOG LAMP FRONT 15A Fog Lamp Front Relay P/SEAT (PASS) 30A Passenger Manual Switch
COOLING FAN1 60A Cooling Fna1 Relay
COOLING FAN2 50A Cooling Fna2 Relay B+4 50A Smart Junction Block (IPS Control Module, IPS3, IPS4, IPS5, IPS6, Fuse - MODULE7)
POWER TAIL GATE 40A Power Tail Gate Module B+2 50A Smart Junction Block (Leak Current Autocut Device, Fuse - P/SEAT DRV, P/WDW RH)
IG1 40A With Smart Key : PDM1/2 Relay, W/O Smart Key : Ignition Switch
IG2 40A Start Relay, With Smart Key : PDM3 Relay, W/O Smart Key : Ignition Switch,
B+1 50A Smart Junction Block (IPS Control Module, Fuse - P/WDW LH, S/HEATER FRT, DR LOCK)
TRAILER 30A Trailer Power Outlet
B+5 50ASmart Junction Block (Motor Driver, Power Outlet Relay, Fuse - S/ROOF FRT, S/ROOF RR, BRAKE
SWITCH, SMART KEY1, SMART KEY3, AMP)
PSD1 40A Power Sliding Door Module
PSD2 40A Power Sliding Door Module
B+3 50A Smart Junction Block (IPS Control Module, IPS1, IPS2)
MDPS 125A MDPS Unit (Rack)
Page 525 of 566
Maintenance
72
7
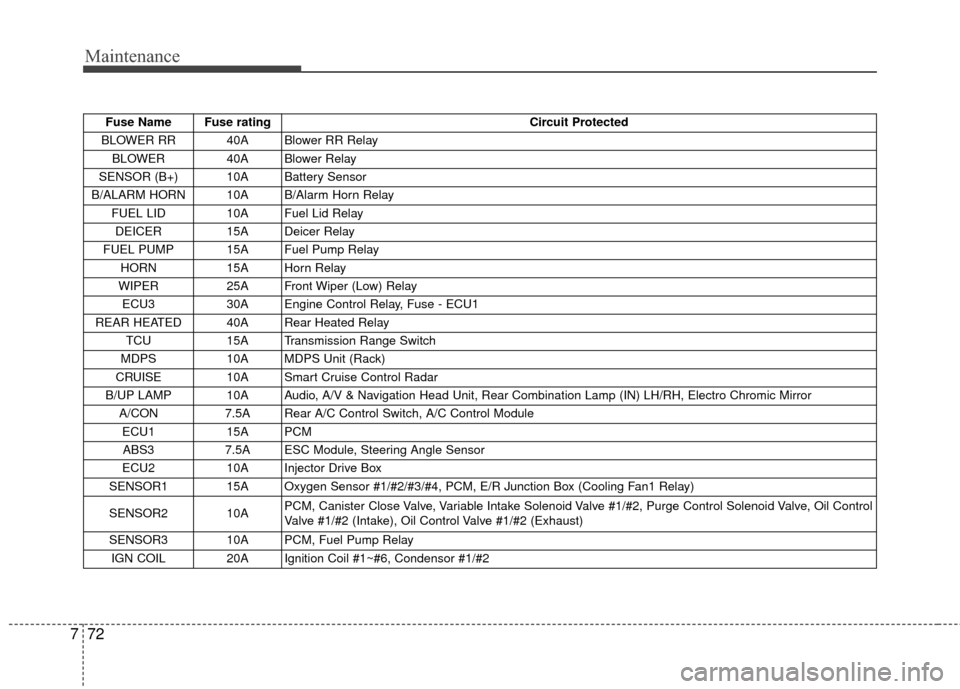
Fuse Name Fuse rating Circuit Protected
BLOWER RR 40A Blower RR Relay BLOWER 40A Blower Relay
SENSOR (B+) 10A Battery Sensor
B/ALARM HORN 10A B/Alarm Horn Relay FUEL LID 10A Fuel Lid Relay DEICER 15A Deicer Relay
FUEL PUMP 15A Fuel Pump Relay HORN 15A Horn Relay
WIPER 25A Front Wiper (Low) Relay
ECU3 30A Engine Control Relay, Fuse - ECU1
REAR HEATED 40A Rear Heated Relay TCU 15A Transmission Range Switch
MDPS 10A MDPS Unit (Rack)
CRUISE 10A Smart Cruise Control Radar
B/UP LAMP 10A Audio, A/V & Navigation Head Unit, Rear Combination Lamp (IN) LH/RH, Electro Chromic \
Mirror A/CON 7.5A Rear A/C Control Switch, A/C Control Module
ECU1 15A PCM ABS3 7.5A ESC Module, Steering Angle Sensor
ECU2 10A Injector Drive Box
SENSOR1 15A Oxygen Sensor #1/#2/#3/#4, PCM, E/R Junction Box (Cooling Fan1 Relay)
SENSOR2 10A PCM, Canister Close Valve, Variable Intake Solenoid Valve #1/#2, Purge Control Solenoid Valve, Oil Control
Valve #1/#2 (Intake), Oil Control Valve #1/#2 (Exhaust)
SENSOR3 10A PCM, Fuel Pump Relay IGN COIL 20A Ignition Coil #1~#6, Condensor #1/#2
Page 526 of 566
773
Maintenance
LIGHT BULBS
Use only the bulbs of the specifiedwattage.
✽
✽ NOTICE
• If the light bulb or lamp connector
is removed from an operating
lamp activated by electricity, the
fuse box’s electronic device may
scan it as a malfunction.
Therefore, a lamp malfunction
history may be recorded in
Diagnostic Trouble Code (DTC) in
the fuse box.
• It is normal for an operating lamp may blink temporarily. Since this
occurrence is due stabilization
function of the vehicle’s electronic
control device, if the lamp lights
up normally after temporary
blinking, there is no problem in
the vehicle.
However, if the lamp continues to
blink several times or turn off
completely, there may be an error
in the vehicle’s electronic control
device. So please have the vehicle
checked by an authorized Kia
dealer immediately.
If you don’t have necessary tools, the
correct bulbs and the expertise, con-
sult an authorized Kia dealer. In
many cases, it is difficult to replace
vehicle light bulbs because other
parts of the vehicle must be removed
before you can get to the bulb. This is
especially true if you have to remove
the headlight assembly to get to the
bulb(s).
Removing/installing the headlight
assembly can result in damage to
the vehicle.
WARNING - Working on
the lights
Prior to working on the light,
firmly apply the parking brake,
ensure that the ignition switch
is turned to the LOCK position
and turn off the lights to avoid
sudden movement of the vehi-
cle and burning your fingers or
receiving an electric shock.
CAUTION -Light replace-
ment
Be sure to replace the burned-
out bulb with one of the samewattage rating. Otherwise, itmay cause damage to the fuseor electric wiring system.