ignition KIA Sedona 2015 3.G Workshop Manual
[x] Cancel search | Manufacturer: KIA, Model Year: 2015, Model line: Sedona, Model: KIA Sedona 2015 3.GPages: 566, PDF Size: 16.71 MB
Page 197 of 566
Features of your vehicle
104
4
✽
✽
NOTICE- Electronic Brake
force Distribution
(EBD) System
Warning Light
When the ABS Warning Light is on
or both ABS and Parking Brake &
Brake Fluid Warning Lights are on,
the speedometer, odometer, or trip-
meter may not work. Also, the EPS
Warning Light may illuminate and
the steering effort may increase or
decrease.
In this case, have your vehicle inspect-
ed by an authorized Kia dealer as
soon as possible.
Electronic Power
Steering (EPS) WarningLight (if equipped)
This warning light illuminates:
Once you set the ignition switch or Engine Start/Stop Button to the ON
position.
- It remains on until the engine isstarted.
When there is a malfunction with the EPS.
In this case, have your vehicle
inspected by an authorized Kia
dealer.
WARNING - Electronic
Brake force Distribution
(EBD) System Warning Light
When both ABS and Parking
Brake & Brake Fluid Warning
Lights are on, the brake system
will not work normally and you
may experience an unexpected
and dangerous situation during
sudden braking.
In this case, avoid high speed
driving and abrupt braking.
Have your vehicle inspected by
an authorized Kia dealer as
soon as possible.
Page 198 of 566
4105
Features of your vehicle
Malfunction IndicatorLamp (MIL)
This warning light illuminates:
Once you set the ignition switch or Engine Start/Stop Button to the ON
position.
- It remains on until the engine isstarted.
When there is a malfunction with the emission control system.
In this case, have your vehicle
inspected by an authorized Kia
dealer.
Charging System
Warning Light
This warning light illuminates:
Once you set the ignition switch or Engine Start/Stop Button to the ON
position.
- It remains on until the engine isstarted.
When there is a malfunction with either the alternator or electrical
charging system.
CAUTION - Gasoline
Engine
If the Malfunction IndicatorLamp (MIL) illuminates, poten-tial catalytic converter damageis possible which could result inloss of engine power.
In this case, have your vehicleinspected by an authorized Kiadealer as soon as possible.
CAUTION - Malfunction
Indicator
Lamp (MIL)
Driving with the MalfunctionIndicator Lamp (MIL) on maycause damage to the emissioncontrol systems which couldeffect drivability and/or fueleconomy.
Page 199 of 566
Features of your vehicle
106
4
If there is a malfunction with either
the alternator or electrical charging
system:
1. Drive carefully to the nearest safe
location and stop your vehicle.
2. Turn the engine off and check the alternator drive belt for looseness
or breakage.
If the belt is adjusted properly,
there may be a problem in the
electrical charging system.
In this case, have your vehicle
inspected by an authorized Kia
dealer as soon as possible.Engine Oil Pressure Warning Light
This warning light illuminates:
Once you set the ignition switch or Engine Start/Stop Button to the ON
position.
- It remains on until the engine isstarted.
When the engine oil pressure is low.
If the engine oil pressure is low:
1. Drive carefully to the nearest safe location and stop your vehicle.
2. Turn the engine off and check the engine oil level (For more details,
refer to “Engine Oil” in section 7). If
the level is low, add oil as required.
If the warning light remains on
after adding oil or if oil is not avail-
able, have your vehicle inspected
by an authorized Kia dealer as
soon as possible.
CAUTION - Engine Oil
Pressure Warning Light
If the engine does not stop immediately after the EngineOil Pressure Warning Light isilluminated, severe damagecould result.
If the warning light stays on while the engine is running, itindicates that there may beserious engine damage ormalfunction. In this case,
1. Stop the vehicle as soon as it is safe to do so.
2. Turn off the engine and check the oil level. If the oillevel is low, fill the engineoil to the proper level.
3. Start the engine again. If the warning light stays on afterthe engine is started, turnthe engine off immediately.In this case, have your vehi-cle inspected by an author-ized Kia dealer.
Page 201 of 566
Features of your vehicle
108
4
Indicator Lights
Electronic Stability
Control (ESC) IndicatorLight
This indicator light illuminates:
Once you set the ignition switch or Engine Start/Stop Button to the ON
position.
- It illuminates for approximately 3seconds and then goes off.
When there is a malfunction with the ESC system.
In this case, have your vehicle
inspected by an authorized Kia
dealer.
This indicator light blinks:
While the ESC is operating.
For more details, refer to “Electronic
Stability Control (ESC)” in chapter 5.
Electronic Stability Control (ESC) OFFIndicator Light
This indicator light illuminates:
Once you set the ignition switch or Engine Start/Stop Button to the ON
position.
- It illuminates for approximately 3seconds and then goes off.
When you deactivate the ESC sys- tem by pressing the ESC OFF but-
ton.
For more details, refer to “Electronic
Stability Control (ESC)” in chapter 5.
ECOMINDER®indicator
Active ECO system
This indicator light illuminates:
When the Active ECO button is
pressed the ECOMINDER
®indicator
(green) will illuminate to show that
the Active ECO is operating.
For more detailed information, refer
to "Active ECO" or "Drive mode" in
chapter 5.
COMPORT Mode
Indicator Light (if equipped)
This indicator light illuminates:
When you select “COMPORT” mode as drive mode.
❈ For more details, refer to “Drive
Mode” in chapter 5.
ECO
COMPORT
Page 202 of 566
4109
Features of your vehicle
Immobilizer IndicatorLight (Without Smart Key)
This indicator light illuminates:
When the vehicle detects the immobilizer in your key properly
while the ignition switch is ON.
- At this time, you can start theengine.
- The indicator light goes off after starting the engine.
This indicator light blinks:
When there is a malfunction with the immobilizer system.
In this case, have your vehicle
inspected by an authorized Kia
dealer.
Immobilizer Indicator
Light (With Smart Key)
This indicator light illuminates for up
to 30 seconds:
When the vehicle detects the smart key in the vehicle properly
while the Engine Start/Stop Button
is ACC or ON.
- At this time, you can start theengine.
- The indicator light goes off after starting the engine.
This indicator light blinks for a few
seconds:
When the smart key is not in the vehicle.
- At this time, you can not start theengine. This indicator light illuminates for 2
seconds and goes off:
When the vehicle can not detect
the smart key which is in the vehi-
cle while the Engine Start/Stop
Button is ON.
In this case, have your vehicle
inspected by an authorized Kia
dealer.
This indicator light blinks:
When the battery of the smart key is weak.
- At this time, you can not start theengine. However, you can start
the engine if you press the Engine
Start/Stop Button with the smart
key. (For more details, refer to
“Starting the Engine” in section 5).
When there is a malfunction with the immobilizer system.
In this case, have your vehicle
inspected by an authorized Kia
dealer.
Page 206 of 566
4113
Features of your vehicle
This system will activate whenbacking up with the ignition switch
ON.
If the vehicle is moving at a speed
over 5 km/h (3 mph), the system
may not be activated correctly.
The sensing distance while the back-up warning system is in oper-
ation is approximately 120 cm (47
in.) at the rear bumper center area,
60 cm (23.5 in.) at the rear bumper
both side area.
When more than two objects are sensed at the same time, the clos-
est one will be recognized first.Types of warning sound
When an object is 120 cm to 61 cm(47 in. to 24 in.) from the rear
bumper: Buzzer beeps intermit-
tently.
When an object is 60 cm to 31 cm (24 in. to 12 in.) from the rear
bumper: Buzzer beeps more fre-
quently.
When an object is within 30 cm (12 in.) of the rear bumper:
Buzzer sounds continuously.
Non-operational conditions of
rear parking assist system
The rear parking assist system
may not operate properly when:
1. Moisture is frozen to the sensor. (It will operate normally when the
moisture has been cleared.)
2. The sensor is covered with foreign matter, such as snow or water, or
the sensor cover is blocked. (It will
operate normally when the materi-
al is removed or the sensor is no
longer blocked.)
3. Driving on uneven road surfaces (unpaved roads, gravel, bumps,
gradient).
4. Objects generating excessive noise (vehicle horns, loud motor-
cycle engines, or truck air brakes)
are within range of the sensor.
5. Heavy rain or water spray exists.
6. Wireless transmitters or mobile phones are within range of the
sensor.
7. The sensor is covered with snow.
8. Trailer towing
Page 213 of 566
Features of your vehicle
120
4
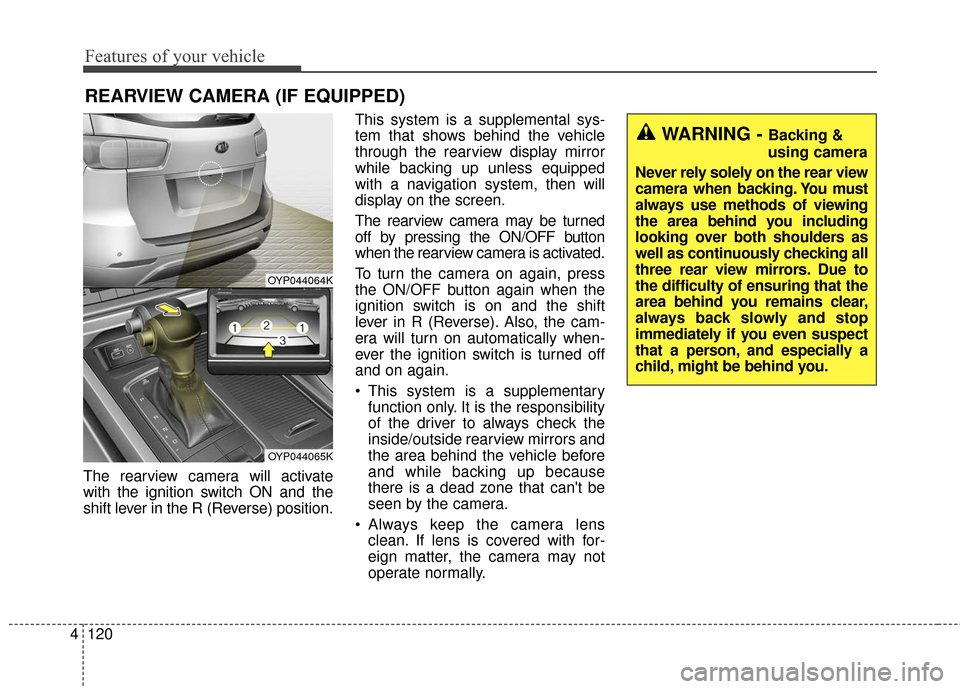
The rearview camera will activate
with the ignition switch ON and the
shift lever in the R (Reverse) position. This system is a supplemental sys-
tem that shows behind the vehicle
through the rearview display mirror
while backing up unless equipped
with a navigation system, then will
display on the screen.
The rearview camera may be turned
off by pressing the ON/OFF button
when the rearview camera is activated.
To turn the camera on again, press
the ON/OFF button again when the
ignition switch is on and the shift
lever in R (Reverse). Also, the cam-
era will turn on automatically when-
ever the ignition switch is turned off
and on again.
This system is a supplementary
function only. It is the responsibility
of the driver to always check the
inside/outside rearview mirrors and
the area behind the vehicle before
and while backing up because
there is a dead zone that can't be
seen by the camera.
Always keep the camera lens clean. If lens is covered with for-
eign matter, the camera may not
operate normally.
REARVIEW CAMERA (IF EQUIPPED)
WARNING - Backing &
using camera
Never rely solely on the rear view
camera when backing. You must
always use methods of viewing
the area behind you including
looking over both shoulders as
well as continuously checking all
three rear view mirrors. Due to
the difficulty of ensuring that the
area behind you remains clear,
always back slowly and stop
immediately if you even suspect
that a person, and especially a
child, might be behind you.
OYP044064K
OYP044065K
Page 215 of 566
Features of your vehicle
122
4
Battery saver function
The purpose of this feature is to
prevent the battery from being dis-
charged if the lights are left in the
ON position. The system automati-
cally shuts off the parking lights 30
seconds after the ignition key is
removed and the driver’s door is
opened and closed.
With this feature, the parking lights will turn off automatically if the driver
parks on the side of the road at night
and opens the driver’s side door.
If necessary, to keep the parking
lights on when the ignition key is
removed, perform the following:
1) Open the driver-side door.
2) Turn the parking lights OFF and ON again using the light switch
on the steering column.
Headlight escort function
If you turn the ignition switch to the
ACC or OFF position with the head-
lights ON, the headlights remain on
for about 5 minutes. However, if the
driver's door is opened and closed,
the headlights are turned off after 15
seconds.
The headlights can be turned off by
pressing the lock button on the trans-
mitter (or smart key) twice or turning
the light switch to the OFF position.
If the driver gets out of the vehicle
through other doors (except driver’s
door), the battery saver function
does not operate and the headlight
escort function does not turn off
automatically. Therefore, It causes
the battery to be discharged. In this
case, make sure to turn off the lamp
before getting out of the vehicle.
Daytime running light
Daytime Running Lights (DRL) can
make it easier for others to see the
front of your vehicle during the day.
DRL can be helpful in many different
driving conditions, and it is especially
helpful after dawn and before sunset.
The DRL system will turn OFF when:
The headlights are ON.
Engine stops.
The parking brake is applied.
LIGHTING
Page 216 of 566
4123
Features of your vehicle
Lighting control
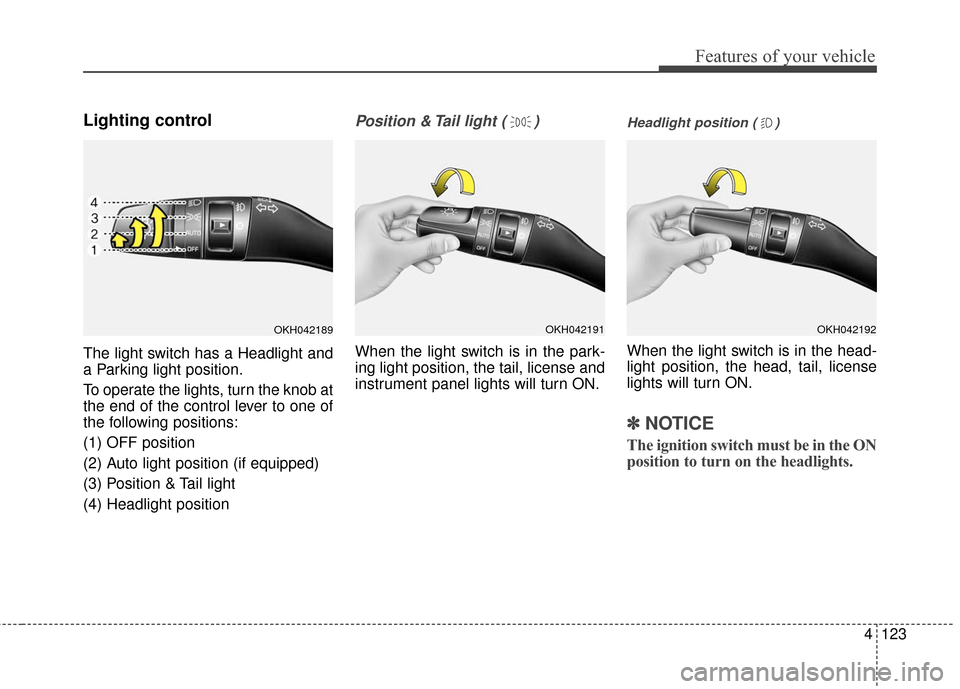
The light switch has a Headlight and
a Parking light position.
To operate the lights, turn the knob at
the end of the control lever to one of
the following positions:
(1) OFF position
(2) Auto light position (if equipped)
(3) Position & Tail light
(4) Headlight position
Position & Tail light ( )
When the light switch is in the park-
ing light position, the tail, license and
instrument panel lights will turn ON.
Headlight position ( )
When the light switch is in the head-
light position, the head, tail, license
lights will turn ON.
✽ ✽NOTICE
The ignition switch must be in the ON
position to turn on the headlights.
OKH042191OKH042192OKH042189
Page 220 of 566
4127
Features of your vehicle
Do not place any accessories,stickers or tint the windshield.
Have the windshield glass replaced from an authorized dealer.
Do not remove or impact related parts of the High Beam system.
Be careful that water doesn’t get into the High Beam unit.
Do not place objects on the dash- board that reflects light such as
mirrors, white paper, etc. The sys-
tem may malfunction if sunlight is
reflected.
At times, the High Beam system may not work properly, always
check the road conditions for your
safety. When the system does not
operate normally, manually change
between the high beam and low
beam.Turn signals and lane change
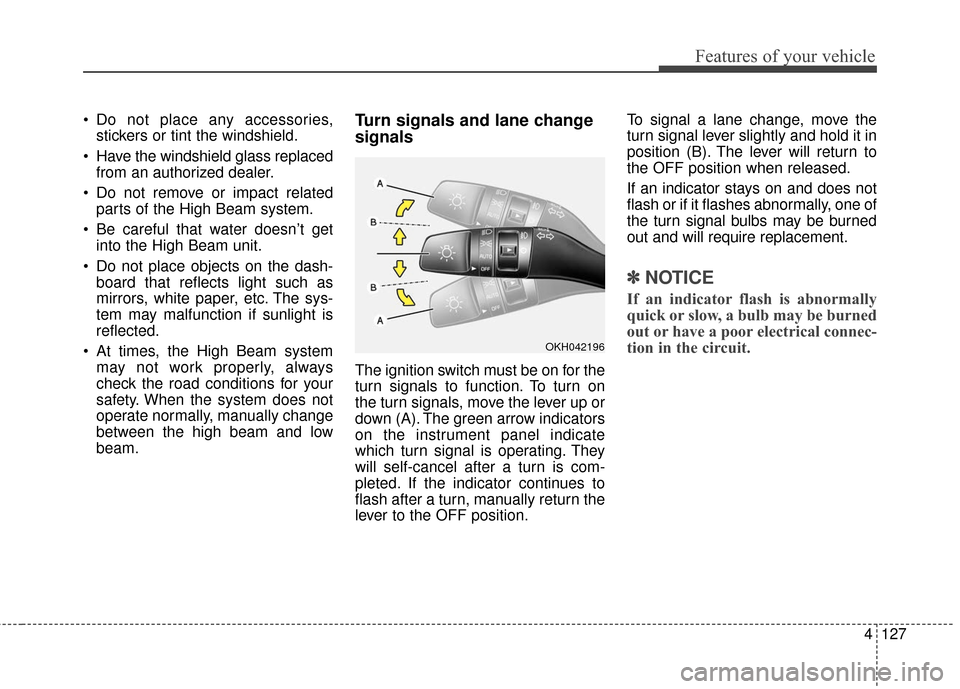
signals
The ignition switch must be on for the
turn signals to function. To turn on
the turn signals, move the lever up or
down (A). The green arrow indicators
on the instrument panel indicate
which turn signal is operating. They
will self-cancel after a turn is com-
pleted. If the indicator continues to
flash after a turn, manually return the
lever to the OFF position. To signal a lane change, move the
turn signal lever slightly and hold it in
position (B). The lever will return to
the OFF position when released.
If an indicator stays on and does not
flash or if it flashes abnormally, one of
the turn signal bulbs may be burned
out and will require replacement.
✽ ✽
NOTICE
If an indicator flash is abnormally
quick or slow, a bulb may be burned
out or have a poor electrical connec-
tion in the circuit.
OKH042196