Trim KIA Sedona 2016 3.G Owner's Manual
[x] Cancel search | Manufacturer: KIA, Model Year: 2016, Model line: Sedona, Model: KIA Sedona 2016 3.GPages: 644, PDF Size: 19.23 MB
Page 136 of 644

Features of your vehicle
34
4
POWER SLIDING DOOR AND POWER TAILGATE (IF EQUIPPED)
(1) Left power sliding door control
button
(2) Right power sliding door control button
(3) Power tailgate control button*
(4) Power door ON/OFF button
*: if equipped
The power sliding doors and power
tailgate can be opened and closed
automatically with the folding key or
smart key, the main control buttons
on the overhead console or the sub
control buttons on the center pillar
trim and the tailgate.
When the power door ON/OFF but-
ton is OFF (depressed), the power
sliding door and power tailgate can
be opened and closed manually by
pulling the door handles from inside
or outside vehicle.
✽ ✽ NOTICE
If the power sliding door is open
approximately 6 hours, the ECU will
enter Sleep mode to conserve bat-
tery power and the door might not
close automatically. Close the door
or tailgate manually and then oper-
ate the door with the power operat-
ing system.
OYP044017K
OYP044018K
OYP044027N
On the center pillar trim
On the tailgate
On the overhead console
WARNING - Unattended
children/pets
Never leave children or animals
unattended in your vehicle.
Children or animals might oper-
ate the power sliding door or
power tailgate that could result
in injury to themselves or oth-
ers or damage to the vehicle.
Page 139 of 644

437
Features of your vehicle
For power sliding door
1. Put the shift lever in the P (Park).
2. Close the fuel filler lid.
3. Change the position of fuse switchto OFF on the driver's side fuse
panel and change the position of
fuse switch to ON after 1 minute.
4. Close the sliding door manually.
5. Open the sliding door completely using the transmitter or main control
button on the overhead console.
6. Close the sliding door completely using the transmitter or main control
button on the overhead console.
For the left/right power sliding doors
and power tailgate, follow above
steps to reset.
If the power sliding door or power
tailgate doesn't work properly after
above procedure, have the system
checked by an authorized Kia dealer.
For power tailgate
1. Put the shift lever in P (Park).
2. Press the tailgate handle switch and tailgate close button at the
same time for more than 3 sec-
onds. (the chime will sound).
3. Close the tailgate manually.
4. Open the tailgate using the tail- gate handle switch and allow it to
fully open.
5. After fully opening, the tailgate will complete initialization and lights
will flash twice indicating reset
complete.
If the power tailgate does not work
properly after the above procedure,
have the system checked by an
authorized Kia dealer.
Power door ON/OFF button
When the power door ON/OFF but- ton is ON (not depressed), the
power sliding door and power tail-
gate can be controlled with the sub
control buttons on the center pillar
trim or tailgate. Also, the doors can
be opened and closed automatical-
ly by pulling the inside or outside
door handles.
OYP044021K
Page 141 of 644

439
Features of your vehicle
When the power door ON/OFF but-ton is ON (not depressed), do as
follows to open or close the power
sliding doors :
- Push the corresponding sub con-trol button on the center pillar trim.
- Pull the door handle from inside or outside vehicle.
- If the sub control button is pushed while the door is locked or child
safety lock is engaged, the chime
sounds once, and the power slid-
ing door will not open. - If the door handle is pulled from
inside or outside while the door is
locked or child safety lock is
engaged, the power sliding door
will not open. However, the power
sliding door can be opened by
pulling the outside door handle
while the door is unlocked and
child safety lock is engaged.
When the power door ON/OFF but- ton is OFF (depressed), the power
sliding door can not be controlled
with the sub control buttons or door
handles, and if the sub control but-
ton is pushed, chime sounds once.
However, the doors can be opened
and closed manually by pulling the
door handles from inside or out-
side vehicle.
On a steep grade, the power slid- ing door will slide faster when clos-
ing. And the drive unit motor may
operate additionally for a moment
after the door is closed. This is a
normal operation to ensure door
closing, not a malfunction.
OYP044023K
WARNING - Rear door
locks
Use the rear door safety locks
whenever children are in the
vehicle. If a child accidently
opens the rear doors while the
vehicle is motion, he can fall out.
Page 163 of 644
461
Features of your vehicle
Make sure to refuel your vehicle
according to the “Fuel requirements”
suggested in chapter 1.
If the fuel filler cap requires replace-
ment, use only a genuine Kia cap or
the equivalent specified for your vehi-
cle. An incorrect fuel filler cap can
result in a serious malfunction of the
fuel system or emission control sys-
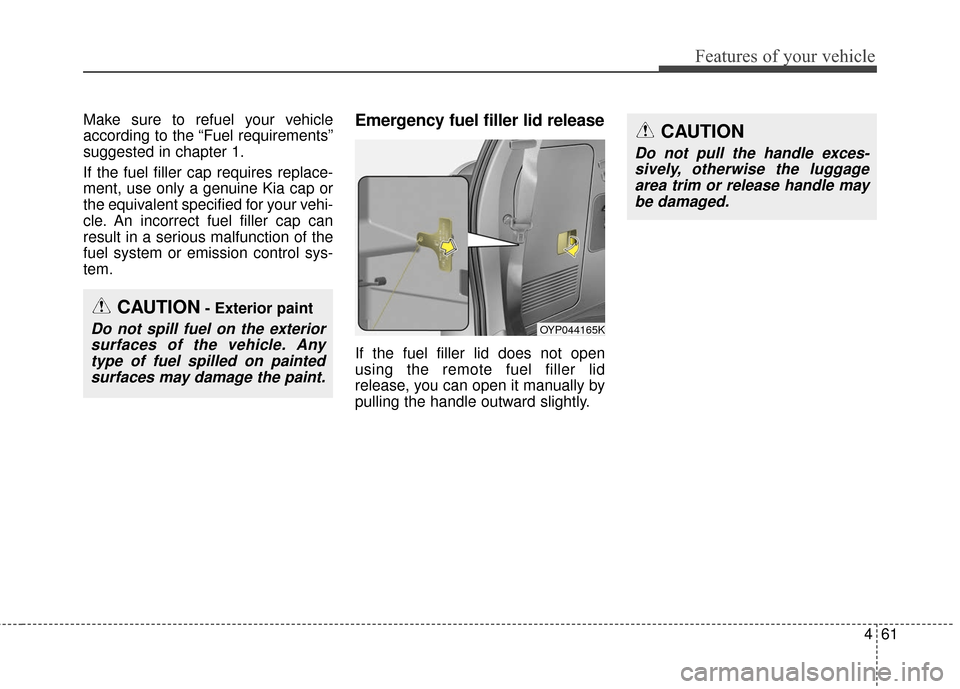
tem.Emergency fuel filler lid release
If the fuel filler lid does not open
using the remote fuel filler lid
release, you can open it manually by
pulling the handle outward slightly.
CAUTION- Exterior paint
Do not spill fuel on the exteriorsurfaces of the vehicle. Anytype of fuel spilled on paintedsurfaces may damage the paint.
CAUTION
Do not pull the handle exces-sively, otherwise the luggagearea trim or release handle maybe damaged.
OYP044165K
Page 258 of 644

Features of your vehicle
156
4
From rear seat
Set the rear climate control selection
(REAR ON) button in the front cli-
mate control panel to the ON posi-
tion and set the rear climate control
selection(REAR LOCK) button in the
front climate control panel to the
OFF position.
To change the rear air temperature,
press the button ( ) for warmer air
or press the button ( ) for cooler air.Rear mode selection (if equipped)
Front climate control is MAX A/C,
:
Rear air blows from the upper
vents on the rear ceiling.
Front climate control is : Rear air blows from the upper vents
on the rear ceiling and the lower
vents on the right rear trim together.
Front climate control is , : Rear air blows from the lower vents
on the right rear trim. When the rear climate control selec-
tion (REAR ON) button in the front
climate control panel is in the ON
position and set the rear climate con-
trol selection(REAR LOCK) button in
the front climate control panel to the
OFF position and the rear mode is
selected by pushing the rear mode
selection button on the rear control
panel as follows:
OYP044216KOYP044217KOYP044218K
Page 259 of 644

4157
Features of your vehicle
: Rear air blows from the uppervents on the rear ceiling.
: Rear air blows from the upper vents on the rear ceil-
ing and the lower vents on
the right rear trim together.
: Rear air blows from the lower vents on the right rear trim.Rear vents (if equipped)
The vent can be adjusted by rotating
the blade.
✽ ✽NOTICE
If all the vents are closed, it may
cause some noise. Always open 2
vents or more.
System operation
Ventilation
1. Set the mode to the position.
2. Set the air intake control to the
outside (fresh) air position.
3. Set the temperature control to the desired position.
4. Set the fan speed control to the desired speed.
OYP044166N
Page 277 of 644

4175
Features of your vehicle
Rear mode selection (if equipped)
Front climate control is :Rear air blows from the upper
vents on the rear ceiling.
Front climate control is : Rear air blows from the upper
vents on the rear ceiling and the
lower vents on the right rear trim
together.
Front climate control is , : Rear air blows from the lower vents
on the right rear trim together. When the rear climate control selec-
tion (REAR ON) button in the front
climate control panel is in the ON
position and set the rear climate con-
trol selection (REAR LOCK) button in
the front climate control panel to the
OFF position and the rear mode is
selected by pushing the rear mode
selection button on the rear control
panel as follows: : Rear air blows from the upper
vents on the rear ceiling.
: Rear air blows from the upper vents on the rear ceil-
ing and the lower vents on
the right rear trim together.
: Rear air blows from the lower vents on the right rear trim.
OYP044217K
OYP044239K
Page 523 of 644

What to do in an emergency
16
6
When using a compact spare tire,
observe the following precautions:
Under no circumstances should
you exceed 80 km/h (50 mph); a
higher speed could damage the
tire.
Ensure that you drive slowly enough for the road conditions to
avoid all hazards. Any road hazard,
such as a pothole or debris, could
seriously damage the compact
spare.
Any continuous road use of this tire could result in tire failure, loss of
vehicle control, and possible per-
sonal injury.
Do not exceed the vehicle’s maxi- mum load rating or the load-carry-
ing capacity shown on the sidewall
of the compact spare tire.
Avoid driving over obstacles. The compact spare tire diameter is
smaller than the diameter of a con-
ventional tire and reduces the
ground clearance approximately
25 mm (1 inch), which could result
in damage to the vehicle. Do not take this vehicle through an
automatic vehicle wash while the
compact spare tire is installed.
Do not use the compact spare tire on any other vehicle because this
tire has been designed especially
for your vehicle.
The compact spare tire’s tread life is shorter than a regular tire.
Inspect your compact spare tire
regularly and replace worn com-
pact spare tires with the same size
and design, mounted on the same
wheel.
The compact spare tire should not be used on any other wheels, nor
should standard tires, snow tires,
wheel covers or trim rings be used
with the compact spare wheel. If
such use is attempted, damage to
these items or other vehicle com-
ponents may occur.
Do not use more than one compact spare tire at a time.
Do not tow a trailer while the com- pact spare tire is installed.
Page 588 of 644

Maintenance
60
7
Pneumatic tire: A mechanical
device made of rubber, chemicals,
fabric and steel or other materials,
that, when mounted on an automo-
tive wheel, provides the traction and
contains the gas or fluid that sustains
the load.
Production options weight: The
combined weight of installed regular
production options weighing over 5
lb.(2.3 kg) in excess of the standard
items which they replace, not previ-
ously considered in curb weight or
accessory weight, including heavy
duty brakes, ride levelers, roof rack,
heavy duty battery, and special trim.
Recommended Inflation Pressure:
Vehicle manufacturer's recommend-
ed tire inflation pressure and shown
on the tire placard.
Radial Ply Tire: A pneumatic tire in
which the ply cords that extend to the
beads are laid at 90 degrees to the
centerline of the tread.
Rim: A metal support for a tire and
upon which the tire beads are seated. Sidewall:
The portion of a tire
between the tread and the bead.
Speed Rating: An alphanumeric
code assigned to a tire indicating the
maximum speed at which a tire can
operate.
Traction: The friction between the
tire and the road surface. The
amount of grip provided.
Tread: The portion of a tire that
comes into contact with the road.
Treadwear Indicators: Narrow
bands, sometimes called "wear bars,"
that show across the tread of a tire
when only 2/32 inch of tread remains.
UTQGS: Uniform Tire Quality
Grading Standards, a tire information
system that provides consumers with
ratings for a tire's traction, tempera-
ture and treadwear. Ratings are
determined by tire manufacturers
using government testing proce-
dures. The ratings are molded into
the sidewall of the tire.
Vehicle Capacity Weight: The num-
ber of designated seating positions
multiplied by 150 lbs. (68 kg) plus the
rated cargo and luggage load. Vehicle Maximum Load on the
Tire:
Load on an individual tire due
to curb and accessory weight plus
maximum occupant and cargo
weight.
Vehicle Normal Load on the Tire:
Load on an individual tire that is
determined by distributing to each
axle its share of the curb weight,
accessory weight, and normal occu-
pant weight and driving by 2.
Vehicle Placard: A label permanent-
ly attached to a vehicle showing the
original equipment tire size and rec-
ommended inflation pressure.
Page 611 of 644

783
Maintenance
High mounted stop lamp
replacement1. Open the tailgate.
2. Gently remove the center cover ofthe rear tailgate trim.
3. Disconnect the electrical connec- tor.
4. Loosen the retaining nuts and remove the spoiler.
5. Remove the high mounted stop light assembly after loosening the
screws.
6. Reinstall a new light assembly in the reverse order of removal.License plate light bulb
replacement
1. Loosen the lens retaining screwswith a phillips head screwdriver.
2. Remove the lens.
3. Remove the bulb by pulling it straight out.
4. Install a new bulb.
5. Reinstall the lens securely with the lens retaining screws.
OYP074027K
OYP074070N
OYP074071N
OXM073118