length KIA SEDONA 2019 Owners Manual
[x] Cancel search | Manufacturer: KIA, Model Year: 2019, Model line: SEDONA, Model: KIA SEDONA 2019Pages: 593, PDF Size: 15.93 MB
Page 36 of 593
Safety features of your vehicle
20
3
1.Lift the armrest up , lower the head-
rests to the lowest position and
slide the seat inside. (if necessary).
2.Pull the walk-in strap (1) or recline lever (2) on the 2nd row seat when
the passenger gets in or out of the
3rd row seat.
3.Push the 2nd row seat to forward. After getting out, push the 2nd row
seat to the original position until it
clicks into place.
Make sure that the seat is locked in
place. In the walk-in position, the
front and back sliding function is
not fixed.Leg support (2nd row seat for SXL package)
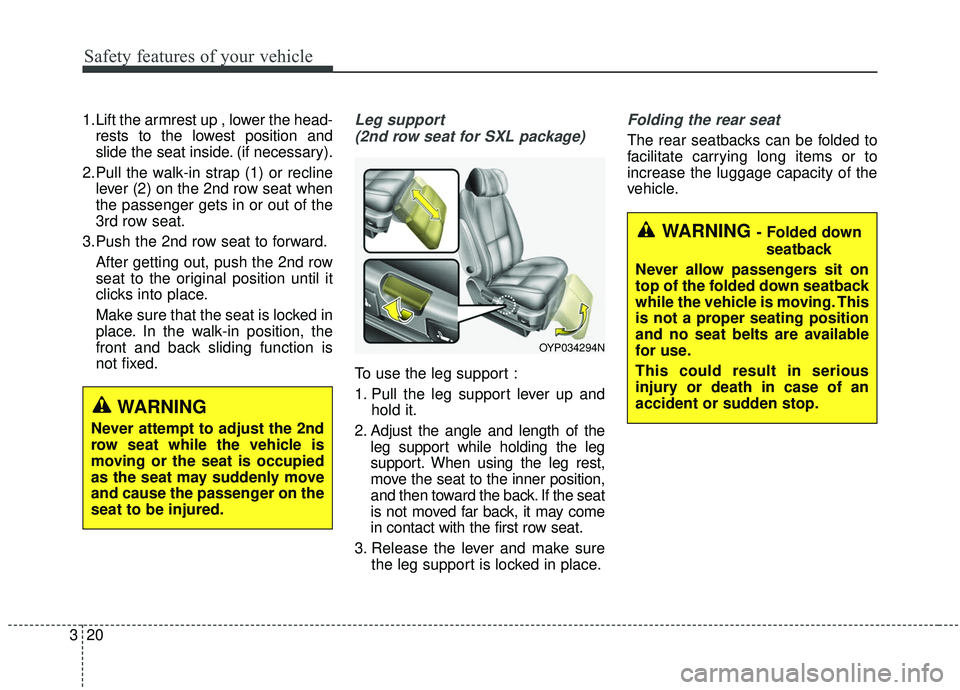
To use the leg support :
1. Pull the leg support lever up and hold it.
2. Adjust the angle and length of the leg support while holding the leg
support. When using the leg rest,
move the seat to the inner position,
and then toward the back. If the seat
is not moved far back, it may come
in contact with the first row seat.
3. Release the lever and make sure the leg support is locked in place.
Folding the rear seat
The rear seatbacks can be folded to
facilitate carrying long items or to
increase the luggage capacity of the
vehicle.
OYP034294N
WARNING
Never attempt to adjust the 2nd
row seat while the vehicle is
moving or the seat is occupied
as the seat may suddenly move
and cause the passenger on the
seat to be injured.
WARNING - Folded down
seatback
Never allow passengers sit on
top of the folded down seatback
while the vehicle is moving. This
is not a proper seating position
and no seat belts are available
for use.
This could result in serious
injury or death in case of an
accident or sudden stop.
Page 54 of 593
Safety features of your vehicle
38
3
You can find the front passenger's
seat belt warning light on the cen-
ter fascia panel.
Although the front passenger seat is not occupied, the seat belt warn-
ing light will blink for 6 seconds.
The seat belt warning light can blink when a briefcase or purse is
placed on the front passenger
seat.
Riding in an improper position
adversely affects the front passen-
ger's seat belt warning system. It is
important for the driver to instruct the
passenger as to the proper seating
instructions as contained in this
manual.Seat belt - Driver's 3-point system with emergency locking retractor
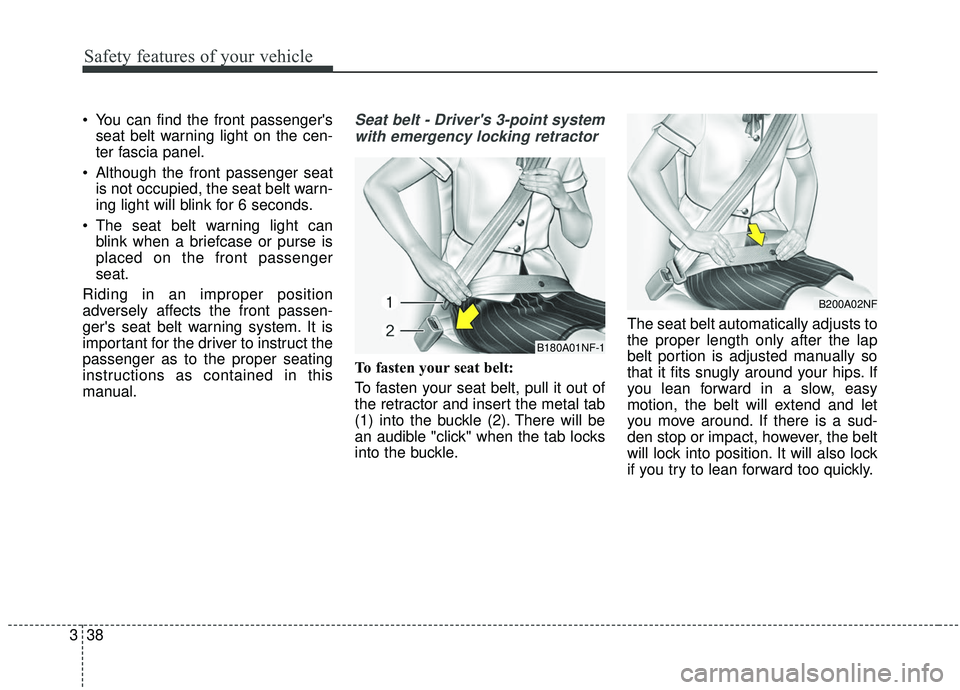
To fasten your seat belt:
To fasten your seat belt, pull it out of
the retractor and insert the metal tab
(1) into the buckle (2). There will be
an audible "click" when the tab locks
into the buckle. The seat belt automatically adjusts to
the proper length only after the lap
belt portion is adjusted manually so
that it fits snugly around your hips. If
you lean forward in a slow, easy
motion, the belt will extend and let
you move around. If there is a sud-
den stop or impact, however, the belt
will lock into position. It will also lock
if you try to lean forward too quickly.
B180A01NF-1
B200A02NF
Page 56 of 593
Safety features of your vehicle
40
3
Seat belts - Front passenger and
rear seat 3-point system withcombination locking retractor
To fasten your seat belt:
Combination retractor type seat belts
are installed in the rear seat posi-
tions to help accommodate the
installation of child restraint systems.
Although a combination retractor is
also installed in the front passenger
seat position, it is strongly recom-
mended that children always be
seated in the rear seat. NEVER
place any infant restraint system in
the front seat of the vehicle.
This type of seat belt combines the
features of both an emergency lock-
ing retractor seat belt and an auto-
matic locking retractor seat belt. To
fasten your seat belt, pull it out of the
retractor and insert the metal tab into
the buckle. There will be an audible
"click" when the tab locks into the
buckle. When not securing a child
restraint, the seat belt operates in the
same way as the driver's seat belt
(Emergency Locking Retractor Type). It automatically adjusts to the proper
length only after the lap belt portion
of the seat belt is adjusted manually
so that it fits snugly around your hips.
When the seat belt is fully extended
from the retractor to allow the instal-
lation of a child restraint system, the
seat belt operation changes to allow
the belt to retract, but not to extend
(Automatic Locking Retractor Type).
Refer to “Using a child restraint sys-
tem” in this section.
WARNING- Shoulder belt
positioning
Never position the shoulder belt
across your neck or face.
WARNING- Seat belt replacement
Replace your seat belts after
being in an accident. Failure to
replace seat belts after an acci-
dent could leave you with dam-
aged seat belts that will not pro-
vide protection in the event of
another collision.
Page 60 of 593
Safety features of your vehicle
44
3
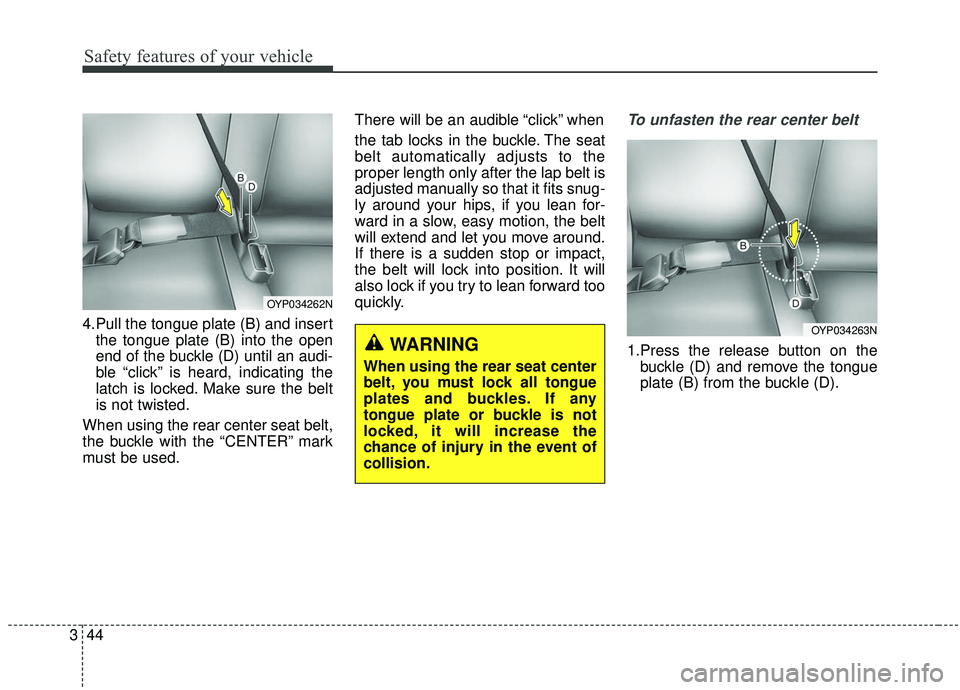
4.Pull the tongue plate (B) and insert
the tongue plate (B) into the open
end of the buckle (D) until an audi-
ble “click” is heard, indicating the
latch is locked. Make sure the belt
is not twisted.
When using the rear center seat belt,
the buckle with the “CENTER” mark
must be used. There will be an audible “click” when
the tab locks in the buckle. The seat
belt automatically adjusts to the
proper length only after the lap belt is
adjusted manually so that it fits snug-
ly around your hips, if you lean for-
ward in a slow, easy motion, the belt
will extend and let you move around.
If there is a sudden stop or impact,
the belt will lock into position. It will
also lock if you try to lean forward too
quickly.
To unfasten the rear center belt
1.Press the release button on the
buckle (D) and remove the tongue
plate (B) from the buckle (D).WARNING
When using the rear seat center
belt, you must lock all tongue
plates and buckles. If any
tongue plate or buckle is not
locked, it will increase the
chance of injury in the event of
collision.
OYP034263N
OYP034262N
Page 312 of 593
Features of your vehicle
208
4
Roof rack (if equipped)
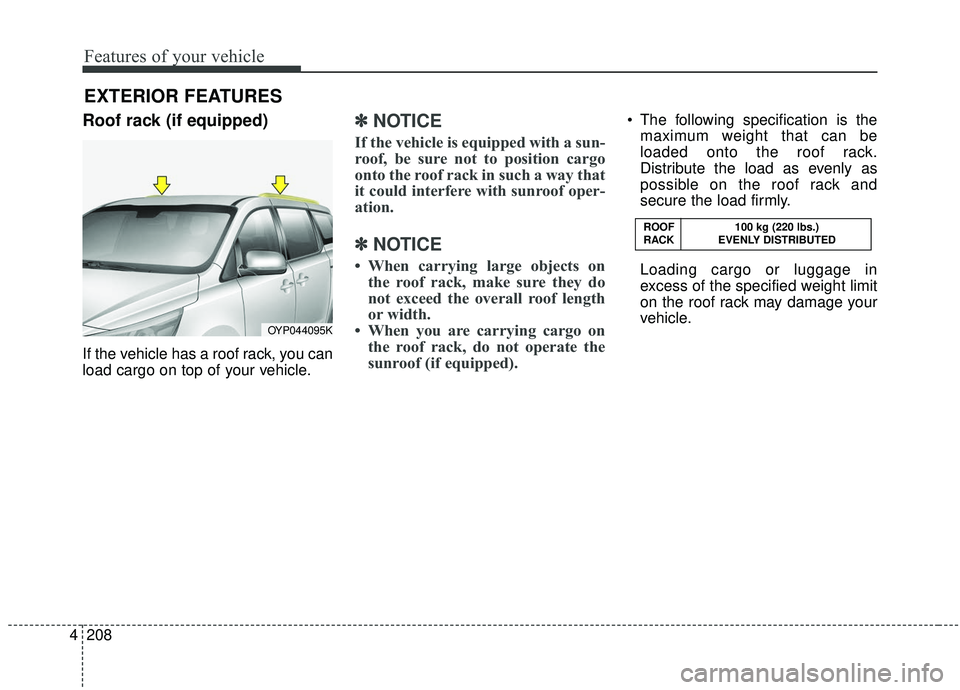
If the vehicle has a roof rack, you can
load cargo on top of your vehicle.
✽ ✽
NOTICE
If the vehicle is equipped with a sun-
roof, be sure not to position cargo
onto the roof rack in such a way that
it could interfere with sunroof oper-
ation.
✽ ✽NOTICE
• When carrying large objects on
the roof rack, make sure they do
not exceed the overall roof length
or width.
• When you are carrying cargo on the roof rack, do not operate the
sunroof (if equipped).
The following specification is the
maximum weight that can be
loaded onto the roof rack.
Distribute the load as evenly as
possible on the roof rack and
secure the load firmly.
Loading cargo or luggage in
excess of the specified weight limit
on the roof rack may damage your
vehicle.
EXTERIOR FEATURES
OYP044095K ROOF
100 kg (220 lbs.)
RACK EVENLY DISTRIBUTED
Page 431 of 593
5117
Driving your vehicle
Following distance
Stay at least twice as far behind the
vehicle ahead as you would when
driving your vehicle without a trailer.
This can help you avoid situations
that require heavy braking and sud-
den turns.
Passing
You’ll need more passing distance
up ahead when you’re towing a trail-
er. And, because of the increased
vehicle length, you’ll need to go
much farther beyond the passed
vehicle before you can return to your
lane. Due to the added load to the
engine when going uphill the vehicle
may also take longer to pass than it
would on flat ground.
Backing up
Hold the bottom of the steering
wheel with one hand. Then, to move
the trailer to the left, just move your
hand to the left. To move the trailer to
the right, move your hand to the
right. Always back up slowly and, if
possible, have someone guide you.
Making turns
When you’re turning with a trailer,
make wider turns than normal. Do
this so your trailer won’t strike soft
shoulders, curbs, road signs, trees,
or other objects near the edge of the
road. Avoid jerky or sudden maneu-
vers. Signal well in advance before
turning or lane changes.
Turn signals when towing a trailer
When you tow a trailer, your vehicle
has to have a different turn signal
flasher and extra wiring. The green
arrows on your instrument panel will
flash whenever you signal a turn or
lane change. Properly connected,
the trailer lights will also flash to alert
other drivers you’re about to turn,
change lanes, or stop.
When towing a trailer, the green
arrows on your instrument panel will
flash for turns even if the bulbs on the
trailer are burned out. Thus, you may
think drivers behind you are seeing
your signals when, in fact, they are
not. It’s important to check occasion-
ally to be sure the trailer bulbs are still
working. You must also check the
lights every time you disconnect and
then reconnect the wires.
Do not connect a trailer lighting sys-
tem directly to your vehicle’s lighting
system. Use only an approved trailer
wiring harness.
An authorized Kia dealer can assist
you in installing the wiring harness.
Page 570 of 593
28
DIMENSIONS Specifications & Consumer information
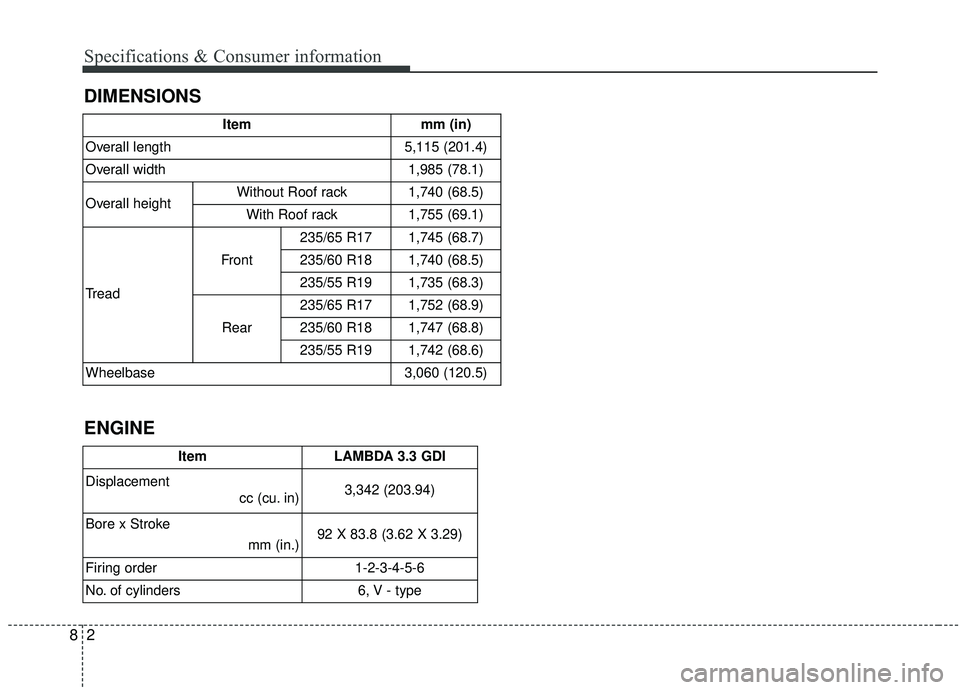
Itemmm (in)
Overall length
5,115 (201.4)
Overall width
1,985 (78.1)
Overall height
Without Roof rack1,740 (68.5)
With Roof rack1,755 (69.1)
Tread
Front
235/65 R171,745 (68.7)
235/60 R181,740 (68.5)
235/55 R191,735 (68.3)
Rear
235/65 R171,752 (68.9)
235/60 R181,747 (68.8)
235/55 R191,742 (68.6)
Wheelbase
3,060 (120.5)
Item LAMBDA 3.3 GDI
Displacement cc (cu. in) 3,342 (203.94)
Bore x Stroke mm (in.)92 X 83.8 (3.62 X 3.29)
Firing order 1-2-3-4-5-6
No. of cylinders 6, V - type
ENGINE