KIA SELTOS 2021 Features and Functions Guide
Manufacturer: KIA, Model Year: 2021, Model line: SELTOS, Model: KIA SELTOS 2021Pages: 62, PDF Size: 4.82 MB
Page 41 of 62
ALWAYS CHECK THE OWNER’S MANUAL FOR COMPLETE OPER ATING INFORMATION AND SAFET Y WARNINGS. *IF EQUIPPED †LEGAL DISCL AIMERS ON BACK INSIDE COVER39
CENTER PANEL
CENTER PANEL
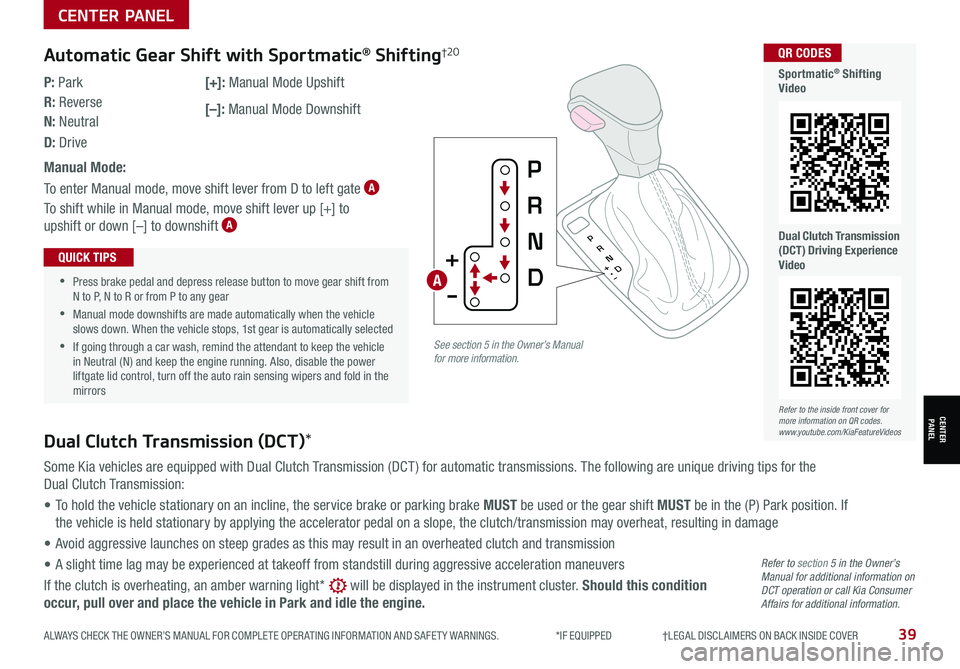
P
R
N
D
+
•
-
Automatic Gear Shift with Sportmatic
Page 42 of 62

*IF EQUIPPED40SELTOS FEATURES & FUNCTIONS GUIDE
CENTER PANEL
CENTER PANEL
Auto Hold temporarily maintains the vehicle at a standstill
even though the brake pedal is not depressed after the
driver brings the vehicle to a complete stop by depressing
the brake pedal. Auto Hold can be turned On/Off using the
AUTO HOLD button B on the center panel below the gear
shift. Before Auto Hold will operate, the driver’s door, engine
hood and liftgate must be closed, and the driver’s seat belt
must be fastened.
The AUTO HOLD indicator on the Instrument Cluster
has four states:
White: Standby – With vehicle at a standstill and AUTO
HOLD button B pressed ON, the indicator will illuminate white. While driving the vehicle
(vehicle is not at a standstill), the Auto Hold indicator will remain white.
Green: Engaged – When coming to a complete stop by depressing the brake pedal, the
Auto Hold indicator changes from white to green.
Off (not illuminated) – The indicator will turn off when the AUTO HOLD button B is
manually pressed off or when the EPB is manually turned on.
Yellow: Malfunction - When the indicator is illuminated yellow, there may be a system
malfunction. Take your vehicle to a local Kia dealer.
REMINDERS:
•
Auto Hold only operates when vehicle is in Drive or Neutral
•
To reduce the risk of an accident, do not activate Auto Hold while driving downhill, backing up or parking your vehicle
•
Do not solely rely on the Auto Hold system to keep the vehicle stopped. Always pay attention to traf fic and road conditions, and be prepared to depress the brakes
Refer to page 4 for location of Instrument Cluster indicators.
See section 5 in the Owner’s Manual for more information.(Type B shown. Located below gear shift)
Electronic Parking Brake (EPB)*
The Electronic Parking Brake (EPB) system utilizes an electric
motor to engage the parking brake.
Applying the Parking Brake
Depress the brake pedal and pull up the EPB switch A. Ensure
that the indicator light is illuminated on the instrument cluster.
If parked on a steep incline/decline, pull up the EPB switch for
more than 3 seconds for a firmer EPB application.
Releasing the Parking Brake
The EPB will automatically release when the shifter is placed in
Reverse or Drive. To release EPB manually, depress the brake
pedal, then press the EPB switch A, with the ignition switch in
the ON position. Ensure that the indicator light is O F F.
•When leaving your keys with parking lot attendants or valet, make sure to inform them how to operate the EPB
•Pull up and hold EPB switch a second time to increase brake pressure if parked on a decline or incline
•If parked on a steep incline, pull up the EPB switch for more than 3 seconds for a firmer EPB application
QUICK TIPS
AUTO
HOLD
Auto Hold*
REMINDERS:
•
As a bulb check, the EPB malfunction indicator will illuminate for approximately 3 seconds when the ignition switch is turned ON
•
If the warning light does not illuminate temporarily, or continues to remain lit, take your vehicle to an authorized Kia dealer and have the system checked
•The EPB should not be operated while the vehicle is moving
•
A click or electric brake motor sound may be heard while operating or releasing the EPB, but these conditions are normal and indicate that the EPB is functioning properly
AB
See section 5 in the Owner’s Manual for more information.
Refer to the inside front cover for more information on QR codes.www.youtube.com/KiaFeatureVideos
QR CODES
Electric Parking Brake Video
Page 43 of 62

ALWAYS CHECK THE OWNER’S MANUAL FOR COMPLETE OPER ATING INFORMATION AND SAFET Y WARNINGS. *IF EQUIPPED †LEGAL DISCL AIMERS ON BACK INSIDE COVER41
CENTER PANEL
CENTER PANEL
Downhill Brake Control (DBC)†8All Wheel Drive (AWD) System*
DBC helps drivers maneuver down steep hills by automatically
applying braking inputs, allowing drivers to concentrate on
steering.
Press button A to turn DBC ON/OFF.
When you select AWD LOCK mode (indicator is illuminated) by pressing the AWD
LOCK button B, the AWD LOCK mode increases the drive power when driving on wet
pavement, snow-covered roads and/or on unpaved roads.
• This mode is used for climbing or descending sharp grades, driving on unpaved roads,
driving on sandy and muddy roads, etc., to improve traction
• This mode automatically begins to deactivate at speeds above 38 mph and is shifted
to AWD AUTO mode at speeds above 38 mph. If the vehicle decelerates to speeds
below approximately 38 mph, however, the transfer mode is shifted into AWD LOCK
mode again
When the AWD LOCK mode is deactivated, a shock may be felt as the drive power is
delivered entirely to the front wheels. This shock is not a mechanical failure.
The AWD system is a supplemental system only. It is the driver’s responsibility to drive carefully depending on road and traffic conditions.
See section 5 in the Owner’s Manual for more information.
LOCK
(Type A shown. Located below gear shift)
•
•When on, DBC will turn OFF when button is pressed again or vehicle speed is over 38 mph •If the red indicator illuminates, the DBC system may have malfunctioned. Take your vehicle to an authorized Kia dealer and have the system checked
QUICK TIPS
REMINDER: DBC defaults to OFF when ignition is cycled.
The DBC system is a supplemental system and does not replace the need for the driver to apply the brakes. Pay attention to road and traffic conditions and be prepared to depress the brakes.
See section 5 in the Owner’s Manual for more information.
A
B
Page 44 of 62

CENTER PANEL
CENTER PANEL
*IF EQUIPPED †LEGAL DISCL AIMERS ON BACK INSIDE COVER42SELTOS FEATURES & FUNCTIONS GUIDE
•
•System is OFF by default. To turn system ON, press the seat warmer switch
•With the seat warmer switch in the ON position, the heating system in the seat turns off or on automatically depending on the seat temperature
•When the Climate Control System’s temperature is turned up to high heat, the Seat Warmers turn on automatically
QUICK TIPS
Seat Warmers*†1 8
A Seat Warmers:
• Press button once for high setting (3 LEDs lit)
• Press button twice for medium setting (2 LEDs lit)
• Press a third time for low setting (1 LED lit) and again to turn OFF
LOCK
(Buttons located on center panel. Passenger side shown.)
REMINDERS:
• Use extreme caution when using the seat warmers to avoid burns. Refer to the Owner’s Manual for more information
• If the Auto Climate Control is on, the seat warmers or ventilated seats may turn on automatically based on the set temperature and ambient temperature
A
See section 4 in the Owner’s Manual for more information.
Refer to the inside front cover for more information on QR codes.www.youtube.com/KiaFeatureVideos
QR CODES
Heated and Ventilated Seats Video
Page 45 of 62
SEATING
SEATING
ALWAYS CHECK THE OWNER’S MANUAL FOR COMPLETE OPER ATING INFORMATION AND SAFET Y WARNINGS. *IF EQUIPPED †LEGAL DISCL AIMERS ON BACK INSIDE COVER43
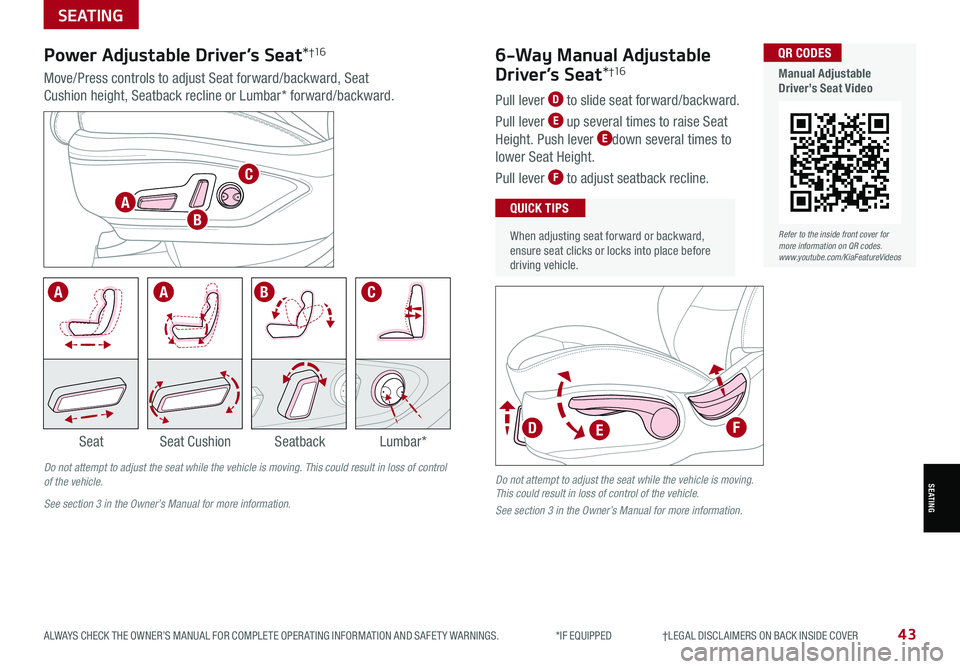
Power Adjustable Driver’s Seat*†1 66-Way Manual Adjustable
Driver’s Seat*†1 6Move/Press controls to adjust Seat forward/backward, Seat
Cushion height, Seatback recline or Lumbar* forward/backward.Pull lever D to slide seat forward/backward.
Pull lever E up several times to raise Seat
Height. Push lever Edown several times to
lower Seat Height.
Pull lever F to adjust seatback recline.
•
When adjusting seat forward or backward, ensure seat clicks or locks into place before driving vehicle.
QUICK TIPS
.
Do not attempt to adjust the seat while the vehicle is moving. This could result in loss of control of the vehicle.
See section 3 in the Owner’s Manual for more information.
Do not attempt to adjust the seat while the vehicle is moving. This could result in loss of control of the vehicle.
See section 3 in the Owner’s Manual for more information.
.
SeatbackLumbar*SeatSeat Cushion
AABC
.
A
B
C
DFE
Refer to the inside front cover for more information on QR codes.www.youtube.com/KiaFeatureVideos
QR CODES
Manual Adjustable Driver’s Seat Video
Page 46 of 62
*IF EQUIPPED †LEGAL DISCL AIMERS ON BACK INSIDE COVER44SELTOS FEATURES & FUNCTIONS GUIDE
SEATING
SEATING
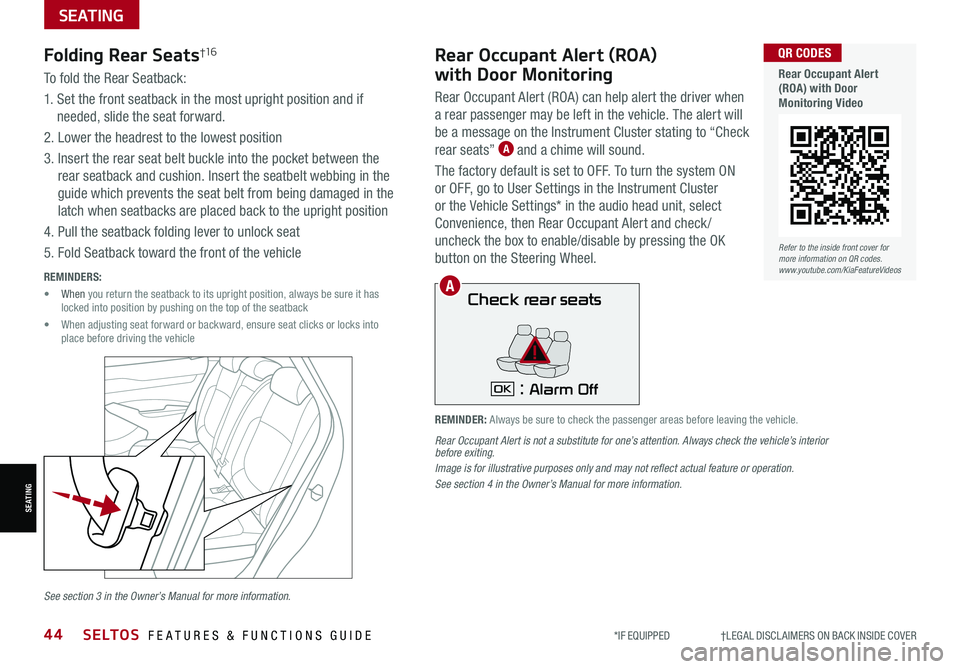
To fold the Rear Seatback:
1. Set the front seatback in the most upright position and if
needed, slide the seat forward.
2. Lower the headrest to the lowest position
3. Insert the rear seat belt buckle into the pocket between the
rear seatback and cushion. Insert the seatbelt webbing in the
guide which prevents the seat belt from being damaged in the
latch when seatbacks are placed back to the upright position
4. Pull the seatback folding lever to unlock seat
5. Fold Seatback toward the front of the vehicle
Folding Rear Seats†1 6
REMINDERS:
• When you return the seatback to its upright position, always be sure it has locked into position by pushing on the top of the seatback
• When adjusting seat forward or backward, ensure seat clicks or locks into place before driving the vehicle
Check rear seats
: Alarm OffOK
Rear Occupant Alert (ROA)
with Door Monitoring
Rear Occupant Alert (ROA) can help alert the driver when
a rear passenger may be left in the vehicle. The alert will
be a message on the Instrument Cluster stating to “Check
rear seats” A and a chime will sound.
The factory default is set to OFF. To turn the system ON
or OFF, go to User Settings in the Instrument Cluster
or the Vehicle Settings* in the audio head unit, select
Convenience, then Rear Occupant Alert and check /
uncheck the box to enable/disable by pressing the OK
button on the Steering Wheel.
Rear Occupant Alert is not a substitute for one’s attention. Always check the vehicle’s interior before exiting.Image is for illustrative purposes only and may not reflect actual feature or operation.See section 4 in the Owner’s Manual for more information.
REMINDER: Always be sure to check the passenger areas before leaving the vehicle.
A
See section 3 in the Owner’s Manual for more information.
Refer to the inside front cover for more information on QR codes.www.youtube.com/KiaFeatureVideos
QR CODES
Rear Occupant Alert (ROA) with Door Monitoring Video
Page 47 of 62

ALWAYS CHECK THE OWNER’S MANUAL FOR COMPLETE OPER ATING INFORMATION AND SAFET Y WARNINGS. *IF EQUIPPED †LEGAL DISCL AIMERS ON BACK INSIDE COVER45
SEATING
SEATING
Front Seat Headrest Adjustment†1 0Unfastening Center Seat Belt
For easy adjustments, hold a headrest post with one hand while using the other hand to pull the headrest from underneath.
QUICK TIP
To raise headrest — Pull headrest up to the desired position.
To lower headrest — Press lock A, then press the headrest down.
1. If Seat Belt is buckled, press the release button
on the buckle
2. To retract the center seatbelt webbing B in
the 2nd row, use the lap belt tongue plate C to
push the “release button” in the small slot on
the center belt buckle D
REMINDERS:
• The headrest only moves up and down as described above. It does not adjust forward or backward
• Do not operate the vehicle with the headrests removed. Headrests can provide critical neck and head support in an accident
• Button may be hard to see if headrest is in its lowest position
B
C
D
A
See section 3 in the Owner’s Manual for more information. Images are for illustrative purposes only. Actual belt buckle/tongue plate may vary.
See section 3 in the Owner’s Manual for more information.
Refer to the inside front cover for more information on QR codes.www.youtube.com/KiaFeatureVideos
QR CODES
Unfastening Center Seat Belt Video
Page 48 of 62
*IF EQUIPPED46SELTOS FEATURES & FUNCTIONS GUIDE
Remote button configuration may vary depending on vehicle options. For more information on the Mechanical Key, please refer to section 4 in the Owner’s Manual.
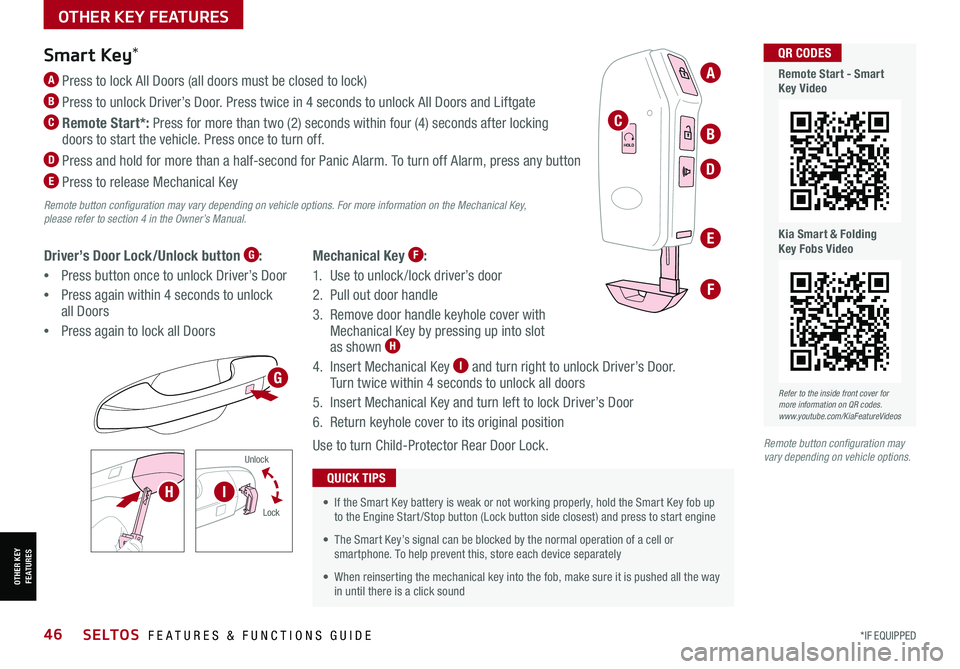
Mechanical Key F:
1. Use to unlock /lock driver’s door
2. Pull out door handle
3. Remove door handle keyhole cover with Mechanical Key by pressing up into slot as shown H
4. Insert Mechanical Key I and turn right to unlock Driver’s Door. Turn twice within 4 seconds to unlock all doors
5. Insert Mechanical Key and turn left to lock Driver’s Door
6. Return keyhole cover to its original position
Use to turn Child-Protector Rear Door Lock.
Driver’s Door Lock/Unlock button G:
•Press button once to unlock Driver’s Door
•Press again within 4 seconds to unlock all Doors
•Press again to lock all Doors
Smart Key*
A Press to lock All Doors (all doors must be closed to lock)
B Press to unlock Driver’s Door. Press twice in 4 seconds to unlock All Doors and Liftgate
C Remote Start*: Press for more than two (2) seconds within four (4) seconds after locking doors to start the vehicle. Press once to turn off.
D
Press and hold for more than a half-second for Panic Alarm. To turn off Alarm, press any button
E
Press to release Mechanical Key
•
• If the Smart Key battery is weak or not working properly, hold the Smart Key fob up to the Engine Start /Stop button (Lock button side closest) and press to start engine
• The Smart Key’s signal can be blocked by the normal operation of a cell or smartphone. To help prevent this, store each device separately
• When reinserting the mechanical key into the fob, make sure it is pushed all the way in until there is a click sound
QUICK TIPS
Unlock
Lock
Remote button configuration may vary depending on vehicle options.
HOLD
Refer to the inside front cover for more information on QR codes.www.youtube.com/KiaFeatureVideos
QR CODES
Remote Start - Smart Key Video
Kia Smart & Folding Key Fobs Video
OTHER KEY FEATURES
OTHER KEY FEATURES
A
BC
E
G
F
HI
D
Page 49 of 62
ALWAYS CHECK THE OWNER’S MANUAL FOR COMPLETE OPER ATING INFORMATION AND SAFET Y WARNINGS. *IF EQUIPPED47
AB
C
D
Refer to the inside front cover for more information on QR codes.www.youtube.com/KiaFeatureVideos
QR CODES
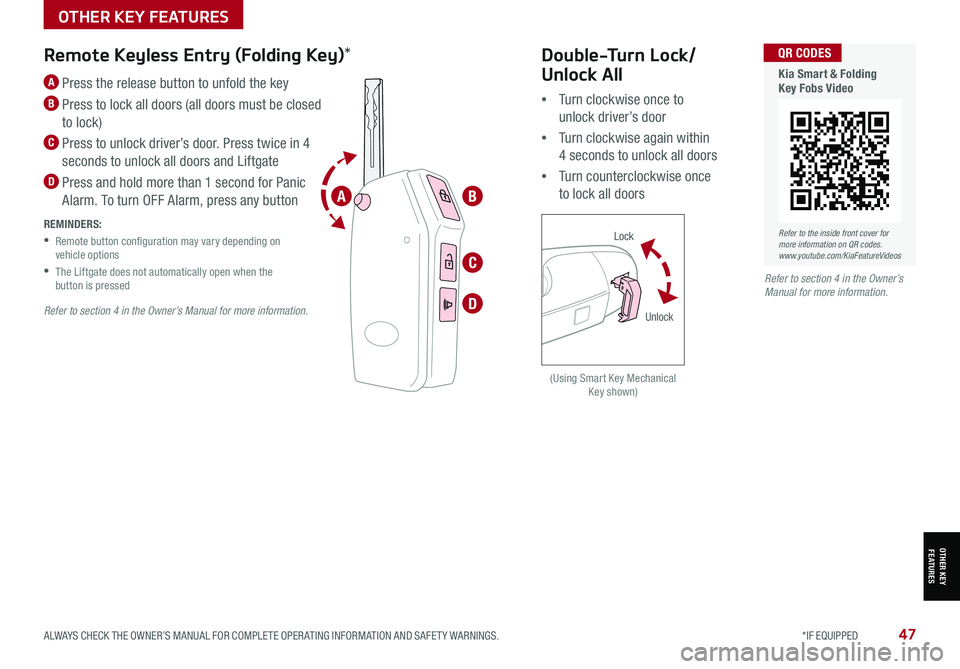
Kia Smart & Folding Key Fobs VideoA
Press the release button to unfold the key
B
Press to lock all doors (all doors must be closed
to lock)
C
Press to unlock driver’s door. Press twice in 4
seconds to unlock all doors and Liftgate
D Press and hold more than 1 second for Panic
Alarm. To turn OFF Alarm, press any button
Remote Keyless Entry (Folding Key)*
REMINDERS:
•
Remote button configuration may vary depending on vehicle options
•
The Liftgate does not automatically open when the button is pressed
Double-Turn Lock/
Unlock All
•Turn clockwise once to
unlock driver’s door
•Turn clockwise again within
4 seconds to unlock all doors
•Turn counterclockwise once
to lock all doors
(Using Smart Key Mechanical Key shown)
Lock
Unlock
OTHER KEY FEATURESOTHER KEY FEATURES
OTHER KEY FEATURES
Refer to section 4 in the Owner’s Manual for more information.
Refer to section 4 in the Owner’s Manual for more information.
Page 50 of 62

*IF EQUIPPED 48SELTOS FEATURES & FUNCTIONS GUIDE
Fuel Filler Lid ReleaseFuel Cap / Malfunction Indicator
(Check Engine Light)To open the Fuel Filler lid:
1. Pull the Fuel Filler Door Open Lever A inside the vehicle
(on floor left of Driver’s Seat)
2. Pull the Fuel Filler door to fully open B
To open the Fuel Cap, turn it counterclockwise C
To access the Fuel Cap, pull the Fuel Filler Door
Open Lever A inside the vehicle (on floor left of
Driver’s Seat). Tighten for ONE CLICK to prevent
Malfunction Indicator from illuminating.
REMINDER: It is normal operation when tightening to hear one click, and then when Fuel Cap is released, it clicks back
Place the Fuel Cap on the inside of the Fuel Filler Lid when fueling D
QUICK TIP
A
B
C
D
Opening the Hood:
1. Pull the Hood Release Lever E to unlatch the Hood
2. In the front of the vehicle, lift the Hood slightly, push
the secondary Latch to the front inside of the Hood’s
center and lift the Hood
Closing the Hood:
Lower the Hood by pressing the front center of the Hood.
Then, press down to securely lock in place.
Hood Release Lever and Latch
REMINDERS:
• While lowering and closing, keep hands away from under the Hood
• Open the Hood only after turning the engine off, on a flat surface, with the gear shift in P (Park) position and setting the parking brake
• Make sure the hood is securely closed before driving
See section 4 in the Owner’s Manual for more information.
See section 4 in the Owner’s Manual for more information.
See section 4 in the Owner’s Manual for more information.
OTHER KEY FEATURES
OTHER KEY FEATURES
Refer to the inside front cover for more information on QR codes.www.youtube.com/KiaFeatureVideos
QR CODES
One-Click Fuel Cap Video
E