roof rack KIA Sorento 2007 1.G Owner's Manual
[x] Cancel search | Manufacturer: KIA, Model Year: 2007, Model line: Sorento, Model: KIA Sorento 2007 1.GPages: 325, PDF Size: 5.01 MB
Page 10 of 325
Keys / 3-2
Remote keyless entry / 3-3
Immobilizer system / 3-5
Door locks / 3-7
Window / 3-13
Seat / 3-15
Safety belts / 3-25
Air bags - advanced supplemental restraint system / 3-47
Hood / 3-69
Fuel filler lid / 3-71
Auto fuel cutoff switch / 3-74
Mirrors / 3-74
Homelink® wireless control system / 3-78
Interior lights / 3-82
Storage compartment / 3-83
Interior features / 3-86
Sunroof / 3-91
Luggage net / 3-94
Tonneau cover / 3-95
Luggage center box / 3-96
Roof rack / 3-96
Antenna / 3-98
Audio remote control / 3-99
Audio system / 3-100
Knowing your vehicle
3
Page 105 of 325
Knowing your vehicle96
3
CAUTION
The crossbars should be placed
in the proper load carrying posi-tions prior to placing items ontothe roof rack.
If the vehicle is equipped with a sunroof, be sure not to positioncargo onto the roof rack in such away that it could interfere withsunroof operation.
When carrying cargo on the roof rack, take the necessary precau-tions to make sure the cargo doesnot damage the roof of the vehicle.
When carrying large objects on the roof rack, make sure they donot exceed the overall roof length or width.
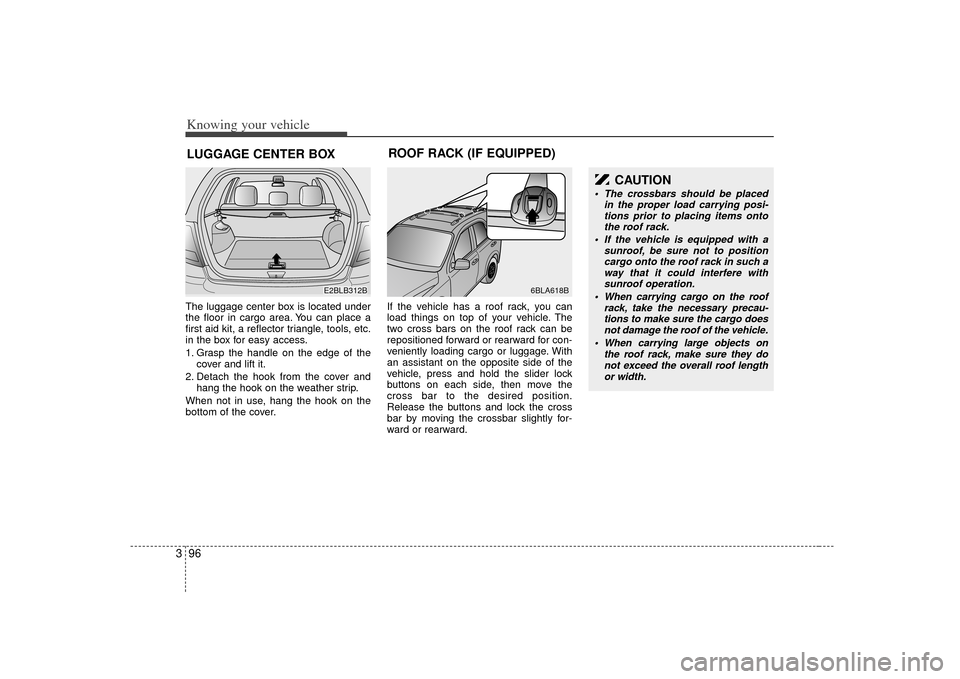
The luggage center box is located under
the floor in cargo area. You can place a
first aid kit, a reflector triangle, tools, etc.
in the box for easy access.
1. Grasp the handle on the edge of the cover and lift it.
2. Detach the hook from the cover and hang the hook on the weather strip.
When not in use, hang the hook on the
bottom of the cover. If the vehicle has a roof rack, you can
load things on top of your vehicle. The
two cross bars on the roof rack can be
repositioned forward or rearward for con-
veniently loading cargo or luggage. With
an assistant on the opposite side of the
vehicle, press and hold the slider lock
buttons on each side, then move the
cross bar to the desired position.
Release the buttons and lock the cross
bar by moving the crossbar slightly for-
ward or rearward.LUGGAGE CENTER BOX
E2BLB312B
6BLA618B
ROOF RACK (IF EQUIPPED)
Page 106 of 325

397
Knowing your vehicle
WARNING
The following specification is themaximum weight that can be
loaded onto the roof rack.
Distribute the load as evenly as
possible across the crossbars
and roof rack and secure the load
firmly.
The vehicle center of gravity will be higher when items are loaded
onto the roof rack. Avoid sudden
starts, braking, sharp turns,
abrupt maneuvers or high speeds
that may result in loss of vehicle
control or rollover causing an
accident.
(Continued)
(Continued)
Always drive slowly and turn cor-ners carefully when carrying
items on the roof rack. Severe
wind updrafts, caused by passing
vehicles or natural causes, can
cause sudden upward pressure
on items loaded on the roof rack.
This is especially true when car-
rying large, flat items such as
wood panels or mattresses. This
could cause the items to fall off
the roof rack and cause damage
to your vehicle or those around
you.
To prevent damage or loss of cargo while driving, check fre-
quently before or while driving to
make sure the items on the roof
rack are securely fastened.
CAUTION
If the vehicle has a sunroof, do not position the roof rack loadsso that they could interfere withthe sunroof.
Loading cargo or luggage above specification on the roof rack maydamage your vehicle.
ROOF 45 kg (100 lbs.)
RACK EVENLY DISTRIBUTED
Page 177 of 325
447
Driving your vehicle
How to correct terrestrial deviation.
1. Press MODE/SET switch for morethan 4.5 seconds, then the present ter-
restrial deviation angle value will be
displayed after DIR blinking for 4.5
seconds.
2. Press UP or DOWN switch for more than 0.1 second to correct the Azimuth
Compass within 30 seconds. If you
press UP switch, the Azimuth com-
pass will move 5 degree to the East
and it will move 5 degree to West if you
press DOWN switch.
For the correct terrestrial deviation
angle value for your location, refer to
the contour line map included.
If your place is located in between the
terrestrial deviation contour line, you
can apply any value (up or down
value) for your location in the contour
line map.
The initial deviation angle is set to 5°W.
Terrestrial Correction Range: West 30° ~ East 30°. 3. To finish the correction, press
MODE/SET switch for more than 1
second.
✽ ✽NOTICEThe terrestrial deviation setting will be
remembered even if the battery has
been disconnected.
The terrestrial deviation angle correc-
tion will be cancelled:1.If you press MODE/SET switch for less than 1 second.
2.If you don't correct the terrestrial devia- tion angle within 30 seconds.✽ ✽ NOTICE1. Do not install a ski rack, antenna, etc.
that is attached to the vehicle using a
magnet as anything attached to the
roof of the vehicle with a magnet will
effect compass operation.
2. If the compass deviates from the cor- rect indication after repeated adjust-
ment, have the compass checked at an
authorized dealer.
3. The compass may not indicate the correct compass point in tunnels or
while driving up or down a steep hill.
(The compass returns to the correct
compass point when the vehicle moves
to an area where the geomagnetism is
stabilized.)
Page 218 of 325

Driving tips10
5Reducing the risk of a rolloverThis multi-purpose passenger vehicle is
defined as a Sports Utility Vehicle (SUV).
SUV’s have higher ground clearance and
a narrower track to make them capable
of performing in a wide variety of off-road
applications. Specific design characteris-
tics give them a higher center of gravity
than ordinary cars. An advantage of the
higher ground clearance is a better view
of the road, which allows you to antici-
pate problems. They are not designed for
cornering at the same speeds as con-
ventional passenger drive vehicles, any
more than low-slung sports cars are
designed to perform satisfactorily in off-
road conditions. Due to this risk, driver
and passengers are strongly recom-
mended to buckle their seatbelts. In a
rollover crash, an unbelted person is
more likely to die than a person wearing
a seatbelt. There are steps that a driver
can make to reduce the risk of a rollover.
If at all possible, avoid sharp turns or
abrupt maneuvers, do not load your roof
rack with heavy cargo, and never modify
your vehicle in any way.
Rollover warning labelTo remind you of the danger of the
rollover, a rollover warning label which is
now required by the Federal safety regu-
lations is adhered to the driver’s sunvisor.
To remind you of the danger of the
rollover, the rollover warning label is
adhered to the driver’s sunvisor. If you
close the driver’s sunvisor, you can see
the rollover warning label which is locat-
ed at the side of the air bag warning
label.
WARNING
- Rollover
As with other Sports Utility Vehicle
(SUV), failure to operate this vehicle
correctly may result in loss of con-
trol, an accident or vehicle rollover.
Utility vehicles have a significant-ly higher rollover rate than other
types of vehicles.
Specific design characteristics (higher ground clearance, nar-
rower track, etc.) give this vehicle
a higher center of gravity than
ordinary cars.
A SUV is not designed for corner- ing at the same speeds as con-
ventional vehicles.
Avoid sharp turns or abrupt maneuvers.
In a rollover crash, an unbelted person is significantly more likely
to die than a person wearing a
safety belt. Make sure everyone in
the vehicle is properly buckled
up.
Avoid Abrupt Maneuversand Excessive Speed.
Always Buckle Up.
See Owner's Manual
For Further Information.
Page 222 of 325
Driving tips14
5
Traveling to remote areasIt makes sense to plan your trip, espe-
cially when going to a remote area. Know
the terrain and plan your route. You are
much less likely to encounter unwanted
surprises. Get accurate maps of trails.
It’s also a good idea to travel with at least
one other vehicle. If something happens
to one of them, the other can quickly
help.
WARNING
- Cargo
Cargo piled close to the height of
(or higher than) the seat backs
can be thrown forward during a
sudden stop or on downhill
slopes. You or your passengers
could be severely injured. Keep
cargo below the top of the seat
backs and, if possible, do not pile
separate items.
Unsecured cargo in the cargo area can be tossed about when
driving on the highways or over
rough terrain. You or your passen-
gers can be struck by flying
objects and severely injured.
Secure the cargo properly.
(Continued)
(Continued)
Cargo should not be carried onthe roof without a proper roof
rack installed. The roof rack will
hold a maximum of 45 kg (100
lbs.). Heavy loads in a roof rack
raise the vehicle’s center of grav-
ity, making it more likely to roll
over. You can be seriously or
fatally injured if the vehicle rolls
over. Do not load cargo on the
roof while driving off-road, if at all
possible. Put heavy loads inside
the cargo area, not on the roof or
in a roof rack. Keep cargo in the
cargo area as far forward and low
as possible.
Page 319 of 325
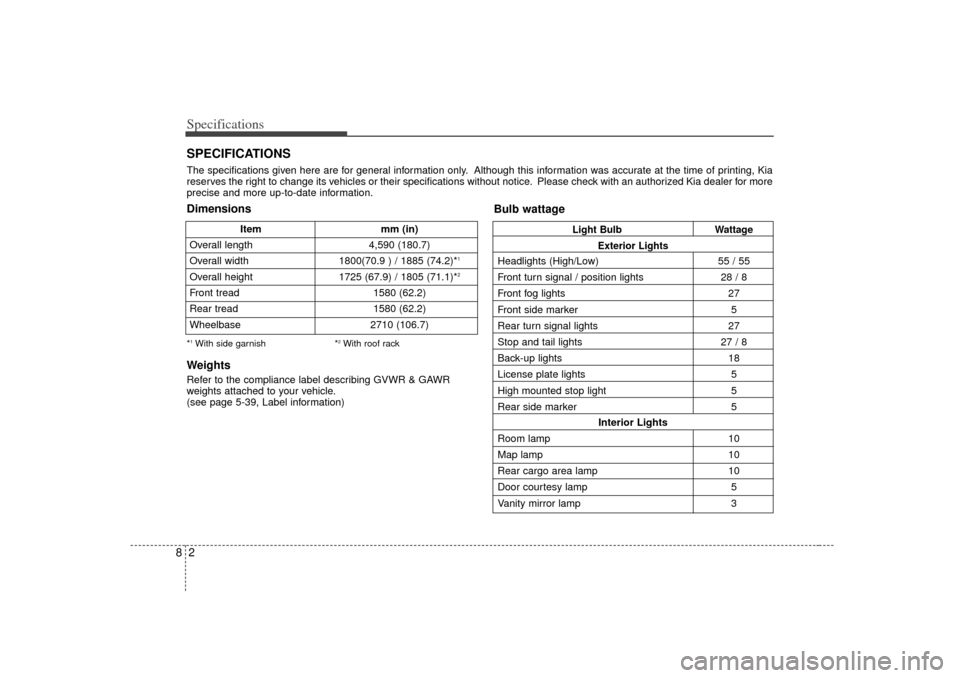
Specifications28SPECIFICATIONSThe specifications given here are for general information only. Although this information was accurate at the time of printing, Kia
reserves the right to change its vehicles or their specifications without notice. Please check with an authorized Kia dealer for more
precise and more up-to-date information.
Item mm (in)
Overall length 4,590 (180.7)
Overall width 1800(70.9 ) / 1885 (74.2)*
1
Overall height 1725 (67.9) / 1805 (71.1)*
2
Front tread 1580 (62.2)
Rear tread 1580 (62.2)
Wheelbase 2710 (106.7)Dimensions
Bulb wattage*1With side garnish*
2With roof rack
WeightsRefer to the compliance label describing GVWR & GAWR
weights attached to your vehicle.
(see page 5-39, Label information)
Light BulbWattage
Exterior Lights
Headlights (High/Low) 55 / 55
Front turn signal / position lights 28 / 8
Front fog lights 27
Front side marker 5
Rear turn signal lights 27
Stop and tail lights 27 / 8
Back-up lights 18
License plate lights 5
High mounted stop light 5
Rear side marker 5
Interior Lights
Room lamp 10
Map lamp 10
Rear cargo area lamp 10
Door courtesy lamp 5
Vanity mirror lamp 3
Page 324 of 325
93
Index
If you have a flat tire ··················\
··················\
···············6-19
Ignition switch ··················\
··················\
··················\
··········4-2
Immobilizer system ··················\
··················\
··················\
··3-5
Instrument cluster ··················\
··················\
··················\
·4-36
Instrument panel overview ··················\
··················\
·······2-2
Interior care··················\
··················\
··················\
············7-42
Interior features ··················\
··················\
··················\
·····3-86
Interior lights ··················\
··················\
··················\
·········3-82
Keys ··················\
··················\
··················\
··················\
·········3-2
Label information ··················\
··················\
··················\
··5-39
Lighting ··················\
··················\
··················\
··················\
·4-51
Limited slip differential··················\
··················\
···········4-19
Lubricant specifications ··················\
··················\
··········7-37
Lubricants and fluids ··················\
··················\
··············7-18
Luggage center box ··················\
··················\
··················\
3-96
Luggage net ··················\
··················\
··················\
············3-94
Maintenance schedule Owner maintenance ················7-7
Maintenance services ··················\
··················\
·················7-2
Manual climate control system··················\
·················4-59\
Mirrors ··················\
··················\
··················\
··················\
··3-74Multi-meter··················\
··················\
··················\
·············4-45
Overheating ··················\
··················\
··················\
··············6-3
Power steering ··················\
··················\
··················\
········7-15
Rear parking assist system·············\
··················\
···········4-33
Remote keyless entry ··················\
··················\
·················3-3
Road warning ··················\
··················\
··················\
···········6-2
Roof rack ··················\
··················\
··················\
················3-96
Safety belts··················\
··················\
··················\
··············3-25
Seat ··················\
··················\
··················\
··················\
········3-15
Special driving conditions ··················\
··················\
·········5-7
Specifications ··················\
··················\
··················\
············8-2
Starting the engine ··················\
··················\
··················\
···4-4
Steering wheel···············\
··················\
··················\
············4-25
Storage compartment ··················\
··················\
··············3-83
Suggestions for economical operation··················\
········5-6
Sunroof ··················\
··················\
··················\
··················\
··3-91KLMI
OPRS