KIA Sorento 2009 2.G Owner's Manual
Manufacturer: KIA, Model Year: 2009, Model line: Sorento, Model: KIA Sorento 2009 2.GPages: 327, PDF Size: 5.03 MB
Page 261 of 327
615
In case of an emergency
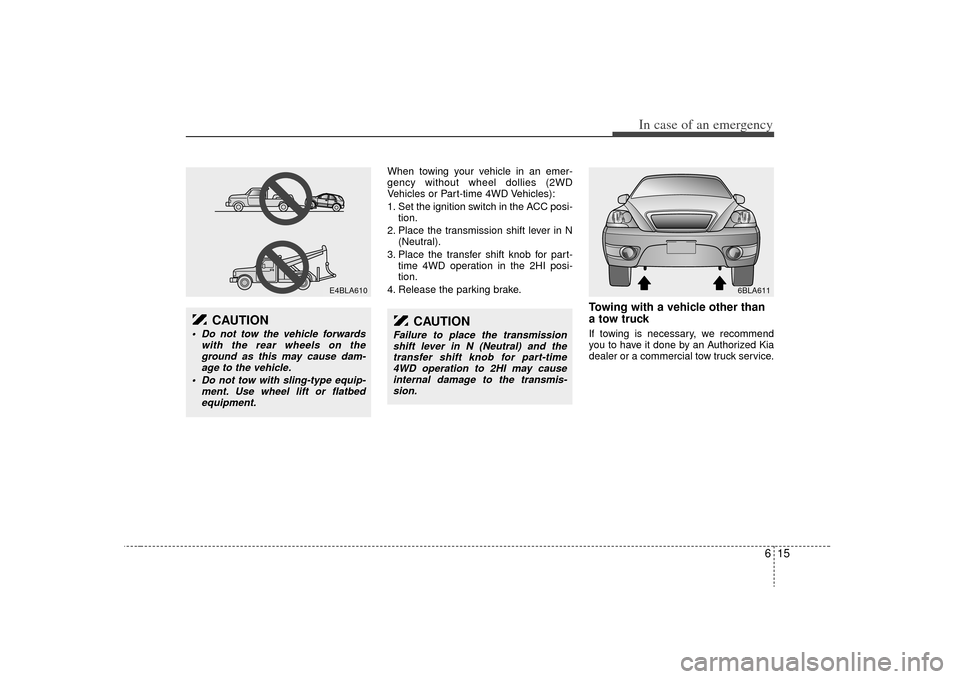
When towing your vehicle in an emer-
gency without wheel dollies (2WD
Vehicles or Part-time 4WD Vehicles):
1. Set the ignition switch in the ACC posi-tion.
2. Place the transmission shift lever in N (Neutral).
3. Place the transfer shift knob for part- time 4WD operation in the 2HI posi-
tion.
4. Release the parking brake.
Towing with a vehicle other than
a tow truck If towing is necessary, we recommend
you to have it done by an Authorized Kia
dealer or a commercial tow truck service.
E4BLA610
CAUTION
Do not tow the vehicle forwards with the rear wheels on theground as this may cause dam-age to the vehicle.
Do not tow with sling-type equip- ment. Use wheel lift or flatbedequipment.
CAUTION
Failure to place the transmissionshift lever in N (Neutral) and thetransfer shift knob for part-time 4WD operation to 2HI may causeinternal damage to the transmis- sion.
6BLA611
Page 262 of 327
In case of an emergency16
6If towing service is not available in an
emergency, your vehicle may be tem-
porarily towed using a cable or chain
secured to the emergency towing hook
under the front of the vehicle. Use
extreme caution when towing the vehicle.
A driver must be in the vehicle to steer it
and operate the brakes.
Towing in this manner may be done only
on hard-surfaced roads for a short dis-
tance and at low speeds. Also, the
wheels, axles, power train, steering and
brakes must all be in good condition.
Do not use the tow hooks to pull a
vehicle out of mud, sand or other con-
ditions from which the vehicle cannot
be driven out under its own power.
Avoid towing a vehicle heavier than the vehicle doing the towing.
The drivers of both vehicles should communicate with each other frequent-
ly. Before emergency towing, check that
the hook is not broken or damaged.
Fasten the towing cable or chain securely to the hook.
Do not jerk the hook. Apply steady and even force.
To avoid damaging the hook, do not pull from the side or at a vertical angle.
Always pull straight ahead.
CAUTION
Attach a towing strap to the tow hook.
Using a portion of the vehicle other than the tow hooks for tow-ing may damage the body of yourvehicle.
Use only a cable or chain specifi- cally intended for use in towingvehicles. Securely fasten the cable or chain to the towing hookprovided.
WARNING
Use extreme caution when towing
the vehicle.
driving maneuvers which would
place excessive stress on the
emergency towing hook and tow-
ing cable or chain. The hook and
towing cable or chain may break
and cause serious injury or dam-
age.
If the towing vehicle can hardly move, do not forcibly continue
the towing. Contact an Authorized
Kia dealer or a commercial tow
truck service for assistance.
Tow the vehicle as straight ahead as possible.
Keep away from the vehicle dur- ing towing.
Page 263 of 327
617
In case of an emergency
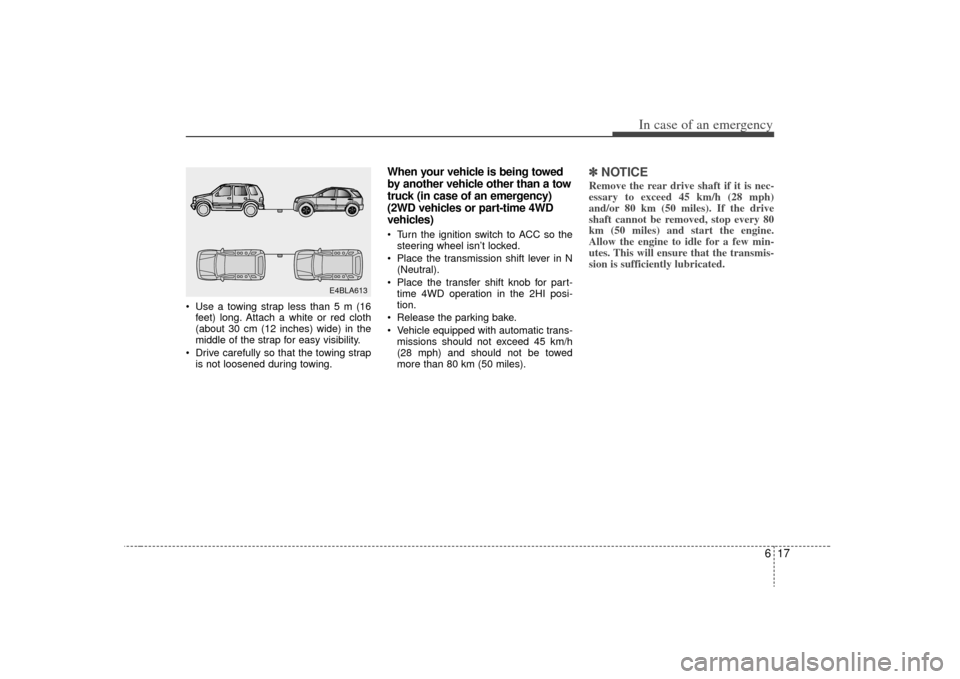
Use a towing strap less than 5 m (16feet) long. Attach a white or red cloth
(about 30 cm (12 inches) wide) in the
middle of the strap for easy visibility.
Drive carefully so that the towing strap is not loosened during towing.
When your vehicle is being towed
by another vehicle other than a tow
truck (in case of an emergency)
(2WD vehicles or part-time 4WD
vehicles) Turn the ignition switch to ACC so thesteering wheel isn’t locked.
Place the transmission shift lever in N (Neutral).
Place the transfer shift knob for part- time 4WD operation in the 2HI posi-
tion.
Release the parking bake.
Vehicle equipped with automatic trans- missions should not exceed 45 km/h
(28 mph) and should not be towed
more than 80 km (50 miles).
✽ ✽ NOTICERemove the rear drive shaft if it is nec-
essary to exceed 45 km/h (28 mph)
and/or 80 km (50 miles). If the drive
shaft cannot be removed, stop every 80
km (50 miles) and start the engine.
Allow the engine to idle for a few min-
utes. This will ensure that the transmis-
sion is sufficiently lubricated.
E4BLA613
Page 264 of 327
In case of an emergency18
6
than normal since you will have
reduced brake performance.
because the power steering system
will be disabled.
brakes may overheat and brake per-
formance will be reduced. Stop often
and let the brakes cool off.✽ ✽ NOTICETo prevent internal damage to the trans-
mission, never tow your vehicle from the
rear (backwards) with all four tires in
contact with the surface.
Tips for towing a stuck vehicleThe following methods are effective
when your vehicle is stuck in mud, sand
or similar substances that prevent the
vehicle from being driven out under its
own power.
Remove the soil and sand, etc. from
the front and the back of the tires.
Place a stone or wood under the tires.
Page 265 of 327
619
In case of an emergency
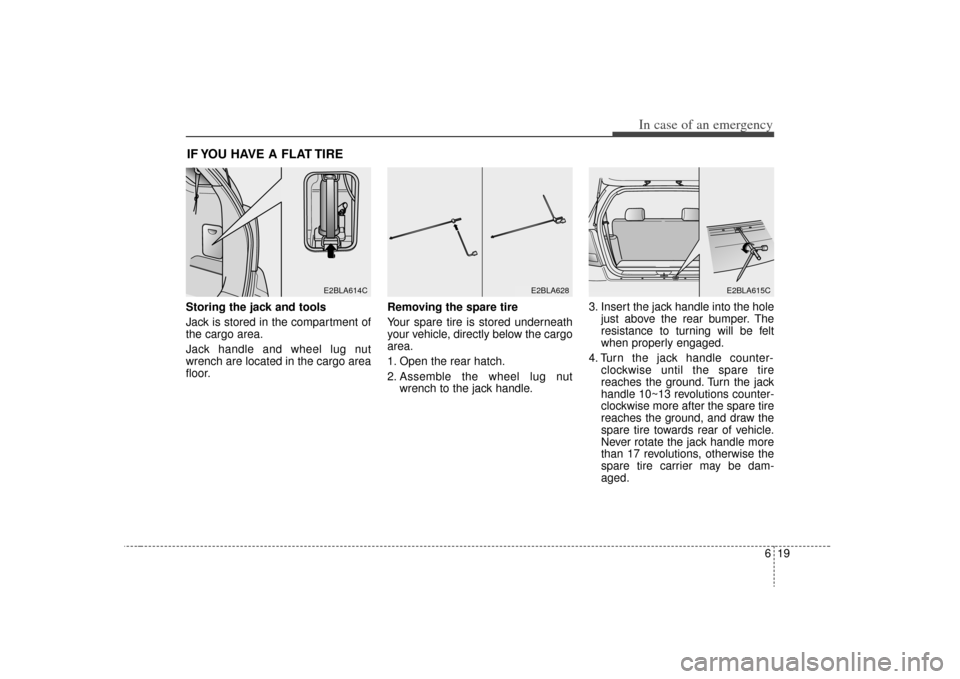
IF YOU HAVE A FLAT TIRE Storing the jack and tools
Jack is stored in the compartment of
the cargo area.
Jack handle and wheel lug nut
wrench are located in the cargo area
floor.Removing the spare tire
Your spare tire is stored underneath
your vehicle, directly below the cargo
area.
1. Open the rear hatch.
2. Assemble the wheel lug nut
wrench to the jack handle. 3. Insert the jack handle into the hole
just above the rear bumper. The
resistance to turning will be felt
when properly engaged.
4. Turn the jack handle counter- clockwise until the spare tire
reaches the ground. Turn the jack
handle 10~13 revolutions counter-
clockwise more after the spare tire
reaches the ground, and draw the
spare tire towards rear of vehicle.
Never rotate the jack handle more
than 17 revolutions, otherwise the
spare tire carrier may be dam-
aged.
E2BLA614C
E2BLA628
E2BLA615C
Page 266 of 327
In case of an emergency20
6
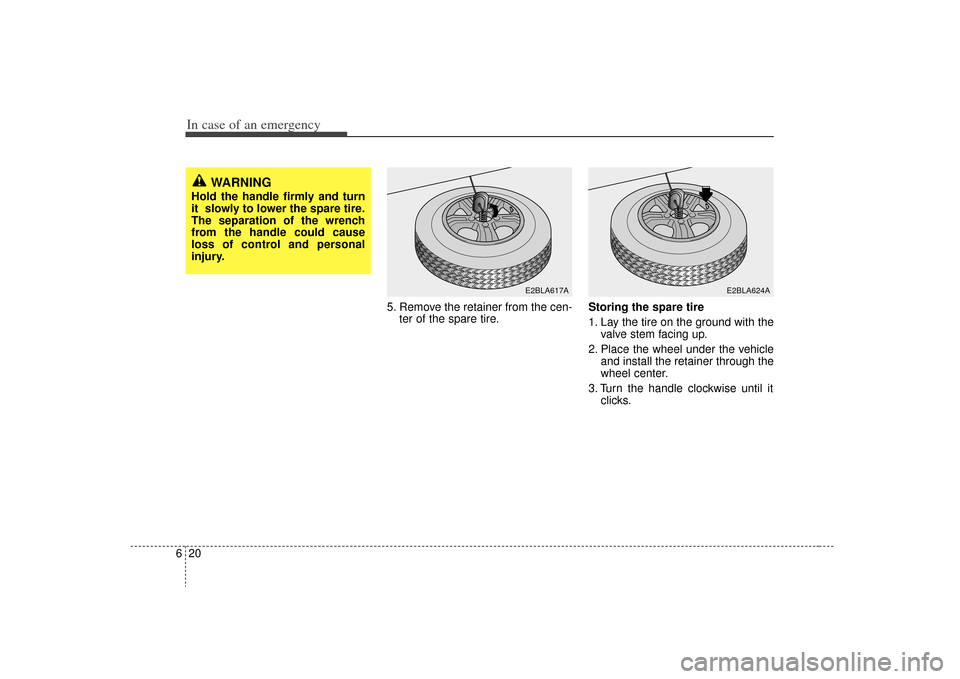
5. Remove the retainer from the cen-
ter of the spare tire. Storing the spare tire
1. Lay the tire on the ground with the
valve stem facing up.
2. Place the wheel under the vehicle and install the retainer through the
wheel center.
3. Turn the handle clockwise until it clicks.
WARNING
Hold the handle firmly and turn
it slowly to lower the spare tire.
The separation of the wrench
from the handle could cause
loss of control and personal
injury.
E2BLA617A
E2BLA624A
Page 267 of 327
621
In case of an emergency
Important - use of compact spare
tire (if equipped)
your vehicle is equipped with a com-
pact spare tire. This compact spare
tire takes up less space than a regu-
lar-size tire. This tire is smaller than a
conventional tire and is designed for
temporary use only.The compact spare should be inflat-
ed to 420 kPa (60 psi).
✽ ✽NOTICECheck the inflation pressure after
installing the spare tire. Adjust it to
the specified pressure, as necessary.
When using a compact spare tire,
observe the following precautions:
Under no circumstances should
you exceed 80 km/h (50 mph); a
higher speed could damage the
tire.
Ensure that you drive slowly enough for the road conditions to
avoid all hazards. Any road hazard,
such as a pothole or debris, could
seriously damage the compact
spare.
Any continuous road use of this tire could result in tire failure, loss of
vehicle control, and possible per-
sonal injury.
Do not exceed the vehicle’s maxi- mum load rating or the load-carry-
ing capacity shown on the sidewall
of the compact spare tire.
Avoid driving over obstacles. The compact spare tire diameter is
smaller than the diameter of a con-
ventional tire and reduces the
ground clearance approximately
25 mm (1 inch), which could result
in damage to the vehicle.
CAUTION
You should drive carefully when the compact spare is inuse. The compact spareshould be replaced by theproper conventional tire andrim at the first opportunity.
The operation of this vehicle is not recommended withmore than one compact sparetire in use at the same time.
CAUTION
This spare tire should be usedonly for VERY short distances.Compact spares should NEVERbe used for long drives orextended distances.
Page 268 of 327
In case of an emergency22
6 Do not take this vehicle through an
automatic car wash.
This tire should not be installed on the front axle if the vehicle must be
driven in snow or on ice.
Do not use the compact spare tire on any other vehicle because this
tire has been designed especially
for your vehicle.
The compact spare tire’s tread life is shorter than a regular tire.
Inspect your compact spare tire
regularly and replace worn com-
pact spare tires with the same size
and design, mounted on the same
wheel. Changing tires
Jacking instructions The jack is provided for emergency
tire changing only.
Follow jacking instructions to reduce
the possibility of personal injury.
WARNING
- Changing tires
Never attempt vehicle repairs in the traffic lanes of a public
road or highway.
Always move the vehicle com- pletely off the road and onto
the shoulder before trying to
change a tire. If you cannot
find a firm, level place off the
road, call a towing service
company for assistance.
Be sure to use the correct front and rear jacking posi-
tions on the vehicle; never use
the bumpers or any other part
of the vehicle for jack support.
(Continued)
(Continued)
The vehicle can easily roll offthe jack causing serious
injury or death. Never allow
any portion of your body to
get beneath the vehicle while
using the jack.
Do not start or run the engine while the vehicle is on the
jack.
Do not allow anyone to remain in the vehicle while it is on the
jack.
Make sure any children pres- ent are in a secure place away
from the road and from the
vehicle to be raised with the
jack.
Page 269 of 327
623
In case of an emergency
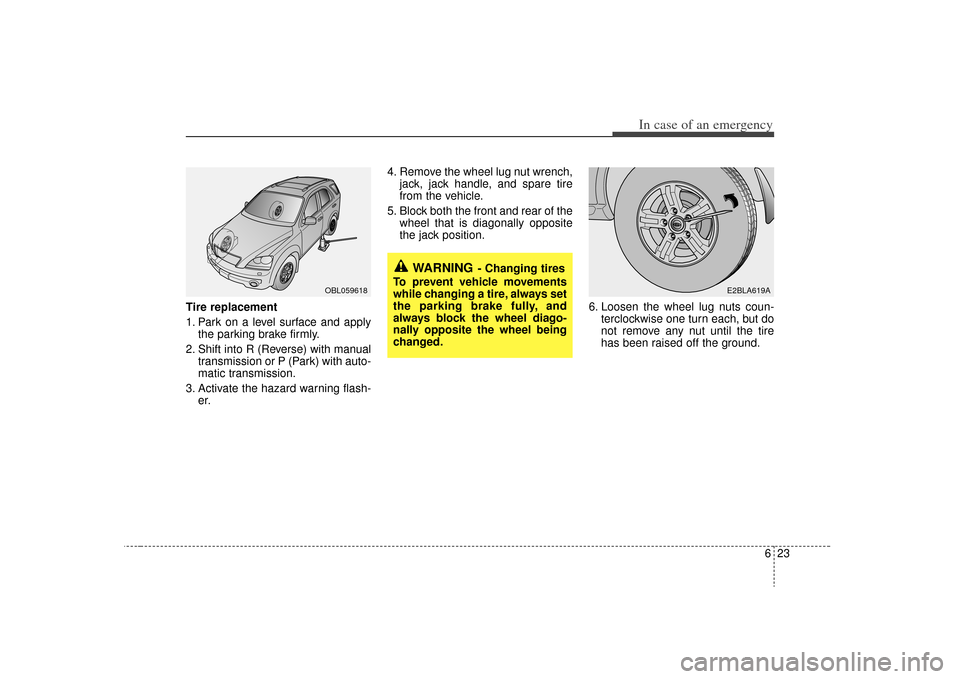
Tire replacement
1. Park on a level surface and applythe parking brake firmly.
2. Shift into R (Reverse) with manual transmission or P (Park) with auto-
matic transmission.
3. Activate the hazard warning flash- er. 4. Remove the wheel lug nut wrench,
jack, jack handle, and spare tire
from the vehicle.
5. Block both the front and rear of the wheel that is diagonally opposite
the jack position.
6. Loosen the wheel lug nuts coun-terclockwise one turn each, but do
not remove any nut until the tire
has been raised off the ground.
OBL059618
E2BLA619A
WARNING
- Changing tires
To prevent vehicle movements
while changing a tire, always set
the parking brake fully, and
always block the wheel diago-
nally opposite the wheel being
changed.
Page 270 of 327
In case of an emergency24
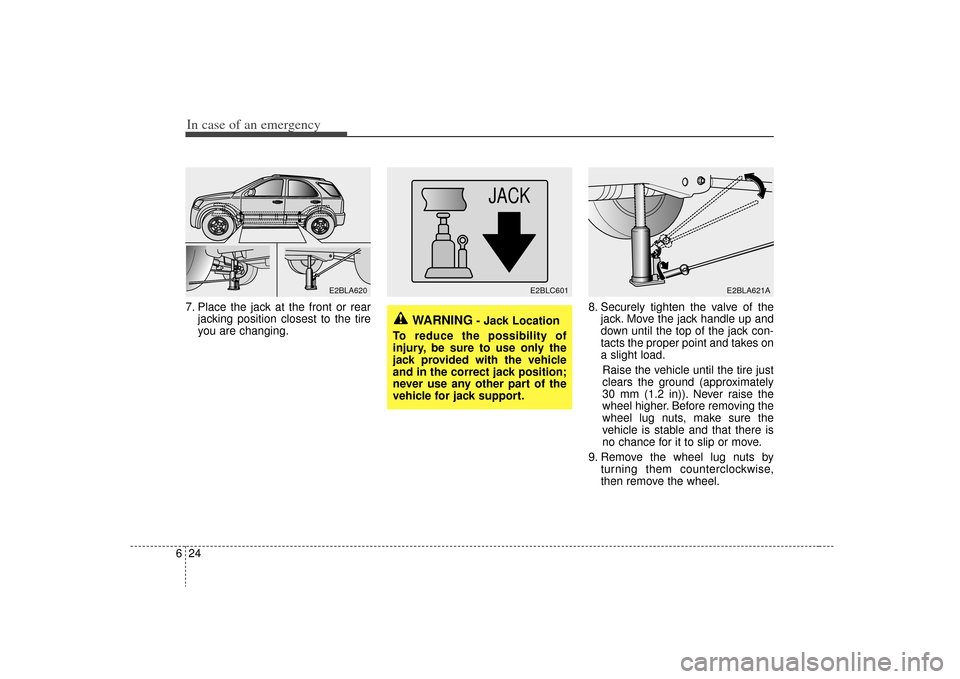
67. Place the jack at the front or rear
jacking position closest to the tire
you are changing. 8. Securely tighten the valve of the
jack. Move the jack handle up and
down until the top of the jack con-
tacts the proper point and takes on
a slight load.
Raise the vehicle until the tire just
clears the ground (approximately
30 mm (1.2 in)). Never raise the
wheel higher. Before removing the
wheel lug nuts, make sure the
vehicle is stable and that there is
no chance for it to slip or move.
9. Remove the wheel lug nuts by turning them counterclockwise,
then remove the wheel.
E2BLA620
JACK
E2BLC601
E2BLA621A
WARNING
- Jack Location
To reduce the possibility of
injury, be sure to use only the
jack provided with the vehicle
and in the correct jack position;
never use any other part of the
vehicle for jack support.