KIA Sorento 2009 2.G Owner's Manual
Manufacturer: KIA, Model Year: 2009, Model line: Sorento, Model: KIA Sorento 2009 2.GPages: 327, PDF Size: 5.03 MB
Page 271 of 327
625
In case of an emergency
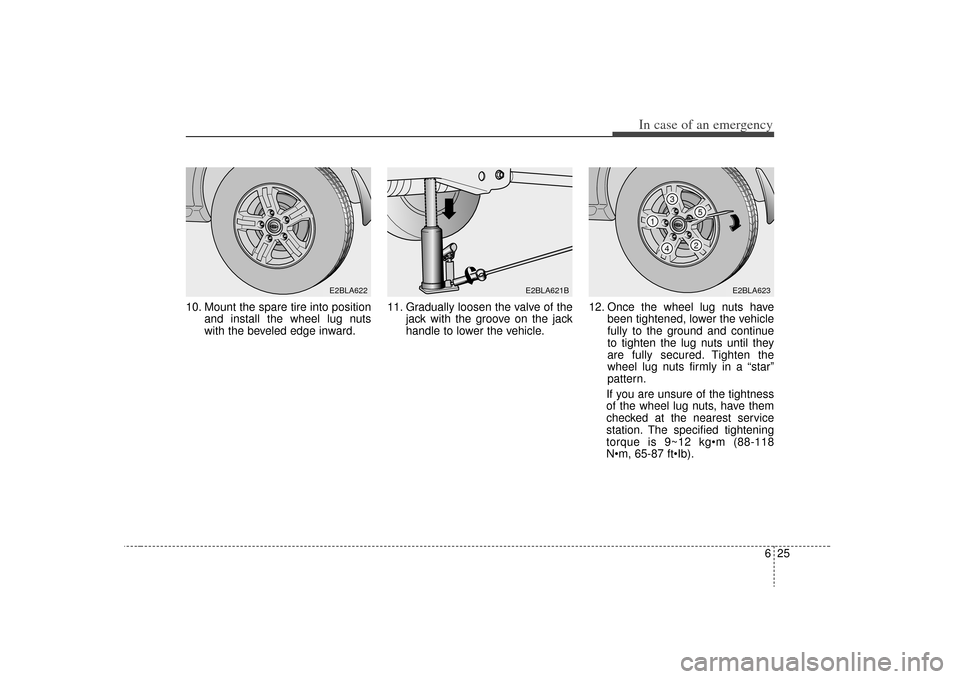
10. Mount the spare tire into positionand install the wheel lug nuts
with the beveled edge inward. 11. Gradually loosen the valve of the
jack with the groove on the jack
handle to lower the vehicle. 12. Once the wheel lug nuts have
been tightened, lower the vehicle
fully to the ground and continue
to tighten the lug nuts until they
are fully secured. Tighten the
wheel lug nuts firmly in a “star”
pattern.
If you are unsure of the tightness
of the wheel lug nuts, have them
checked at the nearest service
station. The specified tightening
torque is 9~12 kg
N
E2BLA622
E2BLA621B
1
34
25
E2BLA623
Page 272 of 327
In case of an emergency26
6
To prevent the jack, jack handle,
wheel lug nut, wrench and spare tire
from rattling while the vehicle is in
motion, store them properly. To store
the flat fire, refer to “Storing the
spare
CAUTION
Your vehicle has metric threads
on the wheel studs and nuts.Make certain during wheelremoval that the same nutsremoved are reinstalled - or, ifreplaced, that nuts with metricthreads and the same chamferconfiguration are used.Installation of a non-metricthread nut on a metric stud orvice-versa will not secure thewheel to the hub properly andwill damage the stud so that itmust be replaced.
Note that most lug nuts do nothave metric threads. Be sure touse extreme care in checkingfor thread style before installingaftermarket lug nuts or wheels.If in doubt, consult anAuthorized Kia Dealer.
WARNING
- Wheel Studs
If the studs are damaged, they
may lose their ability to retain
the wheel. This could lead to the
loss of the wheel and a colli-
sion.
WARNING
Check the inflation pressures as
soon as possible after installing
the spare tire. Adjust it to the
specified pressure, if necessary.
Refer to Section 8, Specifications.
Page 273 of 327
7
Maintenance services / 7-2
Maintenance schedule / 7-3
Explanation of scheduled maintenance items / 7-7
Owner maintenance / 7-10
Engine compartment / 7-13
Engine oil / 7-14
Engine cooling system / 7-15
Brake fluid / 7-17
Power steering / 7-18
Automatic transmission / 7-19
Lubricants and fluids / 7-21
Air cleaner / 7-22
Climate control air filter / 7-23
Wiper blades / 7-23
Battery / 7-25
Tires and wheels / 7-28
Lubricant specifications / 7-41
Exterior care / 7-43
Interior care / 7-46
Maintenance
Page 274 of 327
Maintenance27MAINTENANCE SERVICESYou should exercise the utmost care to
prevent damage to your vehicle and
injury to yourself whenever performing
any maintenance or inspection proce-
dures.
Should you have any doubts concerning
the inspection or servicing of your vehi-
cle, we strongly recommend that you
have an Authorized Kia Dealer perform
this work.
An Authorized Kia Dealer has factory-
trained technicians and genuine Kia
parts to service your vehicle properly. For
expert advice and quality service, see an
Authorized Kia Dealer.
Inadequate, incomplete or insufficient
servicing may result in operational prob-
lems with your vehicle that could lead to
vehicle damage, an accident, or person-
al injury.
Owner’s responsibility Maintenance Service and Record
Retention are the owner's responsibil-
ity.
You must retain documents that show
proper maintenance has been performed
on your vehicle in accordance with the
scheduled maintenance service charts
shown on the following pages. You need
this information to establish your compli-
ance with the servicing and maintenance
requirements of your Kia warranties.
Detailed warranty information is provided
in your Warranty & Consumer Information
manual.Repairs and adjustments required as a
result of improper maintenance or a lack
of required maintenance are not covered.
We strongly recommend that all vehicle
maintenance be performed by an author-
ized Kia dealer using genuine Kia parts.
Page 275 of 327
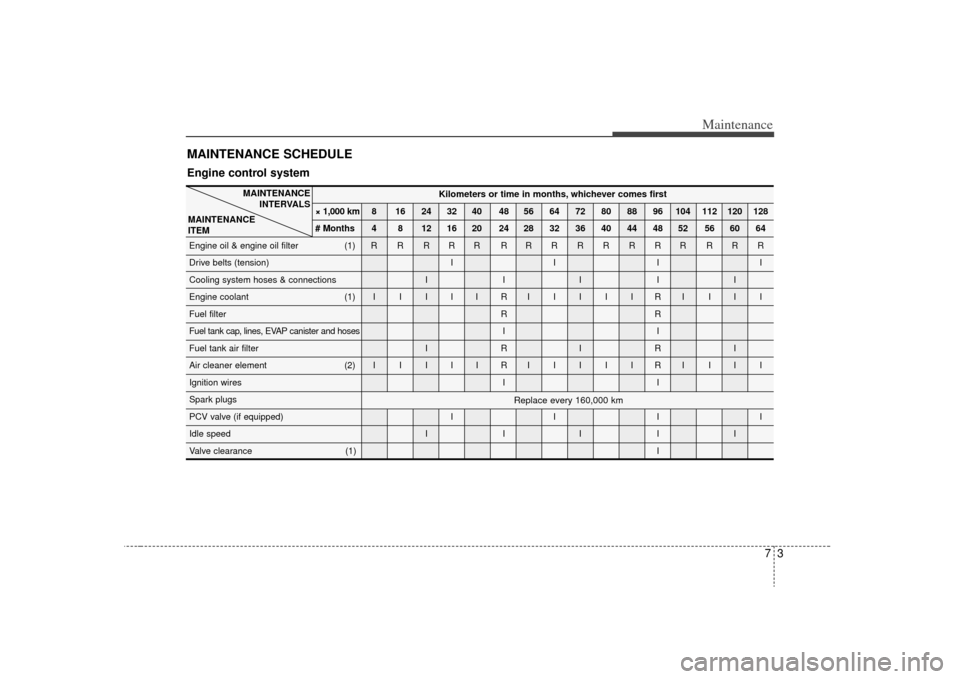
73
Maintenance
MAINTENANCE SCHEDULE Engine control system
MAINTENANCEINTERVALS
MAINTENANCE
ITEM
Replace every 160,000 km
Kilometers or time in months, whichever comes first
× 1,000 km 8 16 24 32 40 48 56 64 72 80 88 96 104 112 120 128
# Months 4 8 12 16 20 24 28 32 36 40 44 48 52 56 60 64
Engine oil & engine oil filter (1) R R R R R R RRRRRRR RRR
Drive belts (tension) I I I I
Cooling system hoses & connections I I I I I
Engine coolant (1) I I I I I R IIIIIRI III
Fuel filter R R
Fuel tank cap, lines, EVAP canister and hoses I I
Fuel tank air filter I R I R I
Air cleaner element (2) I I I I I R IIIIIRI III
Ignition wires I I
Spark plugs
PCV valve (if equipped) I I I I
Idle speed I I I I I
Valve clearance (1) I
Page 276 of 327
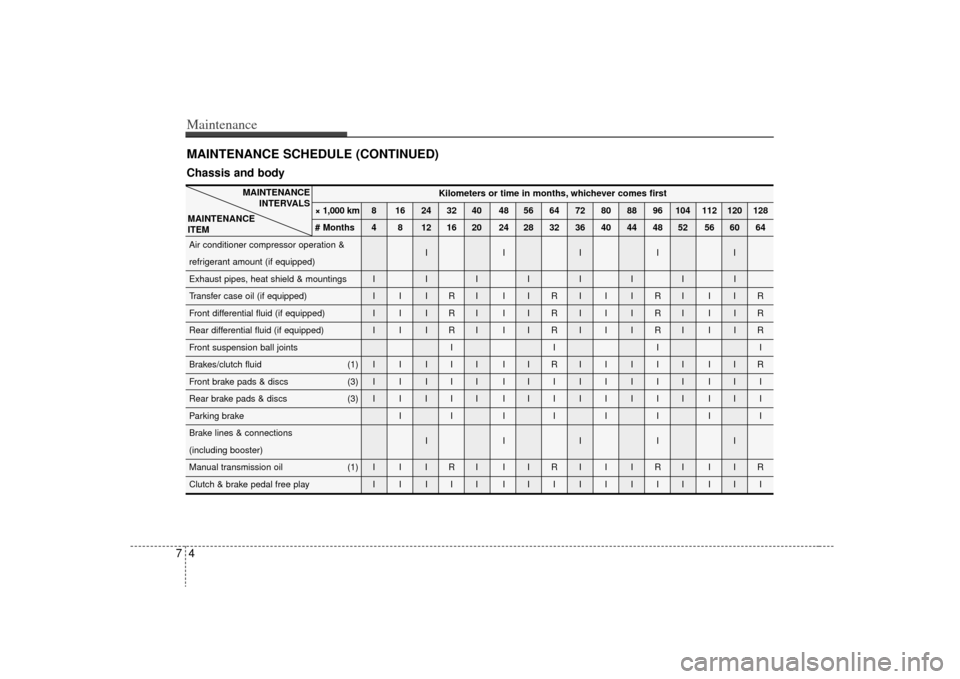
Maintenance47MAINTENANCE SCHEDULE (CONTINUED)Chassis and body
MAINTENANCEINTERVALS
MAINTENANCE
ITEM
Kilometers or time in months, whichever comes first
× 1,000 km 8 16 24 32 40 48 56 64 72 80 88 96 104 112 120 128
# Months 4 8 12 16 20 24 28 32 36 40 44 48 52 56 60 64
Air conditioner compressor operation & IIIII
refrigerant amount (if equipped)
Exhaust pipes, heat shield & mountings I I IIIIII
Transfer case oil (if equipped) I I I R I I I R I I I R I I I R
Front differential fluid (if equipped) I I I R I I I R I I I R I I I R
Rear differential fluid (if equipped) I I I R I I I R I I I R I I I R
Front suspension ball joints I I I I
Brakes/clutch fluid (1) I I I I I I I R IIIII IIR
Front brake pads & discs (3) I I I I I I IIIIIII III
Rear brake pads & discs (3) I I I I I I IIIIIII III
Parking brake I I I IIIII
Brake lines & connections IIIII
(including booster)
Manual transmission oil (1) I I I R I I I R I I I R I I I R
Clutch & brake pedal free play I I I I I I IIIIIII III
Page 277 of 327
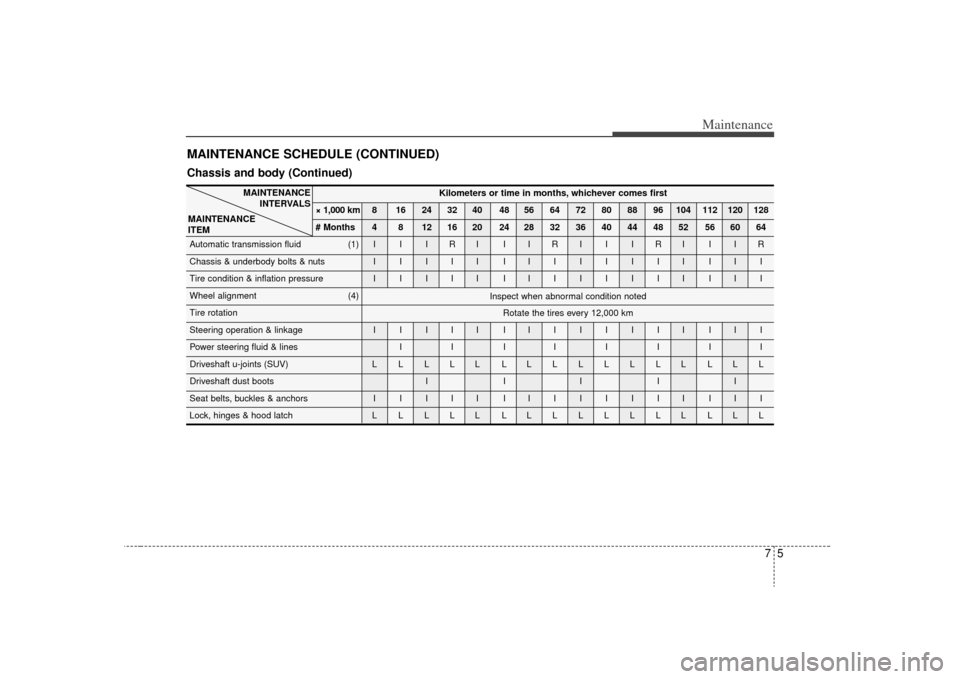
75
Maintenance
MAINTENANCE SCHEDULE (CONTINUED)
MAINTENANCEINTERVALS
MAINTENANCE
ITEM
Inspect when abnormal condition noted
Rotate the tires every 12,000 km
Chassis and body (Continued)
Kilometers or time in months, whichever comes first
× 1,000 km 8 16 24 32 40 48 56 64 72 80 88 96 104 112 120 128
# Months 4 8 12 16 20 24 28 32 36 40 44 48 52 56 60 64
Automatic transmission fluid (1) I I I R I I I R I I I R I I I R
Chassis & underbody bolts & nuts I I I I I I IIIIIII III
Tire condition & inflation pressure I I I I I I IIIIIII III
Wheel alignment (4)
Tire rotation
Steering operation & linkage I I I I I I IIIIIII III
Power steering fluid & lines I I I IIIII
Driveshaft u-joints (SUV) L L L L L L LLLLLLL LLL
Driveshaft dust boots I I I I I
Seat belts, buckles & anchors I I I I I I IIIIIII III
Lock, hinges & hood latch L L L L L L LLLLLLL LLL
Page 278 of 327
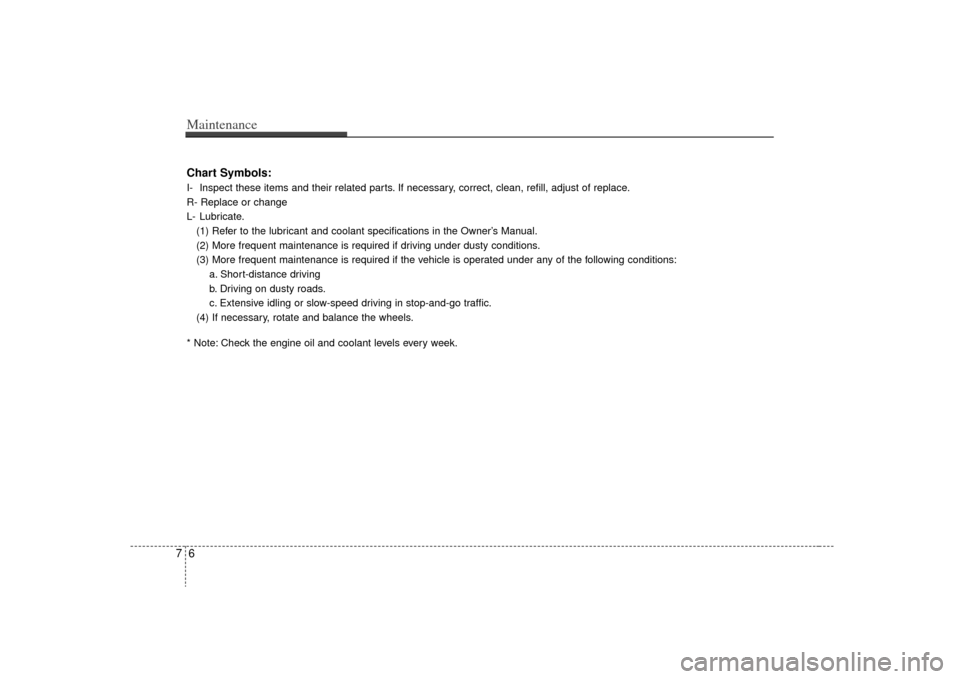
Maintenance67Chart Symbols:I- Inspect these items and their related parts. If necessary, correct, clean, refill, adjust of replace.
R- Replace or change
L- Lubricate.(1) Refer to the lubricant and coolant specifications in the Owner’s Manual.
(2) More frequent maintenance is required if driving under dusty conditions.
(3) More frequent maintenance is required if the vehicle is operated under any of the following conditions: a. Short-distance driving
b. Driving on dusty roads.
c. Extensive idling or slow-speed driving in stop-and-go traffic.
(4) If necessary, rotate and balance the wheels.
* Note: Check the engine oil and coolant levels every week.
Page 279 of 327
77
Maintenance
EXPLANATION OF SCHEDULED MAINTENANCE ITEMSEngine oil and filterThe engine oil and filter should be
changed at the intervals specified in the
maintenance schedule. If the car is being
driven in severe conditions, more fre-
quent oil and filter changes are required.Drive beltsInspect all drive belts for evidence of
cuts, cracks, excessive wear or oil satu-
ration and replace if necessary. Drive
belts should be checked periodically for
proper tension and adjusted as neces-
sary.
Fuel filter (cartridge)A clogged filter can limit the speed at
which the vehicle may be driven, damage
the emission system and cause multiple
issues such as hard starting. If an exces-
sive amount of foreign matter accumu-
lates in the fuel tank, the filter may
require replacement more frequently.
After installing a new filter, run the engine
for several minutes, and check for leaks
at the connections. Fuel filters should be
installed by an authorized KIA dealer.
Fuel lines, fuel hoses and con-
nectionsCheck the fuel lines, fuel hoses and con-
nections for leakage and damage. Have
an authorized KIA dealer replace any
damaged or leaking parts immediately.Vapor hose and fuel filler capThe vapor hose and fuel filler cap should
be inspected at those intervals specified
in the maintenance schedule. Make sure
that a new vapor hose or fuel filler cap is
correctly replaced.
Page 280 of 327
Maintenance87Vacuum crankcase ventilation
hoses Inspect the surface of hoses for evidence
of heat and/or mechanical damage. Hard
and brittle rubber, cracking, tears, cuts,
abrasions, and excessive swelling indi-
cate deterioration. Particular attention
should be paid to examine those hose
surfaces nearest to high heat sources,
such as the exhaust manifold.
Inspect the hose routing to assure that
the hoses do not come in contact with
any heat source, sharp edges or moving
component which might cause heat dam-
age or mechanical wear. Inspect all hose
connections, such as clamps and cou-
plings, to make sure they are secure, and
that no leaks are present. Hoses should
be replaced immediately if there is any
evidence of deterioration or damage.
Air cleaner filterA Genuine KIA air cleaner filter is recom-
mended when the filter is replaced.Spark plugsMake sure to install new spark plugs of
the correct heat range.Valve clearanceInspect excessive valve noise and/or
engine vibration and adjust if necessary.
An authorized KIA dealer should perform
the operation.Cooling systemCheck cooling system components, such
as radiator, coolant reservoir, hoses and
connections for leakage and damage.
Replace any damaged parts.
CoolantThe coolant should be changed at the
intervals specified in the maintenance
schedule.Automatic transmission fluidThe fluid level should be in the "HOT"
range of the dipstick, after the engine
and transmission are at normal operating
temperature. Check the automatic trans-
mission fluid level with the engine run-
ning and the transmission in neutral, with
the parking brake properly applied.Brake hoses and linesVisually check for proper installation,
chafing, cracks, deterioration and any
leakage. Replace any deteriorated or
damaged parts immediately.Brake fluidCheck brake fluid level in the brake fluid
reservoir. The level should be between
“MIN” and “MAX” marks on the side of
the reservoir. Use only hydraulic brake
fluid conforming to DOT 3 or DOT 4
specification.