start stop button KIA Sorento 2011 2.G User Guide
[x] Cancel search | Manufacturer: KIA, Model Year: 2011, Model line: Sorento, Model: KIA Sorento 2011 2.GPages: 377, PDF Size: 7.51 MB
Page 221 of 377
Driving your vehicle10
5 Even if the smart key is in the vehicle,
if it is far away from you, the engine
may not start.
When the ENGINE START/STOP but- ton is in the ACC position or above, if
any door is opened, the system checks
for the smart key. If the smart key is not
in the vehicle, the "KEY OUT" indicator
will blink. And if all doors are closed,
the chime will sound for 5 seconds. The
indicator or warning will turn off while
the vehicle is moving. Always have the
smart key with you.
WARNING
The engine will start, only when the
smart key is in the vehicle.
Never allow children or any person
who is unfamiliar with the vehicle
touch the ENGINE START/STOP
button or related parts.
CAUTION
If the engine stalls while the vehicleis in motion, do not attempt to move the shift lever to the P (Park) posi-tion. If the traffic and road condi-tions permit, you may put the shift lever in the N (Neutral) positionwhile the vehicle is still moving and press the ENGINE START/STOPbutton in an attempt to restart the engine.
XM CAN (ENG) 5.qxp 11/26/2009 12:00 PM Page 10
Page 222 of 377
511
Driving your vehicle
✽
✽
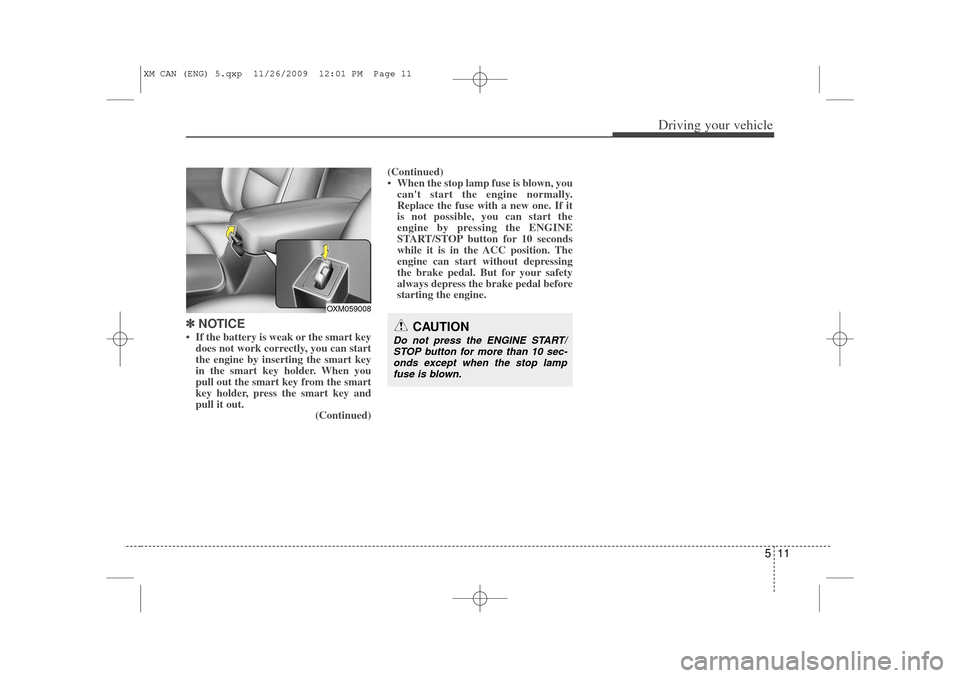
NOTICE• If the battery is weak or the smart key
does not work correctly, you can start
the engine by inserting the smart key
in the smart key holder. When you
pull out the smart key from the smart
key holder, press the smart key and
pull it out. (Continued)(Continued)
• When the stop lamp fuse is blown, you
can't start the engine normally.
Replace the fuse with a new one. If it
is not possible, you can start the
engine by pressing the ENGINE
START/STOP button for 10 seconds
while it is in the ACC position. The
engine can start without depressing
the brake pedal. But for your safety
always depress the brake pedal before
starting the engine.
CAUTION
Do not press the ENGINE START/
STOP button for more than 10 sec- onds except when the stop lampfuse is blown.
OXM059008
XM CAN (ENG) 5.qxp 11/26/2009 12:01 PM Page 11
Page 230 of 377
519
Driving your vehicle
E060103AHMIgnition key interlock system The ignition key cannot be removed
unless the shift lever is in the P (Park)
position. Even if the ignition switch is in
the LOCK position, the key also cannot
be removed.
If your vehicle is equipped with ENGINE
START/STOP button, the button will not
change to the OFF position unless the
shift lever is in the P (Park) position.
E060200AAMGood driving practices Never move the gear shift lever from P(Park) or N (Neutral) to any other posi-
tion with the accelerator pedal
depressed.
Never move the gear shift lever into P (Park) when the vehicle is in motion.
Be sure the vehicle is completely stopped before you attempt to shift into
R (Reverse) or D (Drive).
Never take the vehicle out of gear and coast down a hill. This may be
extremely hazardous. Always leave the
car in gear when moving.
Do not "ride" the brakes. This can cause them to overheat and malfunc-
tion. Instead, when you are driving
down a long hill, slow down and shift to
a lower gear. When you do this, engine
braking will help slow down the car.
Slow down before shifting to a lower gear. Otherwise, the lower gear may
not be engaged. Always use the parking brake. Do not
depend on placing the transaxle in P
(Park) to keep the vehicle from moving.
Exercise extreme caution when driving on a slippery surface. Be especially
careful when braking, accelerating or
shifting gears. On a slippery surface,
an abrupt change in vehicle speed can
cause the drive wheels to lose traction
and the vehicle to go out of control.
Optimum vehicle performance and economy is obtained by smoothly
depressing and releasing the accelera-
tor pedal.
XM CAN (ENG) 5.qxp 11/26/2009 12:01 PM Page 19
Page 246 of 377
535
Driving your vehicle
E070504AAM-EUESC OFF usageWhen driving
It’s a good idea to keep the ESC turnedon for daily driving whenever possible.
To turn ESC off while driving, press the ESC OFF button while driving on a flat
road surface.✽ ✽ NOTICE• When operating the vehicle on a
dynamometer, ensure that the ESC is
turned off (ESC OFF light illuminat-
ed). If the ESC is left on, it may pre-
vent the vehicle speed from increas-
ing, and result in false diagnosis.
• Turning the ESC off does not affect ABS or brake system operation.
Hill-start assist control (HAC)
(if equipped) A vehicle has the tendency to roll back
on a steep hill when it starts to go after
stopping. The Hill-start Assist Control
(HAC) prevents the vehicle from rolling
back by applying the brakes automatical-
ly for about 2 seconds. The brakes are
released when the accelerator pedal is
depressed or after about 2 seconds.✽ ✽ NOTICE• The HAC does not operate when the
transaxle shift lever is in the P (Park)
or N (Neutral) position.
• The HAC activates even though the ESC is off but it does not activate
when the ESC has malfunctioned.
Downhill brake control (DBC)
(if equipped)The Downhill Brake Control (DBC) sup-
ports the driver driving down a steep hill
without the driver depressing the brake
pedal. It slows down the vehicle under 8
km/h (5 mph) and lets the driver concen-
trate on steering the vehicle.
DBC defaults to the OFF position when-
ever the ignition is turned on.
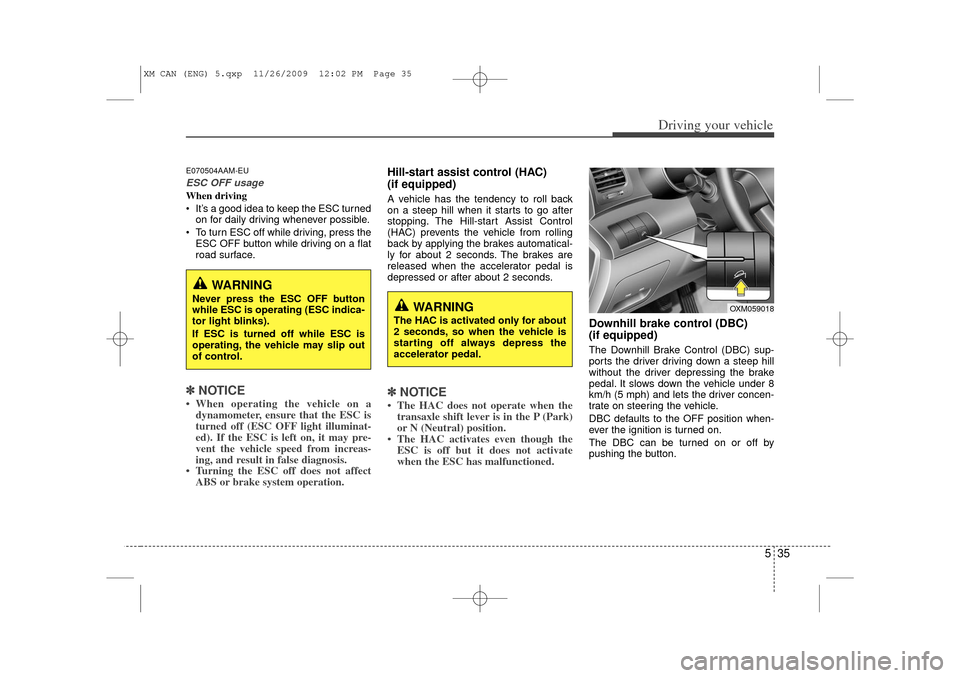
The DBC can be turned on or off by
pushing the button.
WARNING
Never press the ESC OFF button
while ESC is operating (ESC indica-
tor light blinks).
If ESC is turned off while ESC is
operating, the vehicle may slip out
of control.
WARNING
The HAC is activated only for about
2 seconds, so when the vehicle is
starting off always depress the
accelerator pedal.
OXM059018
XM CAN (ENG) 5.qxp 11/26/2009 12:02 PM Page 35
Page 348 of 377
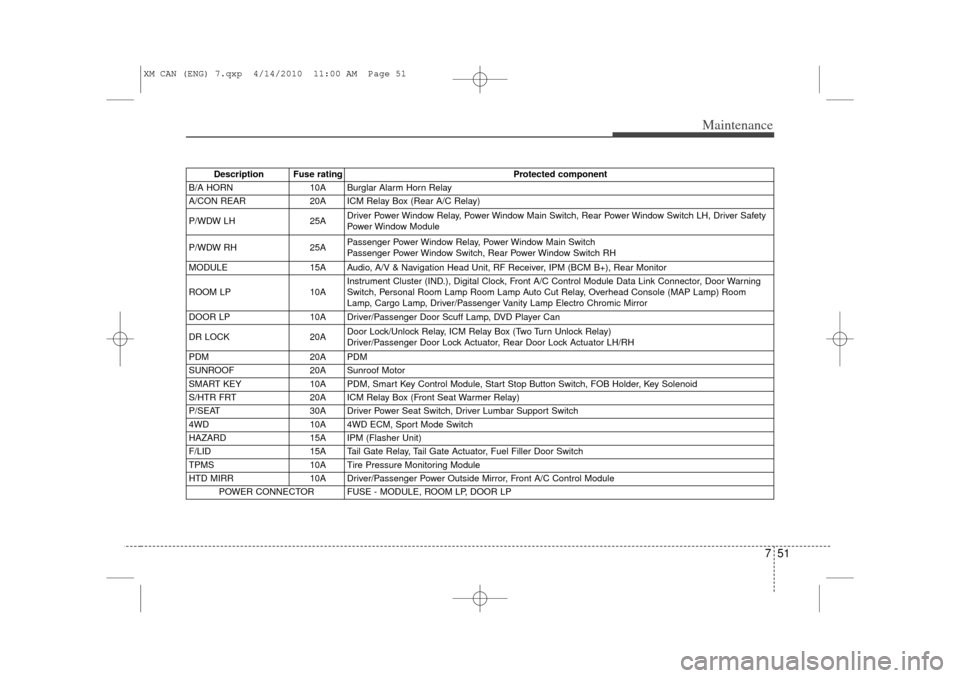
751
Maintenance
Description Fuse ratingProtected component
B/A HORN 10A Burglar Alarm Horn Relay
A/CON REAR 20A ICM Relay Box (Rear A/C Relay)
P/WDW LH 25ADriver Power Window Relay, Power Window Main Switch, Rear Power Window Switch LH, Driver Safety
Power Window Module
P/WDW RH 25APassenger Power Window Relay, Power Window Main Switch
Passenger Power Window Switch, Rear Power Window Switch RH
MODULE 15A Audio, A/V & Navigation Head Unit, RF Receiver, IPM (BCM B+), Rear Monitor
ROOM LP 10AInstrument Cluster (IND.), Digital Clock, Front A/C Control Module Data Link Connector, Door Warning
Switch, Personal Room Lamp Room Lamp Auto Cut Relay, Overhead Console (MAP Lamp) Room
Lamp, Cargo Lamp, Driver/Passenger Vanity Lamp Electro Chromic Mirror
DOOR LP 10A Driver/Passenger Door Scuff Lamp, DVD Player Can
DR LOCK 20ADoor Lock/Unlock Relay, ICM Relay Box (Two Turn Unlock Relay)
Driver/Passenger Door Lock Actuator, Rear Door Lock Actuator LH/RH
PDM 20A PDM
SUNROOF 20A Sunroof Motor
SMART KEY 10A PDM, Smart Key Control Module, Start Stop Button Switch, FOB Holder, Key Solenoid
S/HTR FRT 20A ICM Relay Box (Front Seat Warmer Relay)
P/SEAT 30A Driver Power Seat Switch, Driver Lumbar Support Switch
4WD 10A 4WD ECM, Sport Mode Switch
HAZARD 15A IPM (Flasher Unit)
F/LID 15A Tail Gate Relay, Tail Gate Actuator, Fuel Filler Door Switch
TPMS 10A Tire Pressure Monitoring Module
HTD MIRR 10A Driver/Passenger Power Outside Mirror, Front A/C Control Module
POWER CONNECTOR FUSE - MODULE, ROOM LP, DOOR LP
XM CAN (ENG) 7.qxp 4/14/2010 11:00 AM Page 51
Page 371 of 377
Index4I
Emergency starting ··················\
··················\
··················\
····6-4Jump starting ··················\
··················\
··················\
·········6-4
Push starting ··················\
··················\
··················\
··········6-5
Emergency tailgate safety release ··················\
···············4-20
Emergency towing ··················\
··················\
··················\
···6-17
Emergency while driving··················\
··················\
·············6-2
Emission control system ··················\
··················\
············7-60 Crankcase emission control system ··················\
········7-60
Evaporative emission control (including ORVR) System ··················\
··················\
··················\
··············7-60
Exhaust emission control system ··················\
············7-61
Engine compartment ··················\
··················\
············2-4, 7-2
Engine coolant ··················\
··················\
··················\
·········7-15
Engine number ··················\
··················\
··················\
···········8-8
Engine oil ··················\
··················\
··················\
·················7-14\
Engine overheats··················\
··················\
··················\
········6-6
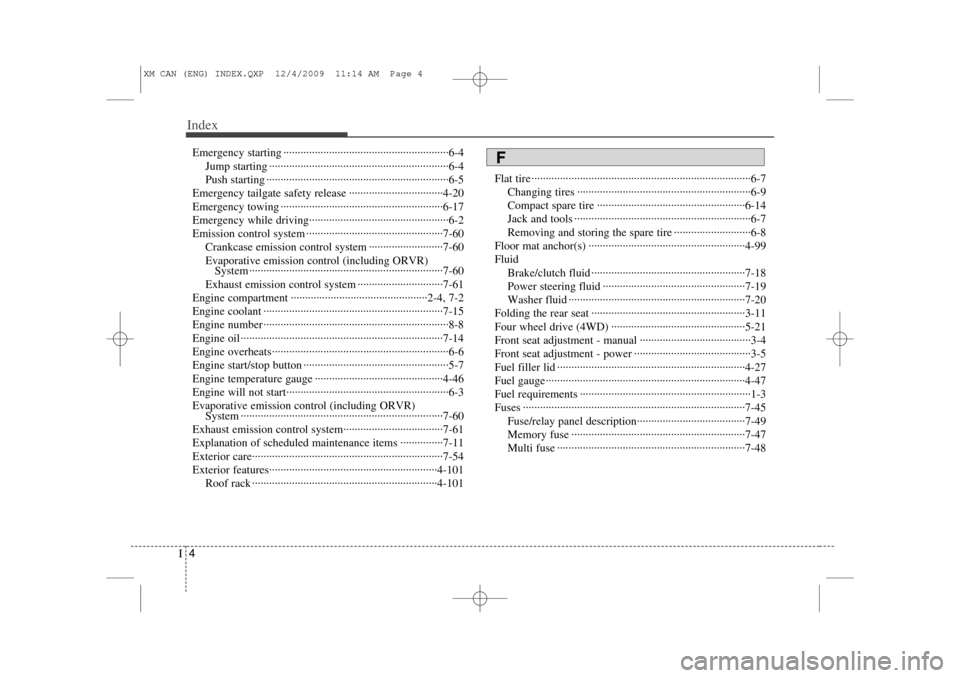
Engine start/stop button ··················\
··················\
···············5-7
Engine temperature gauge ··················\
··················\
·········4-46
Engine will not start··················\
··················\
··················\
···6-3
Evaporative emission control (including ORVR) System ··················\
··················\
··················\
·················7-60\
Exhaust emission control system··················\
·················7-61\
Explanation of scheduled maintenance items ···············7-11
Exterior care··················\
··················\
··················\
·············7-54
Exterior features··················\
··················\
··················\
·····4-101 Roof rack ··················\
··················\
··················\
···········4-101 Flat tire ··················\
··················\
··················\
··················\
·····6-7
Changing tires ··················\
··················\
··················\
·······6-9
Compact spare tire ··················\
··················\
················6-14
Jack and tools ··················\
··················\
··················\
········6-7
Removing and storing the spare tire ··················\
·········6-8
Floor mat anchor(s) ··················\
··················\
··················\
·4-99
Fluid Brake/clutch fluid ··················\
··················\
··················\
7-18
Power steering fluid ··················\
··················\
··············7-19
Washer fluid ··················\
··················\
··················\
········7-20
Folding the rear seat ··················\
··················\
··················\
3-11
Four wheel drive (4WD) ··················\
··················\
···········5-21
Front seat adjustment - manual ··················\
··················\
···3-4
Front seat adjustment - power ··················\
··················\
·····3-5
Fuel filler lid ··················\
··················\
··················\
············4-27
Fuel gauge··················\
··················\
··················\
················4-47
Fuel requirements ··················\
··················\
··················\
······1-3
Fuses ··················\
··················\
··················\
··················\
······7-45 Fuse/relay panel description··················\
··················\
··7-49
Memory fuse ··················\
··················\
··················\
·······7-47
Multi fuse ··················\
··················\
··················\
············7-48
F
XM CAN (ENG) INDEX.QXP 12/4/2009 11:14 AM Page 4