light KIA Sorento 2012 2.G Owner's Guide
[x] Cancel search | Manufacturer: KIA, Model Year: 2012, Model line: Sorento, Model: KIA Sorento 2012 2.GPages: 388, PDF Size: 7.56 MB
Page 103 of 388
413
Features of your vehicle
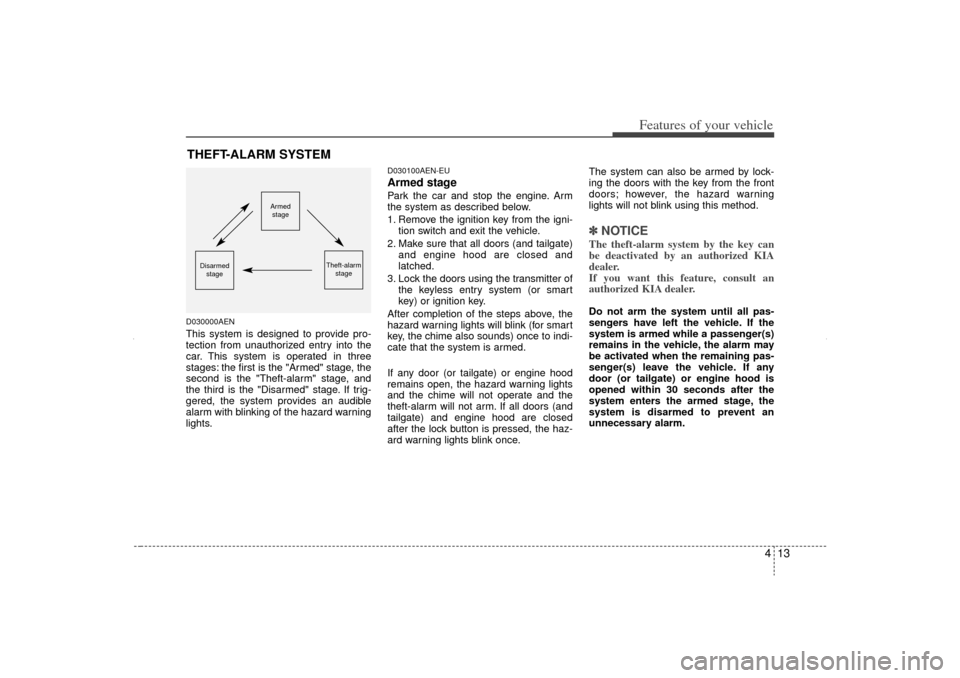
D030000AENThis system is designed to provide pro-
tection from unauthorized entry into the
car. This system is operated in three
stages: the first is the "Armed" stage, the
second is the "Theft-alarm" stage, and
the third is the "Disarmed" stage. If trig-
gered, the system provides an audible
alarm with blinking of the hazard warning
lights.
D030100AEN-EUArmed stagePark the car and stop the engine. Arm
the system as described below.
1. Remove the ignition key from the igni-tion switch and exit the vehicle.
2. Make sure that all doors (and tailgate) and engine hood are closed and
latched.
3. Lock the doors using the transmitter of the keyless entry system (or smart
key) or ignition key.
After completion of the steps above, the
hazard warning lights will blink (for smart
key, the chime also sounds) once to indi-
cate that the system is armed.
If any door (or tailgate) or engine hood
remains open, the hazard warning lights
and the chime will not operate and the
theft-alarm will not arm. If all doors (and
tailgate) and engine hood are closed
after the lock button is pressed, the haz-
ard warning lights blink once. The system can also be armed by lock-
ing the doors with the key from the front
doors; however, the hazard warning
lights will not blink using this method.
✽ ✽
NOTICEThe theft-alarm system by the key can
be deactivated by an authorized KIA
dealer.
If you want this feature, consult an
authorized KIA dealer.Do not arm the system until all pas-
sengers have left the vehicle. If the
system is armed while a passenger(s)
remains in the vehicle, the alarm may
be activated when the remaining pas-
senger(s) leave the vehicle. If any
door (or tailgate) or engine hood is
opened within 30 seconds after the
system enters the armed stage, the
system is disarmed to prevent an
unnecessary alarm.
THEFT-ALARM SYSTEM
Armed
stage
Theft-alarm stage
Disarmedstage
XM CAN (ENG) 4(~105).QXP 4/19/2011 10:35 AM Page 13
Page 104 of 388
Features of your vehicle14
4D030200AEN-EUTheft-alarm stageThe alarm will be activated if any of the
following occurs while the system is
armed.
A front or rear door is opened without
using the ignition key or transmitter (or
smart key).
The tailgate is opened without using the transmitter (or smart key).
The engine hood is opened.
The horn will sound and the hazard
warning lights will blink continuously for
approximately 27 seconds, and repeat
the horn 3 times unless the system is dis-
armed. To turn off the system, unlock the
doors with the ignition key or transmitter
(or smart key).
D030400BEN-EUDisarmed stageThe system will be disarmed when the
doors (and tailgate) are unlocked with the
transmitter (or smart key) or the ignition
key.
After depressing the unlock button, the
hazard warning lights will blink and the
chime will sound twice to indicate that the
system is disarmed.
After depressing the unlock button, if any
door (or tailgate) is not opened within 30
seconds, the system will be rearmed.✽ ✽ NOTICE• Avoid trying to start the engine while
the alarm is activated. The vehicle
starting motor is disabled during the
theft-alarm stage.
If the system is not disarmed with the
transmitter, insert the key into the
ignition switch, turn the ignition
switch to the ON position and wait for
30 seconds. Then the system will be
disarmed. (if equipped)
• If you lose your keys, consult your authorized KIA dealer.
CAUTION
Do not change, alter or adjust the
theft-alarm system because it could
cause the theft-alarm system tomalfunction and should only be serviced by an authorized KIA deal-er.
Malfunctions caused by improperalterations, adjustments or modifi- cations to the theft-alarm systemare not covered by your vehiclemanufacturer warranty.
XM CAN (ENG) 4(~105).QXP 4/19/2011 10:35 AM Page 14
Page 112 of 388
Features of your vehicle22
4D080100AAMPower windowsThe ignition switch must be in the ON
position for power windows to operate.
Each door has a power window switch
that controls the door's window. The driv-
er has a power window lock button which
can block the operation of passenger
windows. The power windows can be
operated for approximately 30 seconds
after the ignition key is removed or turned
to the ACC or LOCK position. However, if
the front doors are opened, the power
windows cannot be operated even within
the 30 second period.✽ ✽
NOTICEWhile driving with the rear windows
down or with the sunroof (if equipped)
in an open (or partially open) position,
your vehicle may demonstrate a wind
buffeting or pulsation noise. This noise
is a normal occurrence and can be
reduced or eliminated by taking the fol-
lowing actions. If the noise occurs with
one or both of the rear windows down,
partially lower both front windows
approximately one inch. If you experi-
ence the noise with the sunroof open,
slightly reduce the size of the sunroof
opening.
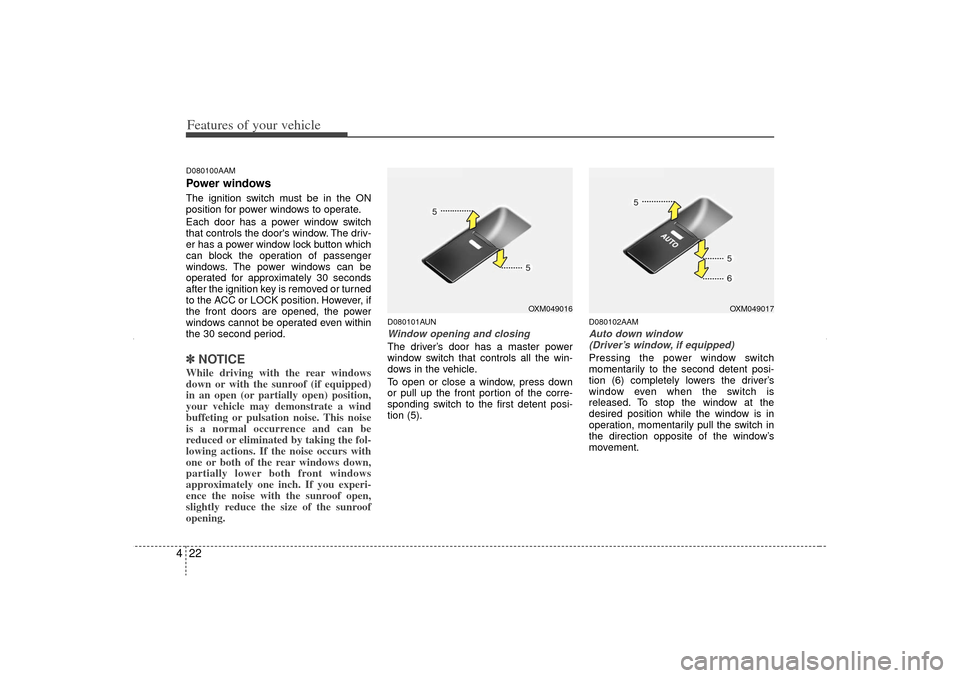
D080101AUNWindow opening and closingThe driver’s door has a master power
window switch that controls all the win-
dows in the vehicle.
To open or close a window, press down
or pull up the front portion of the corre-
sponding switch to the first detent posi-
tion (5).
D080102AAMAuto down window
(Driver’s window, if equipped)Pressing the power window switch
momentarily to the second detent posi-
tion (6) completely lowers the driver’s
window even when the switch is
released. To stop the window at the
desired position while the window is in
operation, momentarily pull the switch in
the direction opposite of the window’s
movement.
OXM049016
OXM049017
XM CAN (ENG) 4(~105).QXP 4/19/2011 10:36 AM Page 22
Page 115 of 388
425
Features of your vehicle
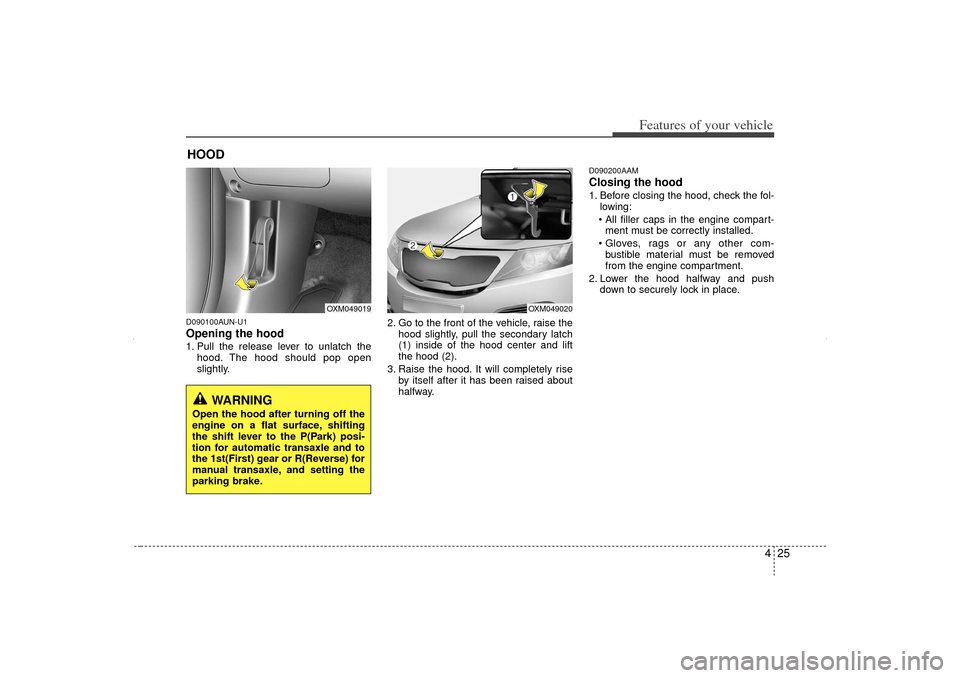
D090100AUN-U1Opening the hood 1. Pull the release lever to unlatch thehood. The hood should pop open
slightly. 2. Go to the front of the vehicle, raise the
hood slightly, pull the secondary latch
(1) inside of the hood center and lift
the hood (2).
3. Raise the hood. It will completely rise by itself after it has been raised about
halfway.
D090200AAMClosing the hood1. Before closing the hood, check the fol-lowing:
All filler caps in the engine compart- ment must be correctly installed.
Gloves, rags or any other com- bustible material must be removed
from the engine compartment.
2. Lower the hood halfway and push down to securely lock in place.
HOOD
OXM049019
OXM049020
WARNING
Open the hood after turning off the
engine on a flat surface, shifting
the shift lever to the P(Park) posi-
tion for automatic transaxle and to
the 1st(First) gear or R(Reverse) for
manual transaxle, and setting the
parking brake.
XM CAN (ENG) 4(~105).QXP 4/19/2011 10:36 AM Page 25
Page 117 of 388
427
Features of your vehicle
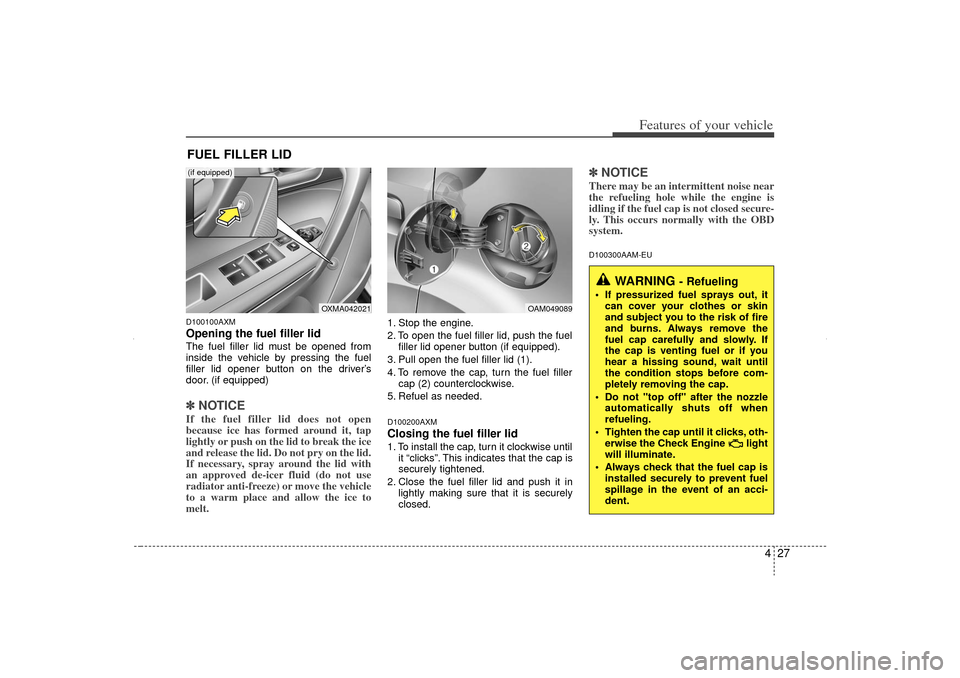
D100100AXMOpening the fuel filler lidThe fuel filler lid must be opened from
inside the vehicle by pressing the fuel
filler lid opener button on the driver’s
door. (if equipped)✽ ✽NOTICEIf the fuel filler lid does not open
because ice has formed around it, tap
lightly or push on the lid to break the ice
and release the lid. Do not pry on the lid.
If necessary, spray around the lid with
an approved de-icer fluid (do not use
radiator anti-freeze) or move the vehicle
to a warm place and allow the ice to
melt.
1. Stop the engine.
2. To open the fuel filler lid, push the fuel
filler lid opener button (if equipped).
3. Pull open the fuel filler lid (1).
4. To remove the cap, turn the fuel filler cap (2) counterclockwise.
5. Refuel as needed.D100200AXMClosing the fuel filler lid1. To install the cap, turn it clockwise until it “clicks”. This indicates that the cap is
securely tightened.
2. Close the fuel filler lid and push it in lightly making sure that it is securely
closed.
✽ ✽NOTICEThere may be an intermittent noise near
the refueling hole while the engine is
idling if the fuel cap is not closed secure-
ly. This occurs normally with the OBD
system.D100300AAM-EU
FUEL FILLER LID
WARNING
- Refueling
If pressurized fuel sprays out, it
can cover your clothes or skin
and subject you to the risk of fire
and burns. Always remove the
fuel cap carefully and slowly. If
the cap is venting fuel or if you
hear a hissing sound, wait until
the condition stops before com-
pletely removing the cap.
Do not "top off" after the nozzle automatically shuts off when
refueling.
Tighten the cap until it clicks, oth- erwise the Check Engine light
will illuminate.
Always check that the fuel cap is installed securely to prevent fuel
spillage in the event of an acci-
dent.
OAM049089
OXMA042021
(if equipped)
XM CAN (ENG) 4(~105).QXP 4/19/2011 10:36 AM Page 27
Page 118 of 388
Features of your vehicle28
4
(Continued)
Do not get back into a vehicle
once you have begun refueling
since you can generate static
electricity by touching, rubbing
or sliding against any item or fab-
ric (polyester, satin, nylon, etc.)
capable of producing static elec-
tricity. Static electricity discharge
can ignite fuel vapors resulting in
rapid burning. If you must re-
enter the vehicle, you should
once again eliminate potentially
dangerous static electricity dis-
charge by touching a metal part
of the vehicle, away from the fuel
filler neck, nozzle or other gaso-
line source.
When using an approved portable fuel container, be sure to
place the container on the
ground prior to refueling. Static
electricity discharge from the
container can ignite fuel vapors
causing a fire. Once refueling has
begun, contact with the vehicle
should be maintained until the
filling is complete.
(Continued)
WARNING -
Refueling dan-
gers
Automotive fuels are flammable
materials. When refueling, please
note the following guidelines care-
fully. Failure to follow these guide-
lines may result in severe personal
injury, severe burns or death by fire
or explosion.
Read and follow all warningsposted at the gas station facility.
Before refueling, note the loca- tion of the Emergency Gasoline
Shut-Off, if available, at the gas
station facility.
Before touching the fuel nozzle, you should eliminate potentially
dangerous static electricity dis-
charge by touching another metal
part of the vehicle, a safe dis-
tance away from the fuel filler
neck, nozzle, or other gas source.
(Continued)
(Continued)Use only approved portable plas-
tic fuel containers designed to
carry and store gasoline.
Do not use cellular phones while refueling. Electric current and/or
electronic interference from cel-
lular phones can potentially
ignite fuel vapors causing a fire.
When refueling, always shut the engine off. Sparks produced by
electrical components related to
the engine can ignite fuel vapors
causing a fire. Once refueling is
complete, check to make sure the
filler cap and filler door are
securely closed, before starting
the engine.
DO NOT use matches or a lighter and DO NOT SMOKE or leave a lit
cigarette in your vehicle while at
a gas station especially during
refueling. Automotive fuel is
highly flammable and can, when
ignited, result in fire.
(Continued)
XM CAN (ENG) 4(~105).QXP 4/19/2011 10:36 AM Page 28
Page 119 of 388
429
Features of your vehicle
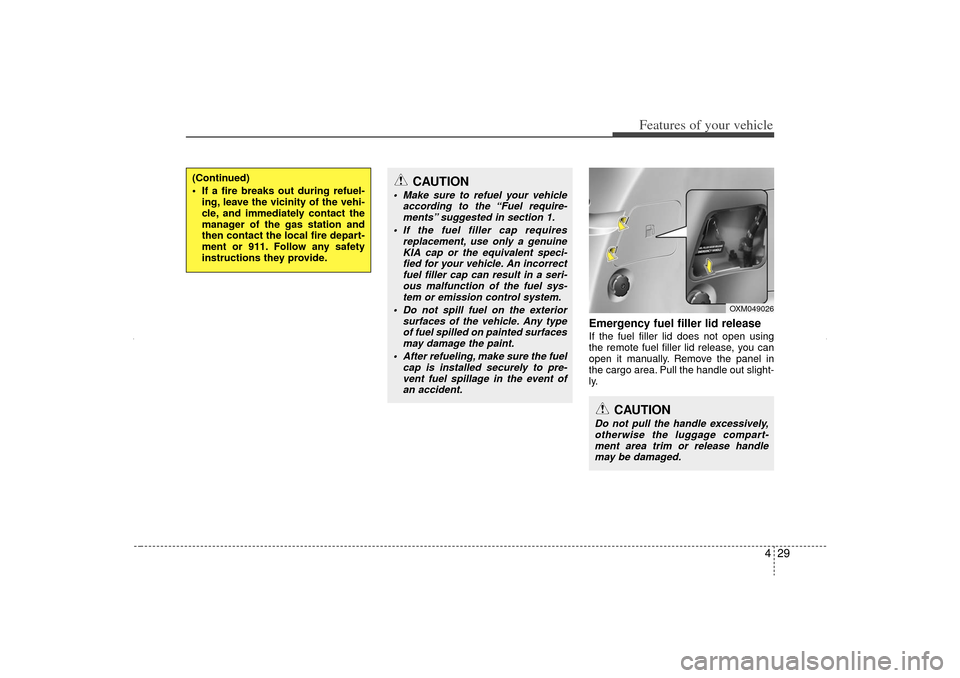
Emergency fuel filler lid releaseIf the fuel filler lid does not open using
the remote fuel filler lid release, you can
open it manually. Remove the panel in
the cargo area. Pull the handle out slight-
ly.
(Continued)
If a fire breaks out during refuel-ing, leave the vicinity of the vehi-
cle, and immediately contact the
manager of the gas station and
then contact the local fire depart-
ment or 911. Follow any safety
instructions they provide.
CAUTION
Make sure to refuel your vehicle according to the “Fuel require-ments” suggested in section 1.
If the fuel filler cap requires replacement, use only a genuineKIA cap or the equivalent speci-fied for your vehicle. An incorrect fuel filler cap can result in a seri-ous malfunction of the fuel sys- tem or emission control system.
Do not spill fuel on the exterior surfaces of the vehicle. Any typeof fuel spilled on painted surfacesmay damage the paint.
After refueling, make sure the fuel cap is installed securely to pre-vent fuel spillage in the event ofan accident.
CAUTION
Do not pull the handle excessively,otherwise the luggage compart-ment area trim or release handle may be damaged.
OXM049026
XM CAN (ENG) 4(~105).QXP 4/19/2011 10:36 AM Page 29
Page 126 of 388
Features of your vehicle36
4D130100AHM-EU-U1Power steeringPower steering uses energy from the
engine to assist you in steering the vehi-
cle. If the engine is off or if the power
steering system becomes inoperative,
the vehicle may still be steered, but it will
require increased steering effort.
Should you notice any change in the
effort required to steer during normal
vehicle operation, have the power steer-
ing checked by an authorized KIA dealer.
✽ ✽
NOTICEIf the power steering drive belt breaks
or if the power steering pump malfunc-
tions, steering effort will greatly
increase.✽ ✽NOTICEIf the vehicle is parked for extended
periods outside in cold weather (below
-10°C/14°F), the power steering may
require increased effort when the
engine is first started. This is caused by
increased fluid viscosity due to the cold
weather and does not indicate a mal-
function.
When this happens, increase the engine
RPM by depressing the accelerator until
the RPM reaches 1,500 rpm then release
or let the engine idle for two or three
minutes to warm up the fluid.
D130300AUNTilt steering Tilt steering allows you to adjust the
steering wheel before you drive. You can
also raise it to give your legs more room
when you exit and enter the vehicle.
The steering wheel should be positioned
so that it is comfortable for you to drive,
while permitting you to see the instru-
ment panel warning lights and gauges.
STEERING WHEEL
CAUTION
Never hold the steering wheel to the
extreme right or left for more than 5 seconds with the engine running.Holding the steering wheel for morethan 5 seconds in either position may cause damage to the powersteering pump.
WARNING
Never adjust the angle of the steering wheel while driving. You
may lose steering control and
cause severe personal injury,
death or accidents.
After adjusting, push the steering wheel both up and down to be
certain it is locked in position.
XM CAN (ENG) 4(~105).QXP 4/19/2011 10:37 AM Page 36
Page 129 of 388
439
Features of your vehicle
D140100AHMInside rearview mirrorAdjust the rearview mirror so that the
center view through the rear window is
seen. Make this adjustment before you
start driving.
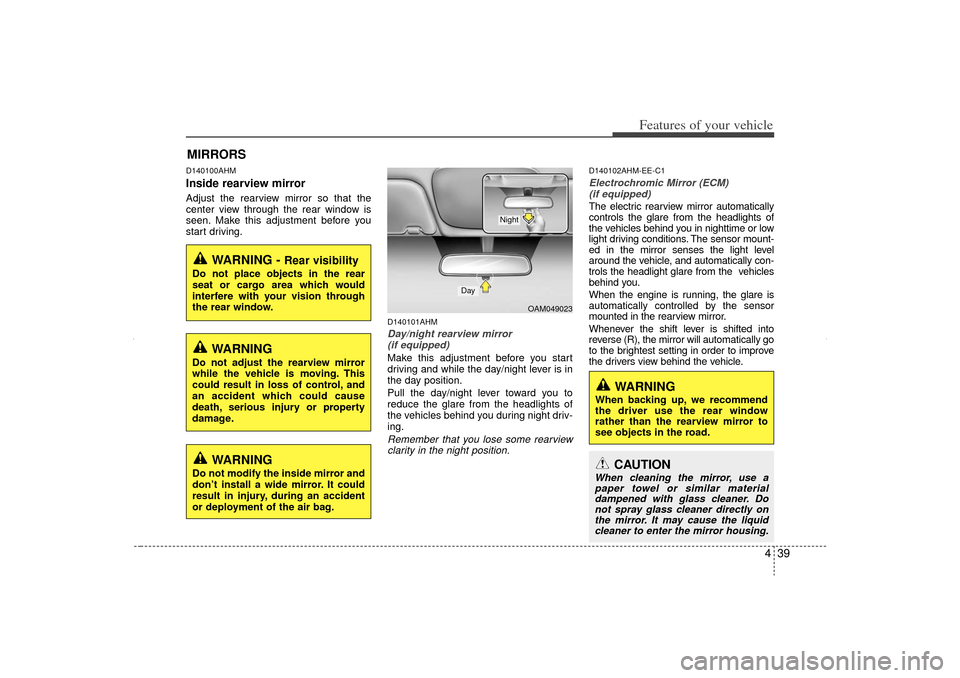
D140101AHMDay/night rearview mirror (if equipped)Make this adjustment before you start
driving and while the day/night lever is in
the day position.
Pull the day/night lever toward you to
reduce the glare from the headlights of
the vehicles behind you during night driv-
ing.Remember that you lose some rearviewclarity in the night position.
D140102AHM-EE-C1Electrochromic Mirror (ECM)(if equipped)The electric rearview mirror automatically
controls the glare from the headlights of
the vehicles behind you in nighttime or low
light driving conditions. The sensor mount-
ed in the mirror senses the light level
around the vehicle, and automatically con-
trols the headlight glare from the vehicles
behind you.
When the engine is running, the glare is
automatically controlled by the sensor
mounted in the rearview mirror.
Whenever the shift lever is shifted into
reverse (R), the mirror will automatically go
to the brightest setting in order to improve
the drivers view behind the vehicle.
MIRRORS
WARNING -
Rear visibility
Do not place objects in the rear
seat or cargo area which would
interfere with your vision through
the rear window.
WARNING
Do not adjust the rearview mirror
while the vehicle is moving. This
could result in loss of control, and
an accident which could cause
death, serious injury or property
damage.
OAM049023
Day
Night
CAUTION
When cleaning the mirror, use apaper towel or similar materialdampened with glass cleaner. Donot spray glass cleaner directly onthe mirror. It may cause the liquidcleaner to enter the mirror housing.
WARNING
When backing up, we recommend
the driver use the rear window
rather than the rearview mirror to
see objects in the road.
WARNING
Do not modify the inside mirror and
don’t install a wide mirror. It could
result in injury, during an accident
or deployment of the air bag.
XM CAN (ENG) 4(~105).QXP 4/19/2011 10:37 AM Page 39
Page 130 of 388
Features of your vehicle40
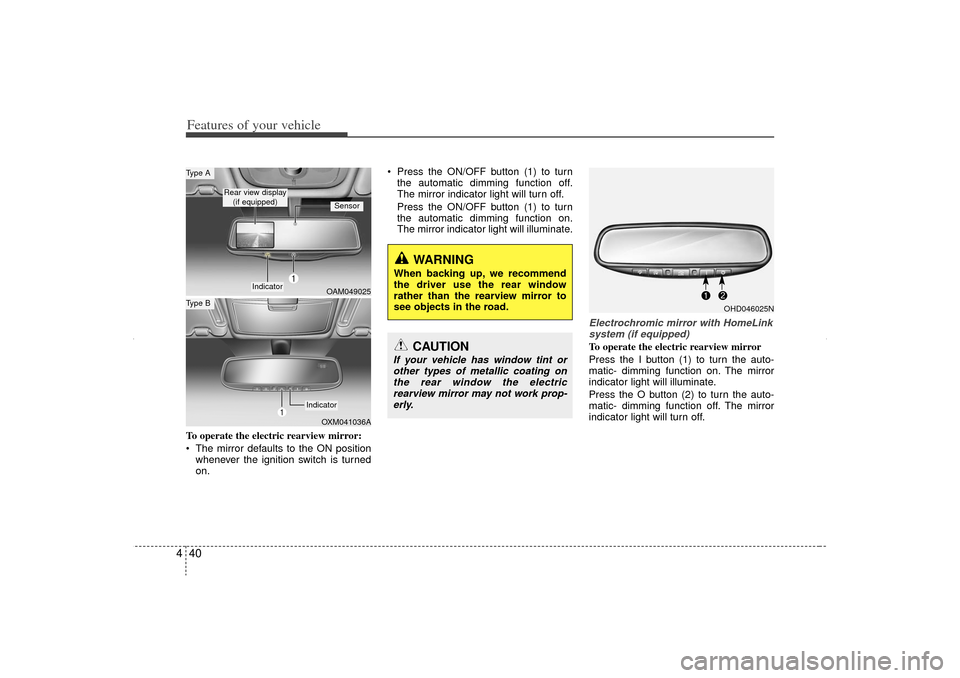
4To operate the electric rearview mirror:
The mirror defaults to the ON position
whenever the ignition switch is turned
on. Press the ON/OFF button (1) to turn
the automatic dimming function off.
The mirror indicator light will turn off.
Press the ON/OFF button (1) to turn
the automatic dimming function on.
The mirror indicator light will illuminate.
Electrochromic mirror with HomeLinksystem (if equipped)To operate the electric rearview mirror
Press the I button (1) to turn the auto-
matic- dimming function on. The mirror
indicator light will illuminate.
Press the O button (2) to turn the auto-
matic- dimming function off. The mirror
indicator light will turn off.
CAUTION
If your vehicle has window tint orother types of metallic coating onthe rear window the electricrearview mirror may not work prop- erly.
OHD046025N
OAM049025OXM041036A
Type AType B
Rear view display
(if equipped)
Sensor
Indicator
Indicator
WARNING
When backing up, we recommend
the driver use the rear window
rather than the rearview mirror to
see objects in the road.
XM CAN (ENG) 4(~105).QXP 4/19/2011 10:37 AM Page 40