ignition KIA Sorento 2012 2.G Owner's Manual
[x] Cancel search | Manufacturer: KIA, Model Year: 2012, Model line: Sorento, Model: KIA Sorento 2012 2.GPages: 388, PDF Size: 7.56 MB
Page 5 of 388
Index2I
Air bags··················\
··················\
··················\
··················\
··3-41Air bag warning label··················\
··················\
············3-67
Air bag warning light ··················\
··················\
············3-44
Curtain air bag··················\
··················\
··················\
·····3-59
Driver's and passenger's front air bag ··················\
·····3-53
Occupant detection system··················\
··················\
····3-47
Side impact air bag··················\
··················\
················3-57
Air cleaner ··················\
··················\
··················\
···············7-25
Alarm system ··················\
··················\
··················\
···········4-13
Antenna ··················\
··················\
··················\
··················\
4-106
Anti-lock brake system (ABS) ··················\
··················\
··5-30
Appearance care··················\
··················\
··················\
·······7-58 Exterior care ··················\
··················\
··················\
········7-58
Interior care ··················\
··················\
··················\
·········7-63
Armrest ··················\
··················\
··················\
··················\
··3-20
Audio system ··················\
··················\
··················\
·········4-106 Antenna ··················\
··················\
··················\
·············4-106
Steering wheel audio control ··················\
················4-107
Auto lock mode (Passenger seat belt) ··················\
·········3-36
Automatic climate control system ··················\
···············4-87 Air conditioning ··················\
··················\
··················\
··4-93
Automatic heating and air conditioning··················\
··4-88
Manual heating and air conditioning ··················\
······4-89
Automatic transaxle ··················\
··················\
··················\
·5-15 Ignition key interlock system ··················\
··················\
5-19
Shift lock system ··················\
··················\
··················\
·5-18
Sports mode··················\
··················\
··················\
·········5-17 Battery··················\
··················\
··················\
··················\
····7-33
Battery saver function··················\
··················\
················4-67
Before driving ··················\
··················\
··················\
············5-3
Bottle holders, see cup holders ··················\
··················\
4-100
Brake system··················\
··················\
··················\
············5-27
Anti-lock brake system (ABS) ··················\
················5-30
Electronic stability control (ESC) ··················\
···········5-32
Parking brake ··················\
··················\
··················\
······5-28
Power brakes ··················\
··················\
··················\
·······5-27
Brake/clutch fluid ··················\
··················\
··················\
····7-22
Bulb wattage ··················\
··················\
··················\
··············8-2
Capacities (Lubricants) ··················\
··················\
················8-4
Care Exterior care ··················\
··················\
··················\
········7-58
Interior care ··················\
··················\
··················\
·········7-63
Tire care ··················\
··················\
··················\
··············7-36
Cargo capacity ··················\
··················\
··················\
·········5-63
Cargo weight··················\
··················\
··················\
············5-67
Center console storage ··················\
··················\
···············4-98
Central door lock switch··················\
··················\
············4-17
Certification label ··················\
··················\
··················\
····5-65
Changing tires ··················\
··················\
··················\
············6-9A
BC
XM CAN (ENG) INDEX.QXP 4/19/2011 10:59 AM Page 2
Page 8 of 388
I5
Index
GaugeEngine temperature gauge··················\
··················\
·····4-50
Fuel gauge ··················\
··················\
··················\
···········4-51
Glassroof, see panoramic sunroof ··················\
···············4-30
Glove box··················\
··················\
··················\
·················4-98\
Hazard warning flasher··················\
··················\
··············4-66
Hazardous driving conditions ··················\
··················\
····5-45
Headlight escort function··················\
··················\
···········4-67
Headrest ··················\
··················\
··················\
············3-7, 3-17
Highway driving ··················\
··················\
··················\
······5-49
Hitches ··················\
··················\
··················\
··················\
···5-54
Heated steering wheel··················\
··················\
················4-37
HomeLink, Electrochromic mirror ··················\
··············4-40
Hood··················\
··················\
··················\
··················\
·······4-25
Horn ··················\
··················\
··················\
··················\
·······4-38
How to use this manual ··················\
··················\
···············1-2
Ignition key interlock system ··················\
··················\
····5-19
Immobilizer system ··················\
··················\
··················\
···4-3
Indicator symbols on the instrument cluster ··················\
·1-6
Indicators and warnings ··················\
··················\
·············4-55
Inside rearview mirror ··················\
··················\
···············4-39 Instrument cluster ··················\
··················\
··················\
····4-48
Engine temperature gauge··················\
··················\
·····4-50
Fuel gauge ··················\
··················\
··················\
···········4-51
Instrument panel illumination ··················\
·················4-49\
Odometer/Tripmeter/Trip computer··················\
········4-51
Speedometer ··················\
··················\
··················\
········4-49
Tachometer ··················\
··················\
··················\
··········4-49
Warning and indicators ··················\
··················\
·········4-55
Instrument panel illumination··················\
··················\
····4-49
Instrument panel overview ··················\
··················\
··········2-3
Interior care··················\
··················\
··················\
··············7-63
Interior features··················\
··················\
··················\
······4-100 Clock ··················\
··················\
··················\
·················4-10\
2
Cup holder ··················\
··················\
··················\
·········4-100
Floor mat anchor(s) ··················\
··················\
·············4-103
Luggage net holder··················\
··················\
··············4-103
Power outlet ··················\
··················\
··················\
······4-101
Sunvisor··················\
··················\
··················\
·············4-101
Interior lights ··················\
··················\
··················\
···········4-75
Interior overview ··················\
··················\
··················\
·······2-2
Interlock system ··················\
··················\
··················\
·······5-19
Jack and tools··················\
··················\
··················\
·············6-7
Jump starting··················\
··················\
··················\
··············6-4GHI
J
XM CAN (ENG) INDEX.QXP 4/19/2011 10:59 AM Page 5
Page 22 of 388
23
Your vehicle at a glance
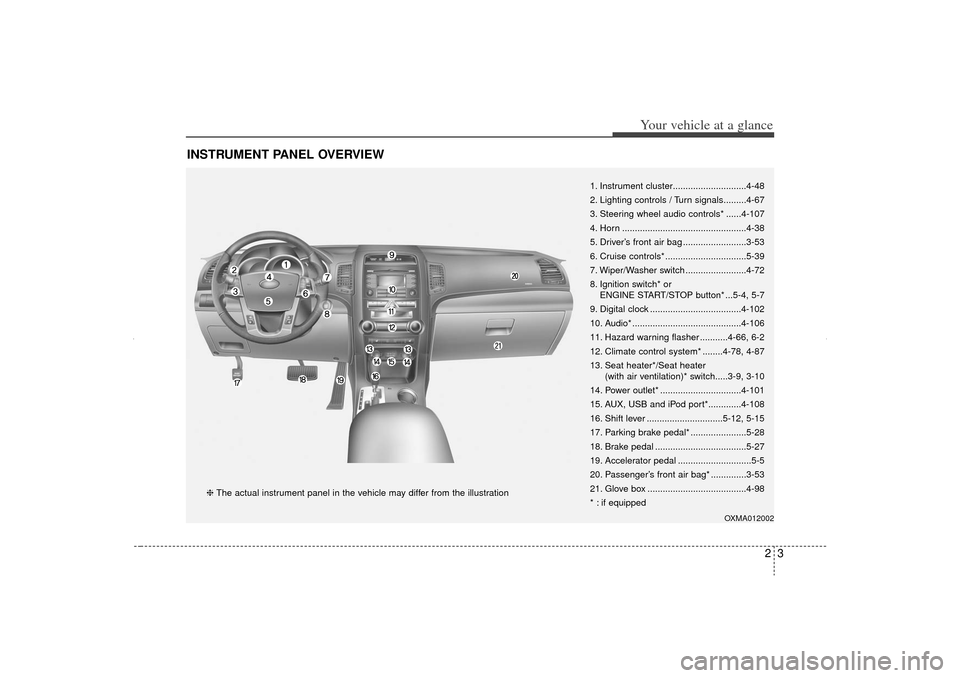
INSTRUMENT PANEL OVERVIEW
1. Instrument cluster.............................4-48
2. Lighting controls / Turn signals.........4-67
3. Steering wheel audio controls* ......4-107
4. Horn .................................................4-38
5. Driver’s front air bag .........................3-53
6. Cruise controls* ................................5-39
7. Wiper/Washer switch ........................4-72
8. Ignition switch* orENGINE START/STOP button* ...5-4, 5-7
9. Digital clock ....................................4-102
10. Audio* ...........................................4-106
11. Hazard warning flasher ...........4-66, 6-2
12. Climate control system* ........4-78, 4-87
13. Seat heater*/Seat heater (with air ventilation)* switch.....3-9, 3-10
14. Power outlet* ................................4-101
15. AUX, USB and iPod port*.............4-108
16. Shift lever ..............................5-12, 5-15
17. Parking brake pedal* ......................5-28
18. Brake pedal ....................................5-27
19. Accelerator pedal .............................5-5
20. Passenger’s front air bag* ..............3-53
21. Glove box .......................................4-98
* : if equipped
OXMA012002
❈ The actual instrument panel in the vehicle may differ from the illustration
XM CAN (ENG) 2.QXP 4/19/2011 10:24 AM Page 3
Page 28 of 388
35
Safety features of your vehicle
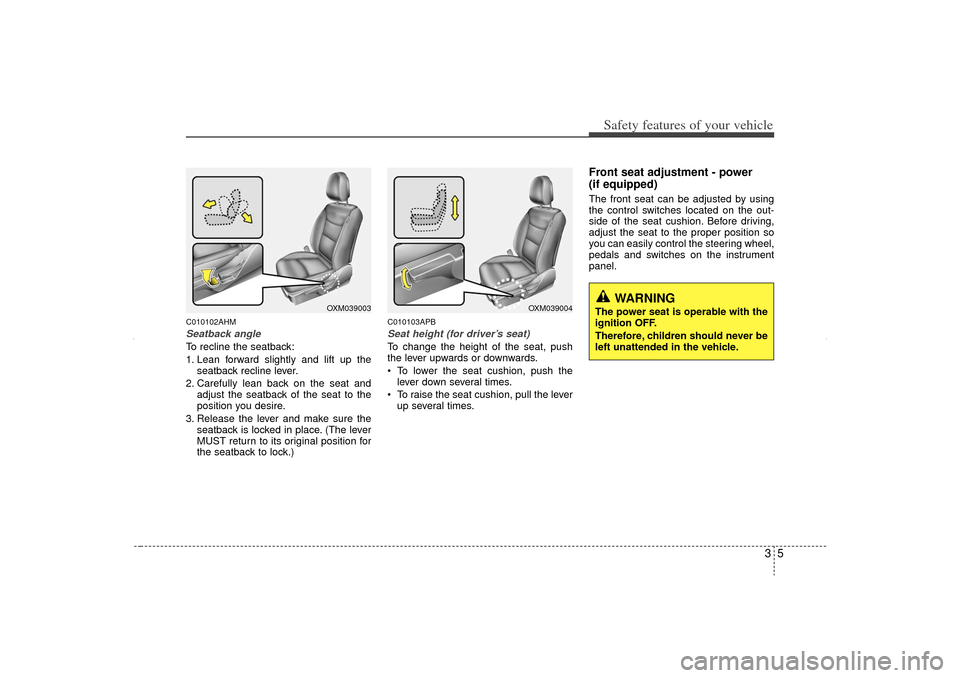
C010102AHMSeatback angleTo recline the seatback:
1. Lean forward slightly and lift up theseatback recline lever.
2. Carefully lean back on the seat and adjust the seatback of the seat to the
position you desire.
3. Release the lever and make sure the seatback is locked in place. (The lever
MUST return to its original position for
the seatback to lock.)
C010103APBSeat height (for driver’s seat)To change the height of the seat, push
the lever upwards or downwards.
To lower the seat cushion, push thelever down several times.
To raise the seat cushion, pull the lever up several times.
Front seat adjustment - power
(if equipped)The front seat can be adjusted by using
the control switches located on the out-
side of the seat cushion. Before driving,
adjust the seat to the proper position so
you can easily control the steering wheel,
pedals and switches on the instrument
panel.
OXM039004
OXM039003
WARNING
The power seat is operable with the
ignition OFF.
Therefore, children should never be
left unattended in the vehicle.
XM CAN (ENG) 3.QXP 4/19/2011 10:26 AM Page 5
Page 32 of 388
39
Safety features of your vehicle
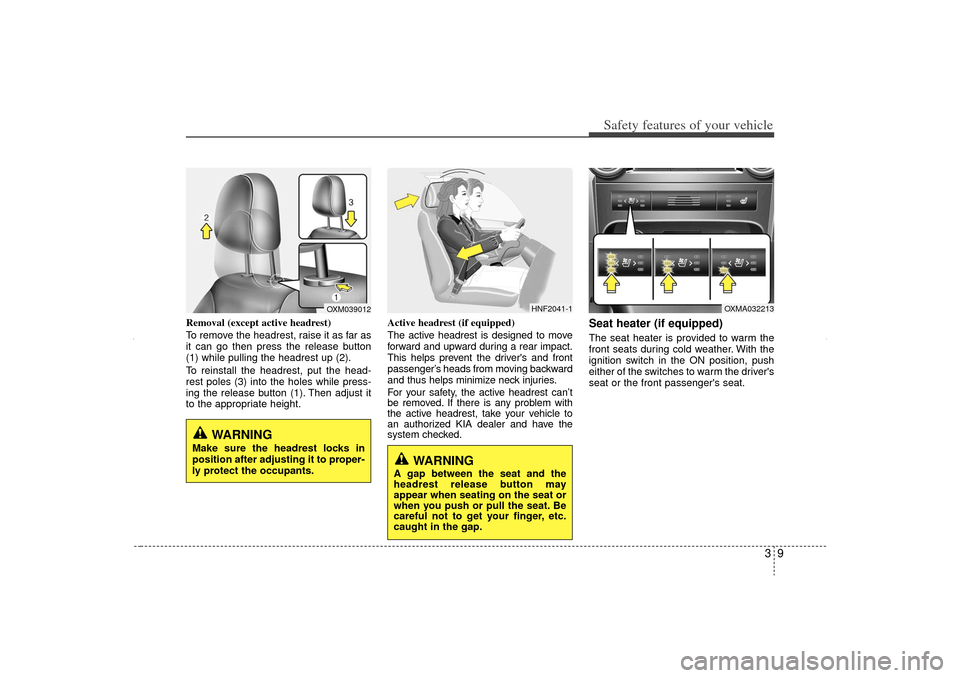
Removal (except active headrest)
To remove the headrest, raise it as far as
it can go then press the release button
(1) while pulling the headrest up (2).
To reinstall the headrest, put the head-
rest poles (3) into the holes while press-
ing the release button (1). Then adjust it
to the appropriate height.Active headrest (if equipped)
The active headrest is designed to move
forward and upward during a rear impact.
This helps prevent the driver's and front
passenger’s heads from moving backward
and thus helps minimize neck injuries.
For your safety, the active headrest can’t
be removed. If there is any problem with
the active headrest, take your vehicle to
an authorized KIA dealer and have the
system checked.
Seat heater (if equipped)The seat heater is provided to warm the
front seats during cold weather. With the
ignition switch in the ON position, push
either of the switches to warm the driver's
seat or the front passenger's seat.
OXM039012
WARNING
Make sure the headrest locks in
position after adjusting it to proper-
ly protect the occupants.
HNF2041-1
WARNING
A gap between the seat and the
headrest release button may
appear when seating on the seat or
when you push or pull the seat. Be
careful not to get your finger, etc.
caught in the gap.
OXMA032213
XM CAN (ENG) 3.QXP 4/19/2011 10:26 AM Page 9
Page 33 of 388
Safety features of your vehicle10
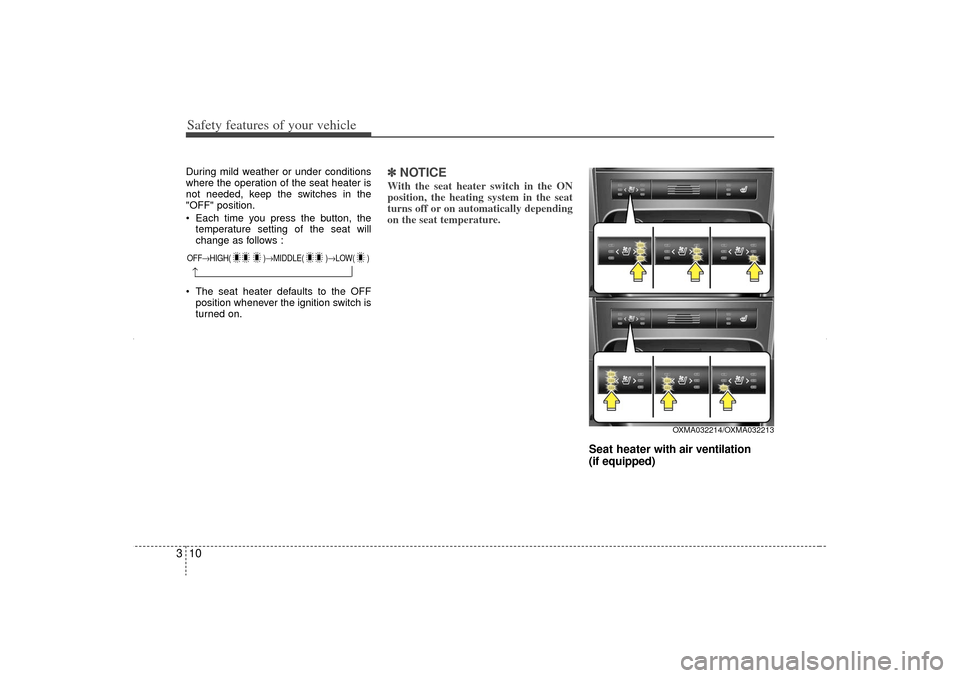
3During mild weather or under conditions
where the operation of the seat heater is
not needed, keep the switches in the
"OFF" position.
Each time you press the button, the
temperature setting of the seat will
change as follows :
The seat heater defaults to the OFF position whenever the ignition switch is
turned on.
✽ ✽ NOTICEWith the seat heater switch in the ON
position, the heating system in the seat
turns off or on automatically depending
on the seat temperature.
Seat heater w ith air ventilation
(if equipped)
OFF→ HIGH( )→ MIDDLE( )→LOW( )→
OXMA032214/OXMA032213
XM CAN (ENG) 3.QXP 4/19/2011 10:26 AM Page 10
Page 34 of 388
311
Safety features of your vehicle
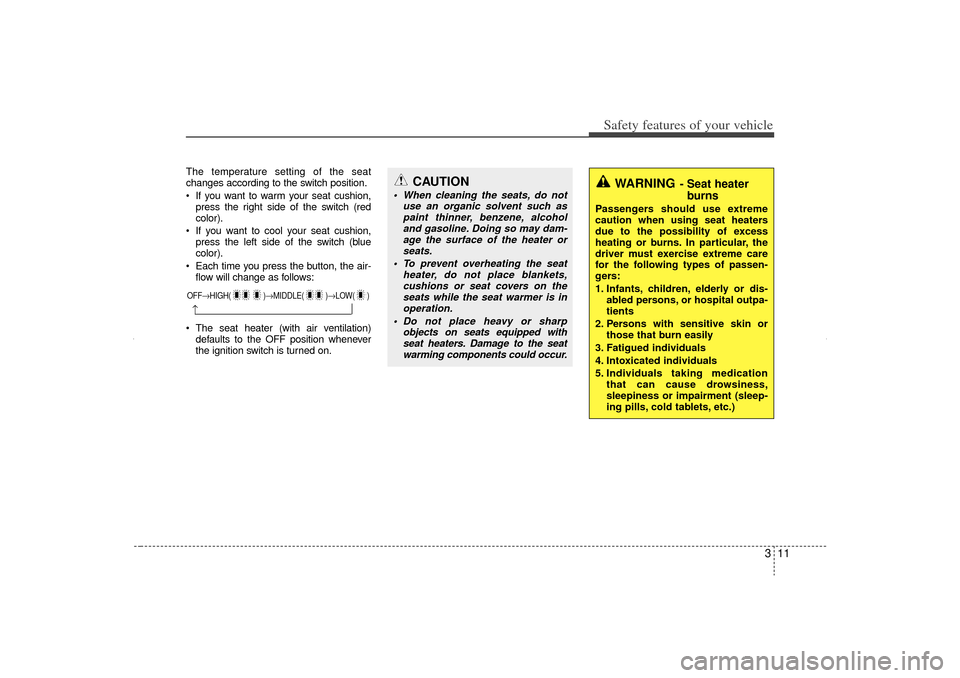
The temperature setting of the seat
changes according to the switch position.
If you want to warm your seat cushion,press the right side of the switch (red
color).
If you want to cool your seat cushion, press the left side of the switch (blue
color).
Each time you press the button, the air- flow will change as follows:
The seat heater (with air ventilation) defaults to the OFF position whenever
the ignition switch is turned on.OFF→ HIGH( )→ MIDDLE( )→LOW( )→
WARNING
- Seat heater
burns
Passengers should use extreme
caution when using seat heaters
due to the possibility of excess
heating or burns. In particular, the
driver must exercise extreme care
for the following types of passen-
gers:
1. Infants, children, elderly or dis-
abled persons, or hospital outpa-
tients
2. Persons with sensitive skin or those that burn easily
3. Fatigued individuals
4. Intoxicated individuals
5. Individuals taking medication that can cause drowsiness,
sleepiness or impairment (sleep-
ing pills, cold tablets, etc.)
CAUTION
When cleaning the seats, do not use an organic solvent such aspaint thinner, benzene, alcohol and gasoline. Doing so may dam-age the surface of the heater orseats.
To prevent overheating the seat heater, do not place blankets,cushions or seat covers on the seats while the seat warmer is inoperation.
Do not place heavy or sharp objects on seats equipped withseat heaters. Damage to the seat warming components could occur.
XM CAN (ENG) 3.QXP 4/19/2011 10:26 AM Page 11
Page 44 of 388
321
Safety features of your vehicle
C020101AAM-EUSeat belt warningAs a reminder to the driver, the seat belt
warning light will blink for approximately
6 seconds each time you turn the ignition
switch ON regardless of belt fastening.
1GQA2083
(Continued)
Belts should not be worn with
straps twisted. Each belt assembly
must only be used by one occu-
pant; it is dangerous to put a belt
around a child being carried on the
occupant's lap.
WARNING
No modifications or additionsshould be made by the user
which will either prevent the seat
belt adjusting devices from oper-
ating to remove slack, or prevent
the seat belt assembly from being
adjusted to remove slack.
When you fasten the seat belt, be careful not to latch the seat belt
in buckles of other seat. It's very
dangerous and you may not be
protected by the seat belt proper-
ly.
Do not unfasten the seat belt and do not fasten and unfasten the
seat belt repeatedly while driving.
This could result in loss of con-
trol, and an accident causing
death, serious injury, or property
damage.
When fastening the seat belt, make sure that the seat belt does
not pass over objects that are
hard or can break easily.
Make sure there is nothing in the buckle. The seat belt may not be
fastened securely.
XM CAN (ENG) 3.QXP 4/19/2011 10:28 AM Page 21
Page 45 of 388
Safety features of your vehicle22
3If the driver's seat belt is not fastened
when the ignition switch is turned on, the
seat belt warning light and the seat belt
warning chime will operate for approxi-
mately 6 seconds. But if it is fastened
within the 6 seconds, the warning light
will blink until the 6 seconds are up. The
warning chime will turn off immediately.
If the driver's seat belt is disconnected
after the ignition switch is turned to the
ON position, the seat belt warning light
and chime will operate for approximately
6 seconds. But if it is fastened within the
6 seconds, the warning light and chime
will turn off immediately. If the driver's
seat belt is not fastened when the vehicle
speed exceeds 10 km/h (6 mph), the
seat belt warning light and chime will
operate for approximately 11 times with a
pattern of 6 seconds on and 24 seconds
off until the belt is fastened or the vehicle
speed decreases below 5 km/h (3 mph).
C020102AAM-EUSeat belt - Driver's 3-point system
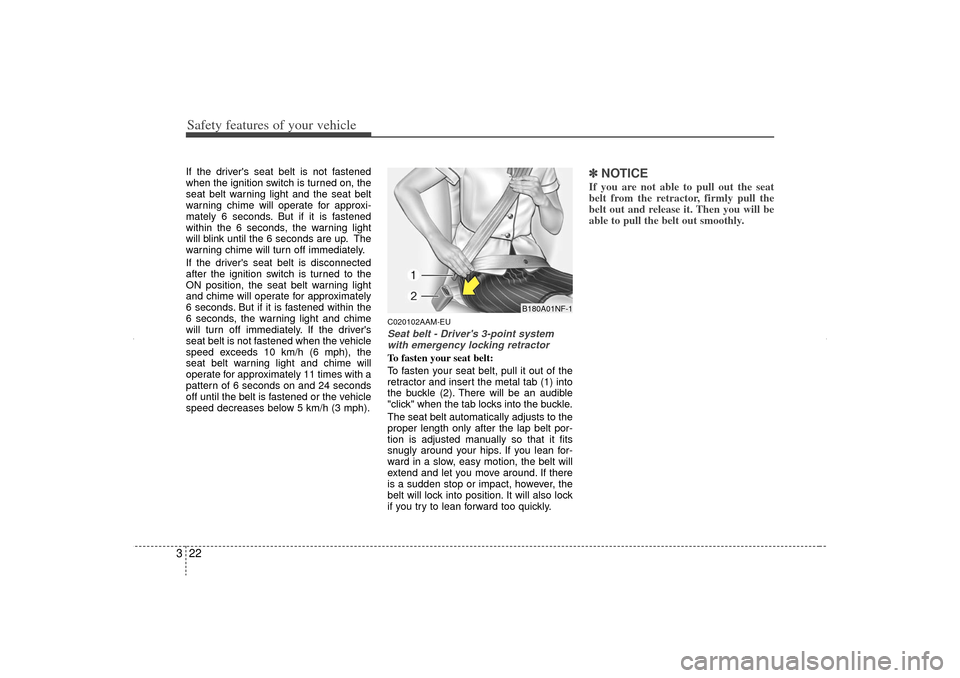
with emergency locking retractorTo fasten your seat belt:
To fasten your seat belt, pull it out of the
retractor and insert the metal tab (1) into
the buckle (2). There will be an audible
"click" when the tab locks into the buckle.
The seat belt automatically adjusts to the
proper length only after the lap belt por-
tion is adjusted manually so that it fits
snugly around your hips. If you lean for-
ward in a slow, easy motion, the belt will
extend and let you move around. If there
is a sudden stop or impact, however, the
belt will lock into position. It will also lock
if you try to lean forward too quickly.
✽ ✽ NOTICEIf you are not able to pull out the seat
belt from the retractor, firmly pull the
belt out and release it. Then you will be
able to pull the belt out smoothly.
B180A01NF-1
XM CAN (ENG) 3.QXP 4/19/2011 10:28 AM Page 22
Page 51 of 388
Safety features of your vehicle28
3✽
✽
NOTICE• Both the driver's and front passen-
ger's pre-tensioner seat belts may be
activated in certain frontal collisions.
The pre-tensioners will not be activat-
ed if the seat belts are not being worn
at the time of the collision.
• When the pre-tensioner seat belts are activated, a loud noise may be heard
and fine dust, which may appear to be
smoke, may be visible in the passenger
compartment. These are normal oper-
ating conditions and are not haz-
ardous.
• Although it is harmless, the fine dust may cause skin irritation and should
not be breathed for prolonged peri-
ods. Wash all exposed skin areas thor-
oughly after an accident in which the
pre-tensioner seat belts were activat-
ed.
✽ ✽ NOTICEBecause the sensor that activates the
SRS air bag is connected with the pre-
tensioner seat belt, the SRS air bag
warning light ( ) on the instrument
panel will illuminate for approximately
6 seconds after the ignition switch has
been turned to the ON position, and
then it should turn off.
CAUTION
If the pre-tensioner seat belt is not
working properly, this warning lightwill illuminate even if there is no malfunction of the SRS air bag. Ifthe SRS air bag warning light doesnot illuminate when the ignitionswitch is turned ON, or if it remains illuminated after illuminating forapproximately 6 seconds, or if it illuminates while the vehicle isbeing driven, please have an authorized KIA dealer inspect thepre-tensioner seat belt and SRS airbag system as soon as possible.
WARNING
Pre-tensioners are designed to operate only one time. After acti-
vation, pre-tensioner seat belts
must be replaced. All seat belts,
of any type, should always be
replaced after they have been
worn during a collision.
The pre-tensioner seat belt assembly mechanisms become
hot during activation. Do not
touch the pre-tensioner seat belt
assemblies for several minutes
after they have been activated.
Do not attempt to inspect or replace the pre-tensioner seat
belts yourself. This must be done
by an authorized KIA dealer.
Do not strike the pre-tensioner seat belt assemblies.
Do not attempt to service or repair the pre-tensioner seat belt
system in any manner.
Do not put anything near the buckle. Placing objects near the
buckle can adversely affect the
buckle pretensioner and may
increase the risk of personal
injury in the event of a collision.
(Continued)
XM CAN (ENG) 3.QXP 4/19/2011 10:28 AM Page 28