hood release KIA Sorento 2014 3.G Owner's Manual
[x] Cancel search | Manufacturer: KIA, Model Year: 2014, Model line: Sorento, Model: KIA Sorento 2014 3.GPages: 508, PDF Size: 7.59 MB
Page 12 of 508

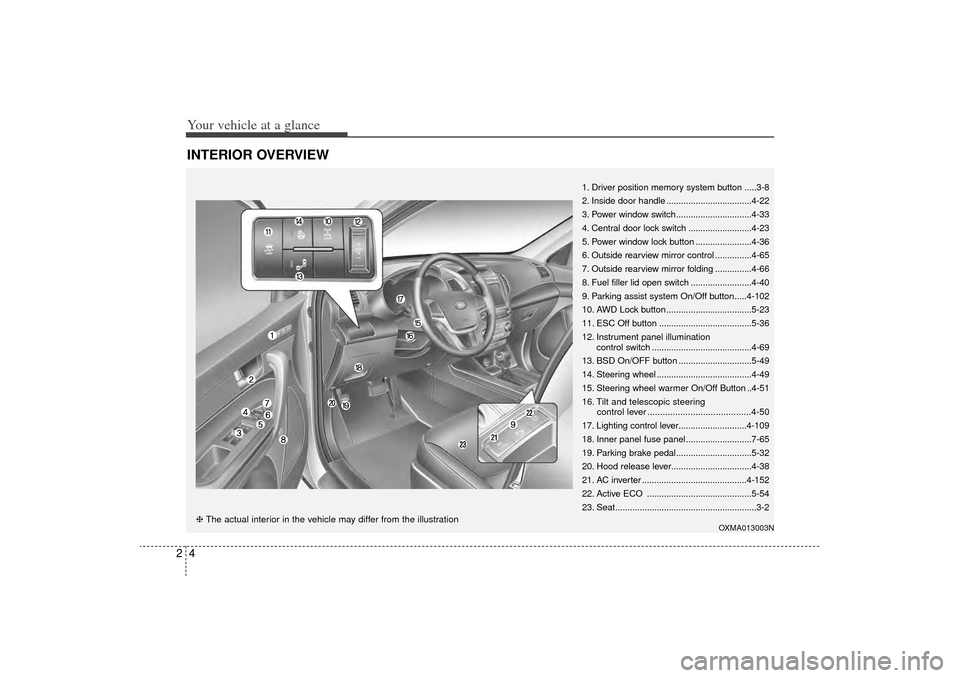
Your vehicle at a glance42INTERIOR OVERVIEW
1. Driver position memory system button .....3-8
2. Inside door handle ...................................4-22
3. Power window switch...............................4-33
4. Central door lock switch ..........................4-23
5. Power window lock button .......................4-36
6. Outside rearview mirror control ...............4-65
7. Outside rearview mirror folding ...............4-66
8. Fuel filler lid open switch .........................4-40
9. Parking assist system On/Off button.....4-102
10. AWD Lock button ...................................5-23
11. ESC Off button ......................................5-36
12. Instrument panel illuminationcontrol switch .........................................4-69
13. BSD On/OFF button ..............................5-49
14. Steering wheel .......................................4-49
15. Steering wheel warmer On/Off Button ..4-51
16. Tilt and telescopic steering control lever .........................................4-50
17. Lighting control lever............................4-109
18. Inner panel fuse panel ...........................7-65
19. Parking brake pedal...............................5-32
20. Hood release lever.................................4-38
21. AC inverter ...........................................4-152
22. Active ECO ...........................................5-54
23. Seat..........................................................3-2
OXMA013003N
❈ The actual interior in the vehicle may differ from the illustration
XM(FL) CAN(ENG) 2.QXP 1/23/2013 3:21 PM Page 4
Page 92 of 508

Features of your vehicleFolding key . . . . . . . . . . . . . . . . . . . . . . . . . . . . . . . . 4-4• Record your key number . . . . . . . . . . . . . . . . . . . . . . . 4-4
• Key operations . . . . . . . . . . . . . . . . . . . . . . . . . . . . . . . . 4-4
• Transmitter precautions . . . . . . . . . . . . . . . . . . . . . . . . 4-6
• Battery replacement . . . . . . . . . . . . . . . . . . . . . . . . . . . 4-7
• Immobilizer system . . . . . . . . . . . . . . . . . . . . . . . . . . . . 4-8Smart key . . . . . . . . . . . . . . . . . . . . . . . . . . . . . . . . 4-11• Record your key number . . . . . . . . . . . . . . . . . . . . . . 4-11
• Smart key function . . . . . . . . . . . . . . . . . . . . . . . . . . . 4-11
• Loss of the smart key . . . . . . . . . . . . . . . . . . . . . . . . . 4-15
• Smart key precautions . . . . . . . . . . . . . . . . . . . . . . . . 4-15
• Smart key immobilizer system . . . . . . . . . . . . . . . . . . 4-16
• Battery replacement . . . . . . . . . . . . . . . . . . . . . . . . . . 4-18Theft-alarm system . . . . . . . . . . . . . . . . . . . . . . . . 4-19• Armed stage . . . . . . . . . . . . . . . . . . . . . . . . . . . . . . . . . 4-19
• Theft-alarm stage . . . . . . . . . . . . . . . . . . . . . . . . . . . . 4-20
• Disarmed stage. . . . . . . . . . . . . . . . . . . . . . . . . . . . . . . 4-20Door locks . . . . . . . . . . . . . . . . . . . . . . . . . . . . . . . . 4-21• Operating door locks from outside the vehicle . . . . 4-21
• Operating door locks from inside the vehicle . . . . . . 4-22
• Impact sensing door unlock system . . . . . . . . . . . . . . 4-24
• Auto door lock/unlock feature (Automatic transaxle) . 4-24
• Child-protector rear door lock. . . . . . . . . . . . . . . . . . 4-24Tailgate . . . . . . . . . . . . . . . . . . . . . . . . . . . . . . . . . . 4-25\
• Opening the tailgate . . . . . . . . . . . . . . . . . . . . . . . . . . 4-25• Closing the tailgate . . . . . . . . . . . . . . . . . . . . . . . . . . . 4-25
• Power tailgate . . . . . . . . . . . . . . . . . . . . . . . . . . . . . . . 4-26
• Emergency tailgate safety release . . . . . . . . . . . . . . . 4-32
Windows . . . . . . . . . . . . . . . . . . . . . . . . . . . . . . . . 4-33• Power windows . . . . . . . . . . . . . . . . . . . . . . . . . . . . . . 4-34Hood. . . . . . . . . . . . . . . . . . . . . . . . . . . . . . . . . . . . \
. 4-38• Opening the hood . . . . . . . . . . . . . . . . . . . . . . . . . . . . 4-38
• Closing the hood . . . . . . . . . . . . . . . . . . . . . . . . . . . . . 4-38Fuel filler lid . . . . . . . . . . . . . . . . . . . . . . . . . . . . . . 4-40• Opening the fuel filler lid . . . . . . . . . . . . . . . . . . . . . . 4-40
• Closing the fuel filler lid . . . . . . . . . . . . . . . . . . . . . . . 4-40
• Emergency fuel filler lid release . . . . . . . . . . . . . . . . 4-43Panoramic sunroof . . . . . . . . . . . . . . . . . . . . . . . . . 4-44• Sunroof open warning. . . . . . . . . . . . . . . . . . . . . . . . . 4-45
• Sliding the sunroof . . . . . . . . . . . . . . . . . . . . . . . . . . . 4-45
• Tilting the sunroof . . . . . . . . . . . . . . . . . . . . . . . . . . . . 4-46
• Sunshade . . . . . . . . . . . . . . . . . . . . . . . . . . . . . . . . . . . 4-\
47
• Resetting the sunroof . . . . . . . . . . . . . . . . . . . . . . . . . 4-48Steering wheel . . . . . . . . . . . . . . . . . . . . . . . . . . . . . 4-49• Electric power steering (EPS) . . . . . . . . . . . . . . . . . . 4-49
• Tilt and telescopic steering . . . . . . . . . . . . . . . . . . . . 4-50
• Heated steering wheel . . . . . . . . . . . . . . . . . . . . . . . . . 4-51
• Horn . . . . . . . . . . . . . . . . . . . . . . . . . . . . . . . . . . . . \
. . . 4-51
• Flex steer . . . . . . . . . . . . . . . . . . . . . . . . . . . . . . . . . . . 4-\
52
4
XM(FL) CAN(ENG) 4a(~158).QXP 1/23/2013 3:46 PM Page 1
Page 129 of 508

Features of your vehicle38
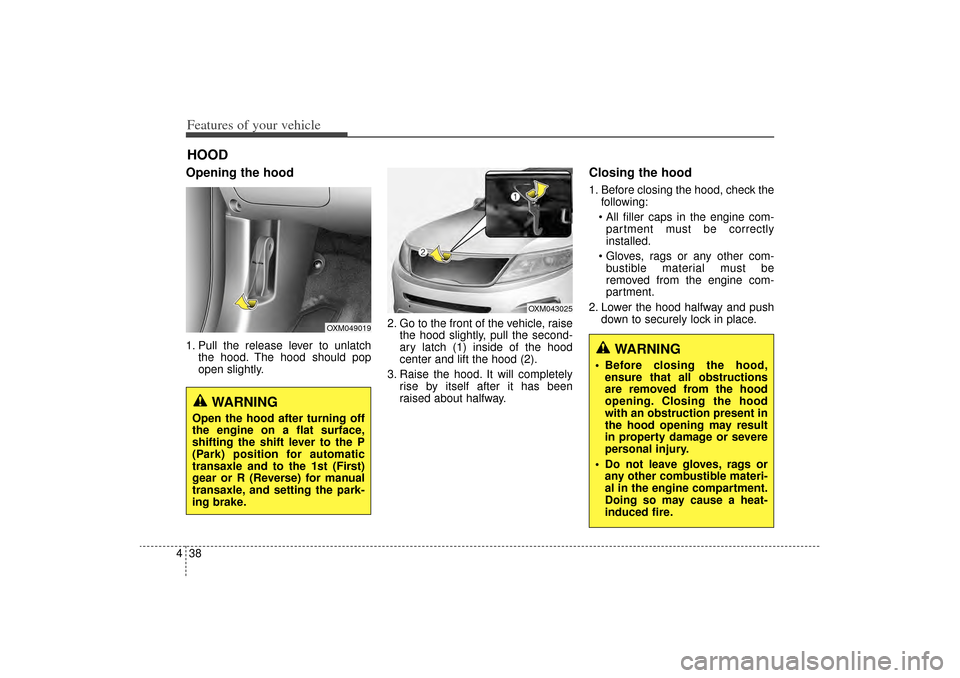
4Opening the hood 1. Pull the release lever to unlatch
the hood. The hood should pop
open slightly. 2. Go to the front of the vehicle, raise
the hood slightly, pull the second-
ary latch (1) inside of the hood
center and lift the hood (2).
3. Raise the hood. It will completely rise by itself after it has been
raised about halfway.
Closing the hood1. Before closing the hood, check thefollowing:
All filler caps in the engine com- partment must be correctly
installed.
Gloves, rags or any other com- bustible material must be
removed from the engine com-
partment.
2. Lower the hood halfway and push down to securely lock in place.
HOOD
OXM049019
OXM043025
WARNING
Open the hood after turning off
the engine on a flat surface,
shifting the shift lever to the P
(Park) position for automatic
transaxle and to the 1st (First)
gear or R (Reverse) for manual
transaxle, and setting the park-
ing brake.
WARNING
Before closing the hood,ensure that all obstructions
are removed from the hood
opening. Closing the hood
with an obstruction present in
the hood opening may result
in property damage or severe
personal injury.
Do not leave gloves, rags or any other combustible materi-
al in the engine compartment.
Doing so may cause a heat-
induced fire.
XM(FL) CAN(ENG) 4a(~158).QXP 1/23/2013 3:47 PM Page 38