fuel KIA Sorento 2016 3.G Workshop Manual
[x] Cancel search | Manufacturer: KIA, Model Year: 2016, Model line: Sorento, Model: KIA Sorento 2016 3.GPages: 565, PDF Size: 10.63 MB
Page 468 of 565
Maintenance
24
7
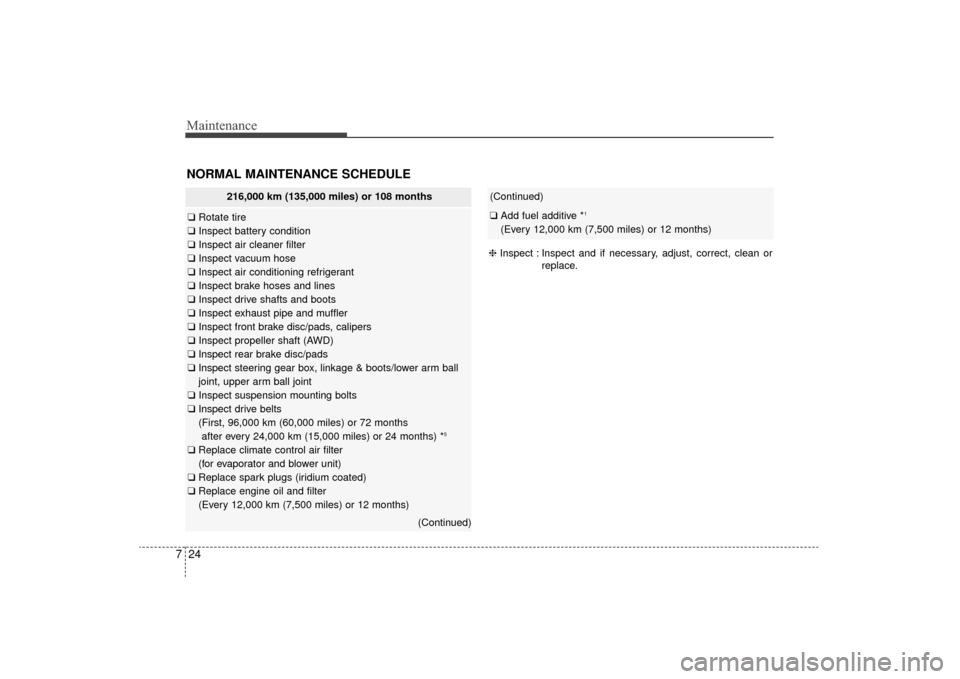
(Continued)
❑ Add fuel additive *1
(Every 12,000 km (7,500 miles) or 12 months)
❈ Inspect : Inspect and if necessary, adjust, correct, clean or
replace.
NORMAL MAINTENANCE SCHEDULE
216,000 km (135,000 miles) or 108 months
❑Rotate tire
❑ Inspect battery condition
❑ Inspect air cleaner filter
❑ Inspect vacuum hose
❑ Inspect air conditioning refrigerant
❑ Inspect brake hoses and lines
❑ Inspect drive shafts and boots
❑ Inspect exhaust pipe and muffler
❑ Inspect front brake disc/pads, calipers
❑ Inspect propeller shaft (AWD)
❑ Inspect rear brake disc/pads
❑ Inspect steering gear box, linkage & boots/lower arm ball
joint, upper arm ball joint
❑ Inspect suspension mounting bolts
❑ Inspect drive belts
(First, 96,000 km (60,000 miles) or 72 months
after every 24,000 km (15,000 miles) or 24 months) *
5
❑ Replace climate control air filter
(for evaporator and blower unit)
❑ Replace spark plugs (iridium coated)
❑ Replace engine oil and filter
(Every 12,000 km (7,500 miles) or 12 months)
(Continued)
UM CAN (ENG) 7.qxp 12/1/2014 1:17 PM Page 24
Page 469 of 565
725
Maintenance
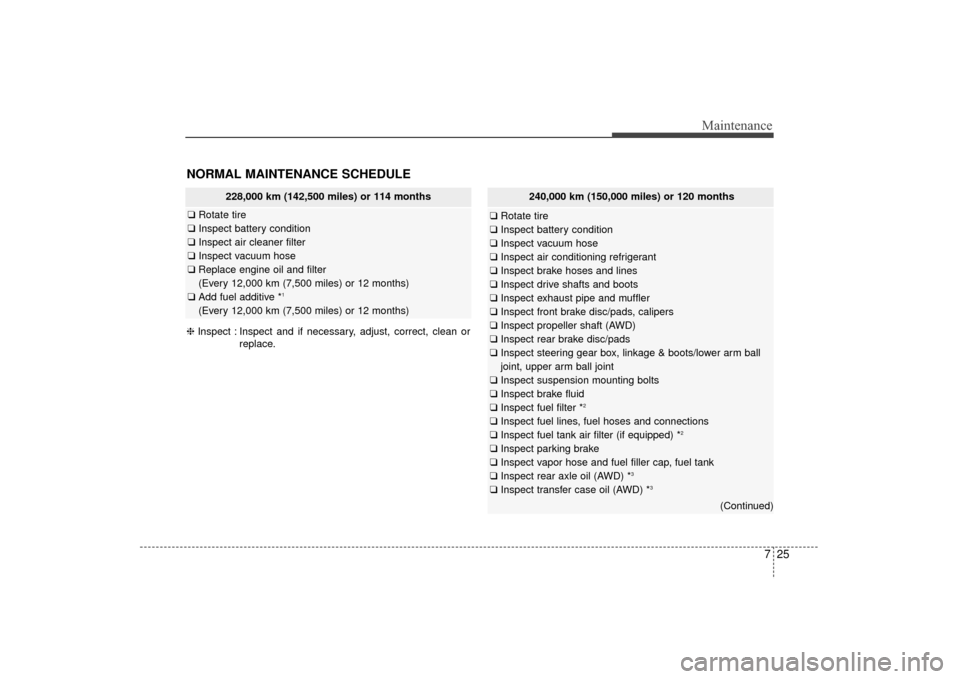
228,000 km (142,500 miles) or 114 months
❑Rotate tire
❑ Inspect battery condition
❑ Inspect air cleaner filter
❑ Inspect vacuum hose
❑ Replace engine oil and filter
(Every 12,000 km (7,500 miles) or 12 months)
❑ Add fuel additive *
1
(Every 12,000 km (7,500 miles) or 12 months)
NORMAL MAINTENANCE SCHEDULE
❈ Inspect : Inspect and if necessary, adjust, correct, clean or
replace.
240,000 km (150,000 miles) or 120 months
❑Rotate tire
❑ Inspect battery condition
❑ Inspect vacuum hose
❑ Inspect air conditioning refrigerant
❑ Inspect brake hoses and lines
❑ Inspect drive shafts and boots
❑ Inspect exhaust pipe and muffler
❑ Inspect front brake disc/pads, calipers
❑ Inspect propeller shaft (AWD)
❑ Inspect rear brake disc/pads
❑ Inspect steering gear box, linkage & boots/lower arm ball
joint, upper arm ball joint
❑ Inspect suspension mounting bolts
❑ Inspect brake fluid
❑ Inspect fuel filter *
2
❑Inspect fuel lines, fuel hoses and connections
❑ Inspect fuel tank air filter (if equipped) *2
❑Inspect parking brake
❑ Inspect vapor hose and fuel filler cap, fuel tank
❑ Inspect rear axle oil (AWD) *
3
❑Inspect transfer case oil (AWD) *3
(Continued)
UM CAN (ENG) 7.qxp 12/1/2014 1:17 PM Page 25
Page 470 of 565
Maintenance
26
7
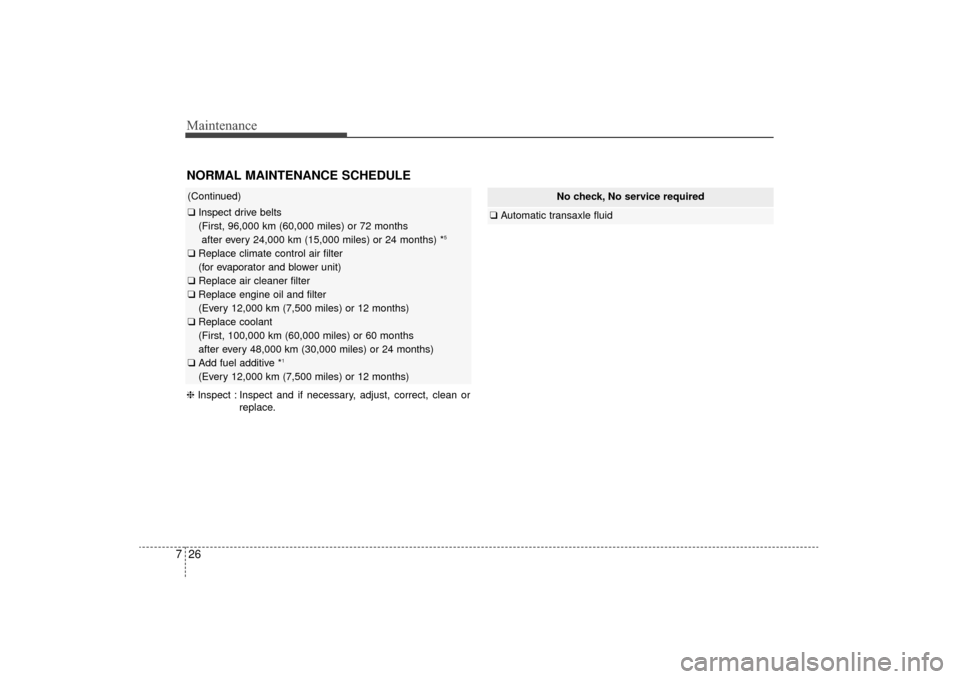
NORMAL MAINTENANCE SCHEDULE
No check, No service required
❑ Automatic transaxle fluid
(Continued)
❑Inspect drive belts
(First, 96,000 km (60,000 miles) or 72 months
after every 24,000 km (15,000 miles) or 24 months) *
5
❑ Replace climate control air filter
(for evaporator and blower unit)
❑ Replace air cleaner filter
❑ Replace engine oil and filter
(Every 12,000 km (7,500 miles) or 12 months)
❑ Replace coolant
(First, 100,000 km (60,000 miles) or 60 months
after every 48,000 km (30,000 miles) or 24 months)
❑ Add fuel additive *
1
(Every 12,000 km (7,500 miles) or 12 months)
❈ Inspect : Inspect and if necessary, adjust, correct, clean or
replace.
UM CAN (ENG) 7.qxp 12/1/2014 1:17 PM Page 26
Page 473 of 565
729
Maintenance
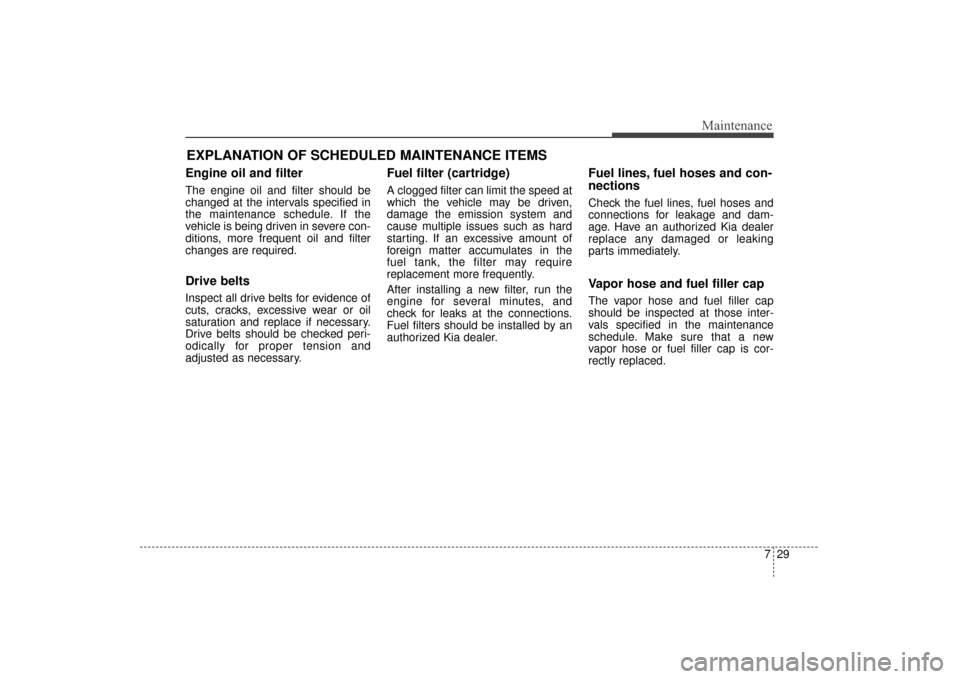
EXPLANATION OF SCHEDULED MAINTENANCE ITEMS
Engine oil and filter
The engine oil and filter should be
changed at the intervals specified in
the maintenance schedule. If the
vehicle is being driven in severe con-
ditions, more frequent oil and filter
changes are required.
Drive belts
Inspect all drive belts for evidence of
cuts, cracks, excessive wear or oil
saturation and replace if necessary.
Drive belts should be checked peri-
odically for proper tension and
adjusted as necessary.
Fuel filter (cartridge)
A clogged filter can limit the speed at
which the vehicle may be driven,
damage the emission system and
cause multiple issues such as hard
starting. If an excessive amount of
foreign matter accumulates in the
fuel tank, the filter may require
replacement more frequently.
After installing a new filter, run the
engine for several minutes, and
check for leaks at the connections.
Fuel filters should be installed by an
authorized Kia dealer.
Fuel lines, fuel hoses and con-
nections
Check the fuel lines, fuel hoses and
connections for leakage and dam-
age. Have an authorized Kia dealer
replace any damaged or leaking
parts immediately.
Vapor hose and fuel filler cap
The vapor hose and fuel filler cap
should be inspected at those inter-
vals specified in the maintenance
schedule. Make sure that a new
vapor hose or fuel filler cap is cor-
rectly replaced.
UM CAN (ENG) 7.qxp 12/1/2014 1:17 PM Page 29
Page 494 of 565
Maintenance
50
7
TIRES AND WHEELS
Tire care
For proper maintenance, safety, and
maximum fuel economy, you must
always maintain recommended tire
inflation pressures and stay within
the load limits and weight distribution
recommended for your vehicle.
Recommended cold tire infla-
tion pressures
All tire pressures (including the
spare) should be checked when the
tires are cold. “Cold Tires” means the
vehicle has not been driven for at
least three hours or driven less than
1.6 km (one mile).
Recommended pressures must be
maintained for the best ride, vehicle
handling, and minimum tire wear.
For recommended inflation pressure,
refer to “Tire and wheels” in chapter
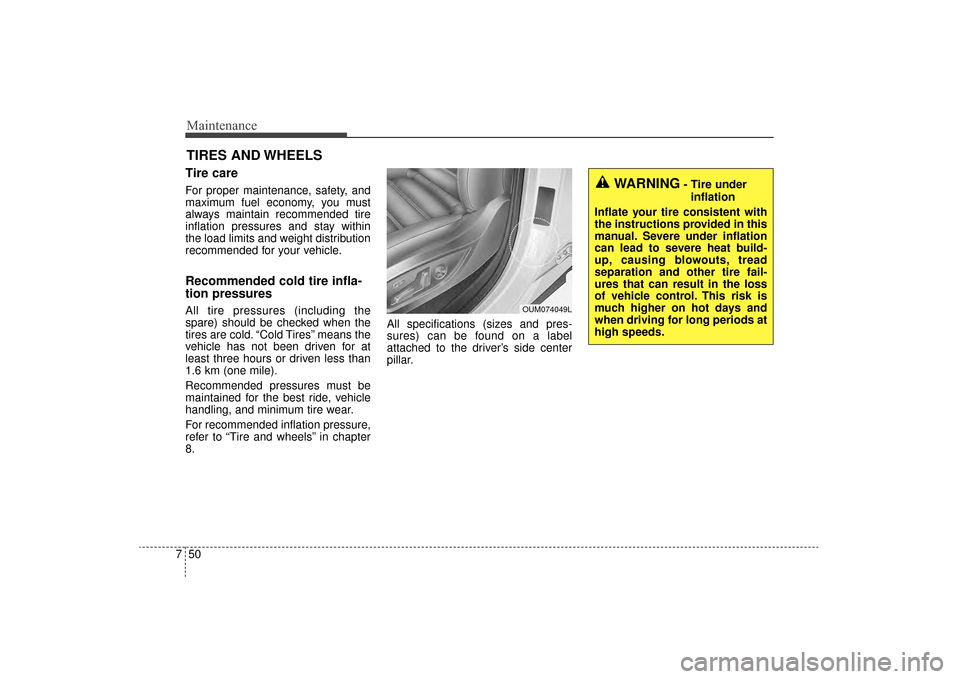
8. All specifications (sizes and pres-
sures) can be found on a label
attached to the driver’s side center
pillar.
WARNING- Tire under
inflation
Inflate your tire consistent with
the instructions provided in this
manual. Severe under inflation
can lead to severe heat build-
up, causing blowouts, tread
separation and other tire fail-
ures that can result in the loss
of vehicle control. This risk is
much higher on hot days and
when driving for long periods at
high speeds.
OUM074049L
UM CAN (ENG) 7.qxp 12/1/2014 1:18 PM Page 50
Page 495 of 565
751
Maintenance
Underinflation also results inexcessive wear, poor handling and
reduced fuel economy. Wheel
deformation also is possible. Keep
your tire pressures at the proper
levels. If a tire frequently needs
refilling, have it checked by an
authorized Kia dealer.
Overinflation produces a harsh ride, excessive wear at the center
of the tire tread, and a greater pos-
sibility of damage from road haz-
ards.
Warm tires normally exceed rec- ommended cold tire pressures by
28 to 41 kPa (4 to 6 psi). Do not
release air from warm tires to
adjust the pressure or the tires will
be underinflated.
Be sure to reinstall the tire inflation valve caps. Without the valve cap,
dirt or moisture could get into the
valve core and cause air leakage. If
a valve cap is missing, install a
new one as soon as possible.Tire pressure
Always observe the following:
Check tire pressure when the tiresare cold. (After vehicle has been
parked for at least three hours or
hasn't been driven more than 1.6
km (one mile) since startup.)
Check the pressure of your spare tire each time you check the pres-
sure of other tires.
Never overload your vehicle. Be careful not to overload a vehicle
luggage rack if your vehicle is
equipped with one.
Checking tire inflation pres-
sure
Check your tires once a month or
more.
Also, check the tire pressure of the
spare tire.
How to check
Use a good quality gauge to check
tire pressure. You cannot tell if your
tires are properly inflated simply by
looking at them. Radial tires may
look properly inflated even when
they're underinflated.
Check the tire's inflation pressure
when the tires are cold. - "Cold"
means your vehicle has been sitting
for at least three hours or driven no
more than 1.6 km (1 mile).
UM CAN (ENG) 7.qxp 12/1/2014 1:18 PM Page 51
Page 504 of 565
Maintenance
60
7
Cold Tire Pressure: The amount of
air pressure in a tire, measured in
pounds per square inch (psi) or kilo-
pascals (kPa) before a tire has built
up heat from driving.
Curb Weight: This means the weight
of a motor vehicle with standard and
optional equipment including the
maximum capacity of fuel, oil and
coolant, but without passengers and
cargo.
DOT Markings: The DOT code
includes the Tire Identification
Number (TIN), an alphanumeric des-
ignator which can also identify the
tire manufacturer, production plant,
brand and date of production.
GVWR: Gross Vehicle Weight Rating
GAWR FRT: Gross Axle Weight
Rating for the Front Axle.
GAWR RR: Gross Axle Weight
Rating for the Rear axle. Intended Outboard Sidewall
: The
side of an asymmetrical tire, that
must always face outward when
mounted on a vehicle.
Kilopascal (kPa): The metric unit for
air pressure.
Load Index: An assigned number
ranging from 1 to 279 that corre-
sponds to the load carrying capacity
of a tire.
Maximum Inflation Pressure: The
maximum air pressure to which a
cold tire may be inflated. The maxi-
mum air pressure is molded onto the
sidewall.
Maximum Load Rating : The load
rating for a tire at the maximum per-
missible inflation pressure for that
tire.
Maximum Loaded Vehicle Weight:
The sum of curb weight; accessory
weight; vehicle capacity weight; and
production options weight. Normal Occupant Weight:The
number of occupants a vehicle is
designed to seat multiplied by 68 kg
(150 pounds).
Occupant Distribution
: Designated
seating positions.
Outward Facing Sidewall: The side
of a asymmetrical tire that has a par-
ticular side that faces outward when
mounted on a vehicle. The outward
facing sidewall bears white lettering
or bears manufacturer, brand, and/or
model name molding that is higher or
deeper than the same moldings on
the inner facing sidewall.
Passenger (P-Metric) Tire : A tire
used on passenger cars and some
light duty trucks and multipurpose
vehicles.
Recommended Inflation Pressure :
Vehicle manufacturer's recommend-
ed tire inflation pressure and shown
on the tire placard.
UM CAN (ENG) 7.qxp 12/1/2014 1:18 PM Page 60
Page 517 of 565
773
Maintenance
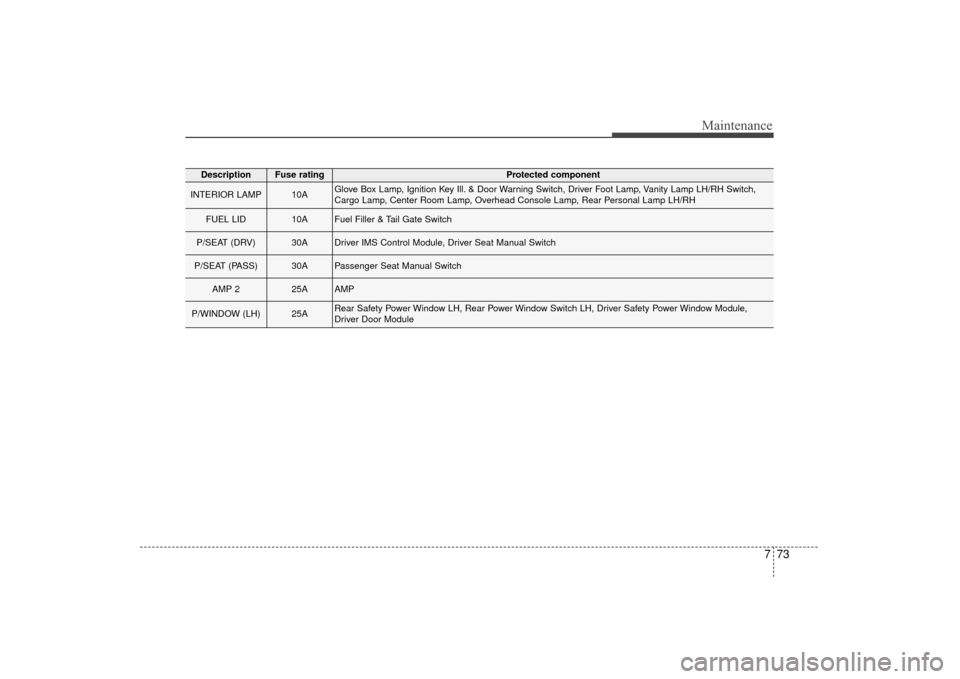
DescriptionFuse ratingProtected component
INTERIOR LAMP 10AGlove Box Lamp, Ignition Key Ill. & Door Warning Switch, Driver Foot Lamp, Vanity Lamp LH/RH Switch,
Cargo Lamp, Center Room Lamp, Overhead Console Lamp, Rear Personal Lamp LH/RH
FUEL LID 10AFuel Filler & Tail Gate Switch
P/SEAT (DRV) 30ADriver IMS Control Module, Driver Seat Manual Switch
P/SEAT (PASS) 30APassenger Seat Manual Switch
AMP 2 25AAMP
P/WINDOW (LH) 25ARear Safety Power Window LH, Rear Power Window Switch LH, Driver Safety Power Window Module,
Driver Door Module
UM CAN (ENG) 7.qxp 12/1/2014 1:19 PM Page 73
Page 522 of 565
![KIA Sorento 2016 3.G Workshop Manual Maintenance
78
7
DescriptionFuse ratingProtected component
POWER
OUTLET 3 20ARear Power Outlet
SENSOR 1 20A[G4KJ/G4KH] Ignition Coil #1/#2/#3/#4 [G6DF] Ignition Coil #1/#2/#3/#4/#\
5/#6, Condecser #](/img/2/2978/w960_2978-521.png "KIA Sorento 2016 3.G Workshop Manual Maintenance
78
7
DescriptionFuse ratingProtected component
POWER
OUTLET 3 20ARear Power Outlet
SENSOR 1 20A[G4KJ/G4KH] Ignition Coil #1/#2/#3/#4 [G6DF] Ignition Coil #1/#2/#3/#4/#\
5/#6, Condecser #")
Maintenance
78
7
DescriptionFuse ratingProtected component
POWER
OUTLET 3 20ARear Power Outlet
SENSOR 1 20A[G4KJ/G4KH] Ignition Coil #1/#2/#3/#4 [G6DF] Ignition Coil #1/#2/#3/#4/#\
5/#6, Condecser #1/#2
SENSOR 3 10A[G4KJ/G4KH] Fuel Pump Relay [G6DF] Fuel Pump Relay, PCM
POWER
OUTLET 4 20ALuggage Power Outlet
REAR
HEATED 40ARear Defogger Relay
SENSOR 2 10A
[G4KJ/G4KH] E/R Junction Block (Cooling Fan 1 Relay), Oil Control Valve (Exhaust), Purge Control Solenoid Valve, Canister Close Valve, Variable Intake Solenoid Valve, RCV Control Solenoid Valve (G4KH)
[G6DH] E/R Junction Block (Cooling Fan 1 Relay), Variable Intake Solenoid Valve #1/#2, Purge Control Solenoid Valve, Oil Control Valve #1/#2/#3/#4 (Intake/Exhaust), PCM, Canister close valve
FUEL PUMP 20AFuel Pump Relay
HORN 15AHorn Relay
B/ALARMHORN 10ABurglar Alarm Horn Relay
UM CAN (ENG) 7.qxp 12/1/2014 1:19 PM Page 78
Page 537 of 565
793
Maintenance
Finish damage repair
Deep scratches or stone chips in the
painted surface must be repaired
promptly. Exposed metal will quickly
rust and may develop into a major
repair expense.
If your vehicle is damaged and
requires any metal repair or replace-
ment, be sure the body shop applies
anti-corrosion materials to the parts
repaired or replaced.
Bright-metal maintenance
To remove road tar and insects,use a tar remover, not a scraper or
other sharp object.
To protect the surfaces of bright- metal parts from corrosion, apply a
coating of wax or chrome preser-
vative and rub to a high luster.
During winter weather or in coastal areas, cover the bright metal parts
with a heavier coating of wax or
preservative. If necessary, coat the
parts with non-corrosive petroleum
jelly or other protective compound.
Underbody maintenance
Corrosive materials used for ice and
snow removal and dust control may
collect on the underbody. If these
materials are not removed, acceler-
ated rusting can occur on underbody
parts such as the fuel lines, frame,
floor pan and exhaust system, even
though they have been treated with
rust protection.
Thoroughly flush the vehicle under-
body and wheel openings with luke-
warm or cold water once a month,
after off-road driving and at the end
of each winter. Pay special attention
to these areas because it is difficult
to see all the mud and dirt. It will do
more harm than good to wet down
the road grime without removing it.
The lower edges of the doors, rocker
panels, and frame members have
drain holes that should not be
allowed to clog with dirt; trapped
water in these areas can cause rust-
ing.
UM CAN (ENG) 7.qxp 12/1/2014 1:20 PM Page 93