instrument cluster KIA Sorento 2016 3.G Owner's Manual
[x] Cancel search | Manufacturer: KIA, Model Year: 2016, Model line: Sorento, Model: KIA Sorento 2016 3.GPages: 565, PDF Size: 10.63 MB
Page 14 of 565
25
Your vehicle at a glance
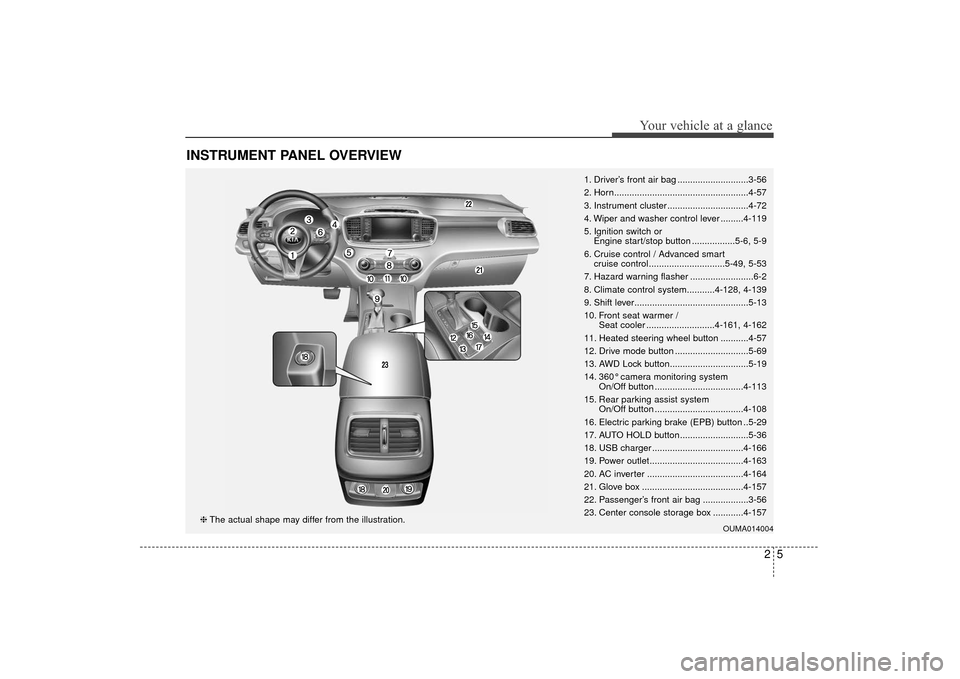
INSTRUMENT PANEL OVERVIEW
1. Driver’s front air bag ............................3-56
2. Horn.....................................................4-57
3. Instrument cluster ................................4-72
4. Wiper and washer control lever .........4-119
5. Ignition switch or Engine start/stop button .................5-6, 5-9
6. Cruise control / Advanced smart cruise control..............................5-49, 5-53
7. Hazard warning flasher .........................6-2
8. Climate control system...........4-128, 4-139
9. Shift lever.............................................5-13
10. Front seat warmer / Seat cooler ...........................4-161, 4-162
11. Heated steering wheel button ...........4-57
12. Drive mode button .............................5-69
13. AWD Lock button...............................5-19
14. 360° camera monitoring system On/Off button ...................................4-113
15. Rear parking assist system On/Off button ...................................4-108
16. Electric parking brake (EPB) button ..5-29
17. AUTO HOLD button...........................5-36
18. USB charger ....................................4-166
19. Power outlet.....................................4-163
20. AC inverter ......................................4-164
21. Glove box ........................................4-157
22. Passenger’s front air bag ..................3-56
23. Center console storage box ............4-157
OUMA014004❈ The actual shape may differ from the illustration.
UM CAN (ENG) 2.qxp 12/1/2014 11:50 AM Page 5
Page 86 of 565
Steering wheel . . . . . . . . . . . . . . . . . . . . . . . . . . . . . 4-55
• Electric power steering (EPS) . . . . . . . . . . . . . . . . . . 4-55
• Tilt and telescopic steering . . . . . . . . . . . . . . . . . . . . 4-56
• Heated steering wheel . . . . . . . . . . . . . . . . . . . . . . . . . 4-57
• Horn . . . . . . . . . . . . . . . . . . . . . . . . . . . . . . . . . . . . \
. . . 4-57
Mirrors . . . . . . . . . . . . . . . . . . . . . . . . . . . . . . . . . . 4-58\
• Inside rearview mirror . . . . . . . . . . . . . . . . . . . . . . . . 4-58
• Outside rearview mirror. . . . . . . . . . . . . . . . . . . . . . . 4-68
Instrument cluster . . . . . . . . . . . . . . . . . . . . . . . . . 4-72
• Instrument cluster control . . . . . . . . . . . . . . . . . . . . . 4-73
• LCD display control . . . . . . . . . . . . . . . . . . . . . . . . . . 4-73
• Gauges . . . . . . . . . . . . . . . . . . . . . . . . . . . . . . . . . . . . \
. 4-74
• Transaxle shift indicator . . . . . . . . . . . . . . . . . . . . . . . 4-77
• Icy Road Warning Indicator . . . . . . . . . . . . . . . . . . . 4-77
LCD display . . . . . . . . . . . . . . . . . . . . . . . . . . . . . . 4-78
• LCD modes. . . . . . . . . . . . . . . . . . . . . . . . . . . . . . . . . .\
4-78
Trip modes (trip computer). . . . . . . . . . . . . . . . . . 4-79
• Trip Modes . . . . . . . . . . . . . . . . . . . . . . . . . . . . . . . . . . 4-79\
• Fuel Economy . . . . . . . . . . . . . . . . . . . . . . . . . . . . . . . 4-79
• Trip A/B . . . . . . . . . . . . . . . . . . . . . . . . . . . . . . . . . . . . \
4-81
• Digital speedometer . . . . . . . . . . . . . . . . . . . . . . . . . . . 4-82
• One time driving information mode . . . . . . . . . . . . . 4-82
• Turn by turn mode . . . . . . . . . . . . . . . . . . . . . . . . . . . 4-83
• ASCC/LDWS mode . . . . . . . . . . . . . . . . . . . . . . . . . . . 4-83
• A/V mode . . . . . . . . . . . . . . . . . . . . . . . . . . . . . . . . . . . 4-\
83• Service mode . . . . . . . . . . . . . . . . . . . . . . . . . . . . . . . . 4-84
• User settings mode. . . . . . . . . . . . . . . . . . . . . . . . . . . . 4-85
• Warning messages . . . . . . . . . . . . . . . . . . . . . . . . . . . . 4-89
Warning and indicator lights . . . . . . . . . . . . . . . . 4-96
• Warning lights . . . . . . . . . . . . . . . . . . . . . . . . . . . . . . . 4-96
• Indicator lights. . . . . . . . . . . . . . . . . . . . . . . . . . . . . . 4-104
Rear parking assist system . . . . . . . . . . . . . . . . . 4-108
• Operation of the rear parking assist system . . . . . . 4-108
• Non-operational conditions of
rear parking assist system . . . . . . . . . . . . . . . . . . . 4-109
• Rear parking assist system precautions . . . . . . . . . 4-110
• Self-diagnosis . . . . . . . . . . . . . . . . . . . . . . . . . . . . . . . 4-111
Rearview camera . . . . . . . . . . . . . . . . . . . . . . . . . 4-112
360° camera monitoring system . . . . . . . . . . . . . 4-113
Lighting . . . . . . . . . . . . . . . . . . . . . . . . . . . . . . . . . 4-114
• Battery saver function . . . . . . . . . . . . . . . . . . . . . . . . 4-114
• Daytime running light . . . . . . . . . . . . . . . . . . . . . . . . 4-114
• Lighting control . . . . . . . . . . . . . . . . . . . . . . . . . . . . . 4-114
• High beam operation . . . . . . . . . . . . . . . . . . . . . . . . . 4-116
• Turn signals and lane change signals. . . . . . . . . . . . 4-117
• Front fog light . . . . . . . . . . . . . . . . . . . . . . . . . . . . . . 4-117
• Check headlight . . . . . . . . . . . . . . . . . . . . . . . . . . . . 4-118
Wipers and washers . . . . . . . . . . . . . . . . . . . . . . . 4-119
• Windshield wipers . . . . . . . . . . . . . . . . . . . . . . . . . . 4-119
• Front windshield washers . . . . . . . . . . . . . . . . . . . . . 4-121
4
UM CAN (ENG) 4.qxp 12/1/2014 12:49 PM Page 2
Page 139 of 565
455
Features of your vehicle
Electric power steering (EPS)
The power steering uses a motor to
assist you in steering the vehicle. If
the engine is off or if the power steer-
ing system becomes inoperative, the
vehicle may still be steered, but it will
require increased steering effort.
The motor driven power steering is
controlled by a power steering con-
trol unit which senses the steering
wheel torque and vehicle speed to
command the motor.
The steering becomes heavier as
the vehicle’s speed increases and
becomes lighter as the vehicle’s
speed decreases for optimum steer-
ing control.
Should you notice any change in the
effort required to steer during normal
vehicle operation, have the power
steering checked by an authorized
Kia dealer. If the Electric Power Steering
System does not operate normally,
the warning light will illuminate on
the instrument cluster. The steering
wheel may require increased
steering effort. Take your vehicle to
an authorized Kia dealer and have
the vehicle checked as soon as
possible.
When you operate the steering wheel in low temperature, noise
may occur. If temperature rises, the
noise will likely disappear. This is a
normal condition.
When the vehicle is stationary, and the steering wheel is turned all the
way to the left or right continuous-
ly, the steering wheel becomes
harder to turn. The power assist is
limited to protect the motor from
overheating.
As time passes, the steering wheel
will return to its normal condition.
✽ ✽ NOTICE
The following symptoms may occur
during normal vehicle operation:
• The EPS warning light does not
illuminate.
• The steering gets heavy immedi- ately after turning the ignition
switch on. This happens as the sys-
tem performs the EPS system
diagnostics. When the diagnostics
are completed, the steering wheel
will return to its normal condition.
• A click noise may be heard from the EPS relay after the ignition
switch is turned to the ON or
LOCK (OFF) position.
• A motor noise may be heard when the vehicle is at a stop or at a low
driving speed.
• If the Electric Power Steering System does not operate normally,
the warning light will illuminate on
the instrument cluster. The steer-
ing wheel may become difficult to
control or operate abnormally.
Take your vehicle to an authorized
Kia dealer and have the vehicle
checked as soon as possible. (Continued)
STEERING WHEEL
UM CAN (ENG) 4.qxp 12/1/2014 12:52 PM Page 55
Page 156 of 565
Features of your vehicle
72
4
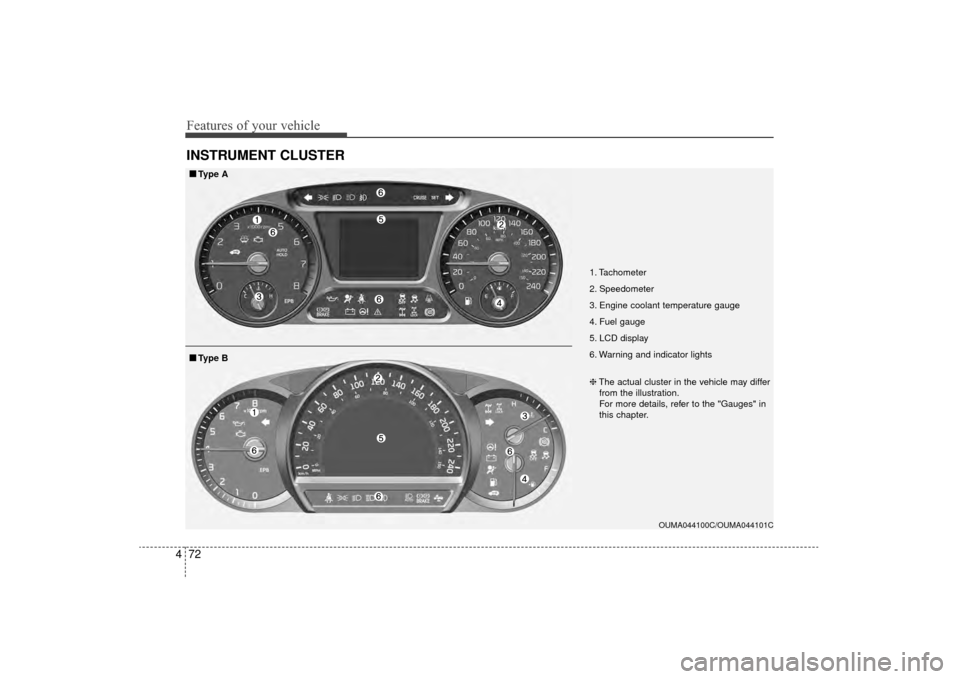
INSTRUMENT CLUSTER
1. Tachometer
2. Speedometer
3. Engine coolant temperature gauge
4. Fuel gauge
5. LCD display
6. Warning and indicator lights
OUMA044100C/OUMA044101C
■
■
Type A
❈The actual cluster in the vehicle may differ
from the illustration.
For more details, refer to the "Gauges" in
this chapter.
■
■ Type B
UM CAN (ENG) 4.qxp 12/1/2014 12:53 PM Page 72
Page 157 of 565
473
Features of your vehicle
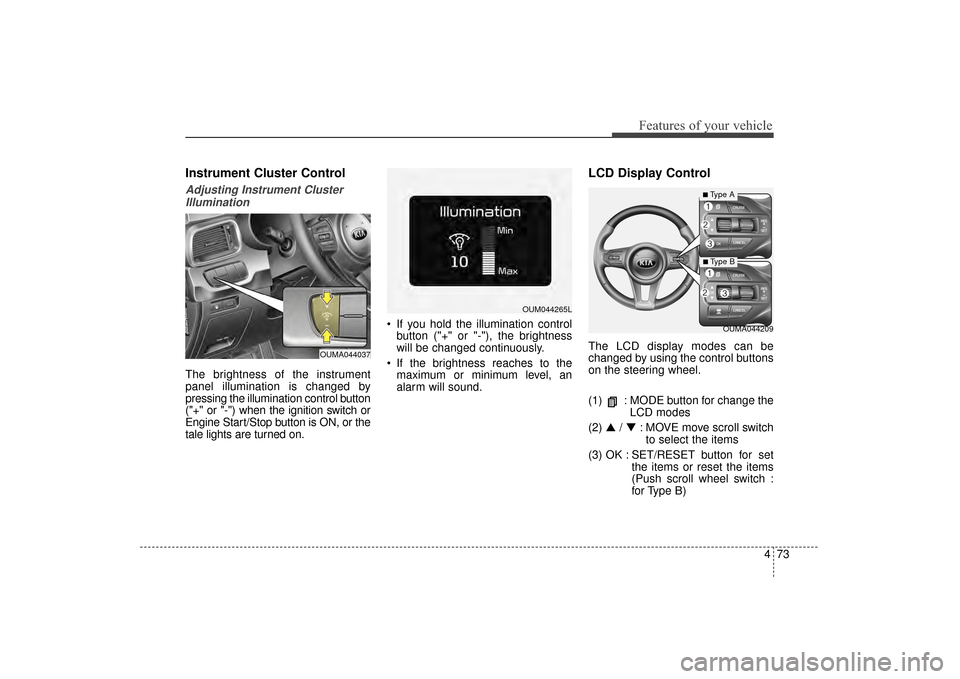
Instrument Cluster Control
Adjusting Instrument ClusterIllumination
The brightness of the instrument
panel illumination is changed by
pressing the illumination control button
("+" or "-") when the ignition switch or
Engine Start/Stop button is ON, or the
tale lights are turned on. If you hold the illumination control
button ("+" or "-"), the brightness
will be changed continuously.
If the brightness reaches to the maximum or minimum level, an
alarm will sound.
LCD Display Control
The LCD display modes can be
changed by using the control buttons
on the steering wheel.
(1) : MODE button for change the LCD modes
(2) ▲ /▼ : MOVE move scroll switch
to select the items
(3) OK : SET/RESET button for set the items or reset the items
(Push scroll wheel switch :
for Type B)
OUMA044209
OUM044265L
OUMA044037
■Type A
■ Type B
UM CAN (ENG) 4.qxp 12/1/2014 12:53 PM Page 73
Page 356 of 565
545
Driving your vehicle
Vehicle stability management
(VSM) (if equipped)
This system provides further
enhancements to vehicle stability
and steering responses when a vehi-
cle is driving on a slippery road or a
vehicle detects changes in coeffi-
cient of friction between right wheels
and left wheels when braking.
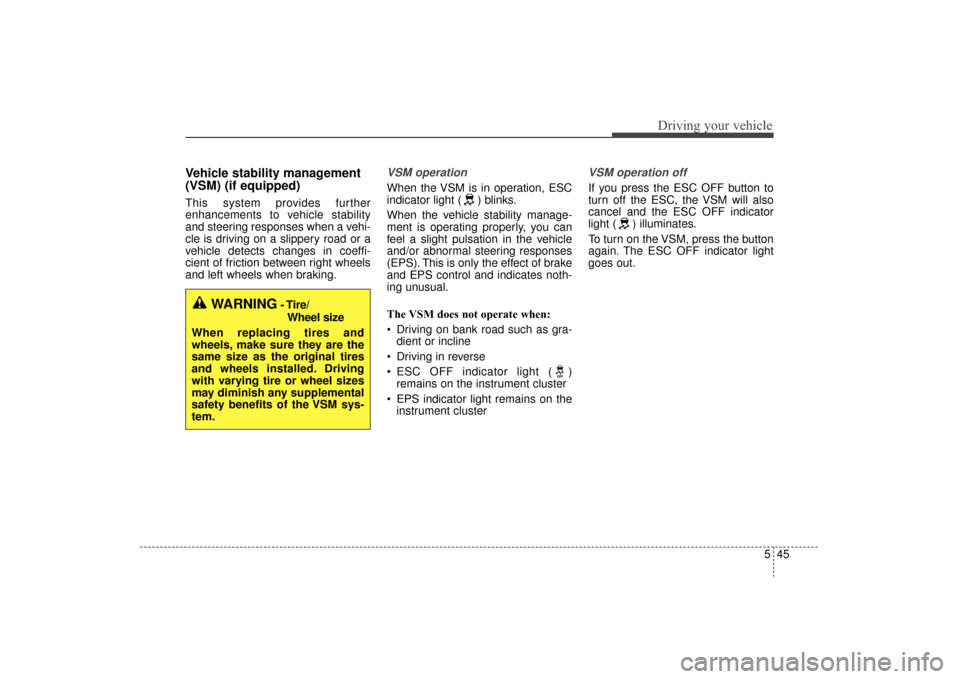
VSM operation
When the VSM is in operation, ESC
indicator light ( ) blinks.
When the vehicle stability manage-
ment is operating properly, you can
feel a slight pulsation in the vehicle
and/or abnormal steering responses
(EPS). This is only the effect of brake
and EPS control and indicates noth-
ing unusual.
The VSM does not operate when:
Driving on bank road such as gra-dient or incline
Driving in reverse
ESC OFF indicator light ( ) remains on the instrument cluster
EPS indicator light remains on the instrument cluster
VSM operation off
If you press the ESC OFF button to
turn off the ESC, the VSM will also
cancel and the ESC OFF indicator
light ( ) illuminates.
To turn on the VSM, press the button
again. The ESC OFF indicator light
goes out.
WARNING- Tire/
Wheel size
When replacing tires and
wheels, make sure they are the
same size as the original tires
and wheels installed. Driving
with varying tire or wheel sizes
may diminish any supplemental
safety benefits of the VSM sys-
tem.
UM CAN (ENG) 5.QXP 12/1/2014 1:03 PM Page 45
Page 361 of 565
Driving your vehicle
50
5
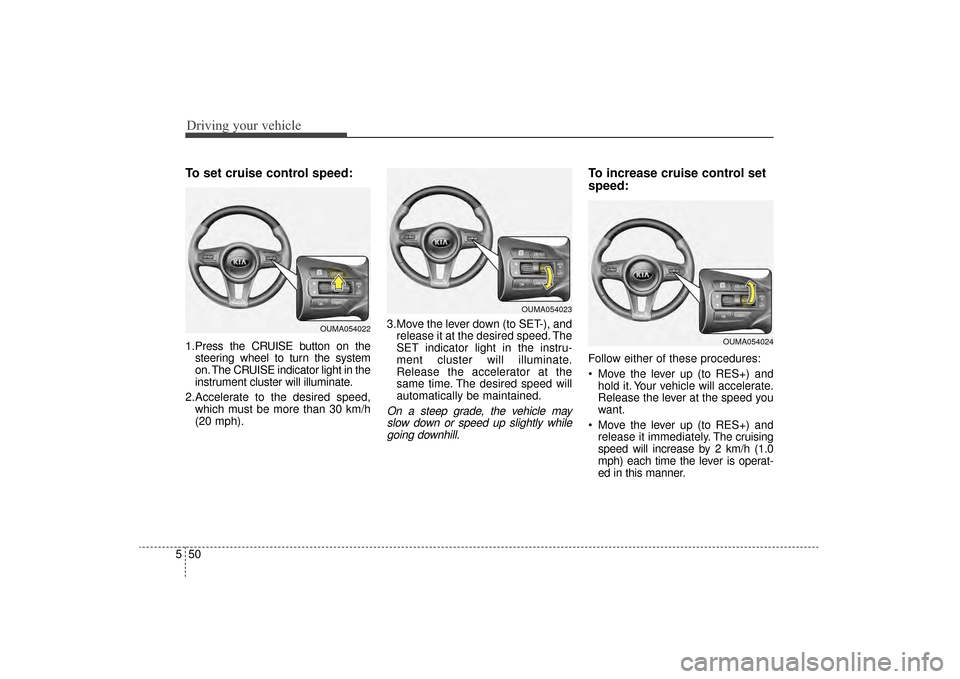
To set cruise control speed:
1.Press the CRUISE button on the
steering wheel to turn the system
on. The CRUISE indicator light in the
instrument cluster will illuminate.
2.Accelerate to the desired speed, which must be more than 30 km/h
(20 mph). 3.Move the lever down (to SET-), and
release it at the desired speed. The
SET indicator light in the instru-
ment cluster will illuminate.
Release the accelerator at the
same time. The desired speed will
automatically be maintained.
On a steep grade, the vehicle mayslow down or speed up slightly whilegoing downhill.
To increase cruise control set
speed:
Follow either of these procedures:
Move the lever up (to RES+) and hold it. Your vehicle will accelerate.
Release the lever at the speed you
want.
Move the lever up (to RES+) and release it immediately. The cruising
speed will increase by 2 km/h (1.0
mph) each time the lever is operat-
ed in this manner.
OUMA054022
OUMA054023
OUMA054024
UM CAN (ENG) 5.QXP 12/1/2014 1:04 PM Page 50
Page 363 of 565
Driving your vehicle
52
5
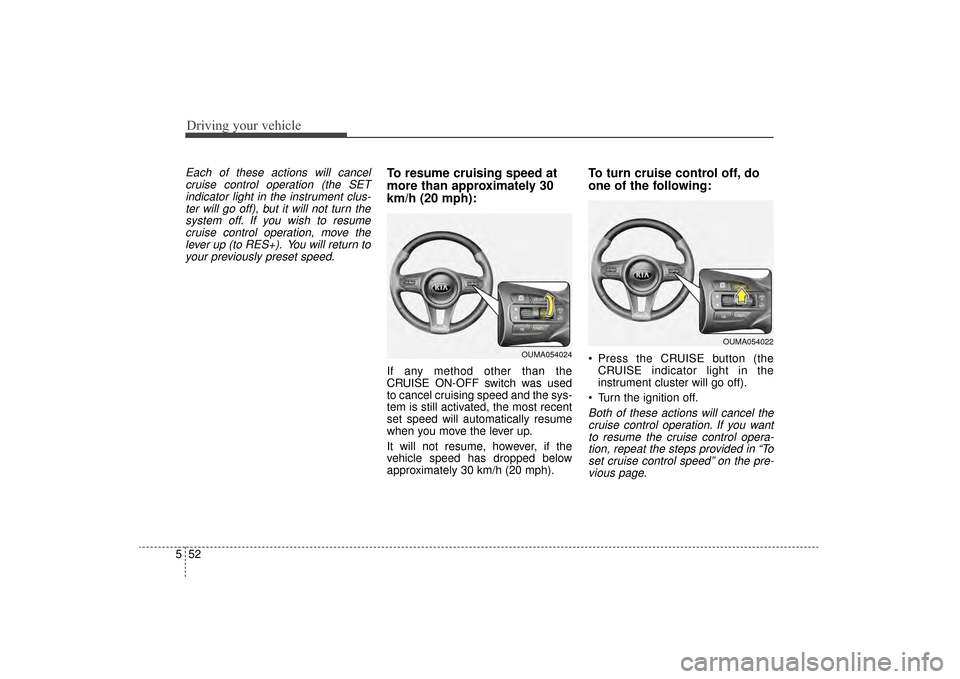
Each of these actions will cancel
cruise control operation (the SETindicator light in the instrument clus-ter will go off), but it will not turn thesystem off. If you wish to resumecruise control operation, move thelever up (to RES+). You will return toyour previously preset speed.To resume cruising speed at
more than approximately 30
km/h (20 mph):
If any method other than the
CRUISE ON-OFF switch was used
to cancel cruising speed and the sys-
tem is still activated, the most recent
set speed will automatically resume
when you move the lever up.
It will not resume, however, if the
vehicle speed has dropped below
approximately 30 km/h (20 mph).
To turn cruise control off, do
one of the following:
Press the CRUISE button (the CRUISE indicator light in the
instrument cluster will go off).
Turn the ignition off.
Both of these actions will cancel the cruise control operation. If you wantto resume the cruise control opera-tion, repeat the steps provided in “Toset cruise control speed” on the pre-vious page.
OUMA054024
OUMA054022
UM CAN (ENG) 5.QXP 12/1/2014 1:04 PM Page 52
Page 364 of 565
553
Driving your vehicle
ADVANCED SMART CRUISE CONTROL SYSTEM (ASCC) (IF EQUIPPED)
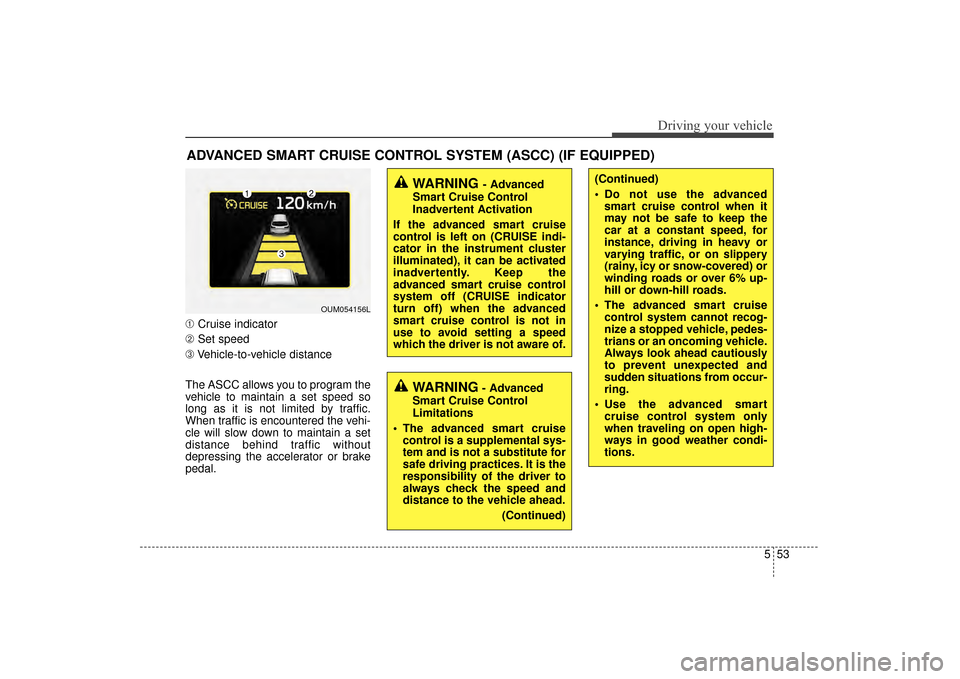
➀Cruise indicator
➁ Set speed
➂ Vehicle-to-vehicle distance
The ASCC allows you to program the
vehicle to maintain a set speed so
long as it is not limited by traffic.
When traffic is encountered the vehi-
cle will slow down to maintain a set
distance behind traffic without
depressing the accelerator or brake
pedal.
WARNING - Advanced
Smart Cruise Control
Inadvertent Activation
If the advanced smart cruise
control is left on (CRUISE indi-
cator in the instrument cluster
illuminated), it can be activated
inadvertently. Keep the
advanced smart cruise control
system off (CRUISE indicator
turn off) when the advanced
smart cruise control is not in
use to avoid setting a speed
which the driver is not aware of.
WARNING- Advanced
Smart Cruise Control
Limitations
The advanced smart cruise control is a supplemental sys-
tem and is not a substitute for
safe driving practices. It is the
responsibility of the driver to
always check the speed and
distance to the vehicle ahead.
(Continued)
OUM054156L
(Continued)
Do not use the advancedsmart cruise control when it
may not be safe to keep the
car at a constant speed, for
instance, driving in heavy or
varying traffic, or on slippery
(rainy, icy or snow-covered) or
winding roads or over 6% up-
hill or down-hill roads.
The advanced smart cruise control system cannot recog-
nize a stopped vehicle, pedes-
trians or an oncoming vehicle.
Always look ahead cautiously
to prevent unexpected and
sudden situations from occur-
ring.
Use the advanced smart cruise control system only
when traveling on open high-
ways in good weather condi-
tions.
UM CAN (ENG) 5.QXP 12/1/2014 1:04 PM Page 53
Page 365 of 565
Driving your vehicle
54
5
Speed setting (ASCC)
To set cruise control speed:
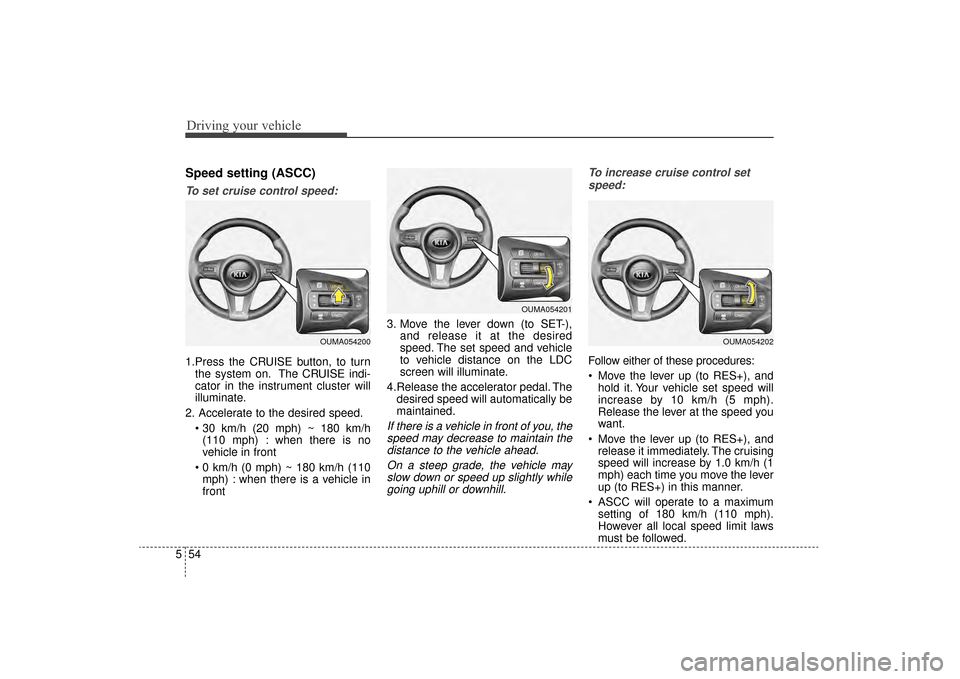
1.Press the CRUISE button, to turn
the system on. The CRUISE indi-
cator in the instrument cluster will
illuminate.
2. Accelerate to the desired speed. (110 mph) : when there is no
vehicle in front
mph) : when there is a vehicle in
front 3. Move the lever down (to SET-),
and release it at the desired
speed. The set speed and vehicle
to vehicle distance on the LDC
screen will illuminate.
4.Release the accelerator pedal. The desired speed will automatically be
maintained.
If there is a vehicle in front of you, thespeed may decrease to maintain thedistance to the vehicle ahead.
On a steep grade, the vehicle mayslow down or speed up slightly whilegoing uphill or downhill. To increase cruise control set
speed:
Follow either of these procedures:
Move the lever up (to RES+), and hold it. Your vehicle set speed will
increase by 10 km/h (5 mph).
Release the lever at the speed you
want.
Move the lever up (to RES+), and release it immediately. The cruising
speed will increase by 1.0 km/h (1
mph) each time you move the lever
up (to RES+) in this manner.
ASCC will operate to a maximum setting of 180 km/h (110 mph).
However all local speed limit laws
must be followed.
OUMA054200
OUMA054201
OUMA054202
UM CAN (ENG) 5.QXP 12/1/2014 1:04 PM Page 54