Rear KIA Sorento 2017 3.G Owner's Manual
[x] Cancel search | Manufacturer: KIA, Model Year: 2017, Model line: Sorento, Model: KIA Sorento 2017 3.GPages: 576, PDF Size: 7.82 MB
Page 408 of 576
595
Driving your vehicle
The LDWS may not warn you
even if the vehicle leaves the
lane, or may warn you even if
the vehicle does not leave the
lane when;
The lane is not visible due to snow,rain, stain, a puddle or other envi-
ronmental conditions.
The brightness of the outside changes suddenly such as tunnel
enter/exit.
The headlights are off at night or in a tunnel.
The color of the lane marking from the road is difficult to distinguish.
Driving on a steep grade or a curve.
Light such as street light, sunlight or oncoming vehicle light reflects
from water on the road.
The lens or windshield is obscured by mud, snow, etc.
The sensor cannot detect the lane because of fog, heavy rain or
heavy snow. The inside rear view mirror housing
overheats from being in direct sun-
light.
The lane is very wide or narrow.
The lane line is damaged or indis- tinct.
The windshield is fogged by humid air in the vehicle.
The shadow is on the lane line by a median strip.
The sensor cannot distinguish the lane from the road due to the
dust/dirt.
There is a mark similar to a lane line.
There is a boundary structure.
The distance from vehicle ahead is very short or the vehicle ahead
drives hiding the lane line.
The vehicle vibrates heavily due to road conditions.
The lane number increases or decreases or the lane lines are
crossing.
Putting something on the dash- board.
Driving with the sun in front of you. Driving in areas under construc-
tion.
The lane line is more than two in either side (Left/Right)
This device complies with
Industry Canada licence-exempt
RSS standard(s).
Operation is subject to the following
two conditions:
(1) This device may not cause inter- ference, and
(2) This device must accept any
interference, including interfer-
ence that may cause undesired
operation of the device.
Page 418 of 576
5105
Driving your vehicle
Don’t let your parking brake
freeze
Under some conditions your parking
brake can freeze in the engaged
position. This is most likely to happen
when there is an accumulation of
snow or ice around or near the rear
brakes or if the brakes are wet. If
there is a risk the parking brake may
freeze, apply it only temporarily while
you put the gear shift lever in P
(Park, automatic transaxle) and
block the rear wheels so the vehicle
cannot roll. Then release the parking
brake.
Don't let ice and snow accu-
mulate underneath
Under some conditions, snow and
ice can build up under the fenders
and interfere with the steering. When
driving in severe winter conditions
where this may happen, you should
periodically check underneath the
vehicle to be sure the movement of
the front wheels and the steering
components are not obstructed.
Carry emergency equipment
Depending on the severity of the
weather, you should carry appropri-
ate emergency equipment. Some of
the items you may want to carry
include tow straps or chains, flash-
light, emergency flares, sand, shov-
el, jumper cables, window scraper,
gloves, ground cloth, coveralls, blan-
ket, etc.
Page 428 of 576
5115
Driving your vehicle
Vehicle capacity weight:
5 persons : 420kg (930 lbs.)
7 persons : 506kg (1,120 lbs.)
Vehicle capacity weight is the maxi-
mum combined weight of occupants
and cargo. If your vehicle is equipped
with a trailer, the combined weight
includes the tongue load.
Seating capacity:
Total - 5 persons (Front seat : 2 persons,
Rear seat : 3 persons)
- 7 persons (Front seat : 2 persons,
Rear seat : 5 persons)
Seating capacity is the maximum
number of occupants including a
driver, your vehicle may carry.
However, the seating capacity may
be reduced based upon the weight of
all of the occupants, and the weight
of the cargo being carried or towed.
Do not overload the vehicle as there
is a limit to the total weight, or load
limit including occupants and cargo,
the vehicle can carry.
Towing capacity:
* 2.0L Engine
Without trailer brakes
: 750 kg (1,650 lbs)
With trailer brakes
: 907 kg (2,000 lbs)
With trailer package
: 1,587 kg (3,500 lbs)
* 2.4L Engine
Without trailer brakes
: 750 kg (1,650 lbs)
With trailer brakes
: 907 kg (2,000 lbs)
With trailer package
: N/A
* 3.3L Engine
Without trailer brakes
: 750 kg (1,650 lbs)
With trailer brakes
: 907 kg (2,000 lbs)
With trailer package
: 2,267 kg (5,000 lbs)
Page 431 of 576
Driving your vehicle
118
5
Certification label
The certification label is located on
the driver's door sill at the center pillar.
This label shows the maximum allow-
able weight of the fully loaded vehi-
cle. This is called the GVWR (Gross
Vehicle Weight Rating). The GVWR
includes the weight of the vehicle, all
occupants, fuel and cargo.
This label also tells you the maxi-
mum weight that can be supported
by the front and rear axles, called
Gross Axle Weight Rating (GAWR).
To find out the actual loads on your
front and rear axles, you need to go
to a weigh station and weigh your
vehicle. Your dealer can help you with
this. Be sure to spread out your load
equally on both sides of the center-
line. The label will help you decide how
much cargo and installed equipment
your vehicle can carry.
If you carry items inside your vehicle
- like suitcases, tools, packages, or
anything else - they are moving as
fast as the vehicle. If you have to stop
or turn quickly, or if there is a crash,
the items will keep going and can
cause an injury if they strike the driv-
er or a passenger.WARNING- Over loading
Never exceed the GVWR for
your vehicle, the GAWR for
either the front or rear axle and
vehicle capacity weight.
Exceeding these ratings can
affect your vehicle’s handling
and braking ability.
Page 433 of 576
This section will guide you in the
proper loading of your vehicle and/or
trailer, to keep your loaded vehicle
weight within its design rating capa-
bility, with or without a trailer.
Properly loading your vehicle will
provide maximum return of the vehi-
cle design performance. Before load-
ing your vehicle, familiarize yourself
with the following terms for determin-
ing your vehicle's weight ratings, with
or without a trailer, from the vehicle's
specifications and the certification
label:
Base curb weight
This is the weight of the vehicle
including a full tank of fuel and all
standard equipment. It does not
include passengers, cargo, or option-
al equipment.
Vehicle curb weight
This is the weight of your new vehicle
when you picked it up from your deal-
er plus any aftermarket equipment.
Cargo weight
This figure includes all weight added
to the Base Curb Weight, including
cargo and optional equipment.
GAW (Gross axle weight)
This is the total weight placed on
each axle (front and rear) - including
vehicle curb weight and all payload.
GAWR
(Gross axle weight rating)
This is the maximum allowable
weight that can be carried by a single
axle (front or rear). These numbers
are shown on the certification label.
The total load on each axle must
never exceed its GAWR.
GVW (Gross vehicle weight)
This is the Base Curb Weight plus
actual Cargo Weight plus passen-
gers.
GVWR
(Gross vehicle weight rating)
This is the maximum allowable
weight of the fully loaded vehicle
(including all options, equipment,
passengers and cargo). The GVWR
is shown on the certification label
located on the driver’s door sill.
VEHICLE WEIGHT GLOSSARY
5120
Driving your vehicle
Page 441 of 576
What to do in an emergency
86
IF YOU HAVE A FLAT TIRE
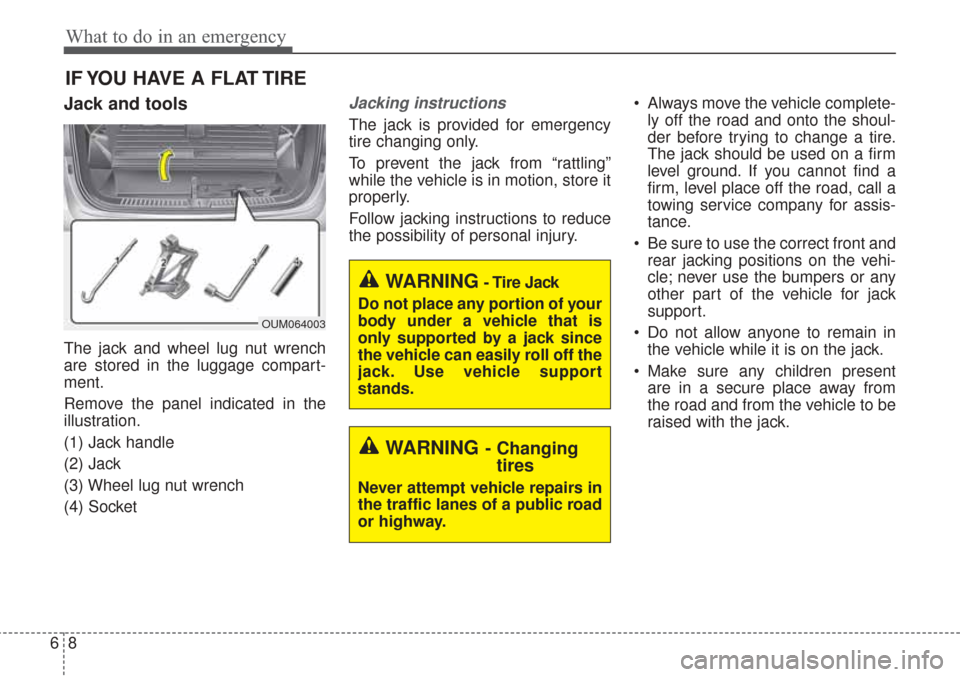
Jack and tools
The jack and wheel lug nut wrench
are stored in the luggage compart-
ment.
Remove the panel indicated in the
illustration.
(1) Jack handle
(2) Jack
(3) Wheel lug nut wrench
(4) Socket
Jacking instructions
The jack is provided for emergency
tire changing only.
To prevent the jack from “rattling”
while the vehicle is in motion, store it
properly.
Follow jacking instructions to reduce
the possibility of personal injury. Always move the vehicle complete-
ly off the road and onto the shoul-
der before trying to change a tire.
The jack should be used on a firm
level ground. If you cannot find a
firm, level place off the road, call a
towing service company for assis-
tance.
Be sure to use the correct front and rear jacking positions on the vehi-
cle; never use the bumpers or any
other part of the vehicle for jack
support.
Do not allow anyone to remain in the vehicle while it is on the jack.
Make sure any children present are in a secure place away from
the road and from the vehicle to be
raised with the jack.
WARNING- Changingtires
Never attempt vehicle repairs in
the traffic lanes of a public road
or highway.
OUM064003
WARNING- Tire Jack
Do not place any portion of your
body under a vehicle that is
only supported by a jack since
the vehicle can easily roll off the
jack. Use vehicle support
stands.
Page 444 of 576
611
What to do in an emergency
Changing tires
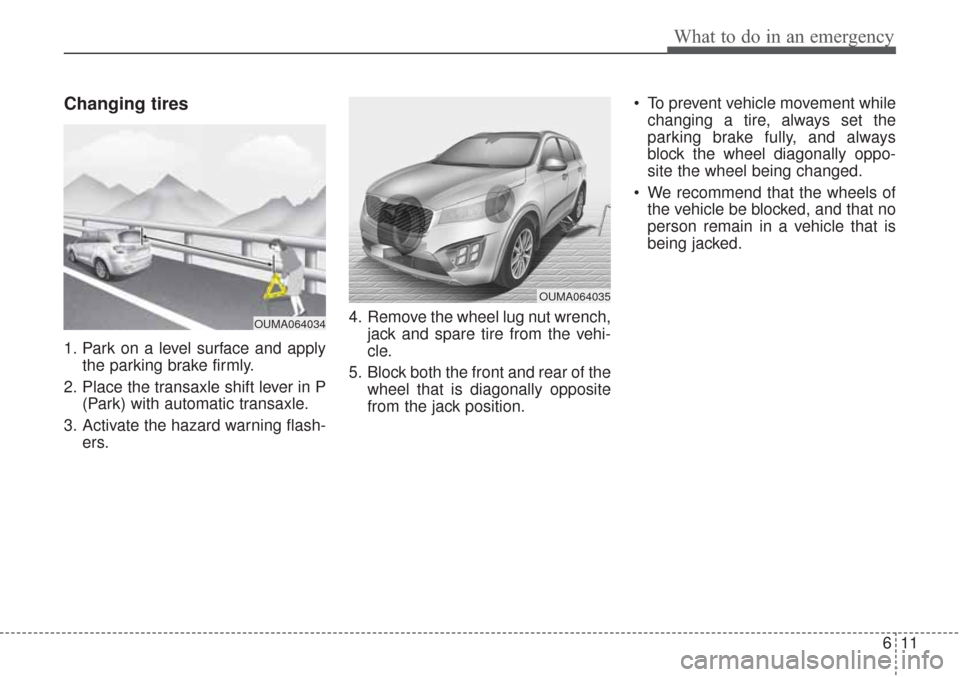
1. Park on a level surface and applythe parking brake firmly.
2. Place the transaxle shift lever in P (Park) with automatic transaxle.
3. Activate the hazard warning flash- ers. 4. Remove the wheel lug nut wrench,
jack and spare tire from the vehi-
cle.
5. Block both the front and rear of the wheel that is diagonally opposite
from the jack position. To prevent vehicle movement while
changing a tire, always set the
parking brake fully, and always
block the wheel diagonally oppo-
site the wheel being changed.
We recommend that the wheels of the vehicle be blocked, and that no
person remain in a vehicle that is
being jacked.
OUMA064035
OUMA064034
Page 445 of 576
What to do in an emergency
12
6
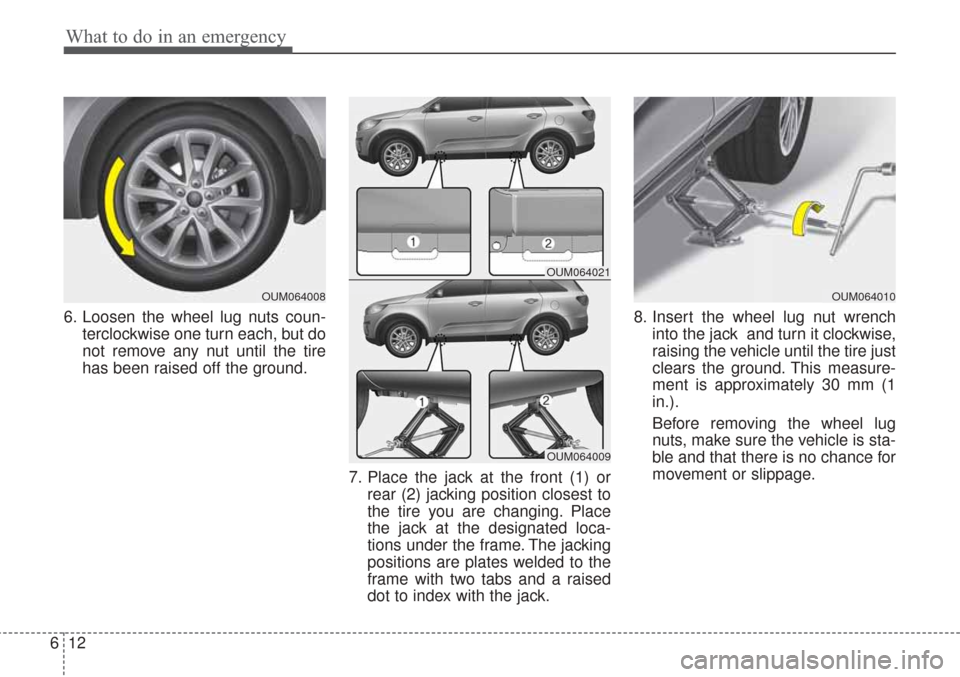
6. Loosen the wheel lug nuts coun-
terclockwise one turn each, but do
not remove any nut until the tire
has been raised off the ground.
7. Place the jack at the front (1) orrear (2) jacking position closest to
the tire you are changing. Place
the jack at the designated loca-
tions under the frame. The jacking
positions are plates welded to the
frame with two tabs and a raised
dot to index with the jack. 8. Insert the wheel lug nut wrench
into the jack and turn it clockwise,
raising the vehicle until the tire just
clears the ground. This measure-
ment is approximately 30 mm (1
in.).
Before removing the wheel lug
nuts, make sure the vehicle is sta-
ble and that there is no chance for
movement or slippage.
OUM064008
OUM064021
OUM064009
OUM064010
Page 451 of 576
What to do in an emergency
18
6
TOWING
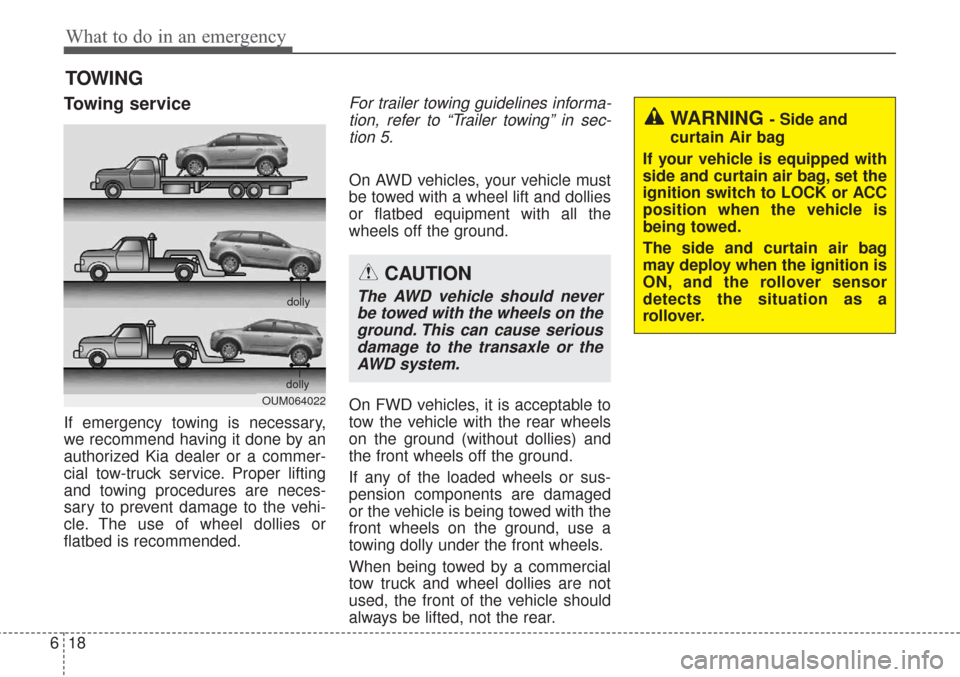
Towing service
If emergency towing is necessary,
we recommend having it done by an
authorized Kia dealer or a commer-
cial tow-truck service. Proper lifting
and towing procedures are neces-
sary to prevent damage to the vehi-
cle. The use of wheel dollies or
flatbed is recommended.
For trailer towing guidelines informa-
tion, refer to “Trailer towing” in sec-tion 5.
On AWD vehicles, your vehicle must
be towed with a wheel lift and dollies
or flatbed equipment with all the
wheels off the ground.
On FWD vehicles, it is acceptable to
tow the vehicle with the rear wheels
on the ground (without dollies) and
the front wheels off the ground.
If any of the loaded wheels or sus-
pension components are damaged
or the vehicle is being towed with the
front wheels on the ground, use a
towing dolly under the front wheels.
When being towed by a commercial
tow truck and wheel dollies are not
used, the front of the vehicle should
always be lifted, not the rear.
OUM064022 dolly
dolly
WARNING - Side and
curtain Air bag
If your vehicle is equipped with
side and curtain air bag, set the
ignition switch to LOCK or ACC
position when the vehicle is
being towed.
The side and curtain air bag
may deploy when the ignition is
ON, and the rollover sensor
detects the situation as a
rollover.
CAUTION
The AWD vehicle should never be towed with the wheels on theground. This can cause seriousdamage to the transaxle or theAWD system.
Page 454 of 576
Fuses . . . . . . . . . . . . . . . . . . . . . . . . . . . . . . . . . . . . \
7-66
• Inner panel fuse replacement . . . . . . . . . . . . . . . . . . . 7-67
• Engine compartment fuse replacement. . . . . . . . . . . 7-69
• Fuse/relay panel description. . . . . . . . . . . . . . . . . . . . 7-71
Light bulbs . . . . . . . . . . . . . . . . . . . . . . . . . . . . . . . 7-82
• Front lamp bulb replacement . . . . . . . . . . . . . . . . . . 7-83
• Side repeater lamp replacement . . . . . . . . . . . . . . . . 7-87
• Rear combination lamp bulb replacement . . . . . . . . 7-88
• High mounted stop lamp replacement . . . . . . . . . . . 7-90
• License plate light bulb replacement. . . . . . . . . . . . . 7-91
• Interior light bulb replacement . . . . . . . . . . . . . . . . . 7-92
Appearance care . . . . . . . . . . . . . . . . . . . . . . . . . . . 7-93
• Exterior care . . . . . . . . . . . . . . . . . . . . . . . . . . . . . . . . 7-93
• Interior care . . . . . . . . . . . . . . . . . . . . . . . . . . . . . . . . . 7-98
Emission control system . . . . . . . . . . . . . . . . . . . 7-101
• Crankcase emission control system . . . . . . . . . . . . . 7-101
• Evaporative emission control (including ORVR: Onboard refueling vapor recovery) system . . . . . 7-101
• Exhaust emission control system . . . . . . . . . . . . . . . 7-102
7