speed adjust KIA SORENTO 2018 Owners Manual
[x] Cancel search | Manufacturer: KIA, Model Year: 2018, Model line: SORENTO, Model: KIA SORENTO 2018Pages: 536, PDF Size: 13.42 MB
Page 44 of 536
327
Safety features of your vehicle
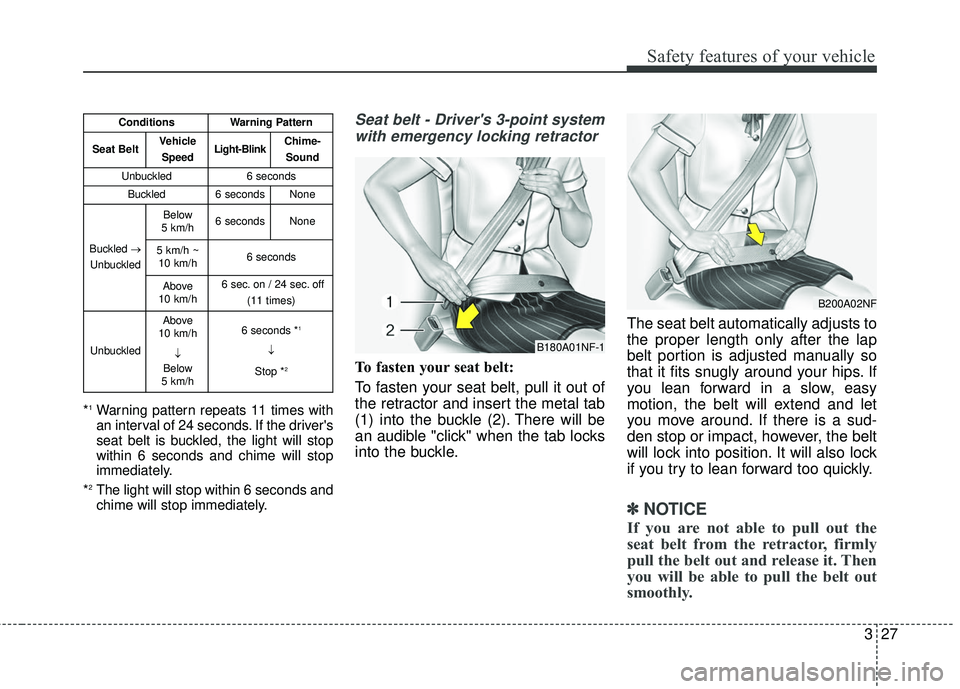
*1Warning pattern repeats 11 times with
an interval of 24 seconds. If the driver's
seat belt is buckled, the light will stop
within 6 seconds and chime will stop
immediately.
*
2The light will stop within 6 seconds and
chime will stop immediately.
Seat belt - Driver's 3-point system with emergency locking retractor
To fasten your seat belt:
To fasten your seat belt, pull it out of
the retractor and insert the metal tab
(1) into the buckle (2). There will be
an audible "click" when the tab locks
into the buckle. The seat belt automatically adjusts to
the proper length only after the lap
belt portion is adjusted manually so
that it fits snugly around your hips. If
you lean forward in a slow, easy
motion, the belt will extend and let
you move around. If there is a sud-
den stop or impact, however, the belt
will lock into position. It will also lock
if you try to lean forward too quickly.
✽ ✽
NOTICE
If you are not able to pull out the
seat belt from the retractor, firmly
pull the belt out and release it. Then
you will be able to pull the belt out
smoothly.
ConditionsWarning Pattern
Seat BeltVehicle
SpeedLight-BlinkChime-Sound
Unbuckled6 seconds
Buckled6 secondsNone
Buckled →
Unbuckled
Below
5 km/h6 secondsNone
5 km/h ~ 10 km/h6 seconds
Above
10 km/h6 sec. on / 24 sec. off
(11 times)
Unbuckled
Above
10 km/h
↓
Below
5 km/h6 seconds *1
↓
Stop *
2
B180A01NF-1
B200A02NF
Page 205 of 536
Features of your vehicle
120
4
Headlight leveling device
(if equipped)
Automatic type
To ensure the proper headlight beam
is used under various conditions, the
headlight beam levels are automati-
cally adjusted depending on the
number of passengers, the weight in
the trunk, and other driving condi-
tions.
✽ ✽
NOTICE
If it does not work properly even
though your car is inclined backward
according to passenger's posture, or
the headlight beam is irradiated to
the high or low position, have the sys-
tem be inspected by an authorized
Kia dealer.
Do not attempt to inspect or replace
the wiring yourself.
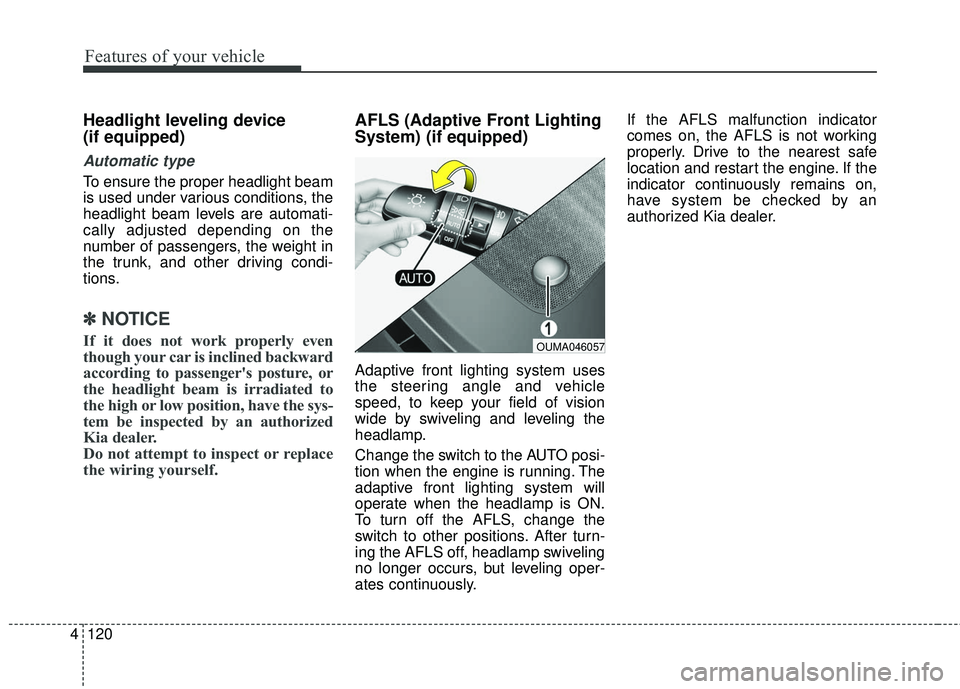
AFLS (Adaptive Front Lighting
System) (if equipped)
Adaptive front lighting system uses
the steering angle and vehicle
speed, to keep your field of vision
wide by swiveling and leveling the
headlamp.
Change the switch to the AUTO posi-
tion when the engine is running. The
adaptive front lighting system will
operate when the headlamp is ON.
To turn off the AFLS, change the
switch to other positions. After turn-
ing the AFLS off, headlamp swiveling
no longer occurs, but leveling oper-
ates continuously. If the AFLS malfunction indicator
comes on, the AFLS is not working
properly. Drive to the nearest safe
location and restart the engine. If the
indicator continuously remains on,
have system be checked by an
authorized Kia dealer.
OUMA046057
Page 206 of 536
4121
Features of your vehicle
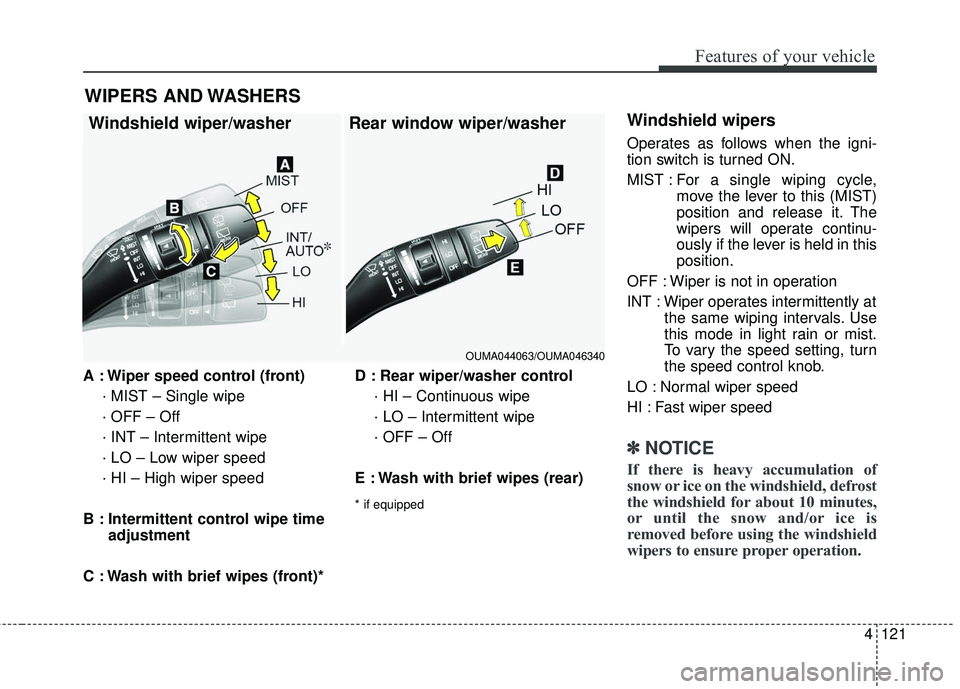
A : Wiper speed control (front)· MIST – Single wipe
· OFF – Off
· INT – Intermittent wipe
· LO – Low wiper speed
· HI – High wiper speed
B : Intermittent control wipe time adjustment
C : Wash with brief wipes (front)* D : Rear wiper/washer control
· HI – Continuous wipe
· LO – Intermittent wipe
· OFF – Off
E : Wash with brief wipes (rear)
* if equipped
Windshield wipers
Operates as follows when the igni-
tion switch is turned ON.
MIST : For a single wiping cycle,
move the lever to this (MIST)
position and release it. The
wipers will operate continu-
ously if the lever is held in this
position.
OFF : Wiper is not in operation
INT : Wiper operates intermittently at the same wiping intervals. Use
this mode in light rain or mist.
To vary the speed setting, turn
the speed control knob.
LO : Normal wiper speed
HI : Fast wiper speed
✽ ✽ NOTICE
If there is heavy accumulation of
snow or ice on the windshield, defrost
the windshield for about 10 minutes,
or until the snow and/or ice is
removed before using the windshield
wipers to ensure proper operation.
WIPERS AND WASHERS
Windshield wiper/washer Rear window wiper/washer
OUMA044063/OUMA046340
Page 218 of 536
4133
Features of your vehicle
MAX A/C selection
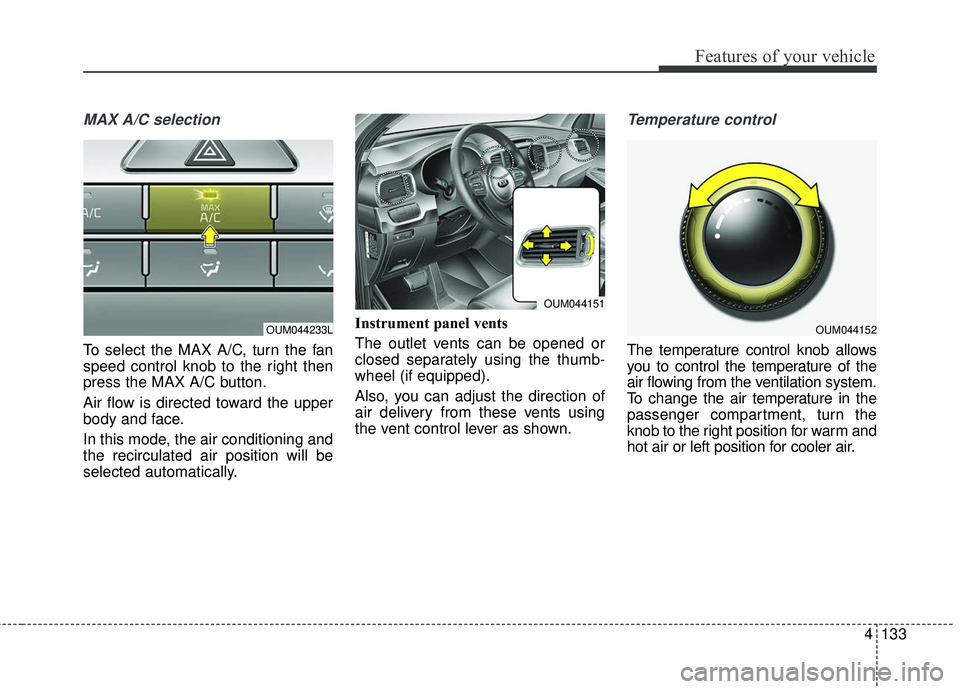
To select the MAX A/C, turn the fan
speed control knob to the right then
press the MAX A/C button.
Air flow is directed toward the upper
body and face.
In this mode, the air conditioning and
the recirculated air position will be
selected automatically.Instrument panel vents
The outlet vents can be opened or
closed separately using the thumb-
wheel (if equipped).
Also, you can adjust the direction of
air delivery from these vents using
the vent control lever as shown.
Temperature control
The temperature control knob allows
you to control the temperature of the
air flowing from the ventilation system.
To change the air temperature in the
passenger compartment, turn the
knob to the right position for warm and
hot air or left position for cooler air.
OUM044233LOUM044152
OUM044151
Page 222 of 536
4137
Features of your vehicle
System operation
Ventilation
1. Set the mode to the position.
2. Set the air intake control to theoutside (fresh) air position.
3. Set the temperature control to the desired position.
4. Set the fan speed control to the desired speed.
Heating
1. Set the mode to the position.
2. Set the air intake control to theoutside (fresh) air position.
3. Set the temperature control to the desired position.
4. Set the fan speed control to the desired speed.
5. If dehumidified heating is desired, turn the air conditioning system (if
equipped) on.
If the windshield fogs up, set the mode to the or position. Operation Tips
To keep dust or unpleasant fumes
from entering the vehicle through
the ventilation system, temporarily
set the air intake control to the
recirculated air position. Be sure to
return the control to the fresh air
position when the irritation has
passed to keep fresh air in the
vehicle. This will help keep the driv-
er alert and comfortable.
Air for the heating/cooling system is drawn in through the grilles just
ahead of the windshield. Care
should be taken that these are not
blocked by leaves, snow, ice or
other obstructions.
To prevent interior fog on the wind- shield, set the air intake control to
the fresh air position and fan speed
to the desired position, turn on the
air conditioning system, and adjust
the temperature control to desired
temperature.
Air conditioning
Kia Air Conditioning Systems are
filled with refrigerant*.
1. Start the engine. Push the air con- ditioning button.
2. Set the mode to the position.
3. Set the air intake control to the outside air or recirculated air posi-
tion.
4. Adjust the fan speed control and temperature control to maintain
maximum comfort.
The refrigerant system should only be serviced by trained and certified
technicians to insure proper and
safe operation.
The refrigerant system should be serviced in a well-ventilated place.
The air conditioning evaporator (cooling coil) shall never be repaired
or replaced with one removed from
a used or salvaged vehicle and new
replacement MAC evaporators shall
be certified (and labeled) as meet-
ing SAE Standard J2842.
Page 232 of 536
4147
Features of your vehicle
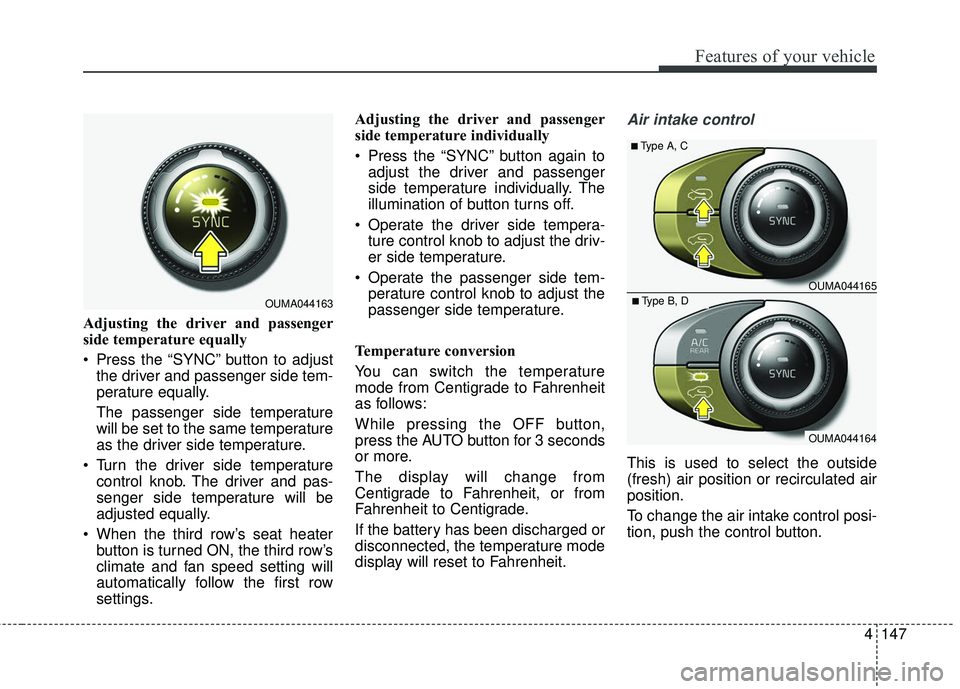
Adjusting the driver and passenger
side temperature equally
Press the “SYNC” button to adjustthe driver and passenger side tem-
perature equally.
The passenger side temperature
will be set to the same temperature
as the driver side temperature.
Turn the driver side temperature control knob. The driver and pas-
senger side temperature will be
adjusted equally.
When the third row’s seat heater button is turned ON, the third row’s
climate and fan speed setting will
automatically follow the first row
settings. Adjusting the driver and passenger
side temperature individually
Press the “SYNC” button again to
adjust the driver and passenger
side temperature individually. The
illumination of button turns off.
Operate the driver side tempera- ture control knob to adjust the driv-
er side temperature.
Operate the passenger side tem- perature control knob to adjust the
passenger side temperature.
Temperature conversion
You can switch the temperature
mode from Centigrade to Fahrenheit
as follows:
While pressing the OFF button,
press the AUTO button for 3 seconds
or more.
The display will change from
Centigrade to Fahrenheit, or from
Fahrenheit to Centigrade.
If the battery has been discharged or
disconnected, the temperature mode
display will reset to Fahrenheit.
Air intake control
This is used to select the outside
(fresh) air position or recirculated air
position.
To change the air intake control posi-
tion, push the control button.
OUMA044163
OUMA044164
OUMA044165
■Type A, C
■Type B, D
Page 236 of 536
4151
Features of your vehicle
1.You can operate the third row airconditioning system from the first
row control panel. Changing the front
row’s fan speed by pressing the con-
trol button will automatically change
the third row’s fan speed as well.
When the front row air conditioning
has been turned off and you want
to stop the A/C in the third row,
press the third row air conditioning
select button one more time. Then,
the third row’s A/C will also turn off.
2.The third row A/C system can be separately controlled by the control
buttons in the third row. When the
A/C is ON or OFF, the third row A/C
control button in the front row will
turn ON or OFF, informing the front
passengers of the situation.
3.The fan speed of the third row air conditioning can also be separate-
ly controlled by turning the fan
speed control knob.System operation
Ventilation
1. Set the mode to the position.
2. Set the air intake control to the outside (fresh) air position.
3. Set the temperature control to the desired position.
4. Set the fan speed control to the desired speed.
Heating
1. Set the mode to the position.
2. Set the air intake control to theoutside (fresh) air position.
3. Set the temperature control to the desired position.
4. Set the fan speed control to the desired speed.
5. If dehumidified heating is desired, turn the air conditioning system (if
equipped) on.
If the windshield fogs up, set the mode to the
orposition. Operation Tips
To keep dust or unpleasant fumes
from entering the vehicle through
the ventilation system, temporarily
set the air intake control to the
recirculated air position. Be sure to
return the control to the fresh air
position when the irritation has
passed to keep fresh air in the
vehicle. This will help keep the driv-
er alert and comfortable.
Air for the heating/cooling system is drawn in through the grilles just
ahead of the windshield. Care
should be taken that these are not
blocked by leaves, snow, ice or
other obstructions.
To prevent interior fog on the wind- shield, set the air intake control to
the fresh air position and fan speed
to the desired position, turn on the
air conditioning system, and adjust
the temperature control to desired
temperature.
Page 237 of 536
Features of your vehicle
152
4
Air conditioning (if equipped)
All Kia Air Conditioning Systems are
filled with R-134a refrigerant.
1. Start the engine. Press the air con-
ditioning button.
2. Set the mode to the position.
3. Set the air intake control to the out- side air or recirculated air position.
4. Adjust the fan speed control and temperature control to maintain
maximum comfort.
When maximum cooling is desired, set the temperature control to the
extreme left position, set the mode
control to the MAX A/C position,
then set the fan speed control to
the highest speed. Air conditioning system operation tips
If the vehicle has been parked in
direct sunlight during hot weather,
open the windows for a short time
to let the hot air inside the vehicle
escape.
To help reduce moisture inside of the windows on rainy or humid
days, decrease the humidity inside
the vehicle by operating the air
conditioning system.
During air conditioning system operation, you may occasionally
notice a slight change in engine
speed as the air conditioning com-
pressor cycles. This is a normal
system operation characteristic.
Use the air conditioning system every month only for a few minutes
to ensure maximum system per-
formance.CAUTION- Excessive A/C
When using the air condition- ing system, monitor the tem-perature gauge closely whiledriving up hills or in heavytraffic when outside tempera-tures are high. Air condition-ing system operation maycause engine overheating.Continue to use the blower fanbut turn the air conditioningsystem off if the temperaturegauge indicates engine over-heating.
When opening the windows in humid weather air condition-ing may create water dropletsinside the vehicle. Sinceexcessive water droplets maycause damage to electricalequipment, air conditioningshould only be used with thewindows closed.
Page 241 of 536
Features of your vehicle
156
4
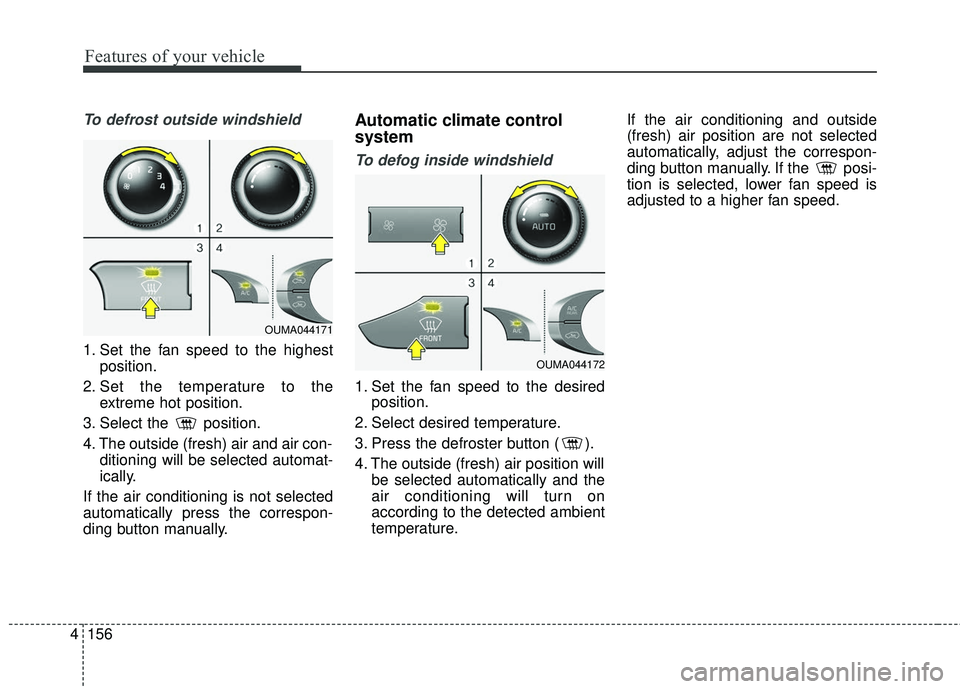
To defrost outside windshield
1. Set the fan speed to the highest
position.
2. Set the temperature to the extreme hot position.
3. Select the position.
4. The outside (fresh) air and air con- ditioning will be selected automat-
ically.
If the air conditioning is not selected
automatically press the correspon-
ding button manually.
Automatic climate control
system
To defog inside windshield
1. Set the fan speed to the desired position.
2. Select desired temperature.
3. Press the defroster button ( ).
4. The outside (fresh) air position will be selected automatically and the
air conditioning will turn on
according to the detected ambient
temperature. If the air conditioning and outside
(fresh) air position are not selected
automatically, adjust the correspon-
ding button manually. If the posi-
tion is selected, lower fan speed is
adjusted to a higher fan speed.
OUMA044172
OUMA044171
Page 271 of 536
Driving your vehicle
Before driving . . . . . . . . . . . . . . . . . . . . . . . . . . . . . . 5-4• Before entering vehicle . . . . . . . . . . . . . . . . . . . . . . . . . 5-4
• Necessary inspections . . . . . . . . . . . . . . . . . . . . . . . . . . 5-4
• Before starting . . . . . . . . . . . . . . . . . . . . . . . . . . . . . . . . 5-4
Key positions . . . . . . . . . . . . . . . . . . . . . . . . . . . . . . . 5-6• Illuminated ignition switch . . . . . . . . . . . . . . . . . . . . . . 5-6
• Ignition switch position . . . . . . . . . . . . . . . . . . . . . . . . . 5-6
• Starting the engine . . . . . . . . . . . . . . . . . . . . . . . . . . . . 5-7
Engine start/stop button . . . . . . . . . . . . . . . . . . . . . 5-9• Illuminated engine start/stop button . . . . . . . . . . . . . . 5-9
• Engine start/stop button position. . . . . . . . . . . . . . . . . 5-9
• Starting the engine with a smart key . . . . . . . . . . . . . 5-11
Automatic transaxle . . . . . . . . . . . . . . . . . . . . . . . . 5-13• Automatic transaxle operation. . . . . . . . . . . . . . . . . . 5-13
• Good driving practices . . . . . . . . . . . . . . . . . . . . . . . . 5-19
All wheel drive (AWD) . . . . . . . . . . . . . . . . . . . . . . 5-20• Tight corner brake effect . . . . . . . . . . . . . . . . . . . . . . 5-21
• All wheel drive (AWD) transfer mode selection . . . . 5-22
• For safe all wheel drive operation . . . . . . . . . . . . . . . 5-23
Brake system . . . . . . . . . . . . . . . . . . . . . . . . . . . . . . 5-27• Power brakes . . . . . . . . . . . . . . . . . . . . . . . . . . . . . . . . 5-27
• Parking brake - Foot type . . . . . . . . . . . . . . . . . . . . . 5-29
• Electronic parking brake (EPB) . . . . . . . . . . . . . . . . 5-30
• Auto hold . . . . . . . . . . . . . . . . . . . . . . . . . . . . . . . . . . . 5-\
37
• Anti-lock brake system (ABS) . . . . . . . . . . . . . . . . . . 5-40
• Electronic stability control (ESC) . . . . . . . . . . . . . . . 5-42
• Vehicle stability management (VSM) . . . . . . . . . . . . 5-46• Hill-start assist control (HAC) . . . . . . . . . . . . . . . . . . 5-47
• Good braking practices. . . . . . . . . . . . . . . . . . . . . . . . 5-48
Autonomous emergency braking (AEB)/
Forward collision warning (FCW) . . . . . . . . . . . 5-50
• System setting and activation . . . . . . . . . . . . . . . . . . . 5-50
• AEB warning message and system control . . . . . . . . 5-52
• Brake operation . . . . . . . . . . . . . . . . . . . . . . . . . . . . . . 5-54
• Sensor to detect the distance from the vehicle
in front (front radar) . . . . . . . . . . . . . . . . . . . . . . . . 5-54
• System malfunction . . . . . . . . . . . . . . . . . . . . . . . . . . . 5-55
• Limitation of the system . . . . . . . . . . . . . . . . . . . . . . . 5-56
• Recognizing pedestrians . . . . . . . . . . . . . . . . . . . . . . . 5-59
Cruise control system. . . . . . . . . . . . . . . . . . . . . . . 5-61• To set cruise control speed . . . . . . . . . . . . . . . . . . . . . 5-62
• To increase cruise control set speed. . . . . . . . . . . . . . 5-62
• To decrease the cruising speed . . . . . . . . . . . . . . . . . . 5-63
• To temporarily accelerate with the cruise control on . . . . . . . . . . . . . . . . . . . . . . . . . . . . . . . . . . 5-63\
• To cancel cruise control . . . . . . . . . . . . . . . . . . . . . . . 5-63
• To resume cruising speed . . . . . . . . . . . . . . . . . . . . . . 5-64
• To turn cruise control off. . . . . . . . . . . . . . . . . . . . . . . 5-64
Advanced smart cruise control system (ASCC). . 5-65• Speed setting (ASCC) . . . . . . . . . . . . . . . . . . . . . . . . . 5-66
• Vehicle to vehicle distance setting (ASCC) . . . . . . . . 5-70
• To adjust the sensitivity of advanced smart
cruise control . . . . . . . . . . . . . . . . . . . . . . . . . . . . . . . 5-74
• To convert to cruise control mode . . . . . . . . . . . . . . . 5-75
• Limitations of the system . . . . . . . . . . . . . . . . . . . . . . 5-75
5