warning light KIA SORENTO 2020 Features and Functions Guide
[x] Cancel search | Manufacturer: KIA, Model Year: 2020, Model line: SORENTO, Model: KIA SORENTO 2020Pages: 54, PDF Size: 3.56 MB
Page 3 of 54
LEGAL DISCLAIMERS . . . . See Back Inside Cover Page
VIDEOS & QR CODES . . . . . . . . . . . . . . . . . . . 2
INSTRUMENT CLUSTERInstrument Cluster Overview . . . . . . . . . . . . . . . . . 3Indicators & Warning Lights . . . . . . . . . . . . . . . . . 4Tire Pressure Monitoring System (TPMS) . . . . . . . . . . 5Fuel Economy. . . . . . . . . . . . . . . . . . . . . . . . . 5LCD Instrument Cluster Modes . . . . . . . . . . . . . . . 6Trip Modes / Trip Computer. . . . . . . . . . . . . . . . . . 6User Settings. . . . . . . . . . . . . . . . . . . . . . . . . 7Service Interval Mode . . . . . . . . . . . . . . . . . . . . 7Drive Mode Integrated Control System. . . . . . . . . . . . 8ECO Mode (Active ECO)* . . . . . . . . . . . . . . . . . . . 8
DRIVER’S PANELElectronic Stability Control (ESC). . . . . . . . . . . . . . . 9Hill-Start Assist Control (HAC) . . . . . . . . . . . . . . . . 9Instrument Cluster Control . . . . . . . . . . . . . . . . . . 9Blind-Spot Collision-Avoidance Assist (BCA)* . . . . . . . . 10Rear Cross Traffic Collision Avoidance Assist (RCCA)*. . . . 11 Lane Keeping Assist (LK A)* . . . . . . . . . . . . . . . . . .11 Forward Collision-Avoidance Assist (FCA)*. . . . . . . . . . 12Power Windows, Window Lock & Central Door Lock . . . . . 13Power Folding Outside Mirrors* . . . . . . . . . . . . . . . 13Power/Heated Outside Mirrors* . . . . . . . . . . . . . . . 13Automatic Door Lock / Unlock . . . . . . . . . . . . . . . .13Fuel Filler Lid Release Button . . . . . . . . . . . . . . . . 13Reverse Parking Aid Function* . . . . . . . . . . . . . . . . 14Engine Start/Stop Button* . . . . . . . . . . . . . . . . . .14
STEERING WHEEL CONTROLSHeadlights & High Beams. . . . . . . . . . . . . . . . . . . 15Tilt / Telescoping Steering Wheel. . . . . . . . . . . . . . . 16Turn Signals & Fog Lights* . . . . . . . . . . . . . . . . . .15Windshield / Rear Wipers & Washers. . . . . . . . . . . . . 17Bluetooth® Wireless Technology . . . . . . . . . . . . . . . 18Audio Controls . . . . . . . . . . . . . . . . . . . . . . . .20Cruise Control . . . . . . . . . . . . . . . . . . . . . . . .20Smart Cruise Control (SCC) with Stop and Go*. . . . . . . . 21
AUDIO SYSTEMSAndroid Auto™ / Apple CarPlay® Setup . . . . . . . . . . . .22Standard Audio System* . . . . . . . . . . . . . . . . . . .23UVO link Activation* . . . . . . . . . . . . . . . . . . . . . 24UVO Assistance* . . . . . . . . . . . . . . . . . . . . . . .24UVO link with Navigation* . . . . . . . . . . . . . . . . . . 25
CENTER PANELSurround View Monitor (SVM)* . . . . . . . . . . . . . . . 26Automatic Gear Shift with Sportmatic® Shifting . . . . . . 27AWD (All-Wheel Drive) Lock*. . . . . . . . . . . . . . . . 27Automatic Climate Control*. . . . . . . . . . . . . . . . . 28Manual Climate Control* . . . . . . . . . . . . . . . . . . 30Digital Clock . . . . . . . . . . . . . . . . . . . . . . . . 31Aux/Multimedia USB Ports, Power Outlets, USB Charger Ports . . . . . . . . . . . . . . . . . . . . 31Wireless Smartphone Charging System*. . . . . . . . . . 32Electronic Parking Brake (EPB)* . . . . . . . . . . . . . . 33Auto Hold* . . . . . . . . . . . . . . . . . . . . . . . . . 33Heated Steering Wheel* . . . . . . . . . . . . . . . . . . 34Seat Warmers / Ventilated Seats* . . . . . . . . . . . . . 34
S E AT I N GFront Seat Headrest Adjustment . . . . . . . . . . . . . . 35Driver Position Memory System*. . . . . . . . . . . . . . 35Power Adjustable Driver's Seat* / Power Lumbar* . . . . . 36Manual Adjustable Driver's Seat*. . . . . . . . . . . . . . 362nd-Row Folding Seat . . . . . . . . . . . . . . . . . . . 372nd-Row Auto-Folding Seat*. . . . . . . . . . . . . . . . 373rd-Row Folding Seat* . . . . . . . . . . . . . . . . . . . 38One-Touch Walk-In Seat Access . . . . . . . . . . . . . . 38
OTHER KEY FEATURESSunvisor . . . . . . . . . . . . . . . . . . . . . . . . . . 39Sunglasses Holder . . . . . . . . . . . . . . . . . . . . . 39Remote Keyless Entry (Folding Key)*. . . . . . . . . . . . 39Double-Turn Lock /Unlock All. . . . . . . . . . . . . . . . 39Smart Key* . . . . . . . . . . . . . . . . . . . . . . . . . 40Power Liftgate*. . . . . . . . . . . . . . . . . . . . . . . 41Smart Power Liftgate* . . . . . . . . . . . . . . . . . . . 42Driver Attention Warning (DAW)*. . . . . . . . . . . . . . 43HomeLink® with Auto-Dimming Rearview Mirror* . . . . . 44Map/Room Lamps . . . . . . . . . . . . . . . . . . . . . 45Panoramic Sunroof with Power Sunshade*. . . . . . . . . 45Parking Distance Warning-Forward* and Reverse . . . . . 46Rear View Monitor . . . . . . . . . . . . . . . . . . . . . 46Hood Release Lever and Latch . . . . . . . . . . . . . . . 47 Fuel Cap / Malfunction Indicator (Check Engine Light) . . . 47Child-Protector Rear Door Locks. . . . . . . . . . . . . . 47
SAFETY FEATURESOccupant Detection System (ODS) /Passenger Airbag Off Indicator. . . . . . . . . . . . . . . 48Seat Belts. . . . . . . . . . . . . . . . . . . . . . . . . . 48
NORMAL MAINTENANCE SCHEDULE. . . . . .Back Page
ESSENTIAL FEATURES
SORENTO FE ATURES & FUNCTIONS GUIDE
Air Conditioning / Automatic Climate Control* . . . . . . 28
Android Auto™ / Apple CarPlay® Setup. . . . . . . . . . 22
Audio System – Standard Audio System* . . . . . . . . 23
Audio System – UVO link Activation*. . . . . . . . . . . 24
Audio System – UVO link with Navigation* . . . . . . . . 25
Aux /Multimedia USB Port, Power Outlets,
USB Charger Ports . . . . . . . . . . . . . . . . . . . 31
Bluetooth® Wireless Technology . . . . . . . . . . . . . 18
Cruise Control . . . . . . . . . . . . . . . . . . . . . . 20
Digital Clock . . . . . . . . . . . . . . . . . . . . . . . 31
Passenger Airbag Off Indicator. . . . . . . . . . . . . . 48
Service Interval Mode . . . . . . . . . . . . . . . . . . . 7
Smart Cruise Control (SCC) with Stop & Go*. . . . . . . 21
Smart Key*. . . . . . . . . . . . . . . . . . . . . . . . 40
Tire Pressure Monitoring System (TPMS) . . . . . . . . . 5
Trip Modes / Trip Computer . . . . . . . . . . . . . . . . 6
User Settings. . . . . . . . . . . . . . . . . . . . . . . . 7
Windshield/Rear Wipers & Washers . . . . . . . . . . . 17
*IF EQUIPPED
Driving while distracted can result in a loss of vehicle control that may lead to an accident, severe personal injury and death. The driver’s primary responsibility is in the safe and legal operation of a vehicle, and any handheld devices, other equipment or vehicle systems which take the driver’s eyes, attention and focus away from the safe operation of a vehicle or that are not permissible by law should never be used during operation of the vehicle.
Page 5 of 54
3ALWAYS CHECK THE OWNER’S MANUAL FOR COMPLETE OPER ATING INFORMATION AND SAFET Y WARNINGS. *IF EQUIPPED
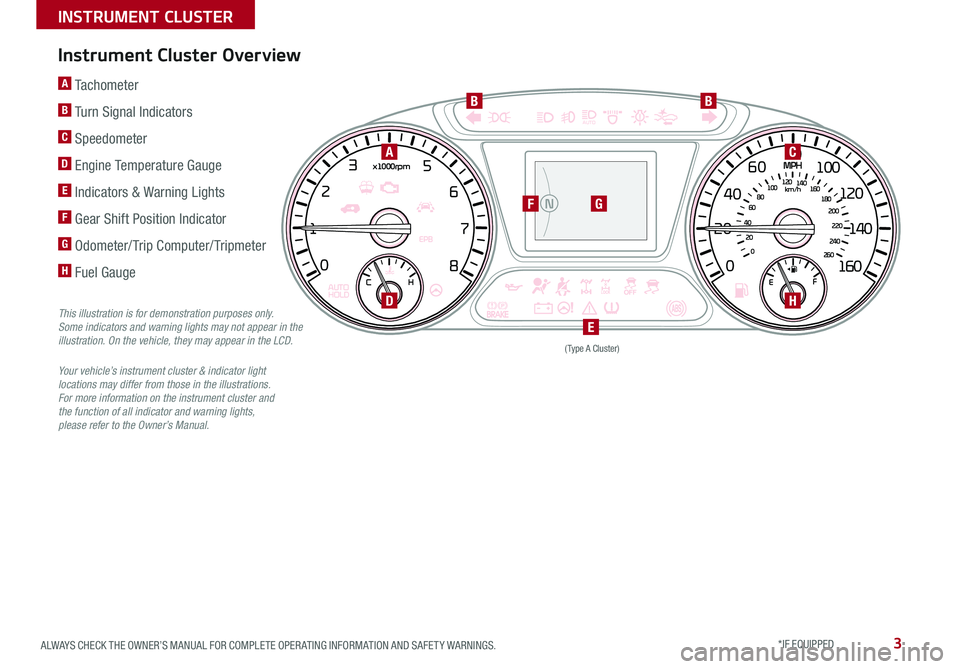
Instrument Cluster Overview
This illustration is for demonstration purposes only. Some indicators and warning lights may not appear in the illustration. On the vehicle, they may appear in the LCD.
Your vehicle’s instrument cluster & indicator light locations may differ from those in the illustrations. For more information on the instrument cluster and the function of all indicator and warning lights, please refer to the Owner’s Manual.
A Tachometer
B Turn Signal Indicators
C Speedometer
D Engine Temperature Gauge
E Indicators & Warning Lights
F Gear Shift Position Indicator
G Odometer/ Trip Computer/ Tripmeter
H Fuel Gauge0
1 2
3
4
5
6
7
8
20 40
60
80
100
120
140
160
0
MPH
km/h
0
20
40 60
80
100
120
140
160
180
200
220
240
260
x1000rpm
EPB
AUTO
HOLD E
F
C H
AUTO
N
(Type A Cluster)
AC
BB
F
D
E
H
G
INSTRUMENT CLUSTER
Page 6 of 54
SORENTO FEATURES & FUNCTIONS GUIDE4*IF EQUIPPED
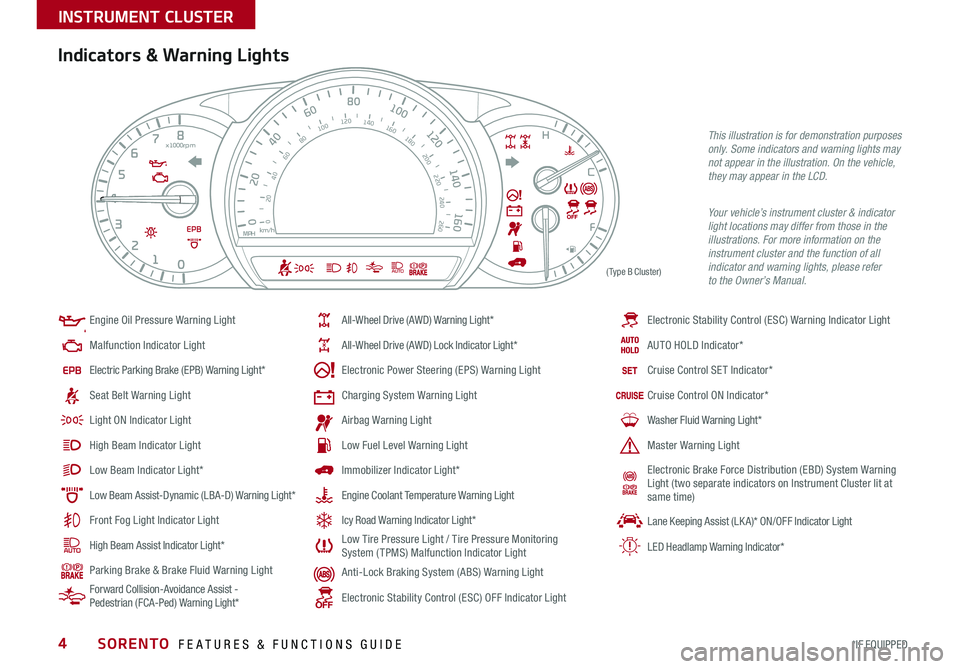
Indicators & Warning Lights
Your vehicle’s instrument cluster & indicator light locations may differ from those in the illustrations. For more information on the instrument cluster and the function of all indicator and warning lights, please refer to the Owner’s Manual.
Engine Oil Pressure Warning Light
Malfunction Indicator Light
Electric Parking Brake (EPB) Warning Light*
Seat Belt Warning Light
Light ON Indicator Light
High Beam Indicator Light
Low Beam Indicator Light*
Low Beam Assist-Dynamic (LBA-D) Warning Light*
Front Fog Light Indicator Light
High Beam Assist Indicator Light*
Parking Brake & Brake Fluid Warning Light
Forward Collision-Avoidance Assist - Pedestrian (FCA-Ped) Warning Light*
All-Wheel Drive (AWD) Warning Light*
All-Wheel Drive (AWD) Lock Indicator Light*
Electronic Power Steering (EPS) Warning Light
Charging System Warning Light
Airbag Warning Light
Low Fuel Level Warning Light
Immobilizer Indicator Light*
Engine Coolant Temperature Warning Light
Icy Road Warning Indicator Light*
Low Tire Pressure Light / Tire Pressure Monitoring System ( TPMS) Malfunction Indicator Light
Anti-Lock Braking System (ABS) Warning Light
Electronic Stability Control (ESC) OFF Indicator Light
x1000rpm
00
202040
60
80100120140160
40
6080100
120
140
160
180
200
220
240
260
0
1
2
3
4
5
6
7
8AUTO
EPBF
C
H
EMPH km/h
AUTO
Electronic Stability Control (ESC) Warning Indicator Light
AUTO HOLD Indicator*
Cruise Control SET Indicator*
Cruise Control ON Indicator*
Washer Fluid Warning Light*
Master Warning Light
Electronic Brake Force Distribution (EBD) System Warning Light (two separate indicators on Instrument Cluster lit at same time)
Lane Keeping Assist (LK A)* ON/OFF Indicator Light
LED Headlamp Warning Indicator*
(Type B Cluster)
This illustration is for demonstration purposes only. Some indicators and warning lights may not appear in the illustration. On the vehicle, they may appear in the LCD.
INSTRUMENT CLUSTER
Page 7 of 54
5ALWAYS CHECK THE OWNER’S MANUAL FOR COMPLETE OPER ATING INFORMATION AND SAFET Y WARNINGS. *IF EQUIPPED †LEGAL DISCL AIMERS ON BACK INSIDE COVER
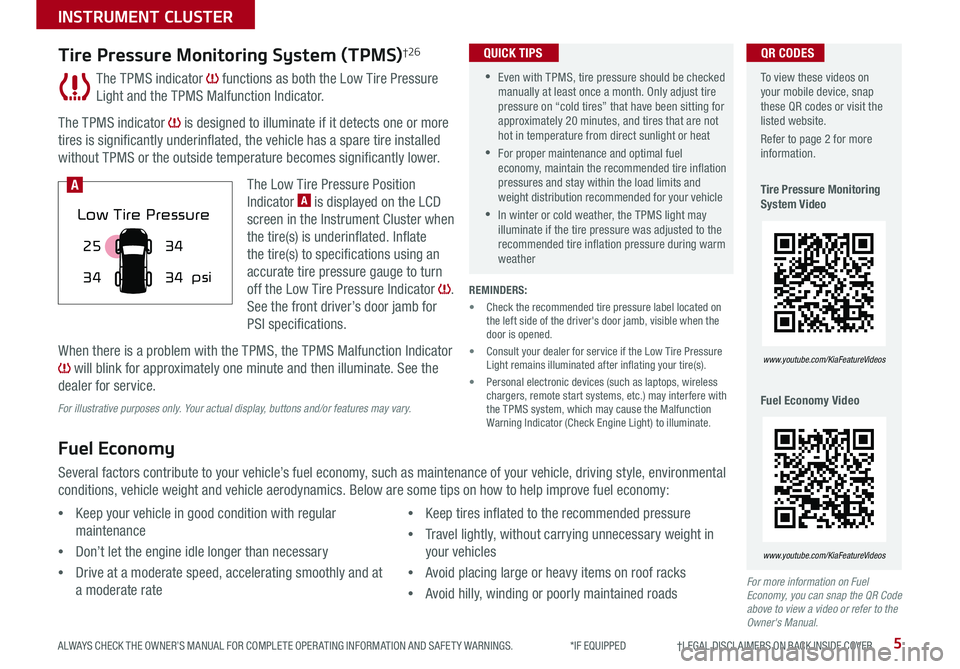
The TPMS indicator functions as both the Low Tire Pressure
Light and the TPMS Malfunction Indicator.
The TPMS indicator is designed to illuminate if it detects one or more
tires is significantly underinflated, the vehicle has a spare tire installed
without TPMS or the outside temperature becomes significantly lower.
The Low Tire Pressure Position
Indicator A is displayed on the LCD
screen in the Instrument Cluster when
the tire(s) is underinflated. Inflate
the tire(s) to specifications using an
accurate tire pressure gauge to turn
off the Low Tire Pressure Indicator .
See the front driver’s door jamb for
PSI specifications.
When there is a problem with the TPMS, the TPMS Malfunction Indicator
will blink for approximately one minute and then illuminate. See the
dealer for service.
Tire Pressure Monitoring System (TPMS)†2 6
REMINDERS:
• Check the recommended tire pressure label located on the left side of the driver's door jamb, visible when the door is opened.
• Consult your dealer for service if the Low Tire Pressure Light remains illuminated after inflating your tire(s).
• Personal electronic devices (such as laptops, wireless chargers, remote start systems, etc.) may interfere with the TPMS system, which may cause the Malfunction Warning Indicator (Check Engine Light) to illuminate.
Fuel Economy
Several factors contribute to your vehicle’s fuel economy, such as maintenance of your vehicle, driving style, environmental
conditions, vehicle weight and vehicle aerodynamics. Below are some tips on how to help improve fuel economy:
For more information on Fuel Economy, you can snap the QR Code above to view a video or refer to the Owner's Manual.
For illustrative purposes only. Your actual display, buttons and/or features may vary.
•Keep your vehicle in good condition with regular
maintenance
•Don’t let the engine idle longer than necessary
•Drive at a moderate speed, accelerating smoothly and at
a moderate rate
•Keep tires inflated to the recommended pressure
•Travel lightly, without carrying unnecessary weight in
your vehicles
•Avoid placing large or heavy items on roof racks
•Avoid hilly, winding or poorly maintained roads
To view these videos on your mobile device, snap these QR codes or visit the listed website.
Refer to page 2 for more information.
Tire Pressure Monitoring System Video
Fuel Economy Video
www.youtube.com/KiaFeatureVideos
www.youtube.com/KiaFeatureVideos
25
34 34
34
psi
Low Tire Pressure
A
QR CODES
•Even with TPMS, tire pressure should be checked manually at least once a month. Only adjust tire pressure on “cold tires” that have been sitting for approximately 20 minutes, and tires that are not hot in temperature from direct sunlight or heat
•For proper maintenance and optimal fuel economy, maintain the recommended tire inflation pressures and stay within the load limits and weight distribution recommended for your vehicle
•In winter or cold weather, the TPMS light may illuminate if the tire pressure was adjusted to the recommended tire inflation pressure during warm weather
QUICK TIPS
INSTRUMENT CLUSTER
Page 9 of 54
7ALWAYS CHECK THE OWNER’S MANUAL FOR COMPLETE OPER ATING INFORMATION AND SAFET Y WARNINGS. *IF EQUIPPED
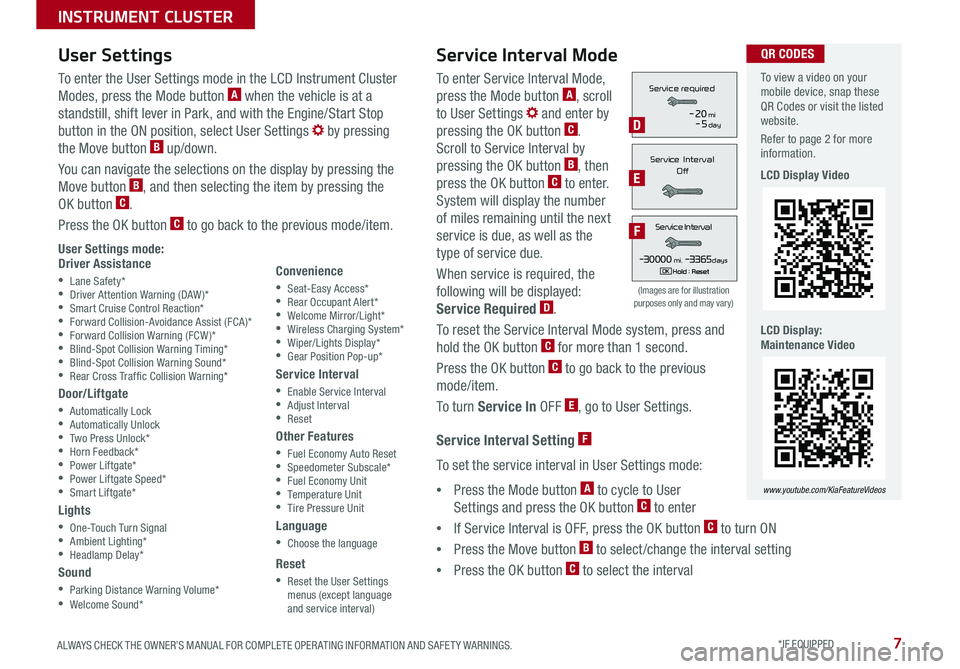
To enter Service Interval Mode,
press the Mode button A, scroll
to User Settings and enter by
pressing the OK button C.
Scroll to Service Interval by
pressing the OK button B, then
press the OK button C to enter.
System will display the number
of miles remaining until the next
service is due, as well as the
type of service due.
When service is required, the
following will be displayed:
Service Required D.
To reset the Service Interval Mode system, press and
hold the OK button C for more than 1 second.
Press the OK button C to go back to the previous
mode/item.
To turn Service In OFF E, go to User Settings.
Service Interval Setting F
To set the service interval in User Settings mode:
•Press the Mode button A to cycle to User
Settings and press the OK button C to enter
•If Service Interval is OFF, press the OK button C to turn ON
•Press the Move button B to select/change the interval setting
•Press the OK button C to select the interval
To enter the User Settings mode in the LCD Instrument Cluster
Modes, press the Mode button A when the vehicle is at a
standstill, shift lever in Park, and with the Engine/Start Stop
button in the ON position, select User Settings by pressing
the Move button B up/down.
You can navigate the selections on the display by pressing the
Move button B, and then selecting the item by pressing the
OK button C.
Press the OK button C to go back to the previous mode/item.
User Settings mode:Driver Assistance
•Lane Safety* •Driver Attention Warning (DAW)* •Smart Cruise Control Reaction* •Forward Collision-Avoidance Assist (FCA)* •Forward Collision Warning (FCW )* •Blind-Spot Collision Warning Timing* •Blind-Spot Collision Warning Sound* •Rear Cross Traf fic Collision Warning*
Door/Liftgate
•Automatically Lock •Automatically Unlock •Two Press Unlock* •Horn Feedback* •Power Liftgate* •Power Liftgate Speed* •Smart Liftgate*
Lights
•One-Touch Turn Signal •Ambient Lighting* •Headlamp Delay*
Sound
•Parking Distance Warning Volume* •Welcome Sound*
User Settings
Convenience
•Seat-Easy Access* •Rear Occupant Alert* •Welcome Mirror/Light* •Wireless Charging System* •Wiper/Lights Display* •Gear Position Pop-up*
Service Interval
•Enable Service Interval •Adjust Interval •Reset
Other Features
•Fuel Economy Auto Reset •Speedometer Subscale* •Fuel Economy Unit •Temperature Unit •Tire Pressure Unit
Language
•Choose the language
Reset
•Reset the User Settings menus (except language and service interval)
Service Interval Mode
(Images are for illustration purposes only and may vary)
Servic e Interval
- 3 0 00 0mi.-3 3 65daysH old : R e se tOK
Service r equired
-20mi-5day
S e rv ic e Interval
Of f
Servic e Interval
- 3 0 00 0mi.-3 3 65daysH old : R e se tOK
Service r equired
-20mi-5day
S e rv ic e Interval
Of f
Servic e Interval
- 3 0 00 0mi.-3 3 65daysH old : R e se tOK
Service r equired
-20mi-5day
S e rv ic e Interval
Of fD
E
F
To view a video on your mobile device, snap these QR Codes or visit the listed website.
Refer to page 2 for more information.
LCD Display Video
LCD Display: Maintenance Video
www.youtube.com/KiaFeatureVideos
QR CODES
INSTRUMENT CLUSTER
Page 11 of 54

9ALWAYS CHECK THE OWNER’S MANUAL FOR COMPLETE OPER ATING INFORMATION AND SAFET Y WARNINGS. *IF EQUIPPED †LEGAL DISCL AIMERS ON BACK INSIDE COVER
The ESC system is designed to help stabilize the vehicle during certain
cornering maneuvers. It is a good idea to keep the ESC turned on for
daily driving whenever possible.
Press the ESC OFF button A to turn Traction Control OFF/ON.
To turn OFF both the Traction Control and Stability Control, press and
hold for more than 3 seconds. Press it again to turn ON.
HAC helps prevent the vehicle from rolling backwards when
accelerating from a stop while on a steep incline. The HAC automatically
activates whether the ESC is OFF or ON but does NOT activate when the
ESC has malfunctioned.
REMINDERS:
•
ESC is active by default at vehicle startup. When the ignition is cycled, ESC will turn ON again
•
The ESC Indicator Light in the instrument cluster will illuminate whenever the ESC is in operation
For more information on Electronic Stability Control (ESC) and its specific features and operation, please refer to your Owner’s Manual.
Electronic Stability Control (ESC)†8
Hill-Start Assist Control (HAC)†8
REMINDERS:
•HAC does not operate when the gear shift is in the P (Park) or the N (Neutral) position.
•In the event of HAC system malfunction, see an Authorized Kia Dealer for service
•HAC does not replace the need to apply brakes while the vehicle is stopped on an incline
(Button panel located left of Steering Wheel)
BCA
Instrument Cluster Control
With the parking lights/headlights ON, press the button B (+) or (-)
to adjust the brightness of the instrument panel illumination.
REMINDER: The Instrument Cluster Control does not adjust brightness on the audio head unit screens. Use the display settings in the Setup menu to adjust the brightness on the screen.
•
•When HAC is active (e.g., during initial acceleration from a stop on an incline), you may notice that the brakes will momentarily remain engaged after you depress the accelerator – this is normal HAC operation. •HAC provides a two-second delay before the vehicle may start rolling backwards
QUICK TIPS
DRIVER'S PANEL
Page 12 of 54

SORENTO FEATURES & FUNCTIONS GUIDE10*IF EQUIPPED †LEGAL DISCL AIMERS ON BACK INSIDE COVER
Blind-Spot Collision-Avoidance Assist (BCA)†6
The BCA system uses radar sensors in the rear bumper to to help alert
the driver, in certain situations, if it detects an approaching vehicle in the
driver’s blind spot area.
To activate the BCA system, go to User Settings by pressing the Mode
button on the Steering Wheel. Select Driver Assistance > Blind Spot Safety
and then press the OK button on the Steering Wheel. Select Active Assist,
Warning Only or Off.
To set the initial warning activation time, go to User Settings > Driver Assistance
> Warning Time and press the OK button. Select the Normal or the Later option.
With the Engine Start /Stop button in the ON position, press the BCA button A to turn the system ON. The button light will illuminate. The outside rearview
mirror warning lights will also illuminate for 3 seconds.
1st-stage alert: When another vehicle is detected within the BCA system
warning boundary B, a yellow indicator will illuminate on the outside rearview
mirrors C.
2nd-stage alert: When 1st stage alert is on and the driver activates a turn
signal, a flashing yellow indicator will illuminate on the outside rearview
mirrors and the system will sound an alert.
REMINDERS:
•
The BCA system will not issue a warning if the vehicle speed is 6 mph or more above the surrounding vehicles
•
When the BCA is OFF or ON and the ignition is cycled, the BCA-R system returns to its previous state
•
The BCA system is a supplemental system. Do not solely rely on these systems, always pay attention to the road and its conditions
The BCA system is not a substitute for safe and proper driving. Always drive safely and use caution.
See the Owner’s Manual for more detailed information, limitations and conditions.
The images on this page are for illustrative purposes only and may not reflect actual feature or operation.
Blind-Spot Collision-Avoidance Assist (BCA) Video
To view a video on your mobile device, snap this QR Code or visit the listed website.
Refer to page 2 for more information.
www.youtube.com/KiaFeatureVideos
A
E
(Button panel located left of Steering Wheel)
QR CODE
C
The BCA system will activate when:
– The system is turned on
– Other vehicles are detected on the rear sides of the vehicle
QUICK TIP
B
DRIVER'S PANEL
Page 13 of 54

11ALWAYS CHECK THE OWNER’S MANUAL FOR COMPLETE OPER ATING INFORMATION AND SAFET Y WARNINGS. *IF EQUIPPED †LEGAL DISCL AIMERS ON BACK INSIDE COVER
Rear Cross-Traffic Collision Avoidance Assist (RCCA)*†6
REMINDERS:
•
LK A /LDW will not issue a warning if the turn signals or hazard lights are activated
•
When the ignition is cycled, LK A /LDW will return to the previously set state
Lane Keeping Assist and Lane Departure Warning are not substitutes for safe driving and may not always alert the driver if the vehicle is driven outside of its lane. Always drive safely and use caution.
For illustrative purposes only. Your actual display, buttons and/or features may vary.
When the LK A sensor does not detect the lane the vehicle is traveling in the lane is not illuminated.
When the LK A sensor detects the lane the vehicle is traveling in, the lane is illuminated.
When the LK A sensor detects the vehicle veering outside of the lane it is traveling in, the lane the vehicle’s crossing will blink (shown in both images above).Lane Keeping AssistLane Keeping Assist
Lane Keeping AssistLane Keeping AssistLane Keeping AssistLane Keeping Assist
Lane Keeping AssistLane Keeping Assist
Lane Keeping AssistLane Keeping Assist
Lane Keeping AssistLane Keeping AssistLane Keeping AssistLane Keeping Assist
Lane Keeping AssistLane Keeping Assist
Lane Keeping Assist (LKA) Video
To view a video on your mobile device, snap this QR Code or visit the listed website. Refer to page 2 for more information.
www.youtube.com/KiaFeatureVideos
QR CODE
If the RCCA system sensors detect approaching vehicles from the rear left or rear right side of the vehicle F, the system will
sound an audible alert, the warning indicators on the outside rearview mirror will illuminate and a message will appear on
the Instrument Cluster screen G. RCCA is designed to operate under the following conditions:
•When the gear shift is in Reverse
•When the vehicle is moving slower than 7 mph
Lane Keeping Assist (LKA)*†6
With the Engine Start /Stop button in the ON position, press the LK A button E to turn the system ON. The instrument cluster
indicator will initially illuminate white. It will remain white when the vehicle is traveling slower than 40 mph and the system does
not detect the lane markers. When the LK A system detects lane markers and can assist steering, the LK A icon will illuminate green.
If LK A detects that you are moving outside of your lane, the vehicle crossing lane indicator will blink and the system issues
an audible warning and displays an Lane Departure Alert (LDW ) alert on the instrument cluster. If the vehicle continues to move
outside of the lane, LK A will apply a slight adjustment to the steering, trying to prevent the vehicle from moving outside its lane.
LK A is the operating mode by default when the LK A button is depressed to ON. To switch between modes (LK A, Active LK A and
Lane Departure), go to User Settings in the Instrument Cluster.
All systems will operate under the following conditions:
• The vehicle speed exceeds approximately 40 mph
• The LK A /LDW system recognizes the lane the vehicle is traveling in
• The vehicle is between the lane markers
REMINDERS:
•
The RCCA feature can be turned OFF/ON in User Settings, under Driver Assistance, Parking Safety
•When vehicle power is cycled, RCCA will remain in the previous state
•
When a vehicle is approaching within the sensing range, and traveling between 2.5 and 22 mph, the RCCA system will show a warning
•
The RCCA systems is a supplemental system. Do not solely rely on this system and always pay attention to the road and its conditions
FG
DRIVER'S PANEL
Page 23 of 54
21ALWAYS CHECK THE OWNER’S MANUAL FOR COMPLETE OPER ATING INFORMATION AND SAFET Y WARNINGS. *IF EQUIPPED †LEGAL DISCL AIMERS ON BACK INSIDE COVER
The Smart Cruise Control with Stop & Go* system is designed to maintain a predetermined distance from vehicles detected
ahead by automatically adjusting the driving speed as needed. When traffic is detected, the vehicle will automatically slow to
maintain a set distance between traffic without depressing the accelerator or brake pedal.
With the SCC on and activated, the vehicle-to-vehicle distance set, and the system detects a vehicle slowing or stopping, the system
can bring the vehicle to a complete stop. When the vehicle ahead starts to move forward, the SCC system re-engages. If the vehicle
ahead stops for more than 3 seconds, the accelerator pedal or the RES+ button must be pressed to start moving the vehicle.
To set/adjust the SCC speed:
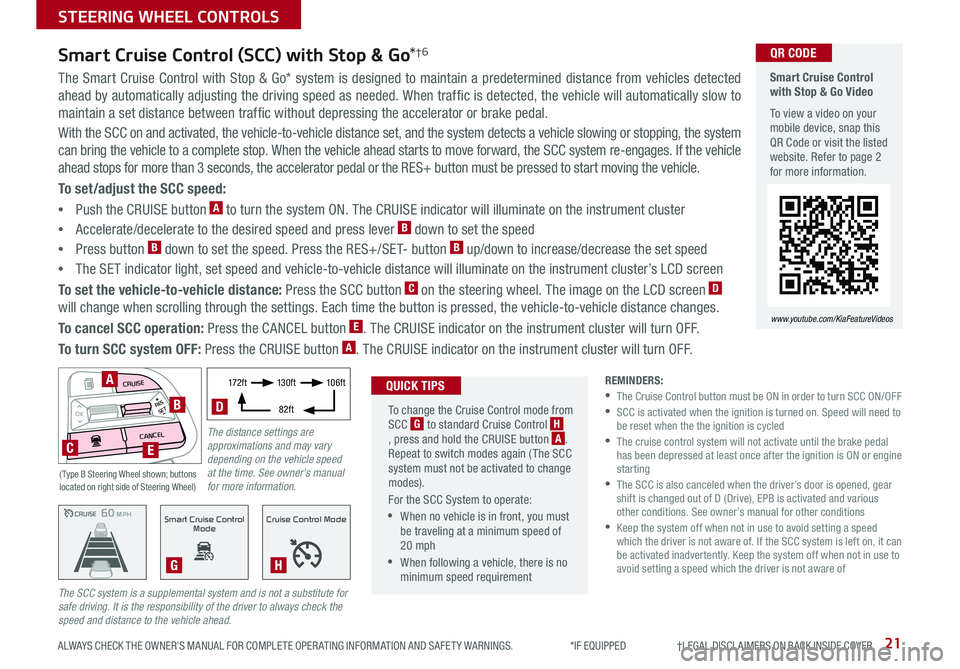
•Push the CRUISE button A to turn the system ON. The CRUISE indicator will illuminate on the instrument cluster
•Accelerate/decelerate to the desired speed and press lever B down to set the speed
•Press button B down to set the speed. Press the RES+/SET- button B up/down to increase/decrease the set speed
•The SET indicator light, set speed and vehicle-to-vehicle distance will illuminate on the instrument cluster’s LCD screen
To set the vehicle-to-vehicle distance: Press the SCC button C on the steering wheel. The image on the LCD screen D
will change when scrolling through the settings. Each time the button is pressed, the vehicle-to-vehicle distance changes.
To cancel SCC operation: Press the CANCEL button E. The CRUISE indicator on the instrument cluster will turn OFF.
To turn SCC system OFF: Press the CRUISE button A. The CRUISE indicator on the instrument cluster will turn OFF.
Smart Cruise Control (SCC) with Stop & Go*†6
REMINDERS: •
The Cruise Control button must be ON in order to turn SCC ON/OFF •
SCC is activated when the ignition is turned on. Speed will need to be reset when the the ignition is cycled •
The cruise control system will not activate until the brake pedal has been depressed at least once after the ignition is ON or engine starting •
The SCC is also canceled when the driver’s door is opened, gear shift is changed out of D (Drive), EPB is activated and various other conditions. See owner’s manual for other conditions •
Keep the system off when not in use to avoid setting a speed which the driver is not aware of. If the SCC system is left on, it can be activated inadvertently. Keep the system off when not in use to avoid setting a speed which the driver is not aware of
The SCC system is a supplemental system and is not a substitute for safe driving. It is the responsibility of the driver to always check the speed and distance to the vehicle ahead.CRUISE100 MPHCRUISE100 MPH
CRUISE60 MPHCRUISE100 MPHSmart Cruise Control
Mode
G
Cruise Control Mode
H
Smart Cruise Control with Stop & Go Video
To view a video on your mobile device, snap this QR Code or visit the listed website. Refer to page 2 for more information.
www.youtube.com/KiaFeatureVideos
QR CODE
To change the Cruise Control mode from SCC G to standard Cruise Control H, press and hold the CRUISE button A. Repeat to switch modes again ( The SCC system must not be activated to change modes).
For the SCC System to operate:
•When no vehicle is in front, you must be traveling at a minimum speed of 20 mph
•When following a vehicle, there is no minimum speed requirement
QUICK TIPS
The distance settings are approximations and may vary depending on the vehicle speed at the time. See owner’s manual for more information.
17 2 f t13 0 f t
82ft
10 6 f t
D
( Type B Steering Wheel shown; buttons located on right side of Steering Wheel)
MODE
RESOKSET
CRUISE
CANCEL
B
CE
A
STEERING WHEEL CONTROLS
Page 33 of 54
31ALWAYS CHECK THE OWNER’S MANUAL FOR COMPLETE OPER ATING INFORMATION AND SAFET Y WARNINGS. *IF EQUIPPED
Aux/Multimedia USB Ports, Power Outlets, & USB Charger Ports*
USB Charger Ports*
Digital Clock
Press the SETUP key, then the Date/ Time
button to display the Clock setting screen.
Then use the onscreen buttons to adjust
time.
12VMAX
180W12VMAX
180W
AUX USB
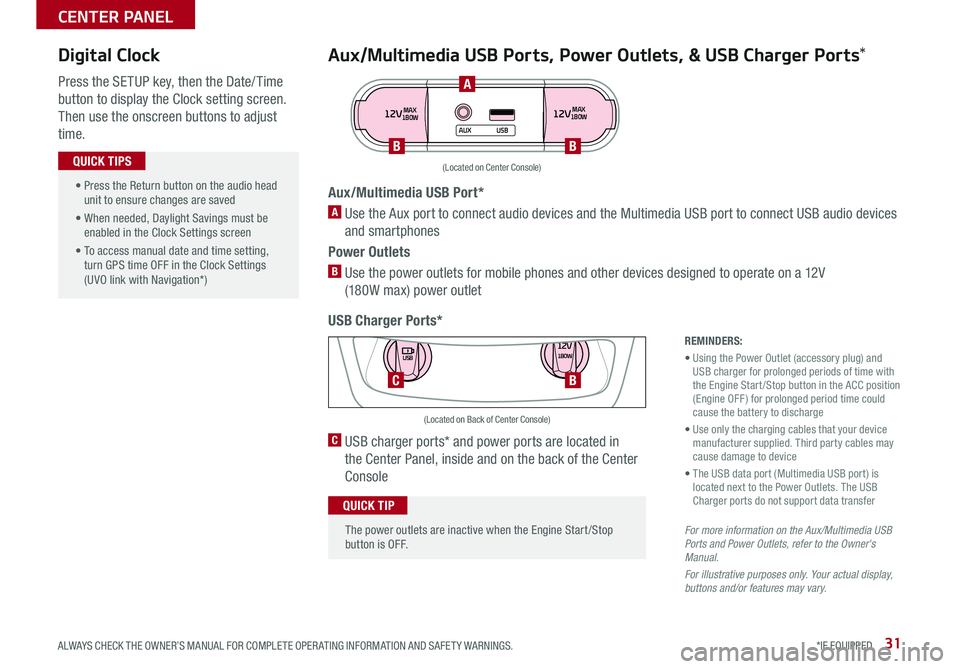
Aux/Multimedia USB Port*
A Use the Aux port to connect audio devices and the Multimedia USB port to connect USB audio devices
and smartphones
Power Outlets
B Use the power outlets for mobile phones and other devices designed to operate on a 12V
(180W max) power outlet
(Located on Center Console)
REMINDERS:
• Using the Power Outlet (accessory plug) and USB charger for prolonged periods of time with the Engine Start /Stop button in the ACC position (Engine OFF ) for prolonged period time could cause the battery to discharge
• Use only the charging cables that your device manufacturer supplied. Third party cables may cause damage to device
• The USB data port (Multimedia USB port) is located next to the Power Outlets. The USB Charger ports do not support data transfer
For more information on the Aux/Multimedia USB Ports and Power Outlets, refer to the Owner's Manual.
For illustrative purposes only. Your actual display, buttons and/or features may vary.
C USB charger ports* and power ports are located in
the Center Panel, inside and on the back of the Center
Console
12V180W
USB
C
(Located on Back of Center Console)
• Press the Return button on the audio head unit to ensure changes are saved
• When needed, Daylight Savings must be enabled in the Clock Settings screen
• To access manual date and time setting, turn GPS time OFF in the Clock Settings (UVO link with Navigation*)
QUICK TIPS
The power outlets are inactive when the Engine Start /Stop button is OFF.
QUICK TIP
A
BB
B
CENTER PANEL