ECU KIA Soul 2010 1.G Owner's Guide
[x] Cancel search | Manufacturer: KIA, Model Year: 2010, Model line: Soul, Model: KIA Soul 2010 1.GPages: 314, PDF Size: 6.39 MB
Page 240 of 314
621
What to do in an emergency
When towing your vehicle in an emer-
gency without wheel dollies :
1. Set the ignition switch in the ACC posi-tion.
2. Place the transaxle shift lever in N (Neutral).
3. Release the parking brake.
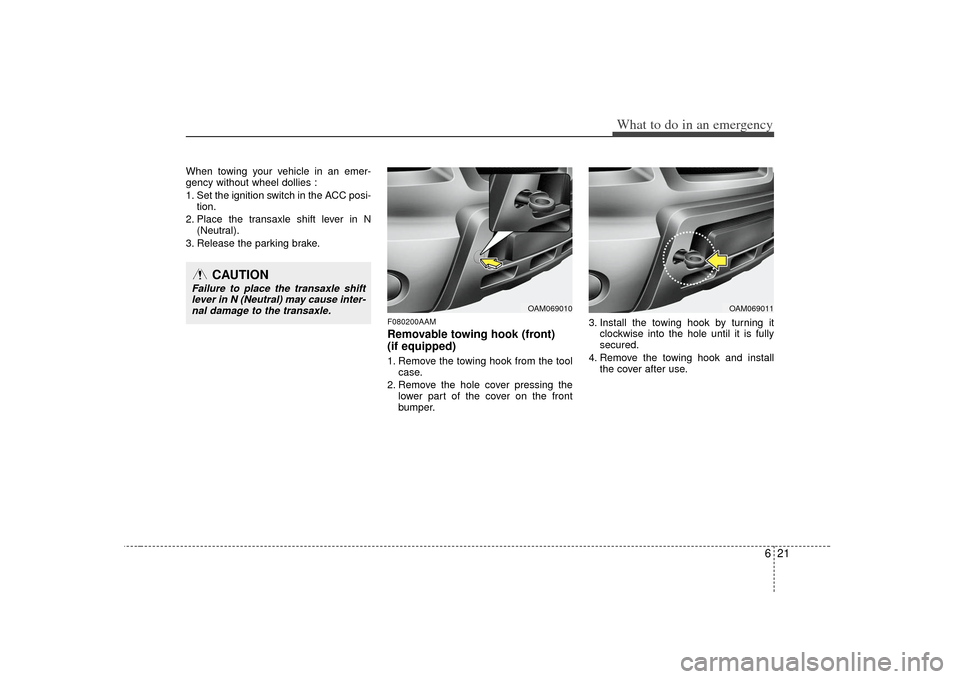
F080200AAMRemovable towing hook (front)
(if equipped)1. Remove the towing hook from the tool case.
2. Remove the hole cover pressing the lower part of the cover on the front
bumper. 3. Install the towing hook by turning it
clockwise into the hole until it is fully
secured.
4. Remove the towing hook and install the cover after use.
CAUTION
Failure to place the transaxle shiftlever in N (Neutral) may cause inter-nal damage to the transaxle.
OAM069010
OAM069011
Page 241 of 314
What to do in an emergency22
6F080300AHM-EUEmergency towingIf towing is necessary, we recommend
you to have it done by an authorized
KIA dealer or a commercial tow truck
service. If towing service is not available in an
emergency, your vehicle may be tem-
porarily towed using a cable or chain
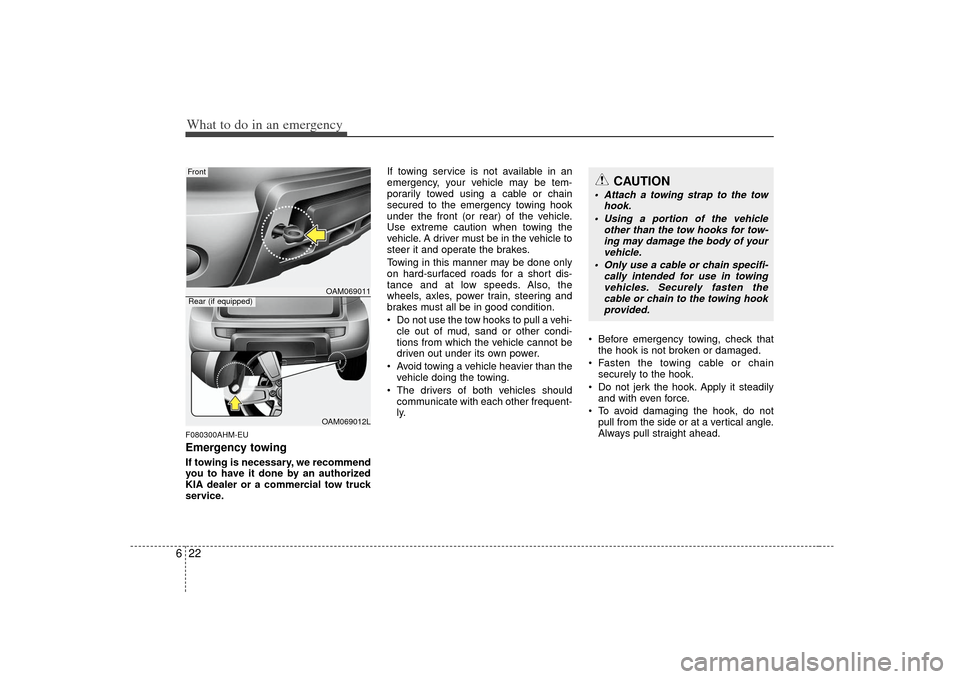
secured to the emergency towing hook
under the front (or rear) of the vehicle.
Use extreme caution when towing the
vehicle. A driver must be in the vehicle to
steer it and operate the brakes.
Towing in this manner may be done only
on hard-surfaced roads for a short dis-
tance and at low speeds. Also, the
wheels, axles, power train, steering and
brakes must all be in good condition.
Do not use the tow hooks to pull a vehi-
cle out of mud, sand or other condi-
tions from which the vehicle cannot be
driven out under its own power.
Avoid towing a vehicle heavier than the vehicle doing the towing.
The drivers of both vehicles should communicate with each other frequent-
ly. Before emergency towing, check that
the hook is not broken or damaged.
Fasten the towing cable or chain securely to the hook.
Do not jerk the hook. Apply it steadily and with even force.
To avoid damaging the hook, do not pull from the side or at a vertical angle.
Always pull straight ahead.
CAUTION
Attach a towing strap to the tow hook.
Using a portion of the vehicle other than the tow hooks for tow-ing may damage the body of yourvehicle.
Only use a cable or chain specifi- cally intended for use in towingvehicles. Securely fasten thecable or chain to the towing hook provided.
OAM069011OAM069012L
FrontRear (if equipped)
Page 254 of 314
711
Maintenance
EXPLANATION OF SCHEDULED MAINTENANCE ITEMSG050100AHMEngine oil and filterThe engine oil and filter should be
changed at the intervals specified in the
maintenance schedule. If the vehicle is
being driven in severe conditions, more
frequent oil and filter changes are
required.G050200AUNDrive beltsInspect all drive belts for evidence of
cuts, cracks, excessive wear or oil satu-
ration and replace if necessary. Drive
belts should be checked periodically for
proper tension and adjusted as neces-
sary.
G050300AUNFuel filter (cartridge)A clogged filter can limit the speed at
which the vehicle may be driven, damage
the emission system and cause multiple
issues such as hard starting. If an exces-
sive amount of foreign matter accumu-
lates in the fuel tank, the filter may
require replacement more frequently.
After installing a new filter, run the engine
for several minutes, and check for leaks
at the connections. Fuel filters should be
installed by an authorized KIA dealer.G050400AUN-EUFuel lines, fuel hoses and con-
nectionsCheck the fuel lines, fuel hoses and con-
nections for leakage and damage. Have
an authorized KIA dealer replace any
damaged or leaking parts immediately.G050500AUNTiming belt (if equipped)Inspect all parts related to the timing belt
for damage and deformation. Replace
any damaged parts immediately.
G050600AUNVapor hose and fuel filler capThe vapor hose and fuel filler cap should
be inspected at those intervals specified
in the maintenance schedule. Make sure
that a new vapor hose or fuel filler cap is
correctly replaced.G050700AUNVacuum crankcase ventilation
hosesInspect the surface of hoses for evidence
of heat and/or mechanical damage. Hard
and brittle rubber, cracking, tears, cuts,
abrasions, and excessive swelling indi-
cate deterioration. Particular attention
should be paid to examine those hose
surfaces nearest to high heat sources,
such as the exhaust manifold.
Inspect the hose routing to assure that
the hoses do not come in contact with
any heat source, sharp edges or moving
component which might cause heat dam-
age or mechanical wear. Inspect all hose
connections, such as clamps and cou-
plings, to make sure they are secure, and
that no leaks are present. Hoses should
be replaced immediately if there is any
evidence of deterioration or damage.
Page 265 of 314
Maintenance22
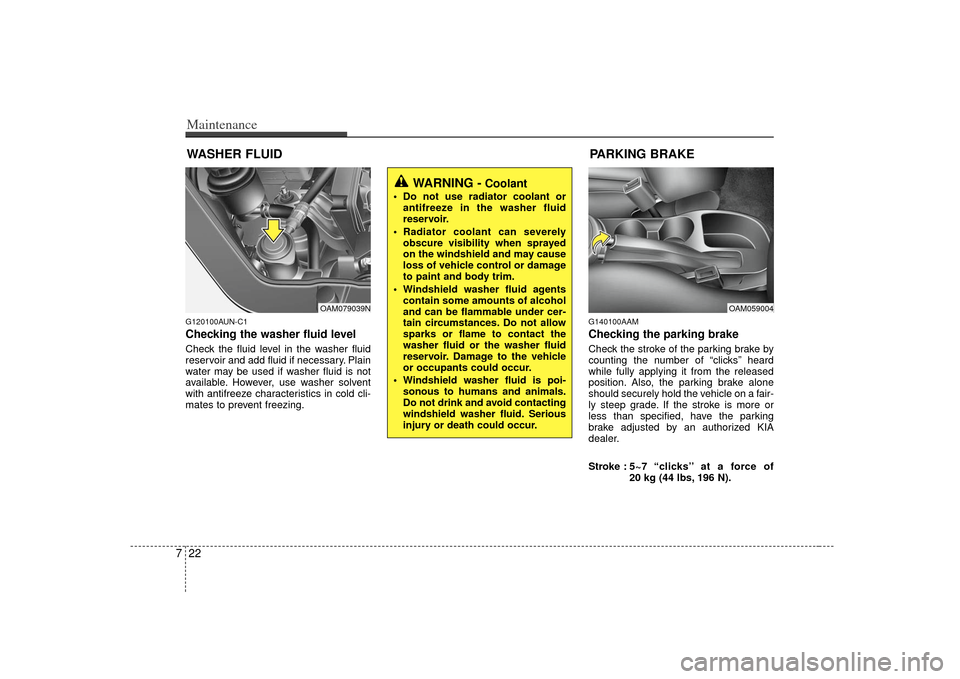
7WASHER FLUIDG120100AUN-C1Checking the washer fluid levelCheck the fluid level in the washer fluid
reservoir and add fluid if necessary. Plain
water may be used if washer fluid is not
available. However, use washer solvent
with antifreeze characteristics in cold cli-
mates to prevent freezing.
G140100AAMChecking the parking brake Check the stroke of the parking brake by
counting the number of “clicks’’ heard
while fully applying it from the released
position. Also, the parking brake alone
should securely hold the vehicle on a fair-
ly steep grade. If the stroke is more or
less than specified, have the parking
brake adjusted by an authorized KIA
dealer.
Stroke : 5~7 “clicks’’ at a force of
20 kg (44 lbs, 196 N).
WARNING -
Coolant
Do not use radiator coolant or
antifreeze in the washer fluid
reservoir.
Radiator coolant can severely obscure visibility when sprayed
on the windshield and may cause
loss of vehicle control or damage
to paint and body trim.
Windshield washer fluid agents contain some amounts of alcohol
and can be flammable under cer-
tain circumstances. Do not allow
sparks or flame to contact the
washer fluid or the washer fluid
reservoir. Damage to the vehicle
or occupants could occur.
Windshield washer fluid is poi- sonous to humans and animals.
Do not drink and avoid contacting
windshield washer fluid. Serious
injury or death could occur.
PARKING BRAKE
OAM079039N
OAM059004
Page 270 of 314
727
Maintenance
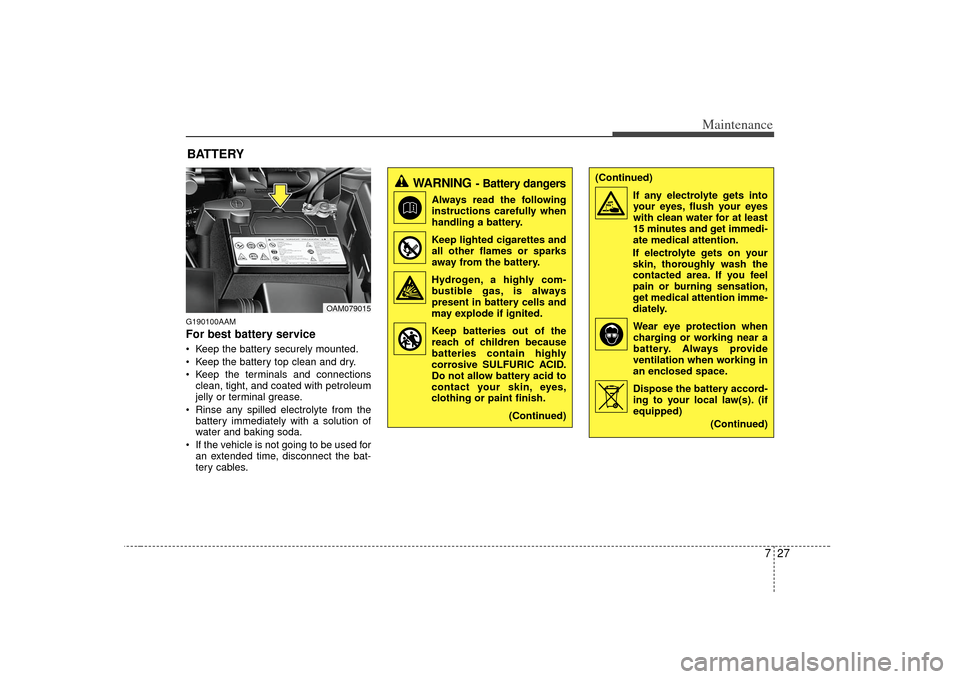
BATTERYG190100AAMFor best battery service Keep the battery securely mounted.
Keep the battery top clean and dry.
Keep the terminals and connectionsclean, tight, and coated with petroleum
jelly or terminal grease.
Rinse any spilled electrolyte from the battery immediately with a solution of
water and baking soda.
If the vehicle is not going to be used for an extended time, disconnect the bat-
tery cables.
WARNING
- Battery dangers
Always read the following
instructions carefully when
handling a battery.
Keep lighted cigarettes and all other flames or sparks
away from the battery.
Hydrogen, a highly com- bustible gas, is always
present in battery cells and
may explode if ignited.
Keep batteries out of the reach of children because
batteries contain highly
corrosive SULFURIC ACID.
Do not allow battery acid to
contact your skin, eyes,
clothing or paint finish.
(Continued)
(Continued)If any electrolyte gets intoyour eyes, flush your eyes
with clean water for at least
15 minutes and get immedi-
ate medical attention.
If electrolyte gets on your
skin, thoroughly wash the
contacted area. If you feel
pain or burning sensation,
get medical attention imme-
diately.
Wear eye protection whencharging or working near a
battery. Always provide
ventilation when working in
an enclosed space.
Dispose the battery accord- ing to your local law(s). (if
equipped)
(Continued)
OAM079015
Page 289 of 314
Maintenance46
73. Check the removed fuse; replace it if it
is blown. To remove or insert the fuse,
use the fuse puller in the engine com-
partment fuse panel.
4. Push in a new fuse of the same rating, and make sure it fits tightly in the clips.
If it fits loosely, consult an authorized
KIA dealer.
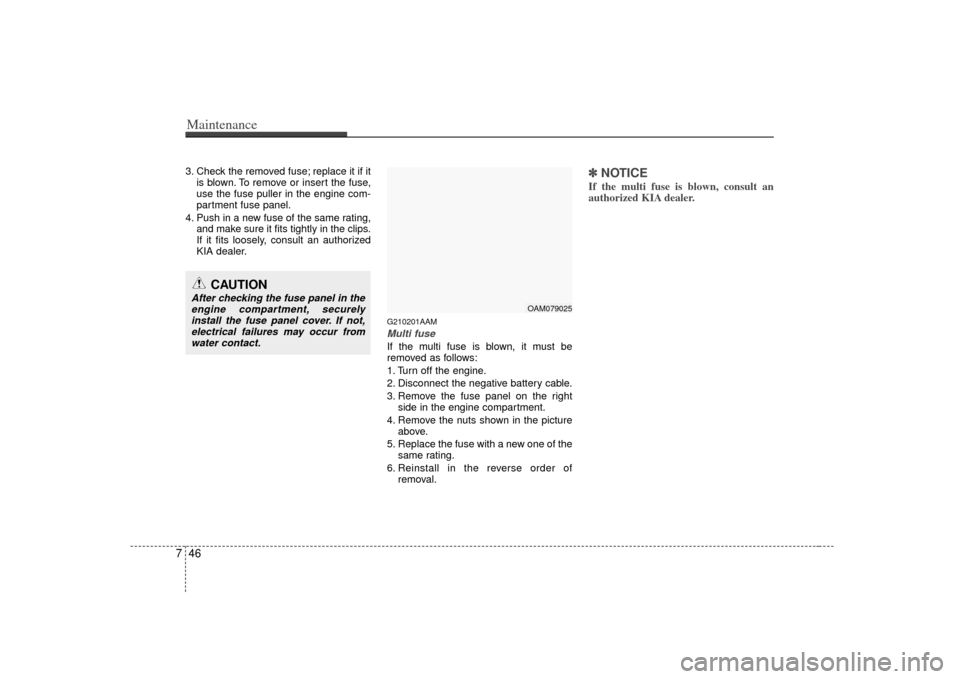
G210201AAMMulti fuseIf the multi fuse is blown, it must be
removed as follows:
1. Turn off the engine.
2. Disconnect the negative battery cable.
3. Remove the fuse panel on the rightside in the engine compartment.
4. Remove the nuts shown in the picture above.
5. Replace the fuse with a new one of the same rating.
6. Reinstall in the reverse order of removal.
✽ ✽NOTICEIf the multi fuse is blown, consult an
authorized KIA dealer.
CAUTION
After checking the fuse panel in the
engine compartment, securelyinstall the fuse panel cover. If not,electrical failures may occur fromwater contact.
OAM079025
Page 292 of 314
749
Maintenance
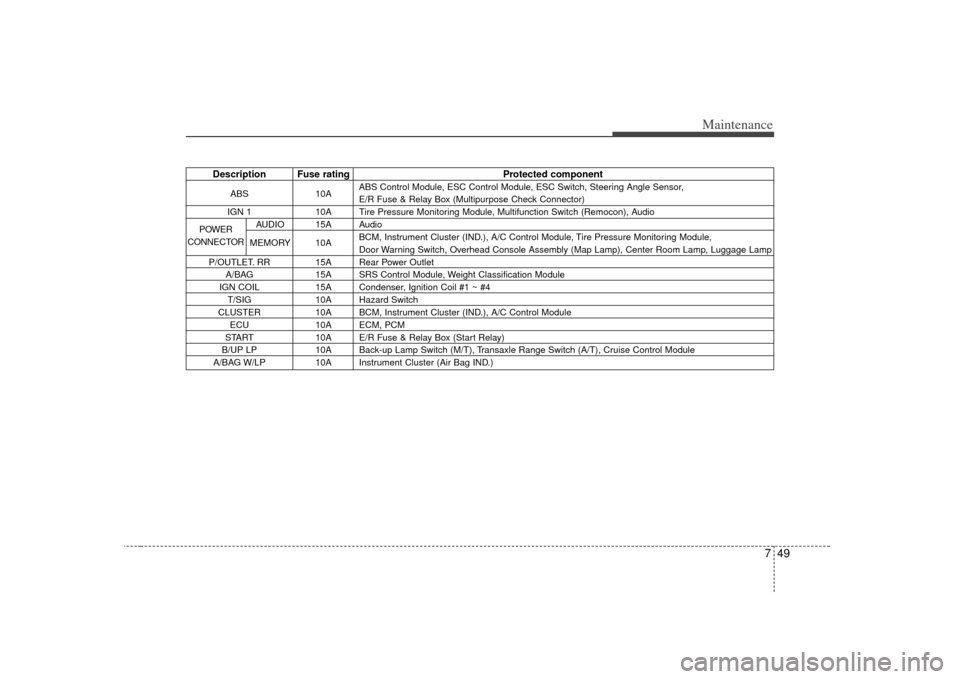
Description Fuse ratingProtected component
ABS10AABS Control Module, ESC Control Module, ESC Switch, Steering Angle Sensor,
E/R Fuse & Relay Box (Multipurpose Check Connector)
IGN 1 10A Tire Pressure Monitoring Module, Multifunction Switch (Remocon), Audio
AUDIO 15A Audio
MEMORY 10A BCM, Instrument Cluster (IND.), A/C Control Module, Tire Pressure Monitoring Module,
Door Warning Switch, Overhead Console Assembly (Map Lamp), Center Room Lamp, Luggage Lamp
P/OUTLET. RR 15A Rear Power Outlet A/BAG 15A SRS Control Module, Weight Classification Module
IGN COIL 15A Condenser, Ignition Coil #1 ~ #4
T/SIG 10A Hazard Switch
CLUSTER 10A BCM, Instrument Cluster (IND.), A/C Control Module
ECU 10A ECM, PCM
START 10A E/R Fuse & Relay Box (Start Relay)
B/UP LP 10A Back-up Lamp Switch (M/T), Transaxle Range Switch (A/T), Cruise Control Module
A/BAG W/LP 10A Instrument Cluster (Air Bag IND.)
POWER
CONNECTOR
Page 293 of 314
Maintenance50
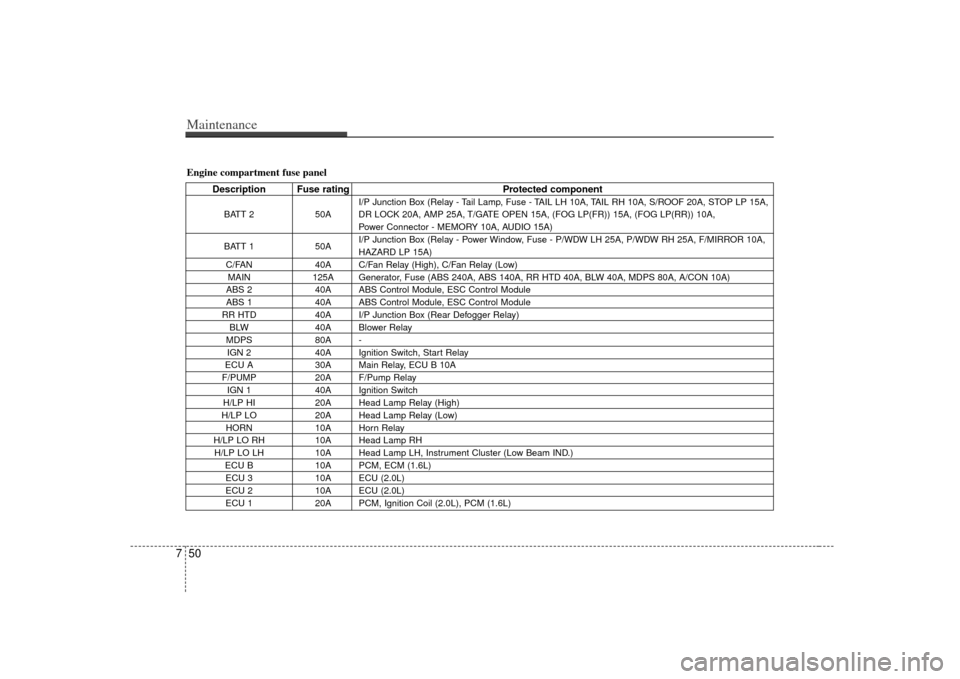
7Engine compartment fuse panel
Description Fuse rating Protected component
BATT 250AI/P Junction Box (Relay - Tail Lamp, Fuse - TAIL LH 10A, TAIL RH 10A, S/ROOF 20A, STOP LP 15A,
DR LOCK 20A, AMP 25A, T/GATE OPEN 15A, (FOG LP(FR)) 15A, (FOG LP(RR)) 10A,
Power Connector - MEMORY 10A, AUDIO 15A)
BATT 1 50AI/P Junction Box (Relay - Power Window, Fuse - P/WDW LH 25A, P/WDW RH 25A, F/MIRROR 10A,
HAZARD LP 15A)
C/FAN 40A C/Fan Relay (High), C/Fan Relay (Low)
MAIN 125A Generator, Fuse (ABS 240A, ABS 140A, RR HTD 40A, BLW 40A, MDPS 80A, A/CON 10A)
ABS 2 40A ABS Control Module, ESC Control Module
ABS 1 40A ABS Control Module, ESC Control Module
RR HTD 40A I/P Junction Box (Rear Defogger Relay)
BLW 40A Blower Relay
MDPS 80A -
IGN 2 40A Ignition Switch, Start Relay
ECU A 30A Main Relay, ECU B 10A
F/PUMP 20A F/Pump Relay
IGN 1 40A Ignition Switch
H/LP HI 20A Head Lamp Relay (High)
H/LP LO 20A Head Lamp Relay (Low)
HORN 10A Horn Relay
H/LP LO RH 10A Head Lamp RH
H/LP LO LH 10A Head Lamp LH, Instrument Cluster (Low Beam IND.)
ECU B 10A PCM, ECM (1.6L)
ECU 3 10A ECU (2.0L)
ECU 2 10A ECU (2.0L)
ECU 1 20A PCM, Ignition Coil (2.0L), PCM (1.6L)