sensor KIA Soul 2014 2.G User Guide
[x] Cancel search | Manufacturer: KIA, Model Year: 2014, Model line: Soul, Model: KIA Soul 2014 2.GPages: 500, PDF Size: 13.89 MB
Page 85 of 500

369
Safety features of your vehicle
Do not place items under the
front seats. Placing items under
the front seats could interfere with
the operation of the supplemental
restraint system sensing compo-
nents and wiring harnesses.
Never hold an infant or child on
your lap. The infant or child could
be seriously injured or killed in the
event of a crash. All infants and
children should be properly
restrained in appropriate child
safety seats or seat belts in the
rear seat.Adding equipment to or modi-
fying your air bag-equipped
vehicle
If you modify your vehicle by changing
your vehicle's frame, bumper system,
front end or side sheet metal or ride
height, this may affect the operation of
your vehicle's air bag system.
WARNING
Sitting improperly or out of position can cause occupants
to be shifted too close to a
deploying air bag, strike the
interior structure or be thrown
from the vehicle resulting in
serious injury or death.
Always sit upright with the seatback in an upright posi-
tion, centered on the seat
cushion with your seat belt
on, legs comfortably extended
and your feet on the floor.
Always have the ignition OFF when the vehicle is being
towed or where it may other-
wise be tilted, since the side
and/or curtain air bags may
inflate if the sensors interpret
those tilt angles as a potential
rollover.
Be careful not to cause impact to the doors when the ignition
is ON. The air bags may inflate.
Page 136 of 500
Features of your vehicle
50
4
Electric chromic mirror (ECM)
(if equipped)
The electric rearview mirror automat-
ically controls the glare from the
headlights of the vehicles behind you
in nighttime or low light driving condi-
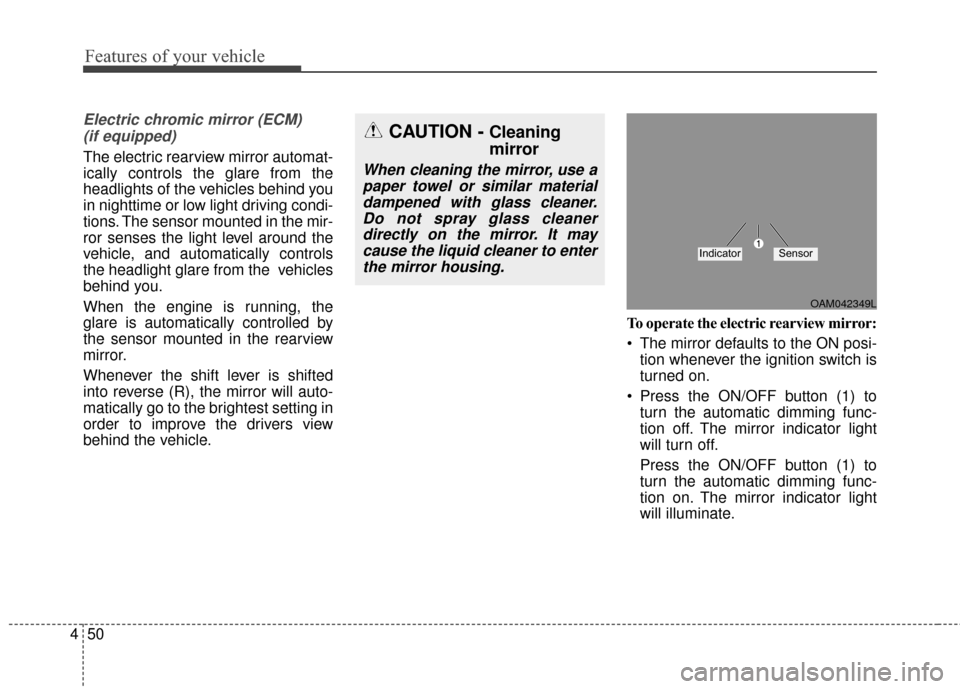
tions. The sensor mounted in the mir-
ror senses the light level around the
vehicle, and automatically controls
the headlight glare from the vehicles
behind you.
When the engine is running, the
glare is automatically controlled by
the sensor mounted in the rearview
mirror.
Whenever the shift lever is shifted
into reverse (R), the mirror will auto-
matically go to the brightest setting in
order to improve the drivers view
behind the vehicle. To operate the electric rearview mirror:
The mirror defaults to the ON posi-
tion whenever the ignition switch is
turned on.
Press the ON/OFF button (1) to turn the automatic dimming func-
tion off. The mirror indicator light
will turn off.
Press the ON/OFF button (1) to
turn the automatic dimming func-
tion on. The mirror indicator light
will illuminate.
CAUTION - Cleaning
mirror
When cleaning the mirror, use apaper towel or similar materialdampened with glass cleaner.Do not spray glass cleanerdirectly on the mirror. It maycause the liquid cleaner to enterthe mirror housing.
OAM042349L
IndicatorSensor
Page 177 of 500
491
Features of your vehicle
Auto light position (if equipped)
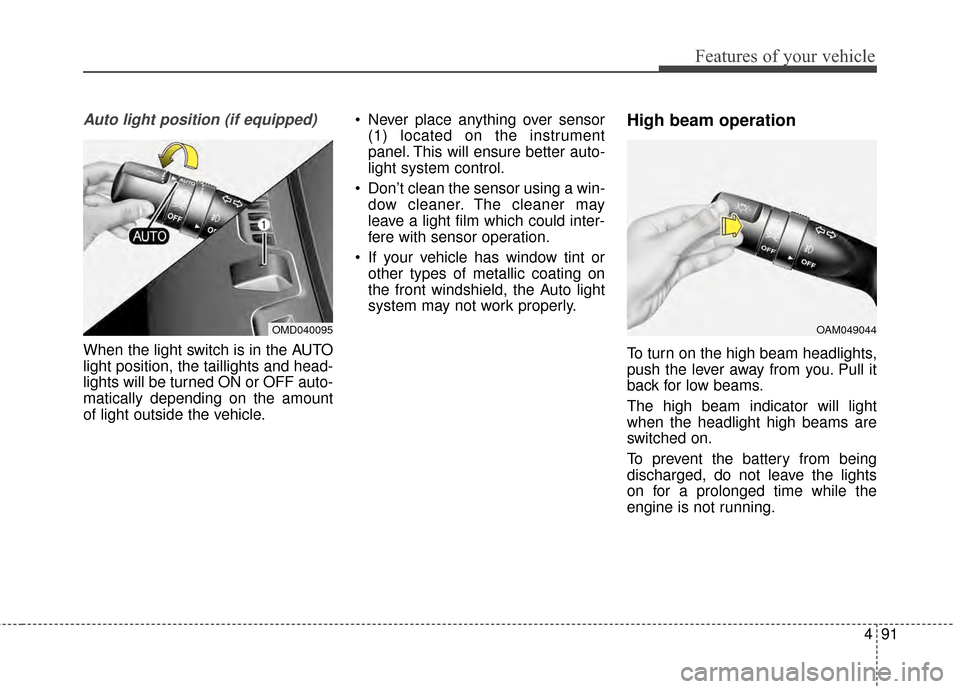
When the light switch is in the AUTO
light position, the taillights and head-
lights will be turned ON or OFF auto-
matically depending on the amount
of light outside the vehicle. Never place anything over sensor
(1) located on the instrument
panel. This will ensure better auto-
light system control.
Don’t clean the sensor using a win- dow cleaner. The cleaner may
leave a light film which could inter-
fere with sensor operation.
If your vehicle has window tint or other types of metallic coating on
the front windshield, the Auto light
system may not work properly.
High beam operation
To turn on the high beam headlights,
push the lever away from you. Pull it
back for low beams.
The high beam indicator will light
when the headlight high beams are
switched on.
To prevent the battery from being
discharged, do not leave the lights
on for a prolonged time while the
engine is not running.
OMD040095OAM049044
Page 201 of 500
4115
Features of your vehicle
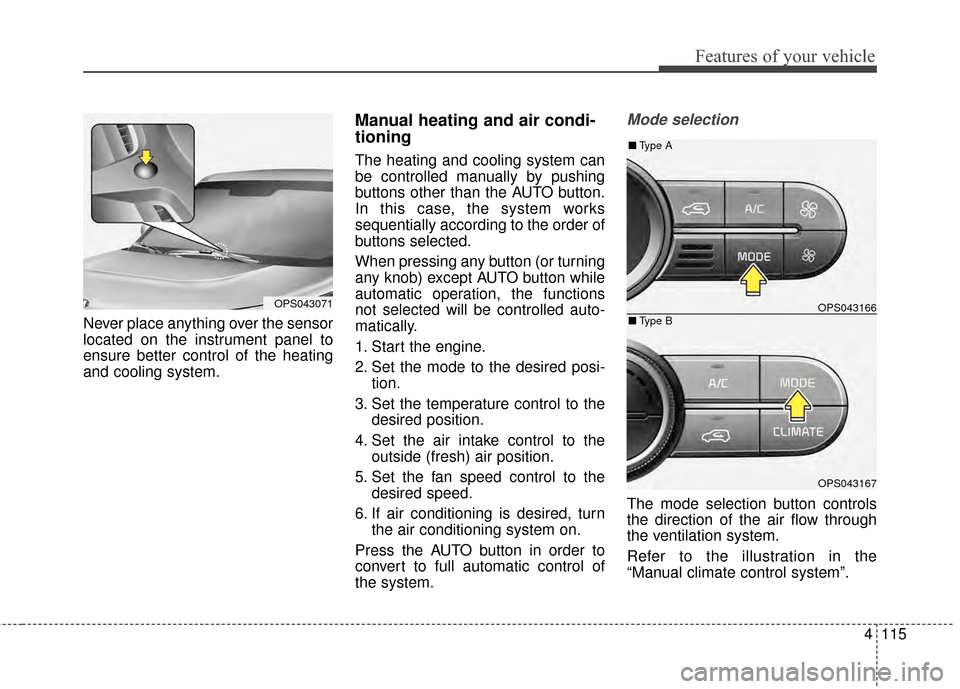
Never place anything over the sensor
located on the instrument panel to
ensure better control of the heating
and cooling system.
Manual heating and air condi-
tioning
The heating and cooling system can
be controlled manually by pushing
buttons other than the AUTO button.
In this case, the system works
sequentially according to the order of
buttons selected.
When pressing any button (or turning
any knob) except AUTO button while
automatic operation, the functions
not selected will be controlled auto-
matically.
1. Start the engine.
2. Set the mode to the desired posi-tion.
3. Set the temperature control to the desired position.
4. Set the air intake control to the outside (fresh) air position.
5. Set the fan speed control to the desired speed.
6. If air conditioning is desired, turn the air conditioning system on.
Press the AUTO button in order to
convert to full automatic control of
the system.
Mode selection
The mode selection button controls
the direction of the air flow through
the ventilation system.
Refer to the illustration in the
“Manual climate control system”.
OPS043071OPS043166
OPS043167
■ Type B
■Type A
Page 337 of 500
Driving your vehicle
50
5
ISG system malfunction
The system may not operate
when:
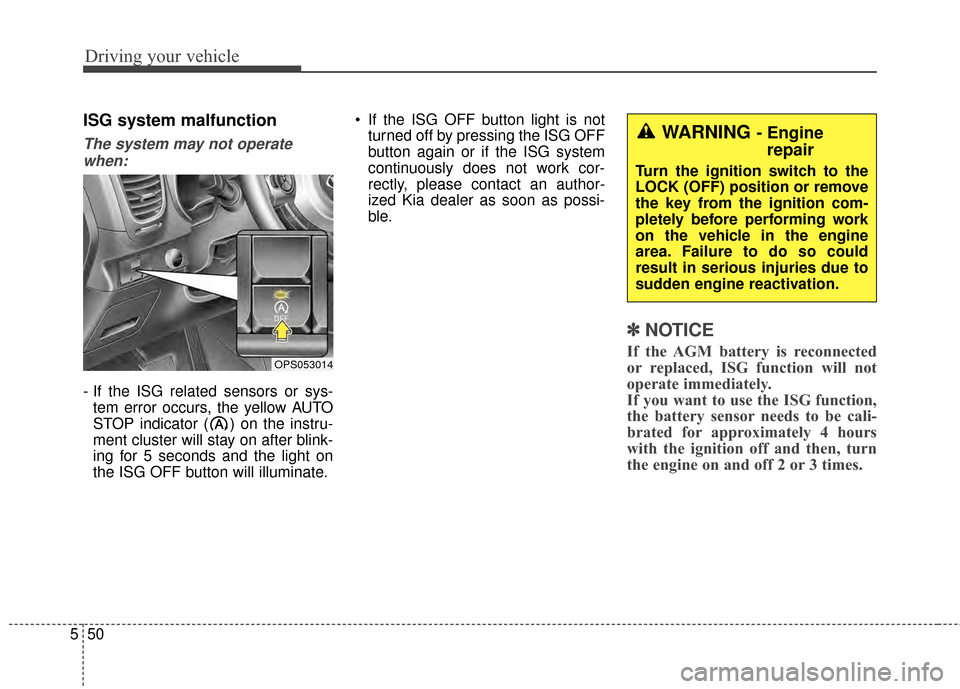
- If the ISG related sensors or sys- tem error occurs, the yellow AUTO
STOP indicator ( ) on the instru-
ment cluster will stay on after blink-
ing for 5 seconds and the light on
the ISG OFF button will illuminate. If the ISG OFF button light is not
turned off by pressing the ISG OFF
button again or if the ISG system
continuously does not work cor-
rectly, please contact an author-
ized Kia dealer as soon as possi-
ble.
✽ ✽ NOTICE
If the AGM battery is reconnected
or replaced, ISG function will not
operate immediately.
If you want to use the ISG function,
the battery sensor needs to be cali-
brated for approximately 4 hours
with the ignition off and then, turn
the engine on and off 2 or 3 times.
WARNING - Engine
repair
Turn the ignition switch to the
LOCK (OFF) position or remove
the key from the ignition com-
pletely before performing work
on the vehicle in the engine
area. Failure to do so could
result in serious injuries due to
sudden engine reactivation.
OPS053014
Page 376 of 500
621
What to do in an emergency
8. With the engine start/stop buttonposition on or ignition switch posi-
tion on, switch on the compressor
and let it run for approximately 5~7
minutes to fill the sealant up to
proper pressure. (refer to the Tire
and Wheels, chapter 8). The infla-
tion pressure of the tire after filling
is unimportant and will be
checked/corrected later.
Be careful not to overinflate the tire
and stay away from the tire when
filling it. 9. Switch off the compressor.
10. Detach the hoses from the
sealant bottle connector and
from the tire valve.
Return the Tire Mobility Kit to its stor-
age location in the vehicle.Distributing the sealant
11. Immediately drive approximately 7~10km (4~6miles or, about
10min) to evenly distribute the
sealant in the tire.
Do not exceed a speed of 80 km/h
(50 mph). If possible, do not fall
below a speed of 20 km/h (12 mph).
While driving, if you experience any
unusual vibration, ride disturbance or
noise, reduce your speed and drive
with caution until you can safely pull
off of the side of the road.
Call for road side service or towing.
When you use the Tire Mobility Kit,
the tire pressure sensors and wheel
may be damaged by sealant, remove
the sealant stained with tire pressure
sensors and wheel and inspect in
authorized dealer.
CAUTION - Tire pressure
Do not attempt to drive your vehicle if the tire pressure isbelow 200kpa (29 PSI). Thiscould result in an accident dueto sudden tire failure.
WARNING - Carbon monoxide
Do not leave your vehicle run-
ning in a poorly ventilated area
for extended periods of time.
Carbon monoxide poisoning
and suffocation can occur.
Page 377 of 500
What to do in an emergency
22
6
Checking the tire inflation pres-
sure
1.After driving approximately
7~10km (4~6miles or about
10min), stop at a safety location.
2.Connect connection hose (9) of the compressor directly to the tire
valve.
3.Plug the compressor power cord into the vehicle power outlet.
4.Adjust the tire inflation pressure to the recommended tire inflation.
With the ignition switched on, pro-
ceed as follows.
- To increase the inflation pres-sure : Switch on the compressor,
position I. To check the current
inflation pressure setting, briefly
switch off the compressor.✽ ✽ NOTICE
The pressure gauge may show high-
er than actual reading when the
compressor is running. To get an
accurate tire pressure, the compres-
sor needs to be turned off.
- To reduce the inflation pres-
sure: Loosen the screw cap (8)
on the compressor hose.
Notes on the safe use of the
Tire Mobility Kit
Park your car at the side of the road so that you can work with the
TMK away from moving traffic.
Place your warning triangle in a
prominent place to make passing
vehicles aware of your location.
To be sure your vehicle will not move, even when you're on fairly
level ground, always set your park-
ing brake.
Only use the TMK for sealing/infla- tion passenger car tires. Do not
use on motorcycles, bicycles or
any other type of tires.
Do not remove any foreign objects- such as nails or screws -that have
penetrated the tire.
Before using the TMK, read the precautionary advice printed on
the sealant bottle!
Provided the car is outdoors, leave the engine running. Otherwise
operating the compressor may
eventually drain the car battery.
CAUTION - Tire pressure
sensor
When you use the Tire MobilityKit including sealant notapproved by Kia, the tire pres-sure sensors may be damagedby sealant. The sealant on thetire pressure sensor and wheelshould be removed when youreplace the tire with a new oneand inspect the tire pressuresensors in authorized dealer.
Page 379 of 500
What to do in an emergency
24
6
TOWING
Towing service
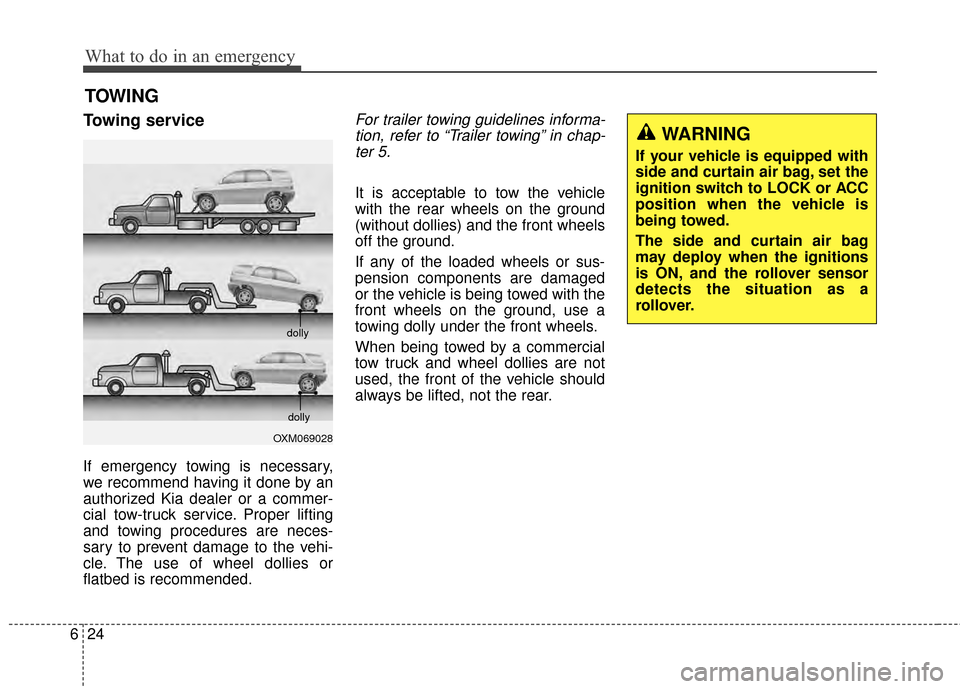
If emergency towing is necessary,
we recommend having it done by an
authorized Kia dealer or a commer-
cial tow-truck service. Proper lifting
and towing procedures are neces-
sary to prevent damage to the vehi-
cle. The use of wheel dollies or
flatbed is recommended.
For trailer towing guidelines informa-
tion, refer to “Trailer towing” in chap-ter 5.
It is acceptable to tow the vehicle
with the rear wheels on the ground
(without dollies) and the front wheels
off the ground.
If any of the loaded wheels or sus-
pension components are damaged
or the vehicle is being towed with the
front wheels on the ground, use a
towing dolly under the front wheels.
When being towed by a commercial
tow truck and wheel dollies are not
used, the front of the vehicle should
always be lifted, not the rear.
OXM069028 dolly
dolly
WARNING
If your vehicle is equipped with
side and curtain air bag, set the
ignition switch to LOCK or ACC
position when the vehicle is
being towed.
The side and curtain air bag
may deploy when the ignitions
is ON, and the rollover sensor
detects the situation as a
rollover.
Page 420 of 500
737
Maintenance
Replace the filter according to the
Maintenance Schedule.
If the vehicle is operated in extreme-
ly dusty or sandy areas, replace the
element more often than the usual
recommended intervals. (Refer to
“Maintenance under severe usage
conditions” in this chapter.)CAUTION
Do not drive with the air clean-er removed; this will result inexcessive engine wear.
When removing the air cleaner filter, be careful that dust ordirt does not enter the airintake, or damage may result.
Use a Kia genuine part. Use of non-genuine parts could dam-age the air flow sensor.
Page 456 of 500
773
Maintenance
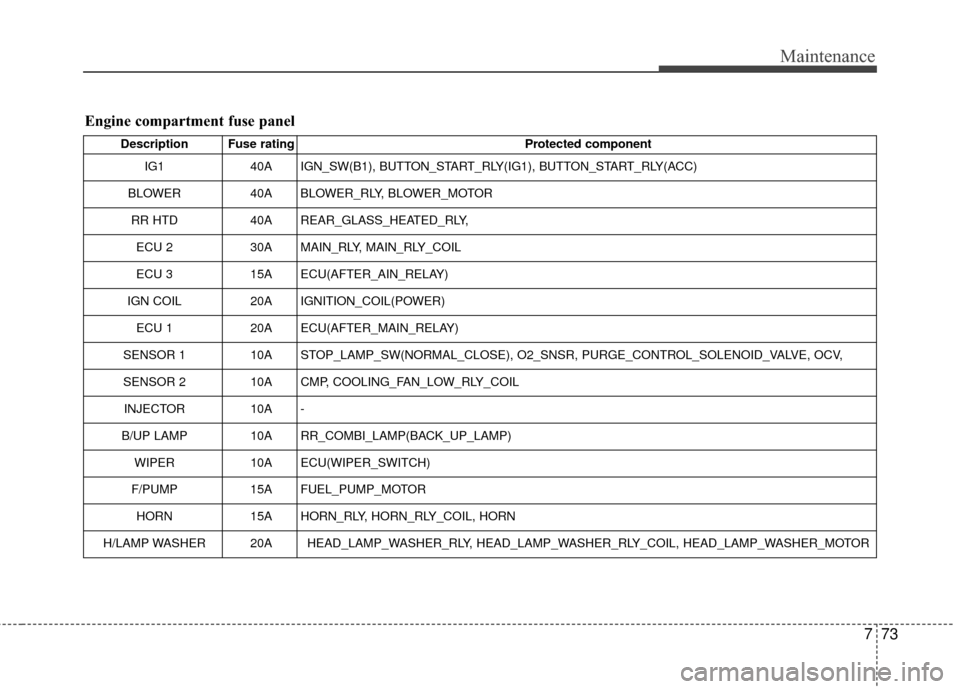
Engine compartment fuse panel
Description Fuse ratingProtected component
IG1 40A IGN_SW(B1), BUTTON_START_RLY(IG1), BUTTON_START_RLY(ACC)
BLOWER 40A BLOWER_RLY, BLOWER_MOTOR
RR HTD 40A REAR_GLASS_HEATED_RLY,
ECU 2 30A MAIN_RLY, MAIN_RLY_COIL
ECU 3 15A ECU(AFTER_AIN_RELAY)
IGN COIL 20A IGNITION_COIL(POWER)
ECU 1 20A ECU(AFTER_MAIN_RELAY)
SENSOR 1 10A STOP_LAMP_SW(NORMAL_CLOSE), O2_SNSR, PURGE_CONTROL_SOLENOID_VALVE, OCV,
SENSOR 2 10A CMP, COOLING_FAN_LOW_RLY_COIL
INJECTOR 10A -
B/UP LAMP 10A RR_COMBI_LAMP(BACK_UP_LAMP)
WIPER 10A ECU(WIPER_SWITCH)
F/PUMP15AFUEL_PUMP_MOTOR
HORN15AHORN_RLY, HORN_RLY_COIL, HORN
H/LAMP WASHER20AHEAD_LAMP_WASHER_RLY, HEAD_LAMP_WASHER_RLY_COIL, HEAD_LAMP_WASHER_MOTOR