language KIA SOUL 2016 Features and Functions Guide
[x] Cancel search | Manufacturer: KIA, Model Year: 2016, Model line: SOUL, Model: KIA SOUL 2016Pages: 50, PDF Size: 4.18 MB
Page 9 of 50

7
User Settings Mode*Service Mode*
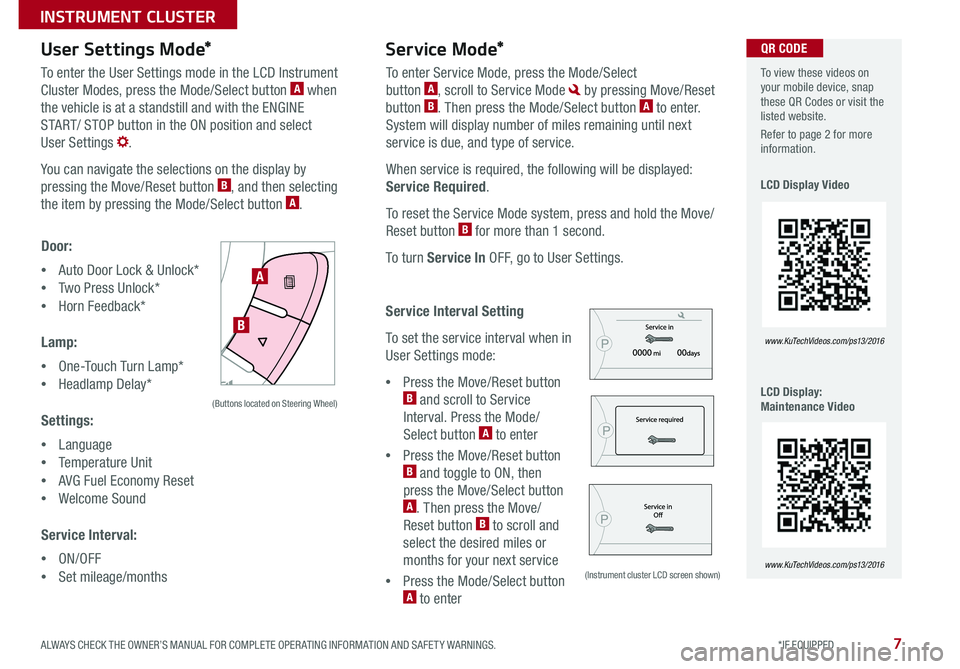
To enter the User Settings mode in the LCD Instrument
Cluster Modes, press the Mode/Select button A when
the vehicle is at a standstill and with the ENGINE
START/ STOP button in the ON position and select
User Settings
You can navigate the selections on the display by
pressing the Move/Reset button
B, and then selecting
the item by pressing the Mode/Select button A
Door:
• Auto Door Lock & Unlock*
• Two Press Unlock*
• Horn Feedback*
Lamp:
• One-Touch Turn Lamp*
• Headlamp Delay*
Settings:
• Language
• Temperature Unit
• AVG Fuel Economy Reset
• Welcome Sound
Service Interval:
• ON/OFF
• Set mileage/months To enter Service Mode, press the Mode/Select
button
A, scroll to Service Mode by pressing Move/Reset
button B Then press the Mode/Select button A to enter
System will display number of miles remaining until next
service is due, and type of service
When service is required, the following will be displayed:
Service Required
To reset the Service Mode system, press and hold the Move/
Reset button
B for more than 1 second
To turn Service In OFF, go to User Settings
Service Interval Setting
To set the service interval when in
User Settings mode:
• Press the Move/Reset button
B and scroll to Service
Interval Press the Mode/
Select button
A to enter
• Press the Move/Reset button
B and toggle to ON, then
press the Move/Select button
A Then press the Move/
Reset button B to scroll and
select the desired miles or
months for your next service
• Press the Mode/Select button
A to enter
SETCRUISERESCANCELMODEVOL
VOL
A
B
(Buttons located on Steering Wheel)
(Instrument cluster LCD screen shown)
To view these videos on
your mobile device, snap
these QR Codes or visit the
listed website
Refer to page 2 for more
information
LCD Display Video
LCD Display:
Maintenance Video
www. KuTechVideo s.c om/p s13/2016
www. KuTechVideo s.c om/p s13/2016
QR CODE
ALWAYS CHECK THE OWNER’S MANUAL FOR COMPLETE OPER ATING INFORMATION AND SAFET Y WARNINGS. *IF EQUIPPED
INSTRUMENT CLUSTER
Page 22 of 50

20
Standard Audio System
Videos
To view a video on your
mobile device, snap this
QR Code or visit the listed
website
Refer to page 2 for more
information
KuTechVideos.com/audio/base_system
QR CODEStandard Audio System (Type A)*
– FM/AM/SiriusXM®/Media (USB, iPod®, Aux, BT Audio, My Music)
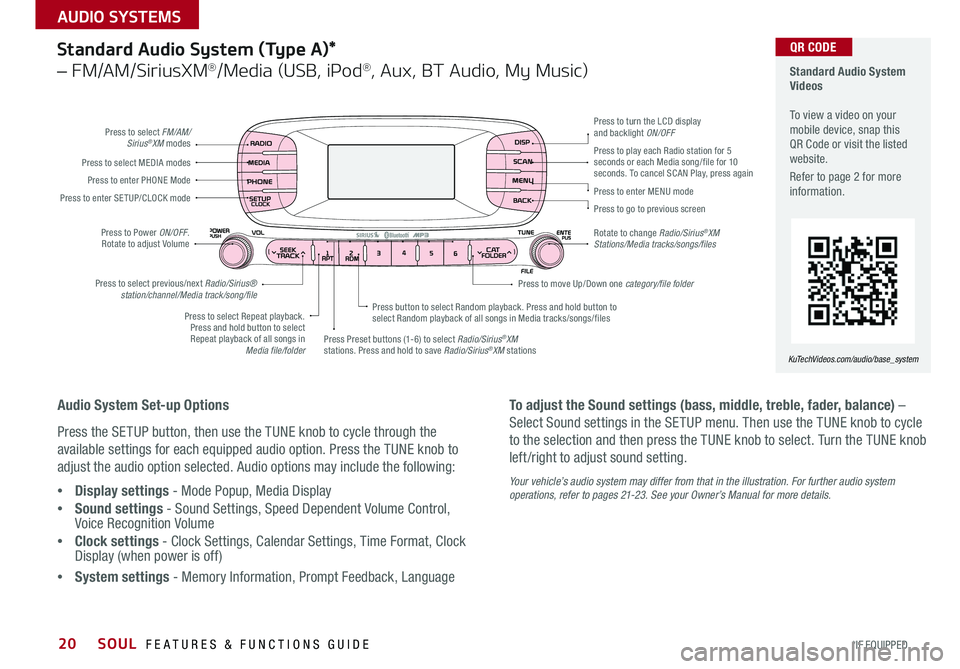
Audio System Set-up Options
Press the SETUP button, then use the TUNE knob to cycle through the
available settings for each equipped audio option Press the TUNE knob to
adjust the audio option selected Audio options may include the following:
• Display settings - Mode Popup, Media Display
• Sound settings - Sound Settings, Speed Dependent Volume Control,
Voice Recognition Volume
• Clock settings - Clock Settings, Calendar Settings, Time Format, Clock
Display (when power is off)
• System settings - Memory Information, Prompt Feedback, Language To adjust the Sound settings (bass, middle, treble, fader, balance) –
Select Sound settings in the SETUP menu
Then use the TUNE knob to cycle
to the selection and then press the TUNE knob to select Turn the TUNE knob
left /right to adjust sound setting
Your vehicle’s audio system may differ from that in the illustration. For further audio system
operations, refer to pages 21-23. See your Owner’s Manual for more details.
Press to select FM/AM/
Sirius®XM modes
Press to Power ON/OFF
Rotate to adjust Volume
Press Preset buttons (1-6) to select Radio/Sirius
®XM
stations Press and hold to save Radio/Sirius®XM stations
Press to select Repeat playback
Press and hold button to select Repeat playback of all songs in Media file/folder Press button to select Random playback
Press and hold button to
select Random playback of all songs in Media tracks/songs/files
Press to select MEDIA modes
Press to play each Radio station for 5
seconds or each Media song/file for 10
seconds
To cancel SCAN Play, press again
Press to enter PHONE Mode
Press to enter SE TUP/ CLOCK mode
Press to select previous/next Radio/Sirius® station/channel/Media track/song/file Press to enter MENU mode
Press to go to previous screen
Rotate to change Radio/Sirius
®XM
Stations/Media tracks/songs/files Press to turn the LCD display
and backlight ON/OFF
Press to move Up/Down one category/file folder
SOUL FEATURES & FUNCTIONS GUIDE
*IF EQUIPPED
AUDIO SYSTEMS
Page 23 of 50

21
Standard Audio System (Type B)*
– FM/AM/Sirius®/Media (USB, iPod®, AUX, My Music, BT Audio)
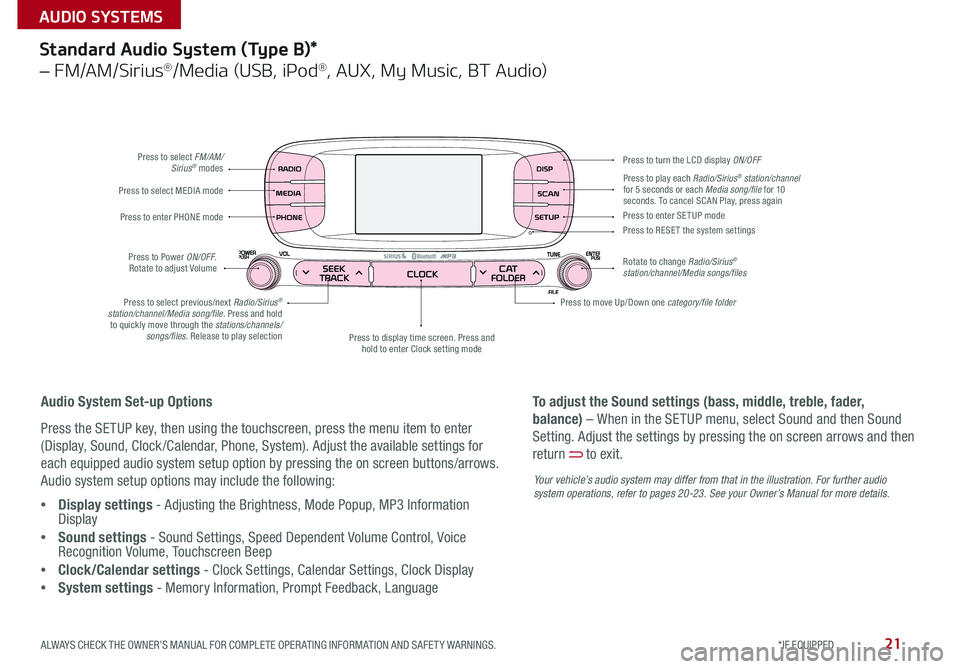
Press to select FM/AM/Sirius® modes
Press to Power ON/OFF
Rotate to adjust Volume
Press to display time screen Press and
hold to enter Clock setting mode
Press to select MEDIA mode
Press to play each Radio/Sirius® station/channel
for 5 seconds or each Media song/file for 10
seconds To cancel SCAN Play, press again
Press to enter PHONE mode
Press to select previous/next Radio/Sirius
®
station/channel/Media song/file. Press and hold to quickly move through the stations/channels/ songs/files. Release to play selection Press to enter SE TUP mode
Press to RESE T the system settings
Rotate to change Radio/Sirius
®
station/channel/Media songs/files Press to turn the LCD display ON/OFF
Press to move Up/Down one category/file folder
Audio System Set-up Options
Press the SETUP key, then using the touchscreen, press the menu item to enter
(Display, Sound, Clock /Calendar, Phone, System) Adjust the available settings for
each equipped audio system setup option by pressing the on screen buttons/arrows
Audio system setup options may include the following:
• Display settings - Adjusting the Brightness, Mode Popup, MP3 Information
Display
• Sound settings - Sound Settings, Speed Dependent Volume Control, Voice
Recognition Volume, Touchscreen Beep
• Clock/Calendar settings - Clock Settings, Calendar Settings, Clock Display
• System settings - Memory Information, Prompt Feedback, Language To adjust the Sound settings (bass, middle, treble, fader,
balance) – When in the SETUP menu, select Sound and then Sound
Setting
Adjust the settings by pressing the on screen arrows and then
return
to exit
Your vehicle’s audio system may differ from that in the illustration. For further audio
system operations, refer to pages 20-2 3. See your Owner’s Manual for more details.
ALWAYS CHECK THE OWNER’S MANUAL FOR COMPLETE OPER ATING INFORMATION AND SAFET Y WARNINGS. *IF EQUIPPED
AUDIO SYSTEMS