light KIA SOUL 2020 Features and Functions Guide
[x] Cancel search | Manufacturer: KIA, Model Year: 2020, Model line: SOUL, Model: KIA SOUL 2020Pages: 50, PDF Size: 4.05 MB
Page 16 of 50
SOUL FEATURES & FUNCTIONS GUIDE14*IF EQUIPPED †LEGAL DISCL AIMERS ON BACK INSIDE COVER
DRIVER'S PANEL
HAC does not replace the need to apply brakes while the vehicle is stopped on an incline.
For more information on Electronic Stability Control (ESC) and its specific features and operations, please refer to your Owner’s Manual.
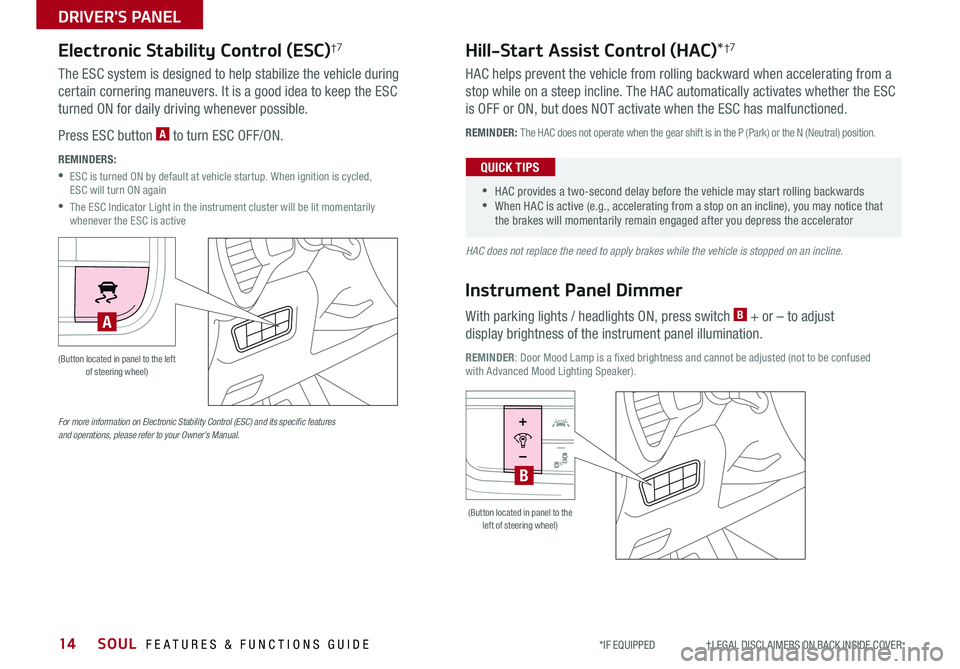
Electronic Stability Control (ESC)†7
The ESC system is designed to help stabilize the vehicle during
certain cornering maneuvers It is a good idea to keep the ESC
turned ON for daily driving whenever possible
Press ESC button A to turn ESC OFF/ON
REMINDERS:
•
ESC is turned ON by default at vehicle startup When ignition is cycled, ESC will turn ON again
•
The ESC Indicator Light in the instrument cluster will be lit momentarily whenever the ESC is active
Hill-Start Assist Control (HAC)*†7
HAC helps prevent the vehicle from rolling backward when accelerating from a
stop while on a steep incline The HAC automatically activates whether the ESC
is OFF or ON, but does NOT activate when the ESC has malfunctioned
REMINDER: The HAC does not operate when the gear shift is in the P (Park) or the N (Neutral) position
•
•HAC provides a two-second delay before the vehicle may start rolling backwards •When HAC is active (e g , accelerating from a stop on an incline), you may notice that the brakes will momentarily remain engaged after you depress the accelerator
QUICK TIPS
Instrument Panel Dimmer
With parking lights / headlights ON, press switch B + or – to adjust
display brightness of the instrument panel illumination
REMINDER: Door Mood Lamp is a fixed brightness and cannot be adjusted (not to be confused with Advanced Mood Lighting Speaker)
HUD
i...
P
HUD
i...
P
(Button located in panel to the left of steering wheel)
(Button located in panel to the left of steering wheel)
A
B
Page 18 of 50

SOUL FEATURES & FUNCTIONS GUIDE*IF EQUIPPED 16
STEERING WHEEL CONTROLS
AUTO*Automatic Headlights position
Headlight position
Parking Light position
OFFOFF position
OFF
OFF
OFF
OFF
O ne -Touch Lane Change Signal
Headlights & High Beams
To operate:
•Rotate switch to change the Headlight function
•Push lever to turn High Beams ON
•Pull lever to flash Headlights / High Beams
AUTO Light* position – When the light switch is in the AUTO light
position, the tail lights and headlights will turn ON/OFF automatically,
depending on the amount of light outside the vehicle
Turn Signals & Fog Lights*
To operate:
•Turn Signals - Move lever Up/Down for Right /Left Turn Signal
•Fog Lights - Rotate lever ring to turn Fog Lights ON/OFF
One-Touch Lane Change Signal is activated by moving the Turn Signal
Lever up/down slightly for less than 1 second and then releasing The lane
change signal will blink 3 times
To change how many times the Lane Change Signal blinks (3/5/7), go to
User Settings Mode* in the LCD Instrument Cluster modes ( Type B cluster)
REMINDER: Headlights must be ON for Fog Light operation
For more information on the User Settings Mode, please refer to your Owner’s Manual.
Page 25 of 50
23ALWAYS CHECK THE OWNER’S MANUAL FOR COMPLETE OPER ATING INFORMATION AND SAFET Y WARNINGS *IF EQUIPPED †LEGAL DISCL AIMERS ON BACK INSIDE COVER
AUDIO SYSTEMS
For other audio system information, refer to pages 22-25.
Driving while distracted can result in a loss of vehicle control that may lead to an accident, severe bodily injury, and death. The driver’s primary responsibility is in the safe and legal operation of a vehicle, and use of any handheld devices, other equipment, or vehicle systems which take the driver’s eyes, attention and focus away from the safe operation of a vehicle or which are not permissible by law should never be used during operation of the vehicle.
UVO link Activation*†1UVO link Activation*†1 (continued)
4b. Follow these steps if using your email to
receive your verification code:
a Check your email The email will be from
reset@notifications myuvo com
b Open link inside email A page will open
requesting that you create your account
Note: If you already have a Kia Owners Portal
account using the email as your login ID, you
will need to provide your password prior to
receiving the verification code
c Enter your first name, last name, email,
phone number, and account password, and
click CRE ATE ACCOUNT A page will open
displaying your verification code
d Enter the code in the head unit and press
ACTIVATE
e Go back to the page with your verification
code and press “I have entered my PIN ”
A link will be provided to download the Kia
Access with UVO link app from your app
store After installing the app, log in
and enjoy
Android AutoTM†3 / Apple CarPlay® Setup†4
Android Auto™*
Setting up Android Auto™:
1 From an Android Auto™ compatible device, download the Android Auto™ app from the Google
Play™ Store†10
2 Open the Android Auto™ app and proceed with the onscreen instructions to complete setup on
the mobile device
How to start Android Auto™:
1 Press the SETUP key on your audio system’s control panel
2 2 Press the Phone Projection or Device Connection button, select Android Auto™, then
select ENABLE ANDROID AUTO Accept all terms, conditions and requests on the head unit and
phone in order to use Android Auto™
3 Connect the Android™ device with the vehicle’s USB port using the manufacturer’s cable
provided with your phone
4 From the vehicle’s Kia home screen, select the Android Auto™ button, where you’ll see all the
Android Auto™ supported apps
Apple CarPlay®*
Setting up and starting Apple CarPlay®:
1 On the head unit, press the SETUP key
2 Press the Phone Projection or Device Connection button,
select Apple CarPlay® then select ENABLE APPLE CARPL AY
(Accept all terms, conditions and requests on the head unit
and phone in order to use Apple CarPlay®)
3 Connect the Apple CarPlay® compatible iPhone® with
the vehicle’s USB port using the manufacturer’s cable
provided with your iPhone®
4 From the vehicle’s home screen, select the Apple
CarPlay® button, where you’ll see all the Apple
CarPlay® supported apps
REMINDERS:
• Android Auto™ compatibility requirements: Micro-USB cable that came with your phone, OS Android™ 5 0 or higher, compatible Android™ smartphone and data and wireless plan for applicable feature(s)
• Apple CarPlay® compatibility requirements: Apple Lightning cable, latest iOS software, iPhone® 5 or later and data and wireless plan for applicable feature(s)
• It is recommended to always update your phone to the latest operating system release
Page 28 of 50
SOUL FEATURES & FUNCTIONS GUIDE26*IF EQUIPPED
•The USB charger port is located inside the Center Console and on rear of the Center Console
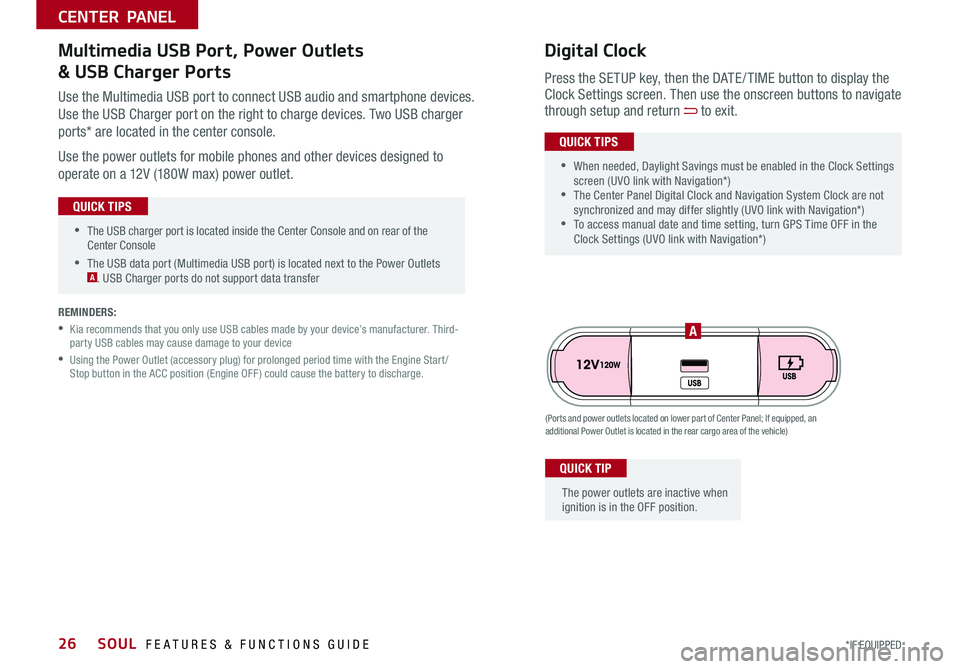
•The USB data port (Multimedia USB port) is located next to the Power Outlets A USB Charger ports do not support data transfer
QUICK TIPS
CENTER PANEL
Use the Multimedia USB port to connect USB audio and smartphone devices
Use the USB Charger port on the right to charge devices Two USB charger
ports* are located in the center console
Use the power outlets for mobile phones and other devices designed to
operate on a 12V (180W max) power outlet
(Ports and power outlets located on lower part of Center Panel; If equipped, an additional Power Outlet is located in the rear cargo area of the vehicle)
Press the SETUP key, then the DATE / TIME button to display the Clock Settings screen Then use the onscreen buttons to navigate through setup and return to exit
•
•When needed, Daylight Savings must be enabled in the Clock Settings screen (UVO link with Navigation*) •The Center Panel Digital Clock and Navigation System Clock are not synchronized and may differ slightly (UVO link with Navigation*) •To access manual date and time setting, turn GPS Time OFF in the Clock Settings (UVO link with Navigation*)
QUICK TIPS
Digital ClockMultimedia USB Port, Power Outlets
& USB Charger Ports
The power outlets are inactive when ignition is in the OFF position
QUICK TIP
A
REMINDERS:
•
Kia recommends that you only use USB cables made by your device’s manufacturer Third-party USB cables may cause damage to your device
•
Using the Power Outlet (accessory plug) for prolonged period time with the Engine Start /Stop button in the ACC position (Engine OFF ) could cause the battery to discharge
Page 29 of 50
27ALWAYS CHECK THE OWNER’S MANUAL FOR COMPLETE OPER ATING INFORMATION AND SAFET Y WARNINGS *IF EQUIPPED
CENTER PANEL
Wireless Charging Video
To view a video on your mobile device, snap this QR Code or visit the listed website
Refer to page 2 for more information
www.youtube.com/KiaFeatureVideos
QR CODE
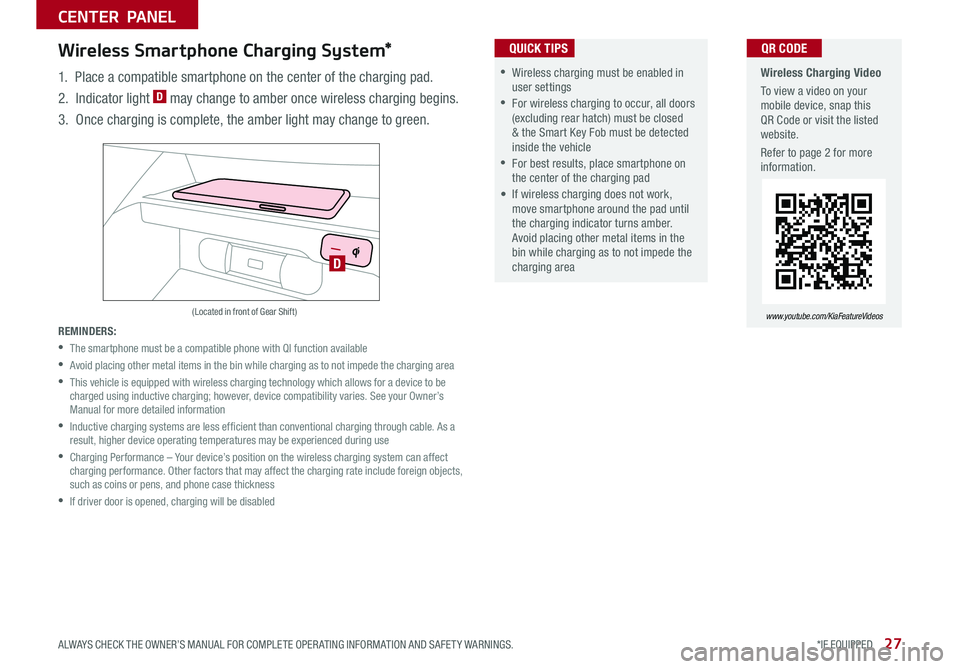
D
(Located in front of Gear Shift)
Wireless Smartphone Charging System*
1 Place a compatible smartphone on the center of the charging pad
2 Indicator light D may change to amber once wireless charging begins
3 Once charging is complete, the amber light may change to green
REMINDERS:
•
The smartphone must be a compatible phone with QI function available
•
Avoid placing other metal items in the bin while charging as to not impede the charging area
•
This vehicle is equipped with wireless charging technology which allows for a device to be charged using inductive charging; however, device compatibility varies See your Owner’s Manual for more detailed information
•
Inductive charging systems are less ef ficient than conventional charging through cable As a result, higher device operating temperatures may be experienced during use
•
Charging Performance – Your device’s position on the wireless charging system can affect charging performance Other factors that may affect the charging rate include foreign objects, such as coins or pens, and phone case thickness
•If driver door is opened, charging will be disabled
•Wireless charging must be enabled in user settings
•For wireless charging to occur, all doors (excluding rear hatch) must be closed & the Smart Key Fob must be detected inside the vehicle
•For best results, place smartphone on the center of the charging pad
• If wireless charging does not work, move smartphone around the pad until the charging indicator turns amber Avoid placing other metal items in the bin while charging as to not impede the charging area
QUICK TIPS
Page 30 of 50
SOUL FEATURES & FUNCTIONS GUIDE28
CENTER PANEL
*IF EQUIPPED †LEGAL DISCL AIMERS ON BACK INSIDE COVER
Engine Stop/Start Button & Smart Key Video To view a video on your mobile device, snap this QR Code or visit the listed website
Refer to page 2 for more information
www.youtube.com/KiaFeatureVideos
ENGINESTART
STOP
A
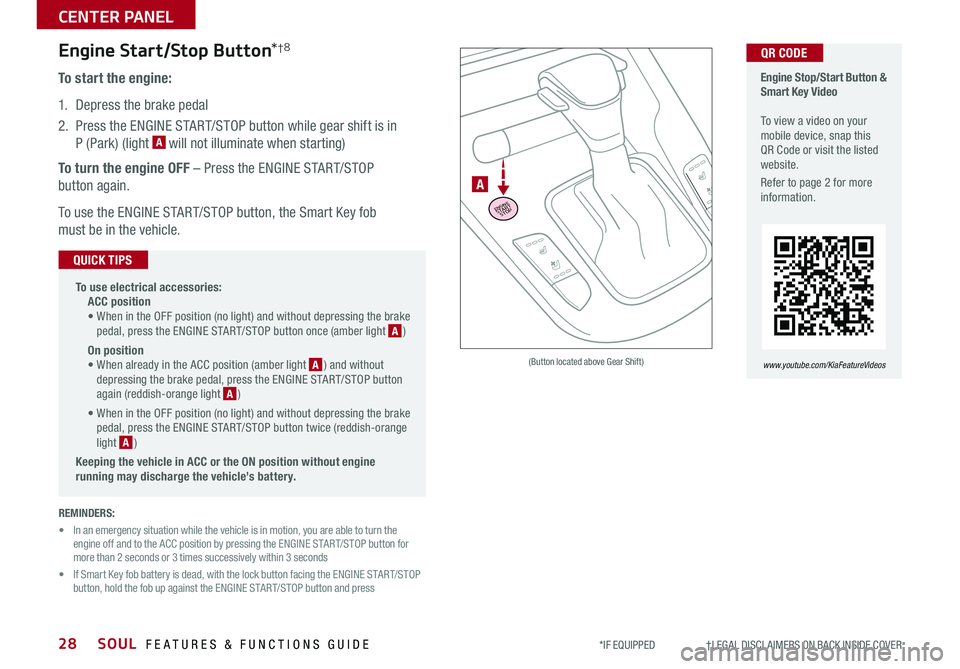
(Button located above Gear Shift)
QR CODEEngine Start/Stop Button*†8
To start the engine:
1 Depress the brake pedal
2 Press the ENGINE START/STOP button while gear shift is in
P (Park) (light A will not illuminate when starting)
To turn the engine OFF – Press the ENGINE START/STOP
button again
To use the ENGINE START/STOP button, the Smart Key fob
must be in the vehicle
•
To use electrical accessories: ACC position • When in the OFF position (no light) and without depressing the brake pedal, press the ENGINE START/STOP button once (amber light A )
On position • When already in the ACC position (amber light A ) and without depressing the brake pedal, press the ENGINE START/STOP button again (reddish-orange light A )
• When in the OFF position (no light) and without depressing the brake pedal, press the ENGINE START/STOP button twice (reddish-orange light A )
Keeping the vehicle in ACC or the ON position without engine running may discharge the vehicle’s battery.
QUICK TIPS
REMINDERS:
• In an emergency situation while the vehicle is in motion, you are able to turn the engine off and to the ACC position by pressing the ENGINE START/STOP button for more than 2 seconds or 3 times successively within 3 seconds
• If Smart Key fob battery is dead, with the lock button facing the ENGINE START/STOP button, hold the fob up against the ENGINE START/STOP button and press
Page 33 of 50

31
CENTER PANEL
Dual Clutch Transmission (DCT)*
Some Kia vehicles are equipped with Dual Clutch Transmission (DCT ) for both automatic and manual transmissions
The following are unique driving tips of the Dual Clutch Transmission:
• To hold the vehicle stationary on an incline, the service brake or parking brake MUST be used or the gear shift MUST be in the (P) Park position
If the vehicle is held stationary by applying the accelerator pedal on a slope, the clutch/transmission may overheat, resulting in damage
• Avoid aggressive launches on steep grades as this may result in an overheated clutch and transmission
• A slight time lag may be experienced at takeoff from standstill during aggressive acceleration maneuvers
If the clutch is overheating an amber-colored warning light will be displayed on the instrument cluster
Should this condition occur, pull over and place the vehicle in Park and idle the engine.
Refer to the Owner’s Manual for additional information on DCT operation or call Kia Consumer Affairs for additional information.
Sportmatic® Shifting Video To view a video on your mobile device, snap this QR Code or visit the listed website
Refer to page 2 for more information
www.youtube.com/KiaFeatureVideos
QR CODE
•
•Press brake pedal and depress release button to move gear shift from N to P, N to R or from P to any gear •Manual Mode downshifts are made automatically when the vehicle slows down When the vehicle stops, 1st gear is automatically selected
QUICK TIPS
P: Park
R: Reverse
N: Neutral
D: Drive
[+]: Manual Mode Upshift
[–]: Manual Mode Downshift
Manual Mode:
To enter Manual mode, move shift lever from D to left gate A
To shift while in Manual mode, move shift lever up [+] to
upshift or down [–] to downshift
Automatic Gear Shift with Sportmatic® Shifting*†21
A
ALWAYS CHECK THE OWNER’S MANUAL FOR COMPLETE OPER ATING INFORMATION AND SAFET Y WARNINGS *IF EQUIPPED †LEGAL DISCL AIMERS ON BACK INSIDE COVER
Page 40 of 50
SOUL FEATURES & FUNCTIONS GUIDE38
OTHER KEY FEATURES
*IF EQUIPPED †LEGAL DISCL AIMERS ON BACK INSIDE COVER
( Type A )
AA
BC
REMINDERS:
•Sunvisor may not shield all direct light
•
The Sunvisor may impair visibility if not adjusted properly Do not operate the vehicle if Sunvisor is impairing your visibility
•
Be aware of seating position when adjusting or swinging Sunvisor around to or from the front or side windows
•Do not operate the vehicle if Sunvisor is impairing your visibility
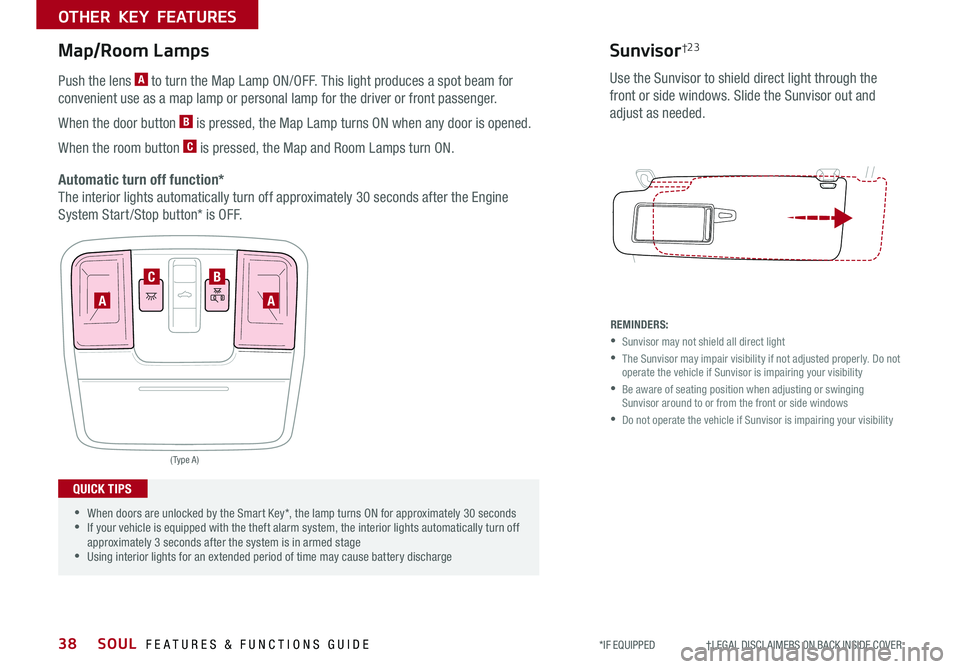
Use the Sunvisor to shield direct light through the
front or side windows Slide the Sunvisor out and
adjust as needed
Sunvisor†2 3
•
•When doors are unlocked by the Smart Key*, the lamp turns ON for approximately 30 seconds •If your vehicle is equipped with the theft alarm system, the interior lights automatically turn off approximately 3 seconds after the system is in armed stage •Using interior lights for an extended period of time may cause battery discharge
QUICK TIPS
Push the lens A to turn the Map Lamp ON/OFF This light produces a spot beam for
convenient use as a map lamp or personal lamp for the driver or front passenger
When the door button B is pressed, the Map Lamp turns ON when any door is opened
When the room button C is pressed, the Map and Room Lamps turn ON
Automatic turn off function*
The interior lights automatically turn off approximately 30 seconds after the Engine
System Start /Stop button* is OFF
Map/Room Lamps
Page 42 of 50

SOUL FEATURES & FUNCTIONS GUIDE40
OTHER KEY FEATURES
*IF EQUIPPED †LEGAL DISCL AIMERS ON BACK INSIDE COVER
(Rear Camera)
(Rear-Camera Display)
P
R
N
DSHIFTL OCK
RELEASE
Rear View Monitor*†6
The Rear View Monitor is a supplemental system that displays the view behind the
vehicle through the audio system screens while the vehicle is in Reverse
The Rear View Monitor activates when the:
1 Engine Start /Stop button* is in the ON position (green light)
2
Gear Shift Lever is in the R (Reverse) position
The Rear View Monitor is not a substitute for proper and safe backing-up procedures. The Rear View Monitor may not display every object behind the vehicle. Always drive safely and use caution when backing up.
For illustrative purposes only. Display may vary.
REMINDER: Always drive carefully and use caution when backing up
Page 44 of 50

SOUL FEATURES & FUNCTIONS GUIDE42*IF EQUIPPED
OTHER KEY FEATURES
Opening the Hood:
1 Located on the bottom left of the driver’s panel, pull the Hood
Release Lever A to unlatch the Hood
2 In the front of the vehicle, lift the Hood slightly, push the
secondary Latch B up inside of the Hood’s center and
lift the Hood
A
B
A
(Button is located underneath the Liftgate lid)
Hood Release Lever and Latch
Closing the Hood:
Lower the Hood by pressing the front center of the Hood Then, press
down to securely lock in place
REMINDERS:
• While lowering and closing, keep hands away from under the Hood
• Open the Hood only after turning the engine off, on a flat surface, with the gear shift in P (Park) position and setting the parking brake
Liftgate Release Button
With Liftgate unlocked, press the Liftgate Release button A and pull
the Liftgate lid up by the handle to open
•
•The Liftgate must be unlocked before it can be opened by the Liftgate Release Button •The Liftgate unlocks automatically and then can be opened manually when the Smart Key* is within close proximity to the vehicle
QUICK TIPS