lock KIA SOUL EV 2017 Features and Functions Guide
[x] Cancel search | Manufacturer: KIA, Model Year: 2017, Model line: SOUL EV, Model: KIA SOUL EV 2017Pages: 51, PDF Size: 4.97 MB
Page 3 of 51
ESSENTIAL FEATURES
SOUL EV FE ATURES & FUNCTIONS GUIDE
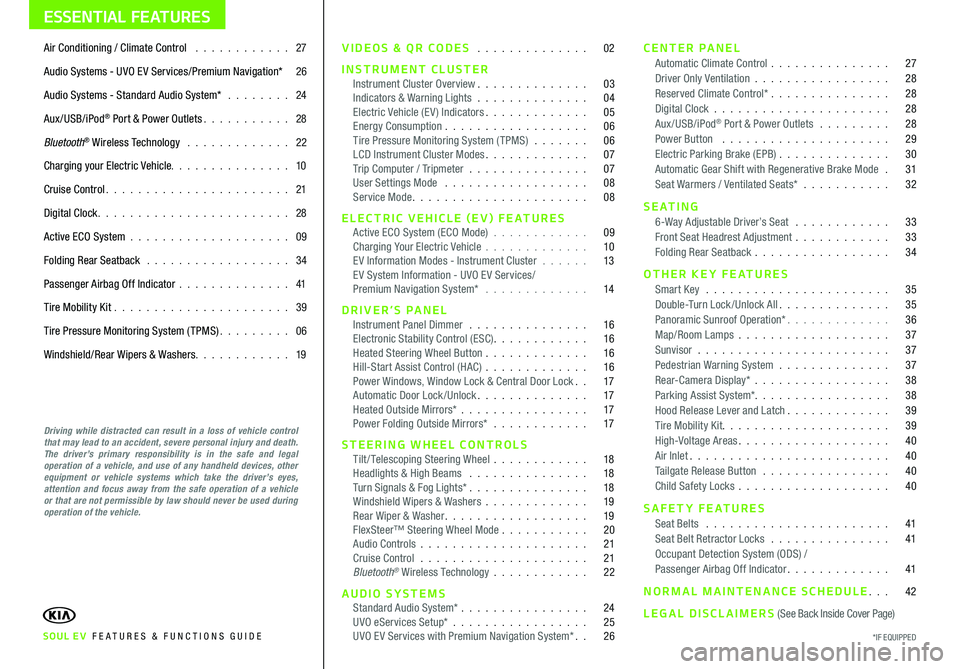
Air Conditioning / Climate Control 27
Audio Systems - UVO E V Services/Premium Navigation* 26
Audio Systems - Standard Audio System* 24
Aux/USB/iPod® Port & Power Outlets 28
Bluetooth® Wireless Technology 22
Charging your Electric Vehicle 10
Cruise Control 21
Digital Clock 28
Active ECO System 09
Folding Rear Seatback 34
Passenger Airbag Off Indicator 41
Tire Mobility Kit 39
Tire Pressure Monitoring System (TPMS) 06
Windshield/Rear Wipers & Washers 19
Driving while distracted can result in a loss of vehicle control that may lead to an accident, severe personal injury and death. The driver’s primary responsibility is in the safe and legal operation of a vehicle, and use of any handheld devices, other equipment or vehicle systems which take the driver’s eyes, attention and focus away from the safe operation of a vehicle or that are not permissible by law should never be used during operation of the vehicle.
VIDEOS & QR CODES 02
INSTRUMENT CLUSTERInstrument Cluster Overview 03Indicators & Warning Lights 04Electric Vehicle (E V ) Indicators 05Energy Consumption 06Tire Pressure Monitoring System (TPMS) 06LCD Instrument Cluster Modes 07Trip Computer / Tripmeter 07User Settings Mode 08Service Mode 08
ELECTRIC VEHICLE (EV) FEATURESActive ECO System (ECO Mode) 09Charging Your Electric Vehicle 10E V Information Modes - Instrument Cluster 13E V System Information - UVO E V Services/ Premium Navigation System* 14
DRIVER’S PANELInstrument Panel Dimmer 16Electronic Stability Control (ESC) 16Heated Steering Wheel Button 16Hill-Start Assist Control (HAC) 16Power Windows, Window Lock & Central Door Lock 17Automatic Door Lock /Unlock 17Heated Outside Mirrors* 17Power Folding Outside Mirrors* 17
STEERING WHEEL CONTROLSTilt/ Telescoping Steering Wheel 18Headlights & High Beams 18Turn Signals & Fog Lights* 18Windshield Wipers & Washers 19Rear Wiper & Washer 19FlexSteer™ Steering Wheel Mode 20Audio Controls 21Cruise Control 21Bluetooth® Wireless Technology 22
AUDIO SYSTEMSStandard Audio System* 24UVO eServices Setup* 25UVO E V Services with Premium Navigation System* 26
CENTER PANELAutomatic Climate Control 27Driver Only Ventilation 28Reserved Climate Control* 28Digital Clock 28Aux/USB/iPod® Port & Power Outlets 28Power Button 29Electric Parking Brake (EPB) 30Automatic Gear Shift with Regenerative Brake Mode 31Seat Warmers / Ventilated Seats* 32
S E AT I N G6-Way Adjustable Driver’s Seat 33Front Seat Headrest Adjustment 33Folding Rear Seatback 34
OTHER KEY FEATURESSmart Key 35Double-Turn Lock /Unlock All 35Panoramic Sunroof Operation* 36Map/Room Lamps 37Sunvisor 37Pedestrian Warning System 37Rear-Camera Display* 38Parking Assist System* 38Hood Release Lever and Latch 39Tire Mobility Kit 39High-Voltage Areas 40Air Inlet 40Tailgate Release Button 40Child Safety Locks 40
SAFETY FEATURESSeat Belts 41Seat Belt Retractor Locks 41Occupant Detection System (ODS) /Passenger Airbag Off Indicator 41
NORMAL MAINTENANCE SCHEDULE 42
LEGAL DISCLAIMERS (See Back Inside Cover Page)
*IF EQUIPPED
Page 6 of 51
4*IF EQUIPPED SOUL EV FEATURES & FUNCTIONS GUIDE
INSTRUMENT CLUSTER
Energy Consumption
Hold: Reset0
4
8
--.-mi./kwh
POWER
ECO
GUIDE
CHARGEMAX
MIN
EPB
RANGE mi.
MPH
POWER
ECO
GUIDE
CHARGEMAX
MIN
EPB
RANGE mi.
MPH
ECOelectric
Energy Consumption
Hold : Reset0
4
8
--.-mi./kwh
EV Cluster Overview Video To view a video on your mobile device, snap this QR Code or visit the listed website
www.KuTechVideos.com/ps23/2017
AB
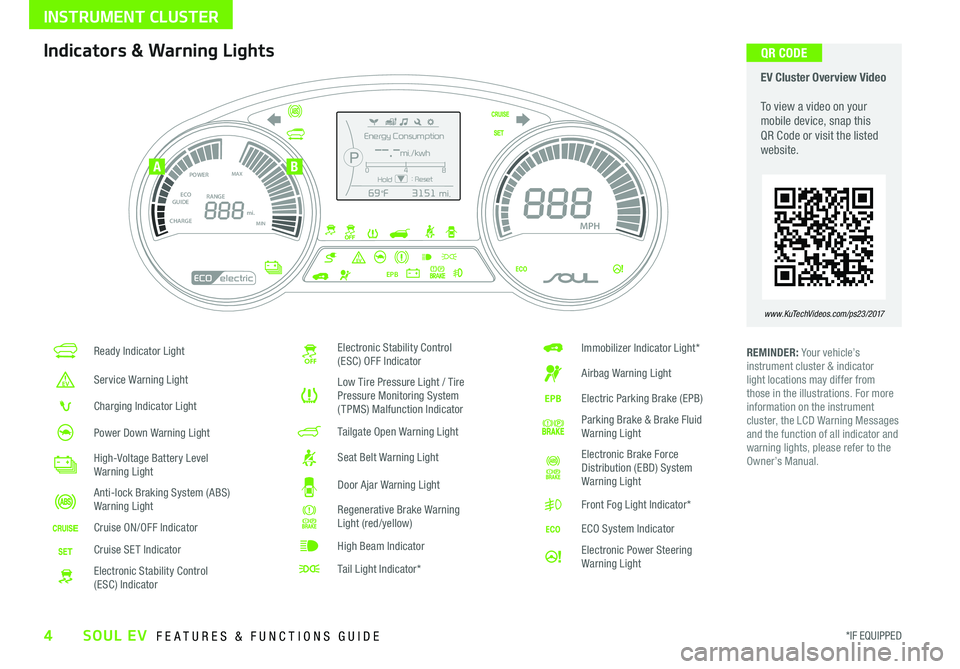
QR CODEIndicators & Warning Lights
Ready Indicator Light
Service Warning Light
Charging Indicator Light
Power Down Warning Light
High-Voltage Battery Level Warning Light
Anti-lock Braking System (ABS) Warning Light
Cruise ON/OFF Indicator
Cruise SET Indicator
Electronic Stability Control (ESC) Indicator
Electronic Stability Control (ESC) OFF Indicator
Low Tire Pressure Light / Tire Pressure Monitoring System (TPMS) Malfunction Indicator
Tailgate Open Warning Light
Seat Belt Warning Light
Door Ajar Warning Light
Regenerative Brake Warning Light (red/yellow)
High Beam Indicator
Tail Light Indicator*
Immobilizer Indicator Light*
Airbag Warning Light
Electric Parking Brake (EPB)
Parking Brake & Brake Fluid Warning Light
Electronic Brake Force Distribution (EBD) System Warning Light
Front Fog Light Indicator*
ECO System Indicator
Electronic Power Steering Warning Light
REMINDER: Your vehicle’s instrument cluster & indicator light locations may differ from those in the illustrations For more information on the instrument cluster, the LCD Warning Messages and the function of all indicator and warning lights, please refer to the Owner’s Manual
Page 10 of 51
8*IF EQUIPPED SOUL EV FEATURES & FUNCTIONS GUIDE
INSTRUMENT CLUSTER
P35000 mi365days
Service Interval
Service IntervalOFF
P
P
Service Required
Service IntervalBack
On
Off01000 mi10 months
P
MODE
SETCRUISERESCANCELMODEVOL
VOL
MODE
A
B
(Buttons located on Steering Wheel)
(Instrument Cluster LCD Screens)
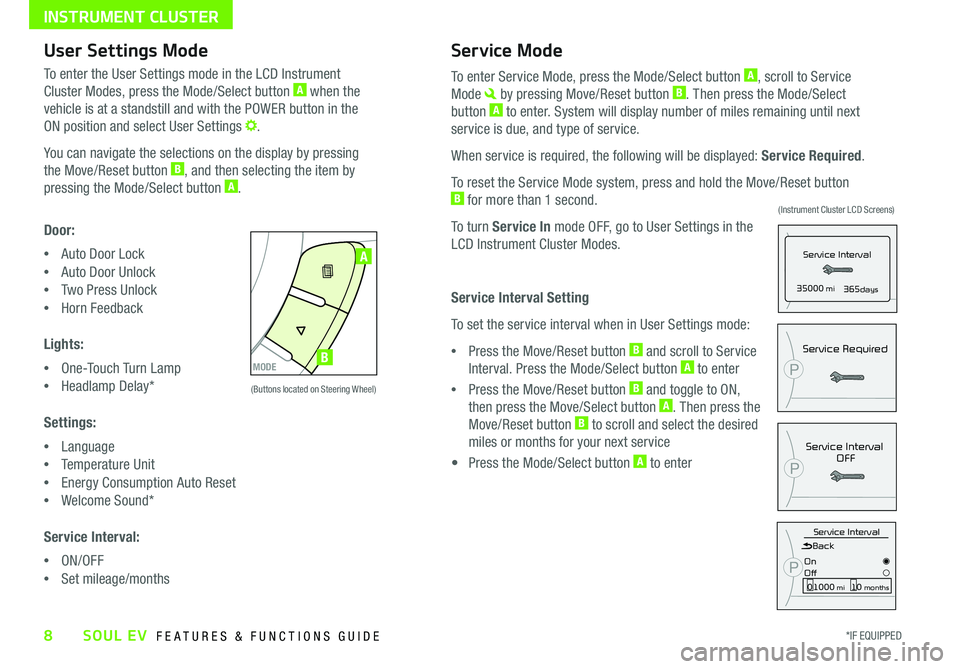
User Settings Mode
To enter the User Settings mode in the LCD Instrument
Cluster Modes, press the Mode/Select button A when the
vehicle is at a standstill and with the POWER button in the
ON position and select User Settings
You can navigate the selections on the display by pressing
the Move/Reset button B, and then selecting the item by
pressing the Mode/Select button A
Door:
•Auto Door Lock
•Auto Door Unlock
•Two Press Unlock
•Horn Feedback
Lights:
•One-Touch Turn Lamp
•Headlamp Delay*
Settings:
•Language
•Temperature Unit
•Energy Consumption Auto Reset
•Welcome Sound*
Service Interval:
•ON/OFF
•Set mileage/months
Service Mode
To enter Service Mode, press the Mode/Select button A, scroll to Service
Mode by pressing Move/Reset button B Then press the Mode/Select
button A to enter System will display number of miles remaining until next
service is due, and type of service
When service is required, the following will be displayed: Service Required
To reset the Service Mode system, press and hold the Move/Reset button B for more than 1 second
To turn Service In mode OFF, go to User Settings in the
LCD Instrument Cluster Modes
Service Interval Setting
To set the service interval when in User Settings mode:
•Press the Move/Reset button B and scroll to Service
Interval Press the Mode/Select button A to enter
•Press the Move/Reset button B and toggle to ON,
then press the Move/Select button A Then press the
Move/Reset button B to scroll and select the desired
miles or months for your next service
• Press the Mode/Select button A to enter
Page 11 of 51

*IF EQUIPPED 9ALWAYS CHECK THE OWNER’S MANUAL FOR COMPLETE OPER ATING INFORMATION AND SAFET Y WARNINGS
ELECTRIC VEHICLE (EV) FEATURES
EV Active ECO Video
To view a video on your mobile device, snap this QR Code or visit the listed website
Refer to page 2 for more information
www.KuTechVideos.com/ps23/2017
ACTIVE ECOECOOFF
ECOOFF
Energy Consumption
Hold : Reset0
4
8
--.-mi./kwh
POWER
ECO
GUIDE
CHARGEMAX
MIN
EPB
RANGE mi.
MPH
POWER
ECO
GUIDE
CHARGEMAX
MIN
EPB
RANGE mi.
MPH
ECOelectric
Energy Consumption
Hold : Reset0
4
8
--.-mi./kwh
A
B
(Shown in Instrument Cluster)(Button located below Gear Shift)
P
R
NDB
SHIFTLOCK
RELEASE
POWER
C
QR CODEActive ECO System
Soul EV is equipped with an ECO feature that improves energy
efficiency and helps extend battery life The Active ECO System
helps reduce energy consumption by controlling several vehicle
components When activated, it optimizes drivetrain operations such
as engine power and transmission to help improve energy economy
Active ECO System ON results in reduced torque, higher energy
efficiency, and enhanced regenerative braking
Active ECO System OFF results in more torque, lower energy
efficiency, and reduced regenerative braking
The Active ECO System is activated by pressing the ACTIVE ECO
button A (LED illuminated) and can be deactivated by pressing the
button again (LED not illuminated) The green ECO indicator light B in
the instrument cluster will illuminate, indicating that ECO is operating
Regenerative Brake Mode “B” – Move the
gear shift to the “B” position C to enter the
maximum regenerative braking drive mode
This mode helps to minimize energy loss and
increase the distance to empty
To help reduce energy consumption: •Drive at a moderate speed, accelerating smoothly and at a moderate rate •Keep tires inflated to the recommended pressure and wheels aligned properly
QUICK TIPS
REMINDER: When Active ECO is activated and the Power button is cycled, the Active ECO system remains ON
For more information on the Active ECO System, refer to your Owner’s Manual or contact your local dealership.
Page 19 of 51
DRIVER'S PANEL
*IF EQUIPPED 17ALWAYS CHECK THE OWNER’S MANUAL FOR COMPLETE OPER ATING INFORMATION AND SAFET Y WARNINGS
A
B
C
D
E
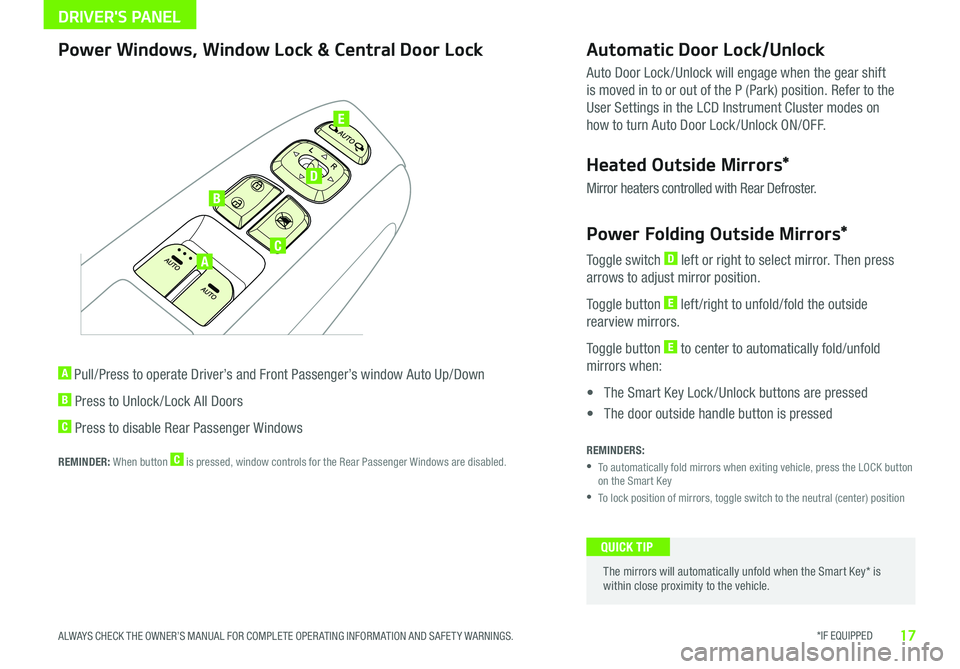
Power Windows, Window Lock & Central Door Lock
A Pull/Press to operate Driver’s and Front Passenger’s window Auto Up/Down
B Press to Unlock /Lock All Doors
C Press to disable Rear Passenger Windows
REMINDER: When button C is pressed, window controls for the Rear Passenger Windows are disabled
Automatic Door Lock/Unlock
Auto Door Lock /Unlock will engage when the gear shift
is moved in to or out of the P (Park) position Refer to the
User Settings in the LCD Instrument Cluster modes on
how to turn Auto Door Lock /Unlock ON/OFF
Heated Outside Mirrors*
Mirror heaters controlled with Rear Defroster
Power Folding Outside Mirrors*
Toggle switch D left or right to select mirror Then press
arrows to adjust mirror position
Toggle button E left /right to unfold/fold the outside
rearview mirrors
Toggle button E to center to automatically fold/unfold
mirrors when:
• The Smart Key Lock /Unlock buttons are pressed
• The door outside handle button is pressed
REMINDERS:
•
To automatically fold mirrors when exiting vehicle, press the LOCK button on the Smart Key
•To lock position of mirrors, toggle switch to the neutral (center) position
The mirrors will automatically unfold when the Smart Key* is within close proximity to the vehicle
QUICK TIP
Page 20 of 51
STEERING WHEEL CONTROLS
18*IF EQUIPPED SOUL EV FEATURES & FUNCTIONS GUIDE
AUTOAutomatic Headlights position
Headlight position
Parking light position
OFFOFF position
O ne -Touch Lane Change Signal
C
B
A
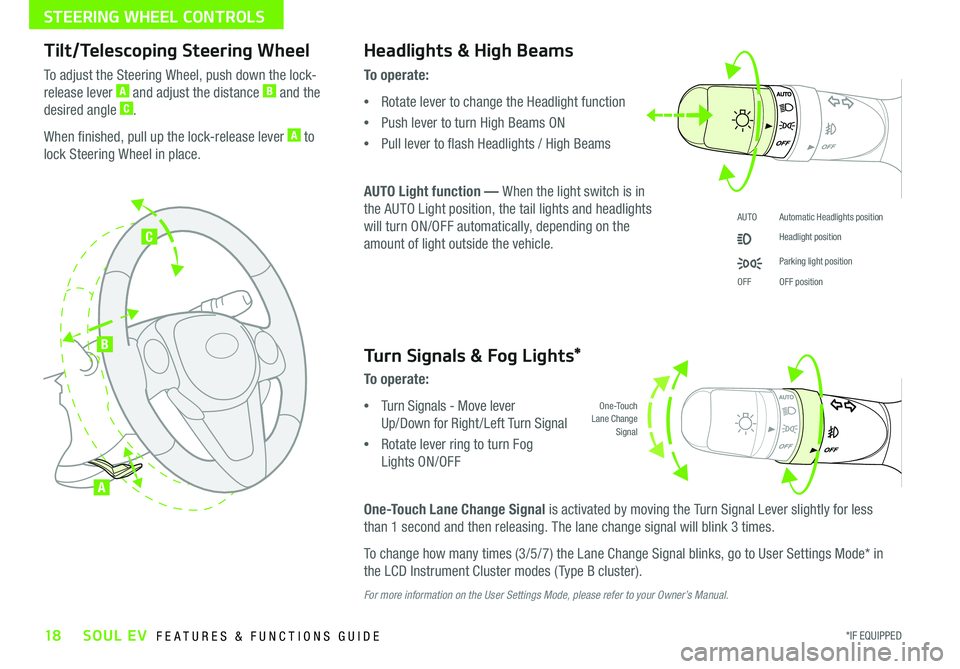
Tilt/Telescoping Steering Wheel
To adjust the Steering Wheel, push down the lock-
release lever A and adjust the distance B and the
desired angle C
When finished, pull up the lock-release lever A to
lock Steering Wheel in place
Headlights & High Beams
To operate:
•Rotate lever to change the Headlight function
•Push lever to turn High Beams ON
•Pull lever to flash Headlights / High Beams
AUTO Light function — When the light switch is in
the AUTO Light position, the tail lights and headlights
will turn ON/OFF automatically, depending on the
amount of light outside the vehicle
Turn Signals & Fog Lights*
To operate:
•Turn Signals - Move lever
Up/Down for Right /Left Turn Signal
•Rotate lever ring to turn Fog
Lights ON/OFF
One-Touch Lane Change Signal is activated by moving the Turn Signal Lever slightly for less
than 1 second and then releasing The lane change signal will blink 3 times
To change how many times (3/5/7) the Lane Change Signal blinks, go to User Settings Mode* in
the LCD Instrument Cluster modes ( Type B cluster)
For more information on the User Settings Mode, please refer to your Owner’s Manual.
Page 26 of 51
AUDIO SYSTEMS
24*IF EQUIPPED SOUL EV FEATURES & FUNCTIONS GUIDE
DISP
CLOCK
SETUP
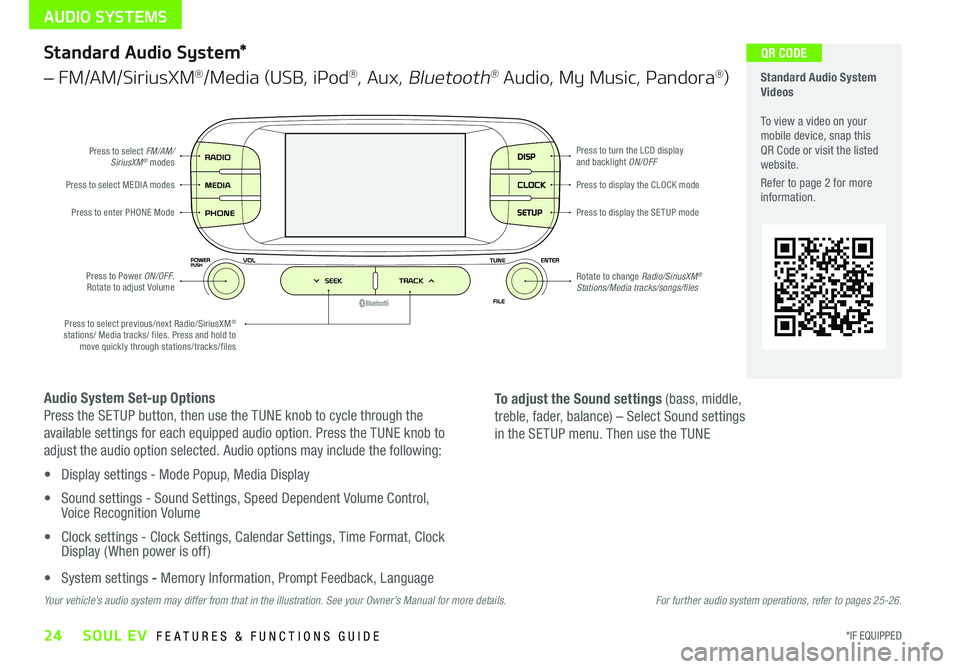
Press to select FM/AM/SiriusXM® modes
Press to Power ON/OFF Rotate to adjust Volume
Press to enter PHONE ModePress to display the SE TUP mode
Press to display the CLOCK modePress to select MEDIA modes
Rotate to change Radio/SiriusXM® Stations/Media tracks/songs/files
Press to turn the LCD display and backlight ON/OFF
Press to select previous/next Radio/SiriusXM® stations/ Media tracks/ files Press and hold to move quickly through stations/tracks/files
Standard Audio System Videos To view a video on your mobile device, snap this QR Code or visit the listed website
Refer to page 2 for more information
QR CODEStandard Audio System*
– FM/AM/SiriusXM®/Media (USB, iPod®, Aux, Bluetooth® Audio, My Music, Pandora®)
Audio System Set-up Options
Press the SETUP button, then use the TUNE knob to cycle through the
available settings for each equipped audio option Press the TUNE knob to
adjust the audio option selected Audio options may include the following:
• Display settings - Mode Popup, Media Display
• Sound settings - Sound Settings, Speed Dependent Volume Control, Voice Recognition Volume
• Clock settings - Clock Settings, Calendar Settings, Time Format, Clock Display ( When power is off)
• System settings - Memory Information, Prompt Feedback, Language
To adjust the Sound settings (bass, middle,
treble, fader, balance) – Select Sound settings
in the SETUP menu Then use the TUNE
Your vehicle’s audio system may differ from that in the illustration. See your Owner’s Manual for more details.For further audio system operations, refer to pages 25-26.
Page 30 of 51
28*IF EQUIPPED SOUL EV FEATURES & FUNCTIONS GUIDE
CENTER PANEL
EV A /C and Driver Only Ventilation Video To view a video on your mobile device, snap this QR Code or visit the listed website
Refer to page 2 for more information
www.KuTechVideos.com/ps23/2017
QR CODES
AUTO
OFF
FRONT
DRIVER
EV
HEAT
REAR
ONLY
A/C MODE
CLIMATE
P
A SSE NGE R
A IR BA G
DRIVER
EV
ONLYPA SSE NGE R
A IR BA G
AB
(Buttons located on Center Panel)
12V120W12V180W
AUX USB
(Located on lower part of Center Panel)
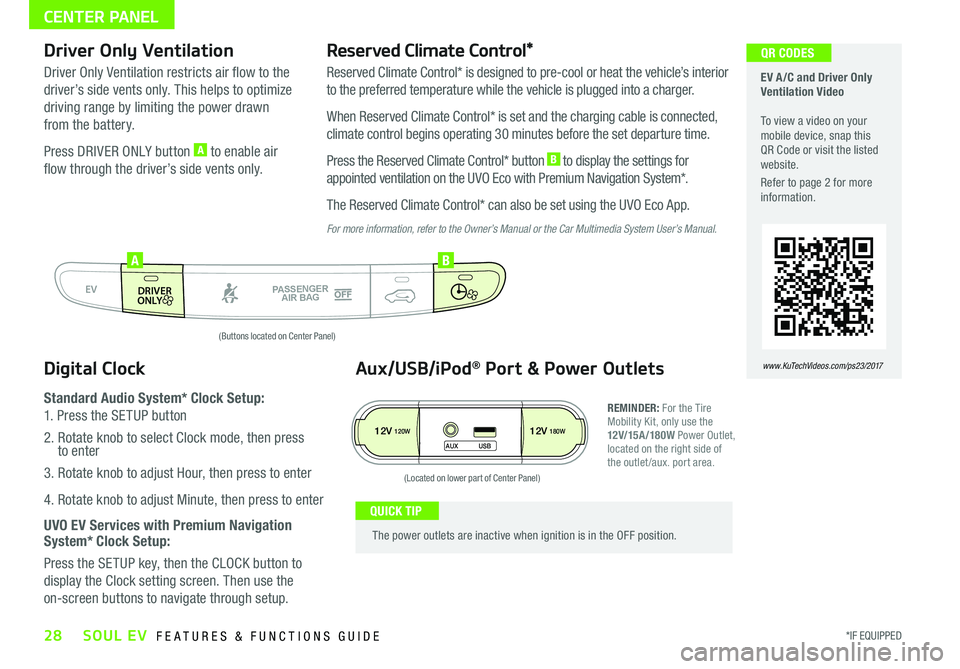
Driver Only Ventilation
Driver Only Ventilation restricts air flow to the
driver’s side vents only This helps to optimize
driving range by limiting the power drawn
from the battery
Press DRIVER ONLY button A to enable air
flow through the driver’s side vents only
Reserved Climate Control*
Reserved Climate Control* is designed to pre-cool or heat the vehicle’s interior
to the preferred temperature while the vehicle is plugged into a charger
When Reserved Climate Control* is set and the charging cable is connected,
climate control begins operating 30 minutes before the set departure time
Press the Reserved Climate Control* button B to display the settings for
appointed ventilation on the UVO Eco with Premium Navigation System*
The Reserved Climate Control* can also be set using the UVO Eco App
For more information, refer to the Owner’s Manual or the Car Multimedia System User’s Manual.
Digital Clock
Standard Audio System* Clock Setup:
1 Press the SETUP button
2 Rotate knob to select Clock mode, then press to enter
3 Rotate knob to adjust Hour, then press to enter
4 Rotate knob to adjust Minute, then press to enter
UVO EV Services with Premium Navigation System* Clock Setup:
Press the SETUP key, then the CLOCK button to
display the Clock setting screen Then use the
on-screen buttons to navigate through setup
Aux/USB/iPod® Port & Power Outlets
REMINDER: For the Tire Mobility Kit, only use the 12V/15A/180W Power Outlet, located on the right side of the outlet /aux port area
The power outlets are inactive when ignition is in the OFF position
QUICK TIP
Page 33 of 51

*IF EQUIPPED 31ALWAYS CHECK THE OWNER’S MANUAL FOR COMPLETE OPER ATING INFORMATION AND SAFET Y WARNINGS
CENTER PANEL
P
R
N
D
B
SHIFTLOCK
RELEASE
POWER
B
EV Regenerative Braking Video To view a video on your mobile device, snap this QR Code or visit the listed website
Refer to page 2 for more information
www.KuTechVideos.com/ps23/2017
QR CODEAutomatic Gear Shift with Regenerative Brake Mode
P: Park
R: Reverse
N: Neutral
D: Drive
B: Regenerative Brake Mode
Regenerative Brake Mode “B” – Move the gear
shift to the “B” position B to enter the maximum
regenerative braking drive mode This mode helps
to minimize energy loss and increase the distance
to empt y
For more information on Regenerative Brake Mode, refer to the Owner’s Manual.
Page 35 of 51

*IF EQUIPPED 33ALWAYS CHECK THE OWNER’S MANUAL FOR COMPLETE OPER ATING INFORMATION AND SAFET Y WARNINGS
SEATING
AB
C
6-Way Adjustable Driver’s Seat
Pull lever A to slide Seat forward/backward
Pull/press lever B to adjust Seat Height
Pull lever C to adjust Seatback Recline
When adjusting seat forward or backwards, ensure seat clicks or locks into place before driving the vehicle
QUICK TIP
Front Seat Headrest Adjustment
To adjust headrest forward*: Pull headrest forward to one of
several positions
To adjust headrest back*: Pull headrest completely forward,
then release
To raise headrest: Pull headrest up
To lower headrest: Press lock, then press the headrest down
For easy adjustments, hold a headrest post with one hand while using the other hand to pull the headrest from underneath
QUICK TIP